Do you want users to create an account during WooCommerce checkout?
Did you know that forcing account creation at checkout can lead to users abandoning their carts?
Yes, according to Baymard, around 24% of people will abandon their carts if they are required to create an account.
Customers want a quick and easy checkout, not a long sign-up process. If they feel forced to register, they may just walk away, leave the cart in the middle, and not complete the purchase.
So, what's the solution?
Well, you can let customers check out as guests and use the email address to automatically create an account for them and send a friendly welcome email that highlights the perks of having an account.
In this blog, we will share how to create an account on WooCommerce checkout automatically.
So, let’s jump in.
Why Allow Automatic Account Creation at WooCommerce Checkout?
Allowing customers to create an account during checkout automatically is beneficial for both customers and store owners. Without this option, WooCommerce will prompt users to sign in to their account when they go to the checkout page to place an order.
Here is a preview:

This hinders the checkout process flow and can result in cart abandonment. So, you can understand why it’s important to allow customers to create an account on the checkout page.
Here are the reasons why account creation matters:
- Reduced cart abandonment
Automatically creating an account for users can streamline the checkout process, encouraging them to complete their purchase without the extra step of manually signing up. This can help reduce cart abandonment rates.
- Enhanced customer experience
When customers create an account, they enjoy a streamlined shopping experience. They can save their shipping and billing information, track orders, and manage preferences.
- Increased customer retention
Customers with accounts are more likely to return for future purchases. By creating an account, they can receive personalized recommendations, exclusive offers, and loyalty rewards that encourage repeat business.
- Improved communication
With an account, you can send targeted email campaigns, updates on promotions, and personalized messages that keep customers engaged with your brand.
- Customer loyalty and trust
Allowing customers to create accounts fosters trust and loyalty. When customers can log in at any time to view their order history, it enhances their confidence in your business and creates a sense of security in their transactions.
Understanding Guest Checkout vs. Account Creation
When setting up your WooCommerce store, it’s important to understand the basic differences between guest checkout and account creation.
To put it simply, Guest Checkout allows users to complete a purchase without creating an account.
On the other hand, enabling Account Creation means users must sign up or log in to place an order.
Here’s a breakdown:
| Topic | Guest Checkout | Account Creation |
|---|---|---|
| What it is | Allows customers to make purchases without creating an account. They can simply enter their shipping and billing information to place and order without having to create an account. | Requires customers to sign up for an account during checkout to complete an purchase. In case they have an account, they have to sign in. |
| Pros | Provides a quick and hassle-free checkout experience, reducing cart abandonment rates. | Customers can save their information, making future checkouts smoother and faster. |
| Cons | Miss out on collecting valuable customer data and insights for future marketing. | Some customers may be deterred by the extra step of account creation, leading to abandoned carts. |
| Ideal for whom? | Ideal for retailers with a high volume of first-time visitors. | Recommended for businesses that offer subscription services or loyalty programs. |
While both are different options, it's recommended that they be used together. By allowing guest checkout, users can quickly checkout, and creating an account automatically lets you continue communication with the customer to earn brand loyalty and repeat purchases.
How to Enable the Automatically Create Account Option in WooCommerce Checkout?
Follow these steps to enable automatic account creation on WooCommerce checkout:
Step 1: Navigate to WooCommerce Accounts & Privacy settings
From the WordPress dashboard, go to WooCommerce ⇒ Settings, and then make sure you are on the “Accounts and Privacy” tab.

Step 2: Allow account creation during WooCommerce checkout
Next, on the Account Creation option, make sure to check the option “Allow customers to create an account on the "My account" page.”.
Since this is an automatic account creation, you should also enable the option “When creating an account, automatically generate an account username for the customer based on their name, surname, or email.” This option will generate a unique user name based on the given name, surname or email.
Also, check the option “When creating an account, send the new user a link to set their password” to ensure users receive a confirmation email of the account creation with a link that they can use to set a password.
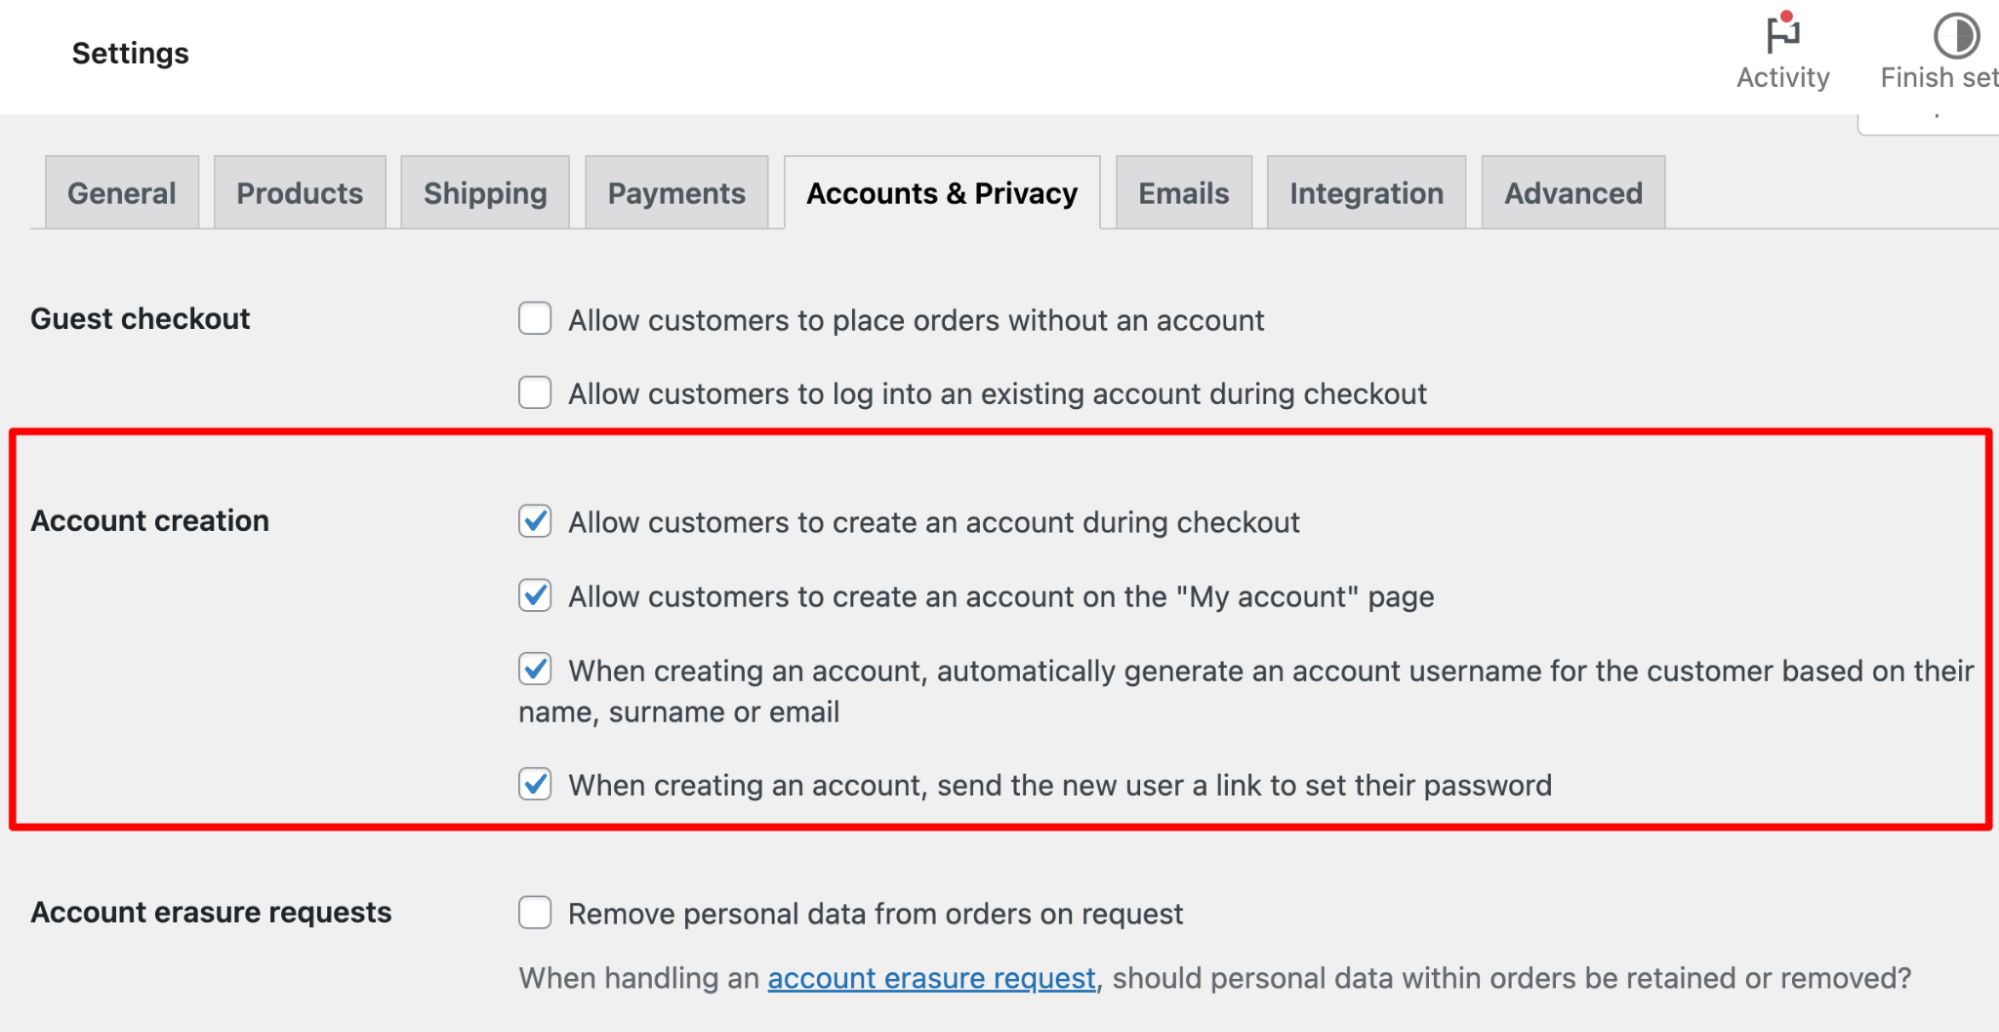
🔔 Note: Experts also recommend enabling guest checkout and allowing account creation on my account page.
Step 3: Update the settings
Once you make the changes, make sure to hit “Save Changes.” to update the settings.
Then, try to place an order using a new email address that does not have an account in the WooCommerce store.

🔔 Note: The beautiful one-page checkout page above is built with FunnelKit Funnel Builder.
After successful order placement, you will receive an email that confirms that an account has been created.
Usually the emails thank the users, share the username, and add a link that the customer can use to set a password.
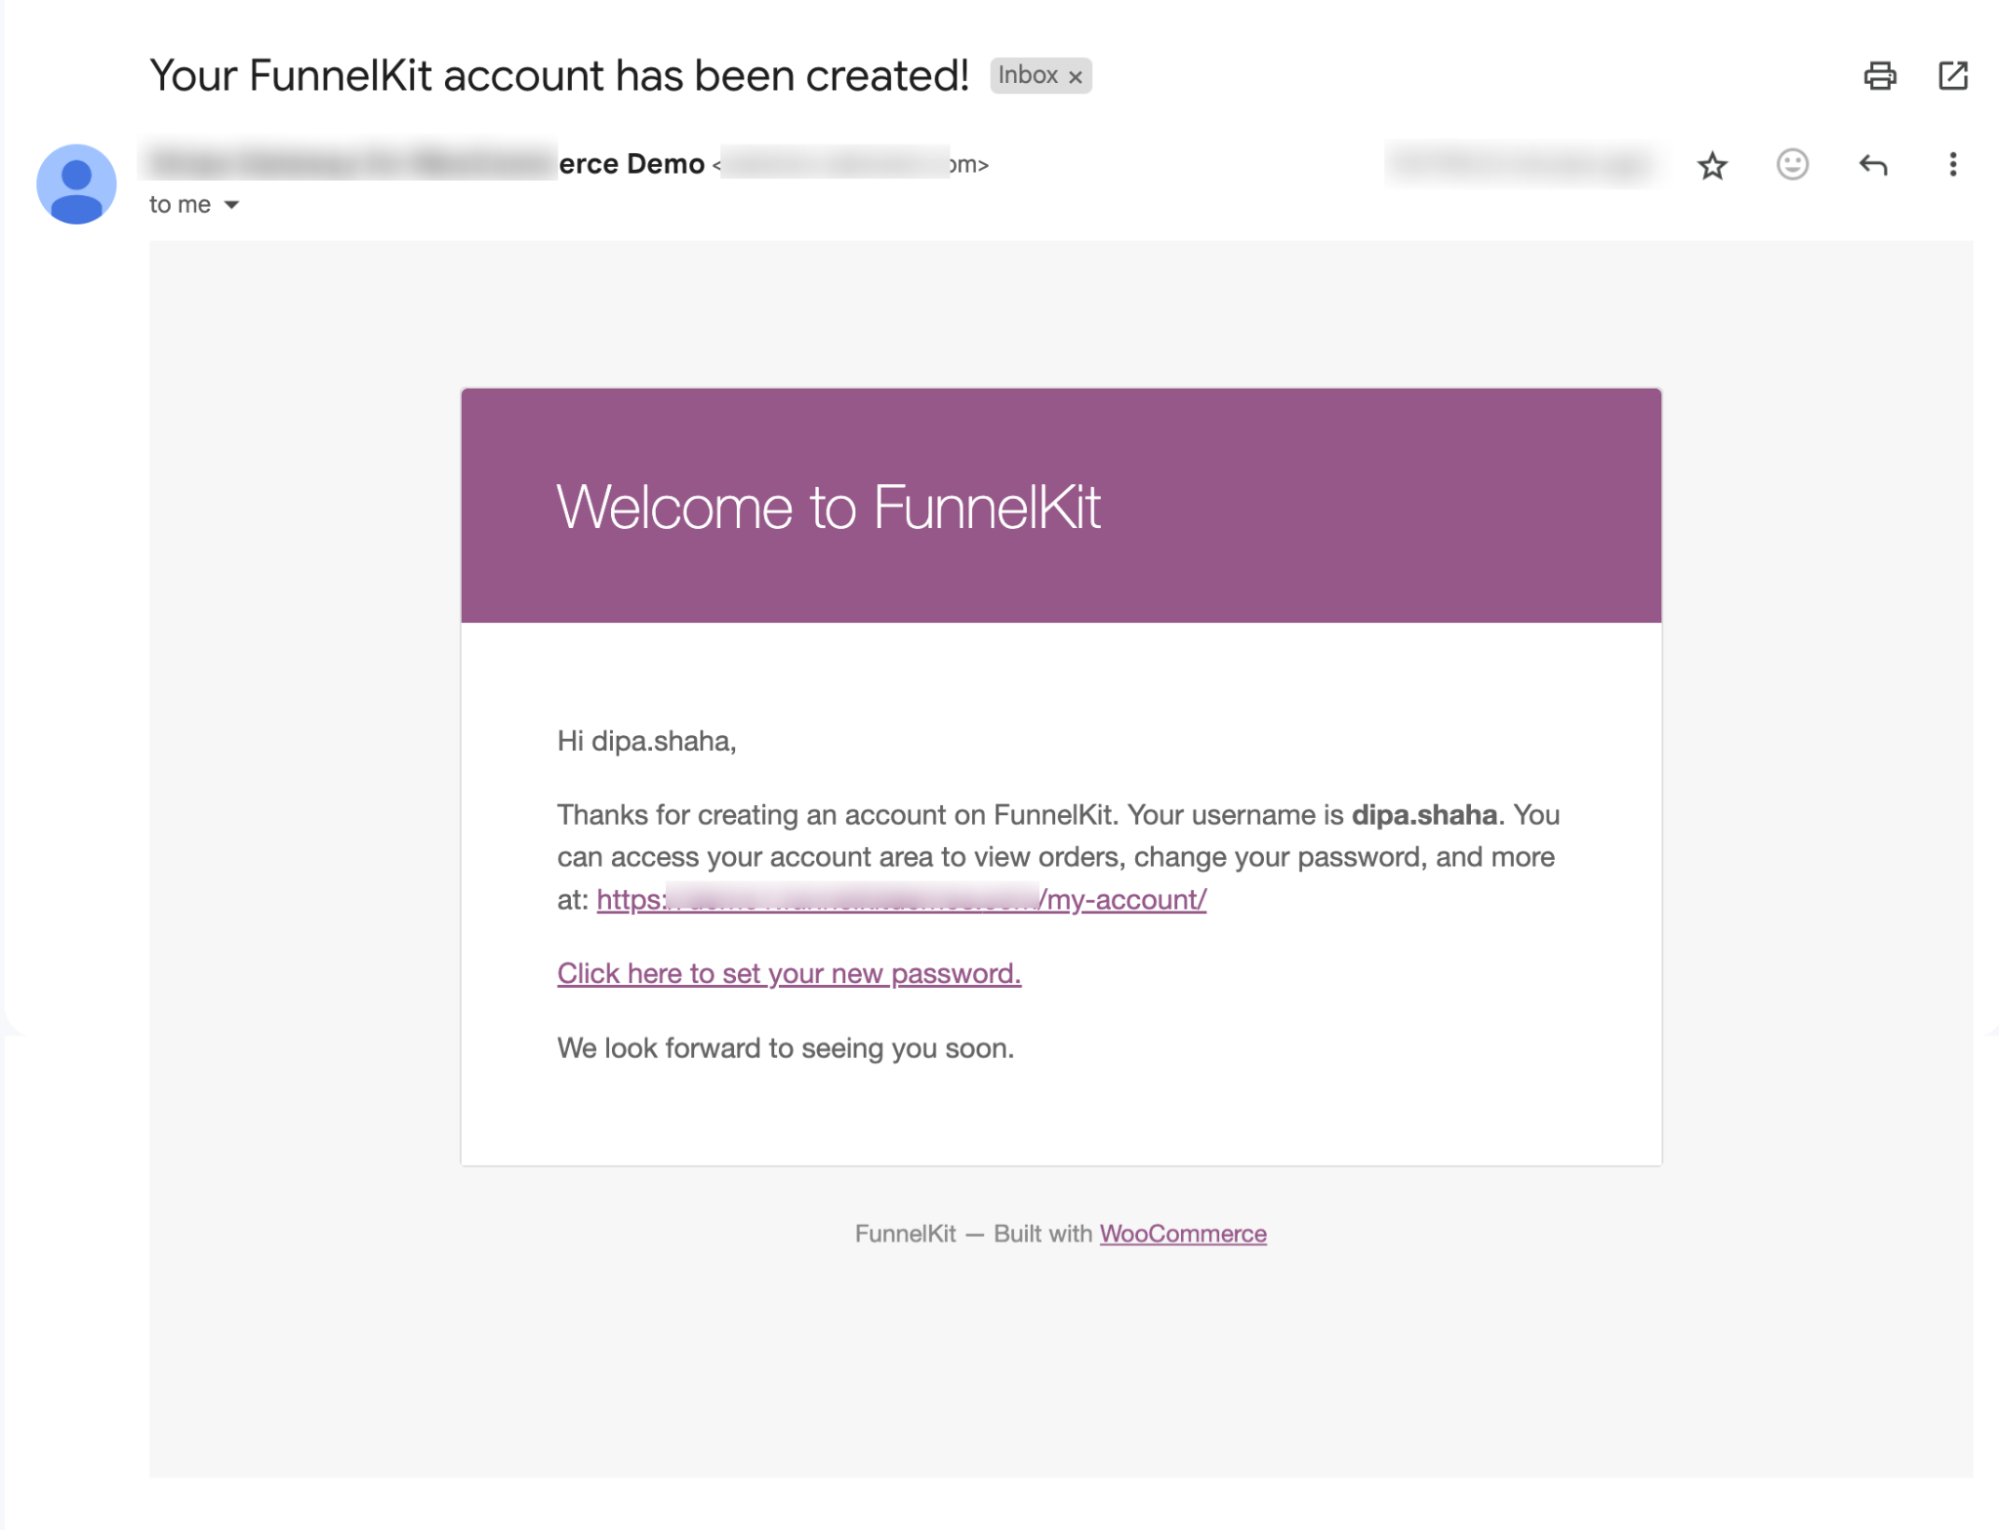
If you receive the emails, it means an account has been successfully created.
However, as you can see, the email is too bland, lacks personalization, and doesn’t capture the user's attention.
It should highlight the store's benefits, such as showcasing brand consistency and inviting them to join the social community to keep them engaged.
To learn how to send a custom WooCommerce account creation email, move to the next section.
How to Send Custom WooCommerce Account Creation Confirmation Email?
We will use FunnelKit Automations to send custom emails to users every time an account is created.
This is an all-in-one marketing solution that allows you to design and send automated stunning emails without leaving the comfort of your WordPress dashboard.
Along with account creation emails, you can also send follow-up emails, post-purchase product recommendations, product review emails, winback campaigns, and so on.
The best is that this WooCommerce CRM comes with a prebuilt automation workflow and ready-to-use email template, which makes email marketing a breeze.
Before we move on to the main process, make sure to install and activate FunnelKit Automations (both free and pro versions).
Now follow these steps:
Step 1 : Disable the default account creation email
Before creating custom new user emails in WordPress, ensure you disable the default email to avoid sending two emails, which can lead to a poor user experience.
To disable the default new user email, add the following code snippet using WPCode.
<?php

/**
 * This will unhook user registeration emails
 */
add_filter( 'init', function () {
	remove_action( 'network_site_new_created_user', 'wp_send_new_user_notifications' );
	remove_action( 'network_site_users_created_user', 'wp_send_new_user_notifications' );
	remove_action( 'network_user_new_created_user', 'wp_send_new_user_notifications' );
	remove_action( 'register_new_user', 'wp_send_new_user_notifications' );
	remove_action( 'edit_user_created_user', 'wp_send_new_user_notifications' );
} );
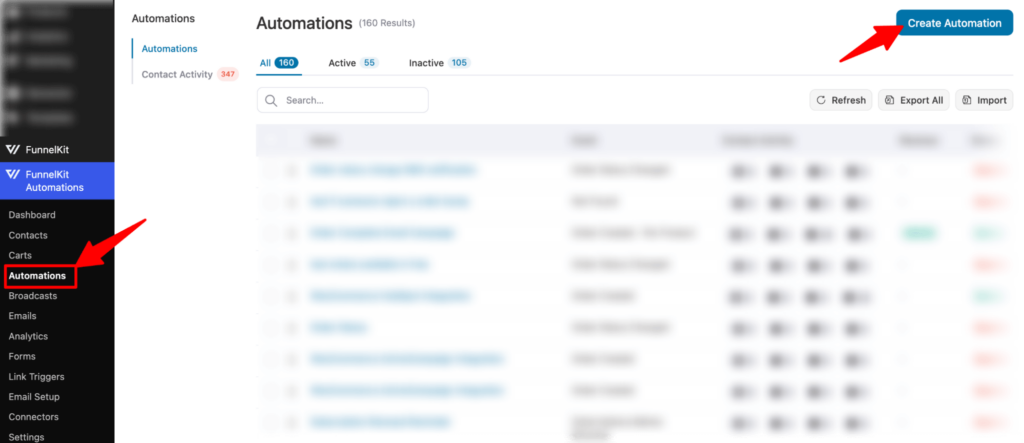
Step 2: Create an automation
Navigate to FunnelKit Automations ⇒ Automations and then click on Create Automation.
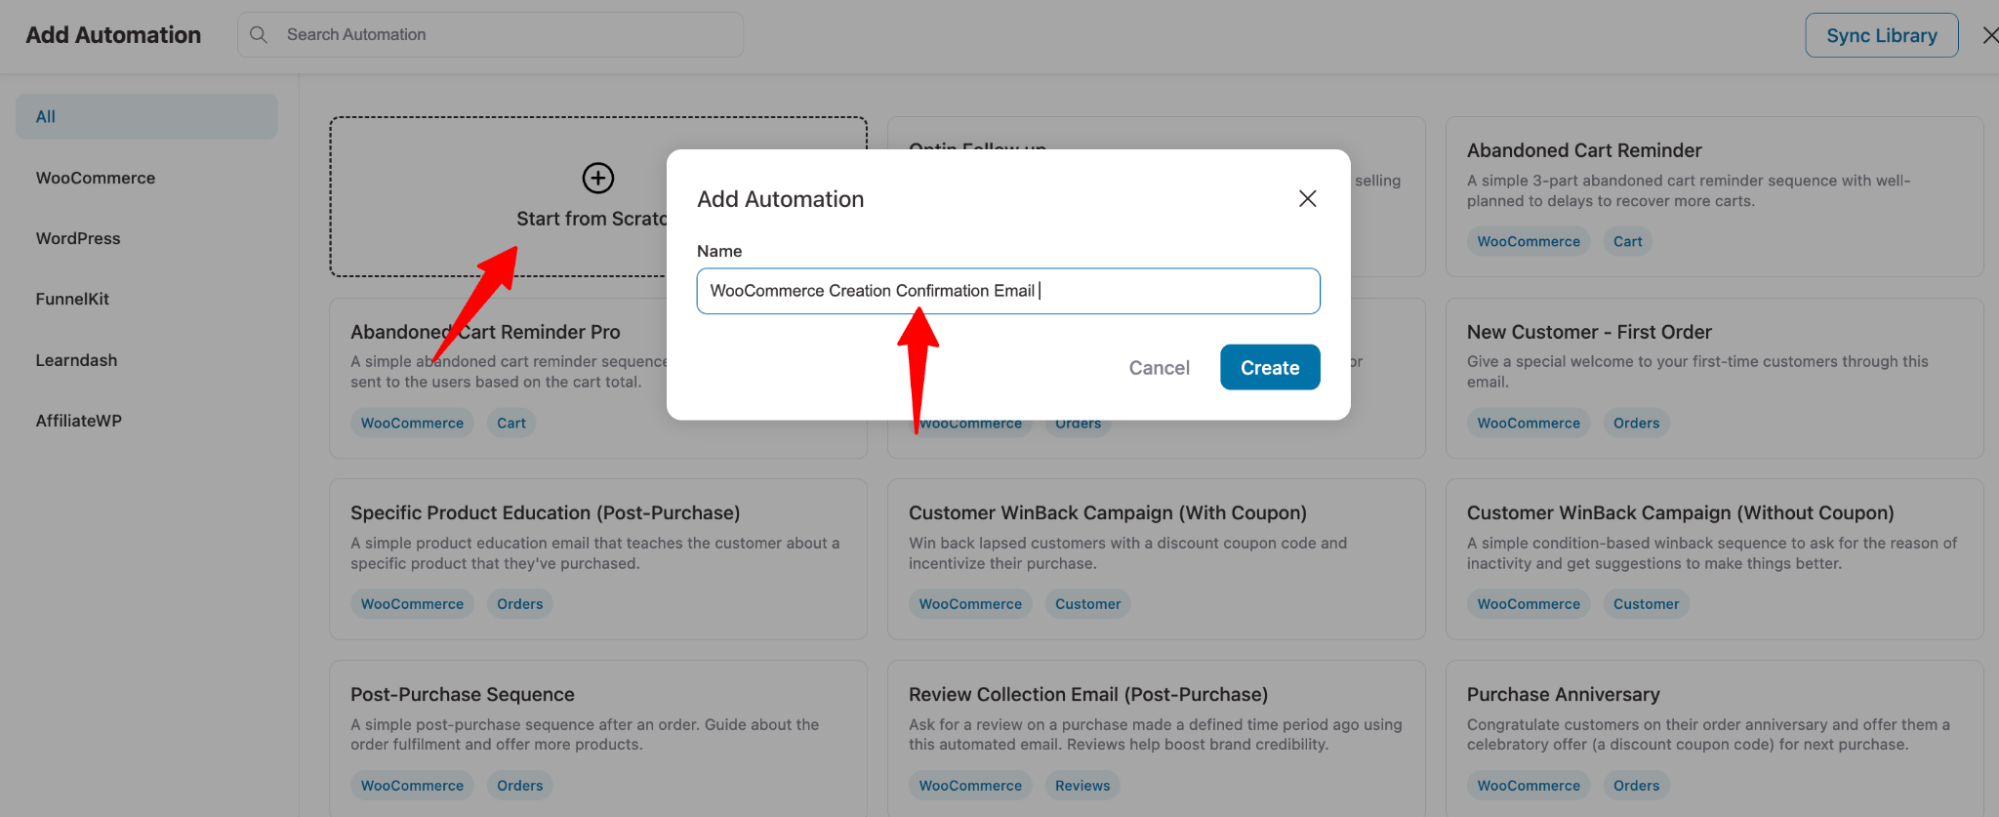
We won’t use any prebuilt recipe but rather build one from scratch. So, click on the "Start From Scratch" option, provide a name, and click on Create.
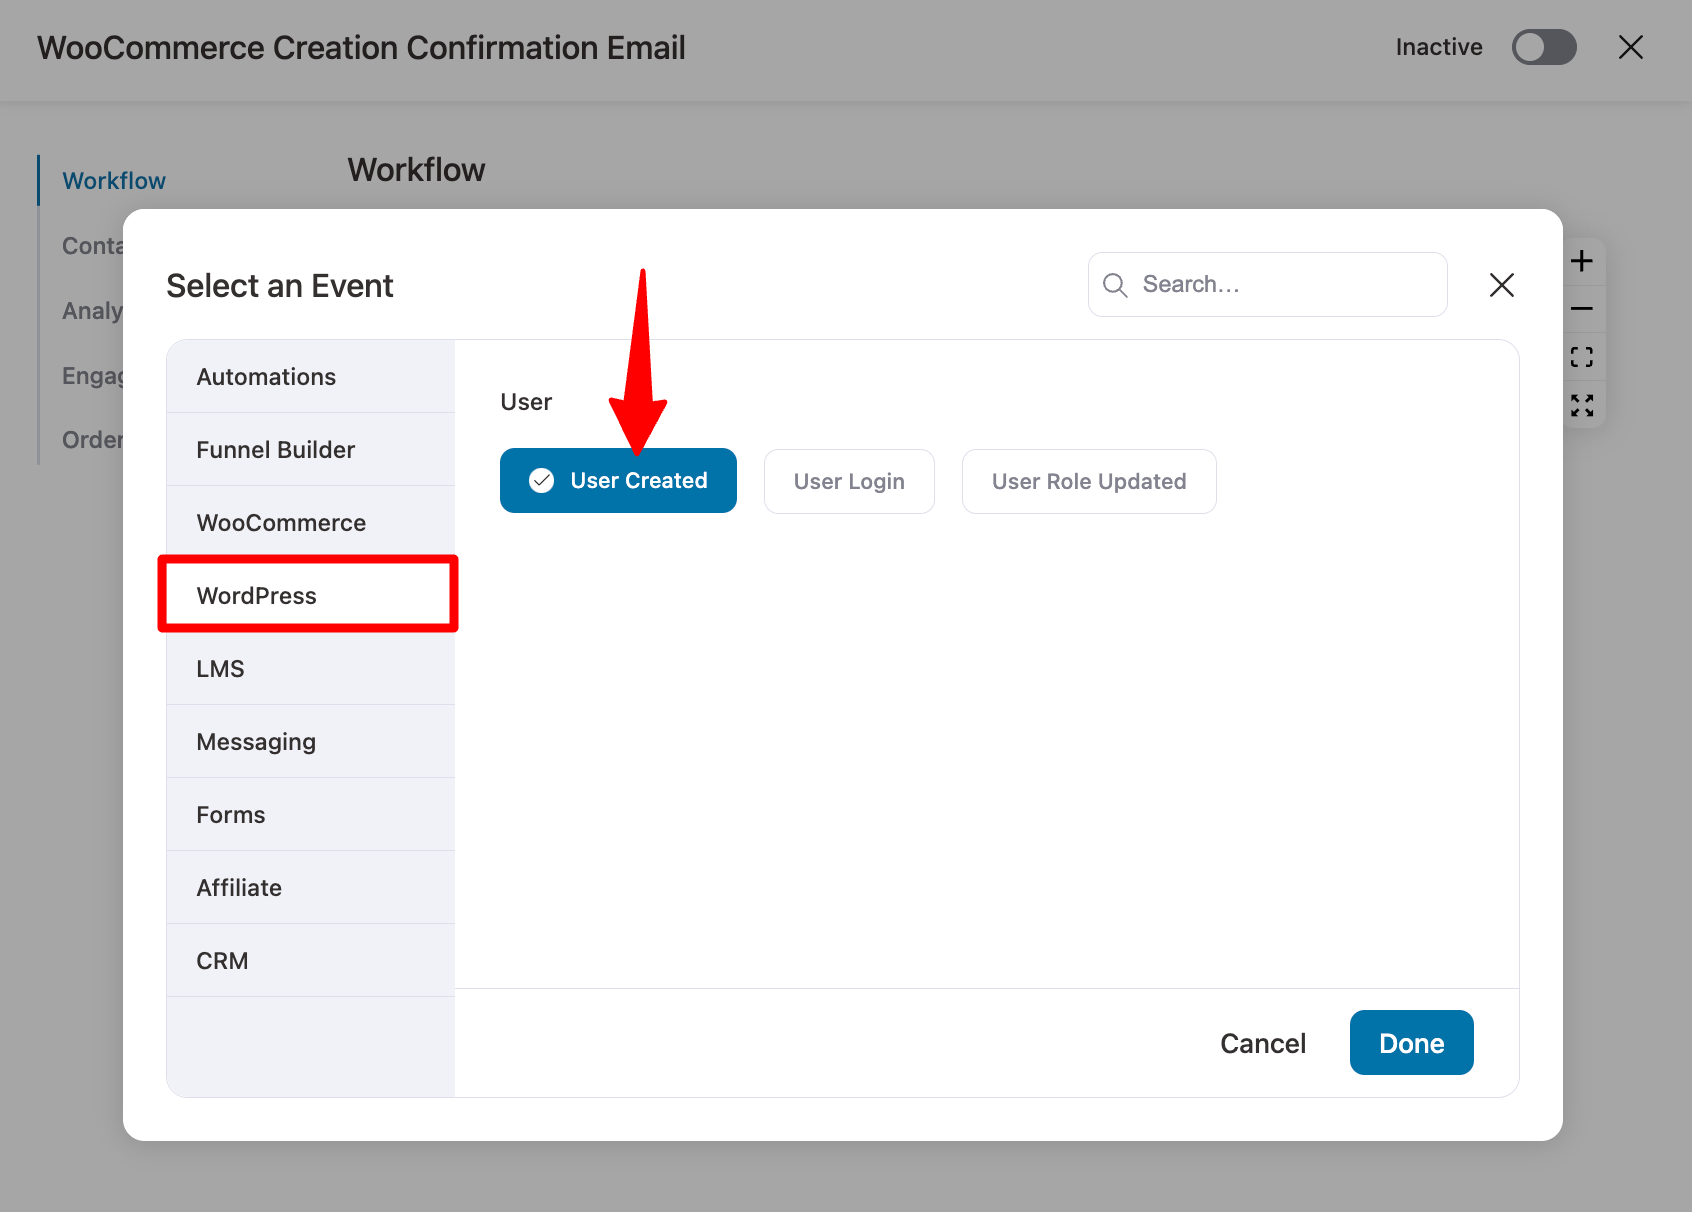
Next, click on the option “Select an event.”.
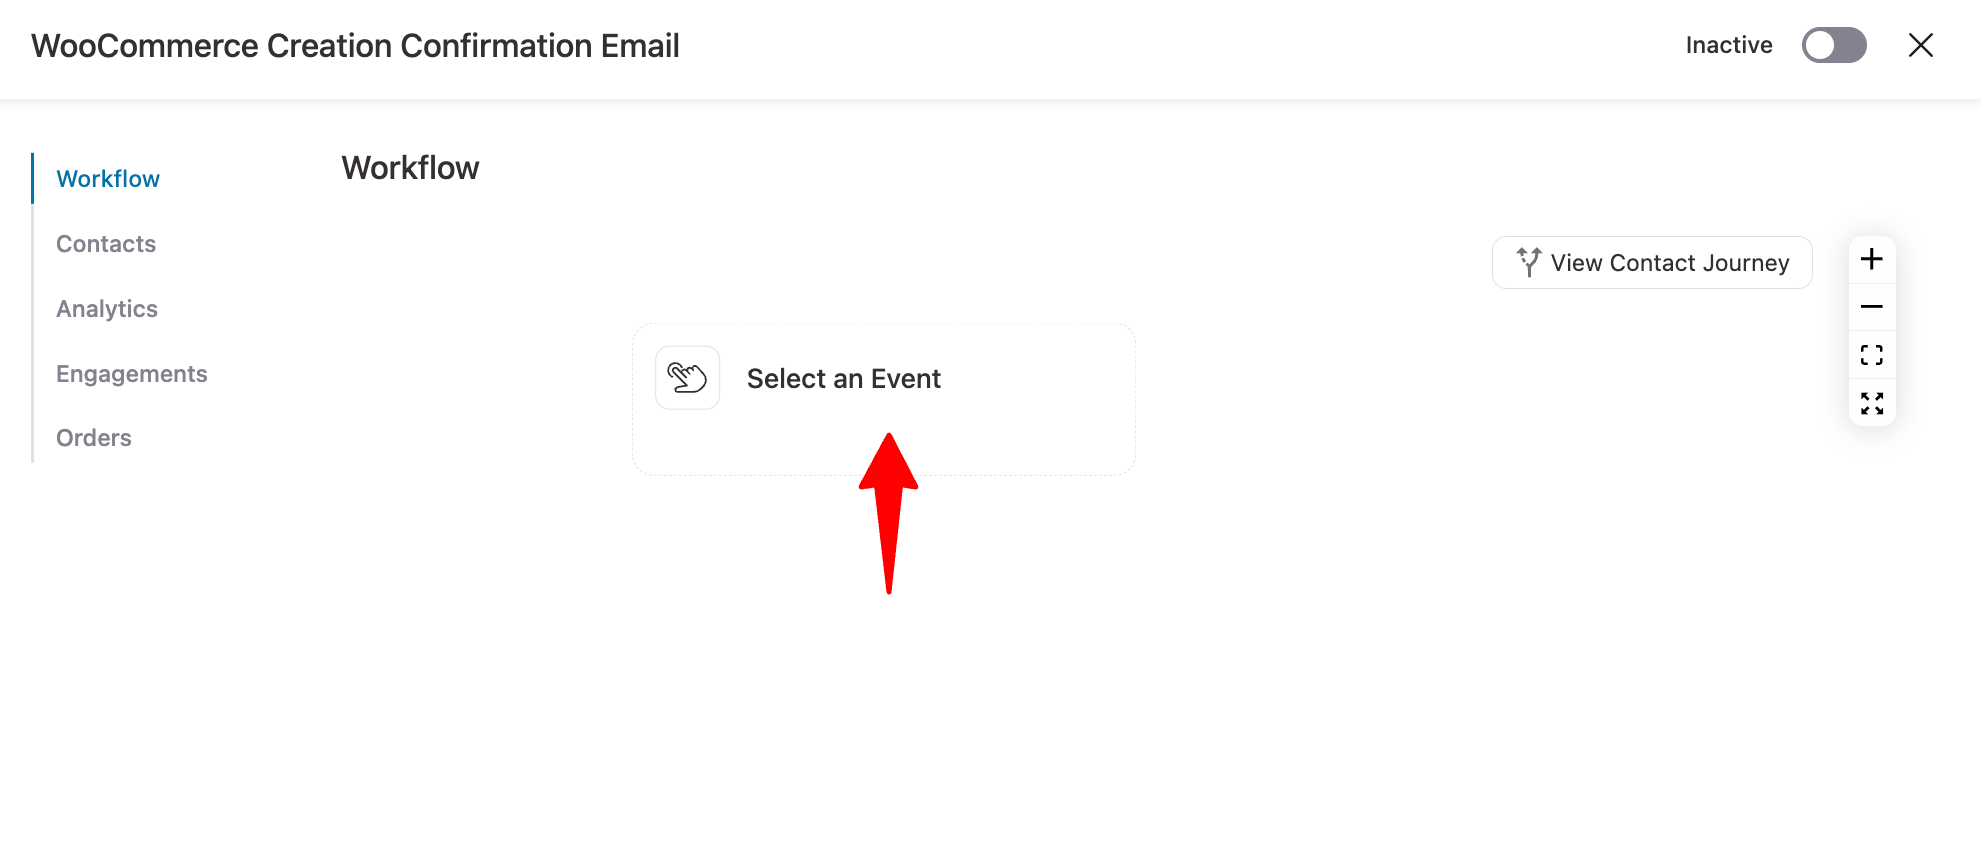
Under WordPress, choose the trigger “User Created,” so every time an new account has been created, the system will send this email automatically. Finally, click on “Done.”
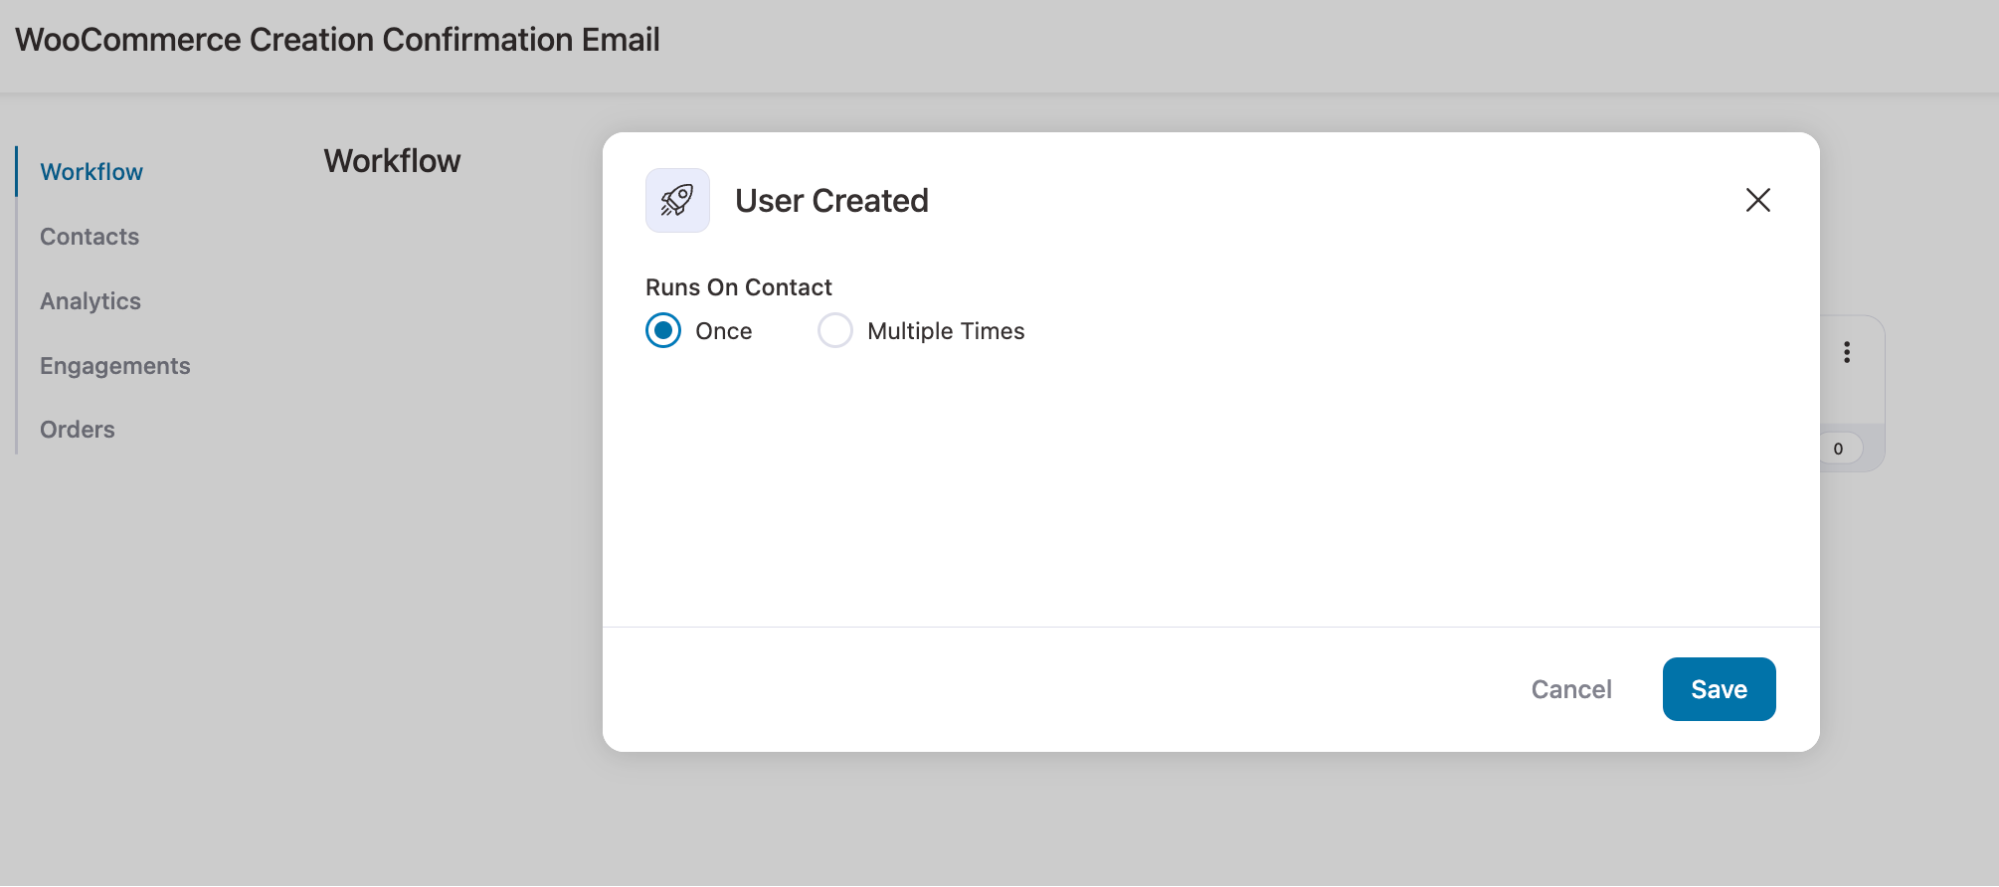
Then make sure the run-on contact option is set to once and hit “Save”.
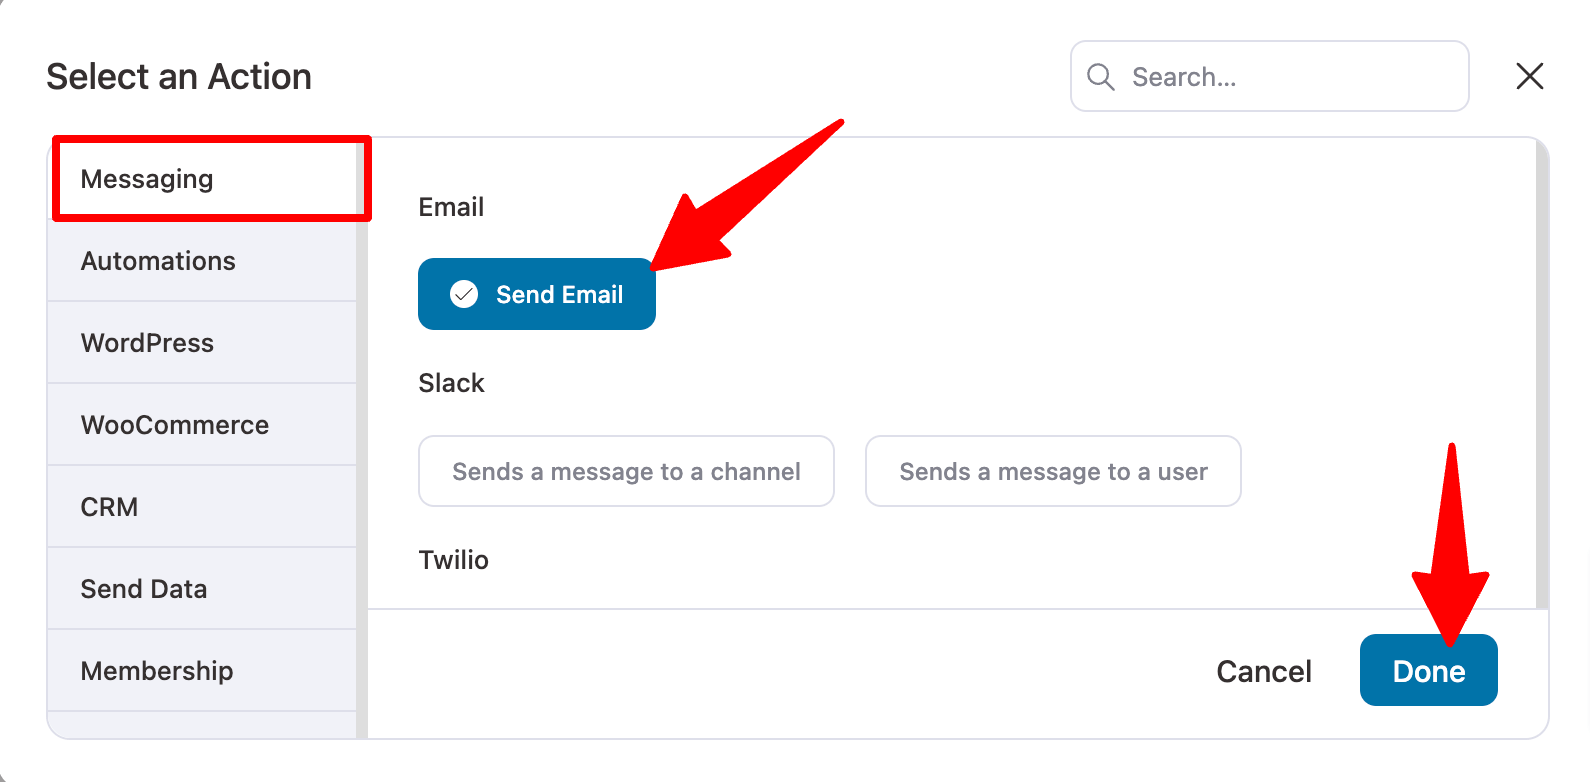
Step 3: Add a “Send Email” action
It's time to add a send emails action that will send the custom order creation email to everything when this automation gets triggered.
To do so, click on the ‘+’ icon and choose Action.
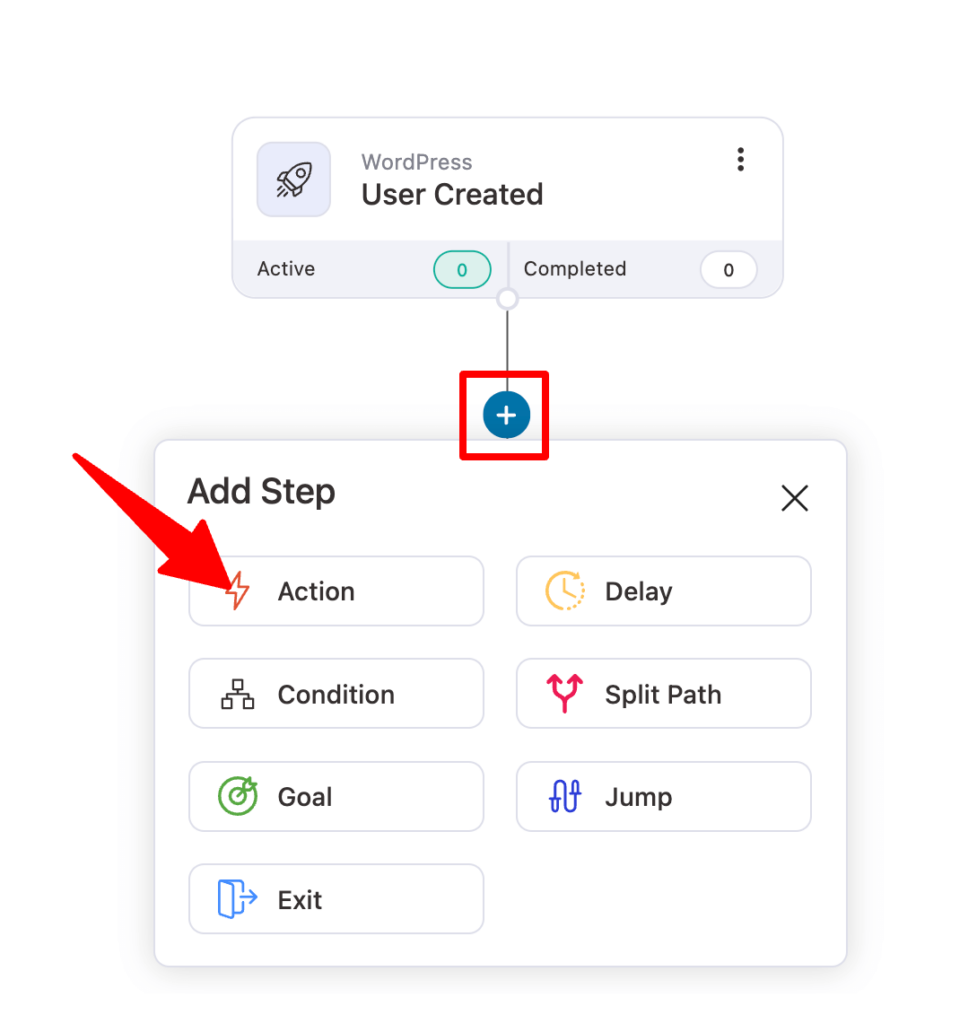
Now choose the ‘Send Email’ option in the Messaging section and click on Done.
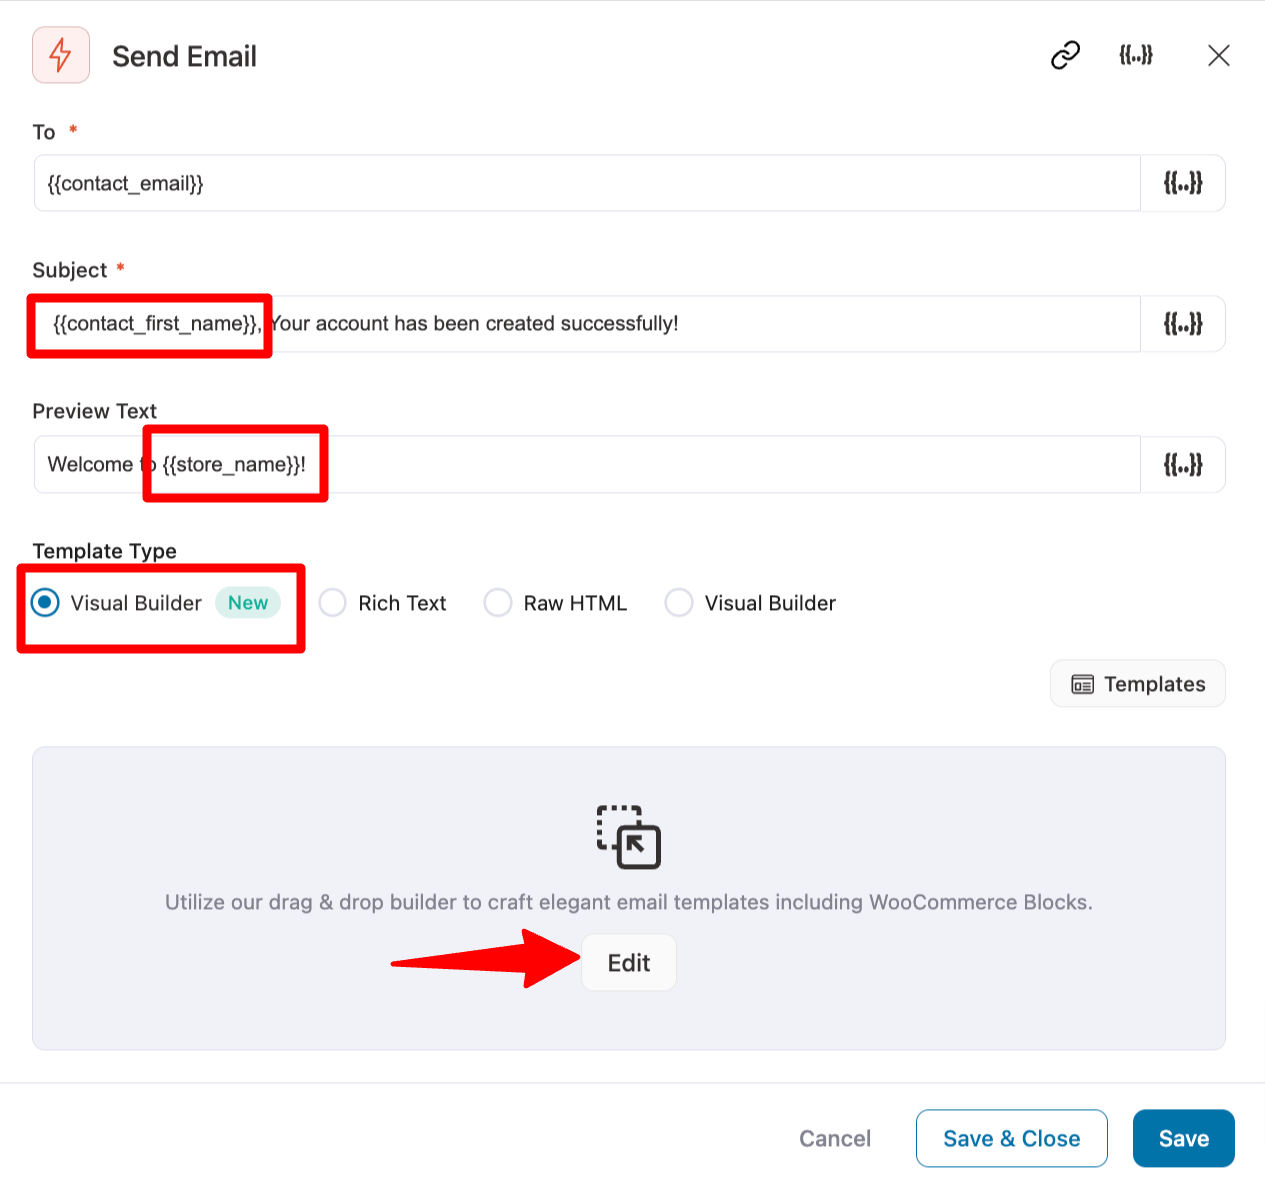
Step 4: Design the custom WooCommerce account creation email
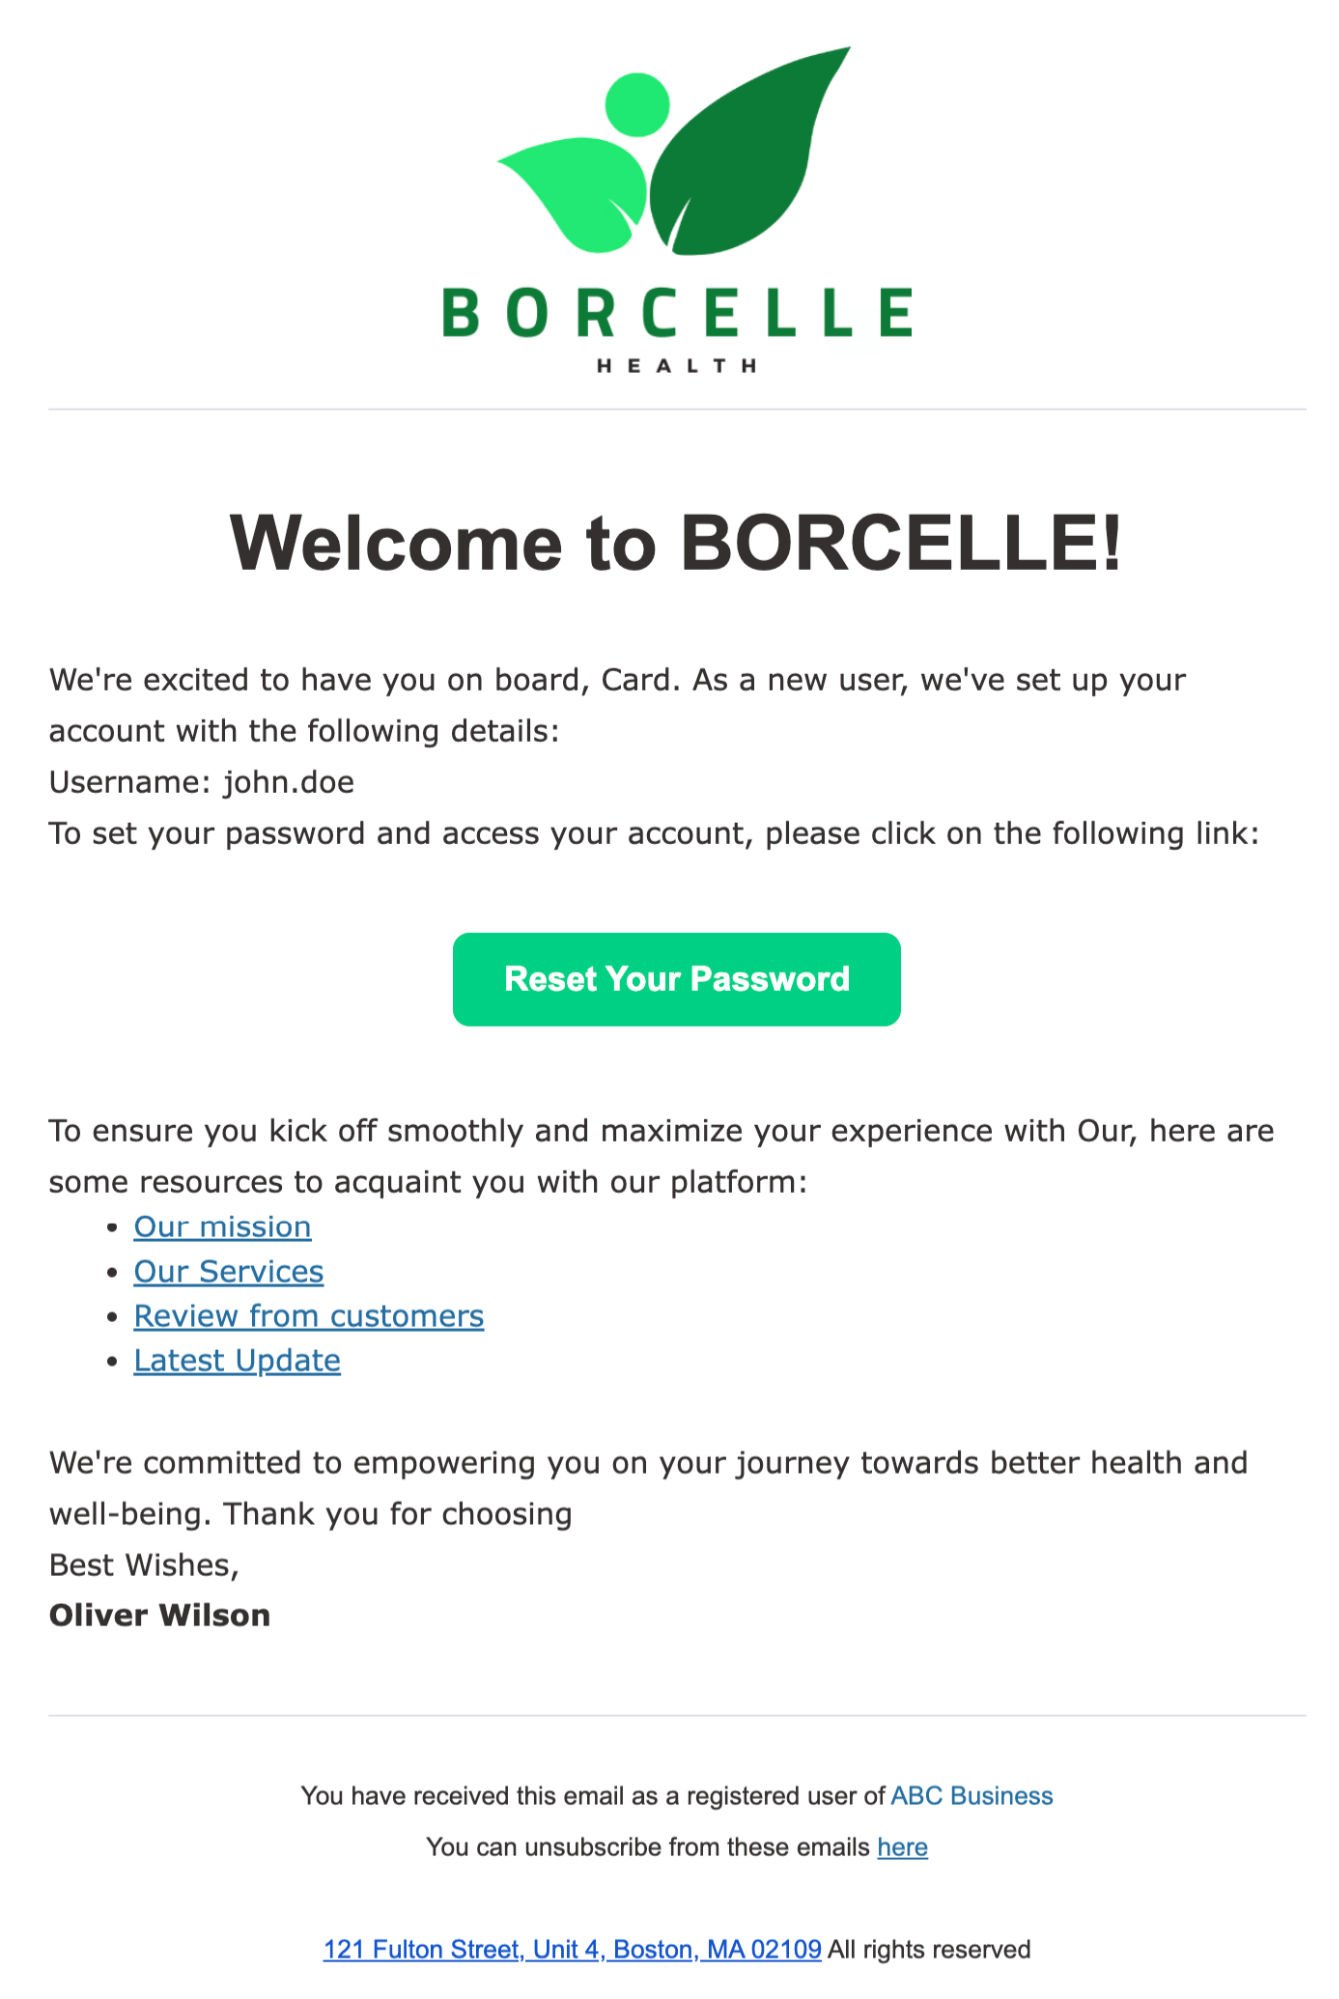
Now, set a custom email subject line and preview text. Use the Merge tag to insert dynamic information like customers' first names to give a personalized touch.
Next, choose Visual Builder and hit Edit to design your email. You will find a lot of prebuilt email templates.
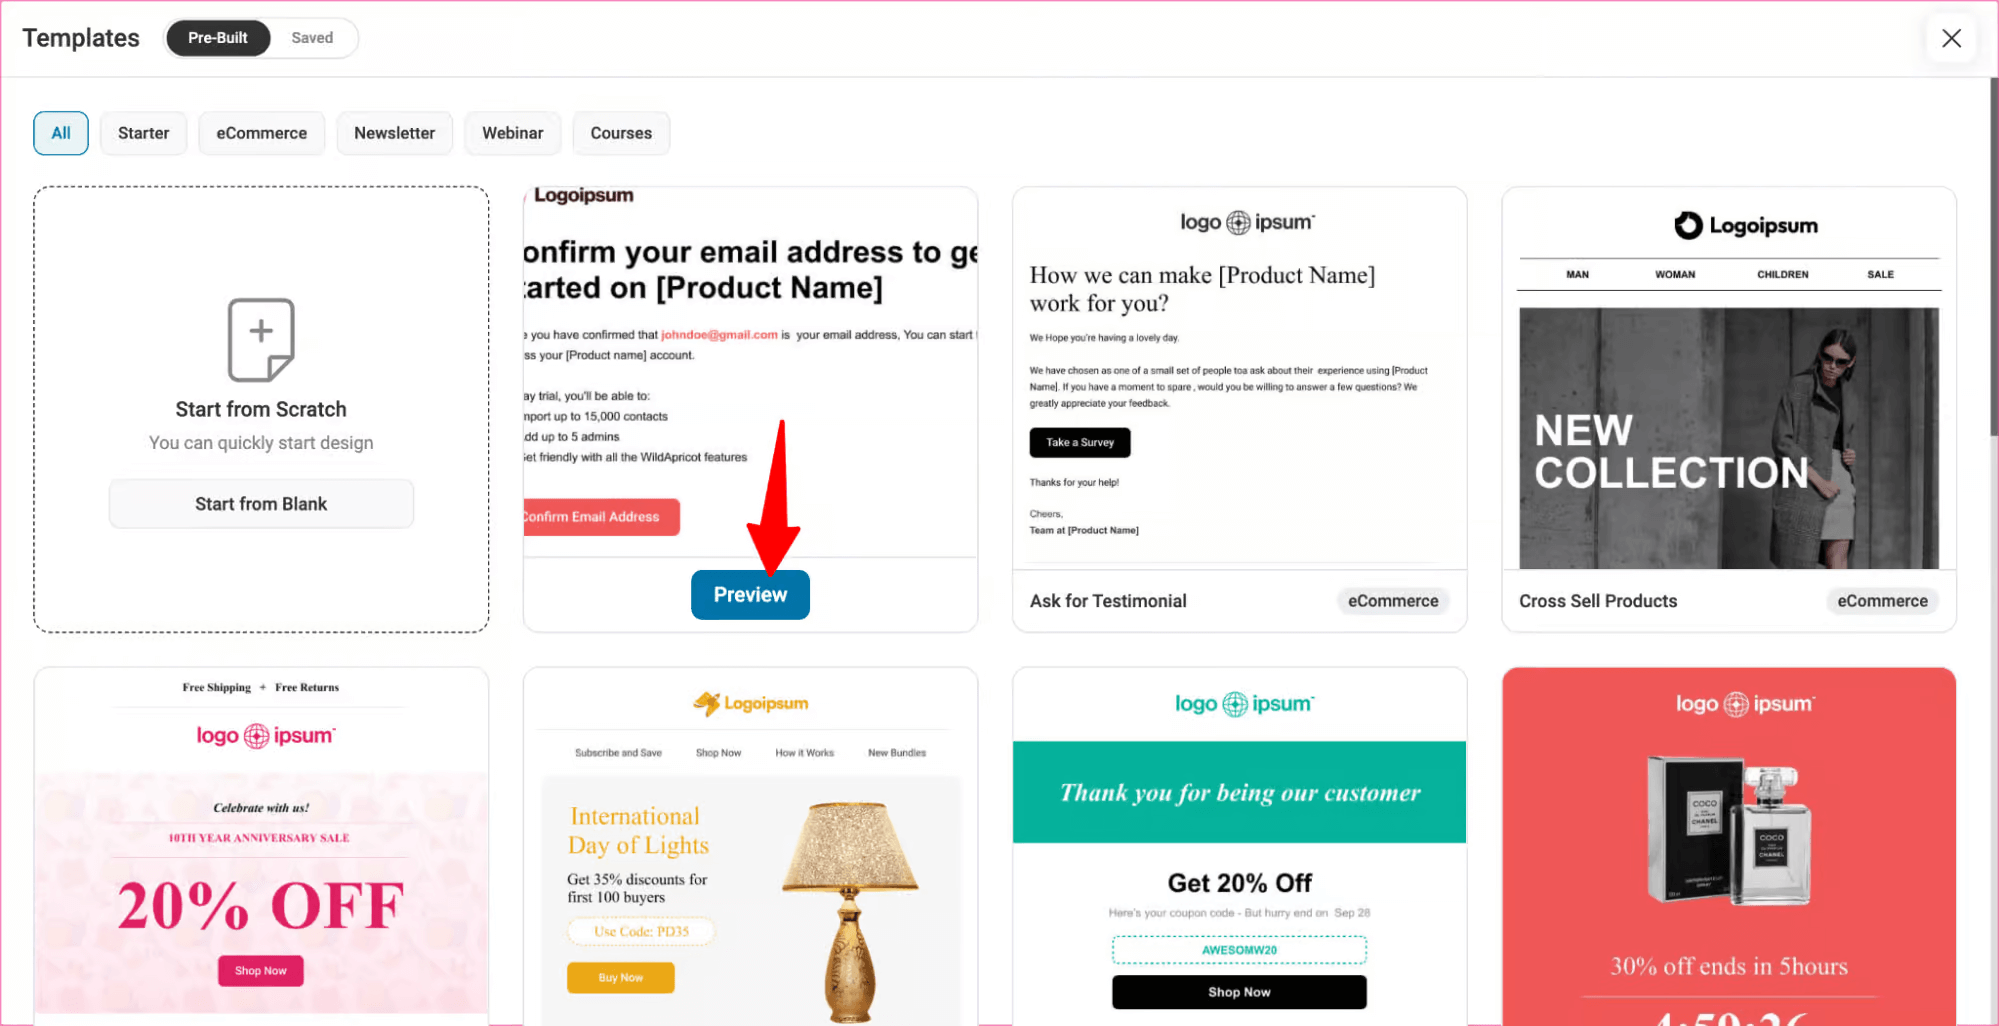
Along these, we will use the New Registration Email template. To use this, hover over the template and click on Preview. Then, to import, click on the Import This Template button.

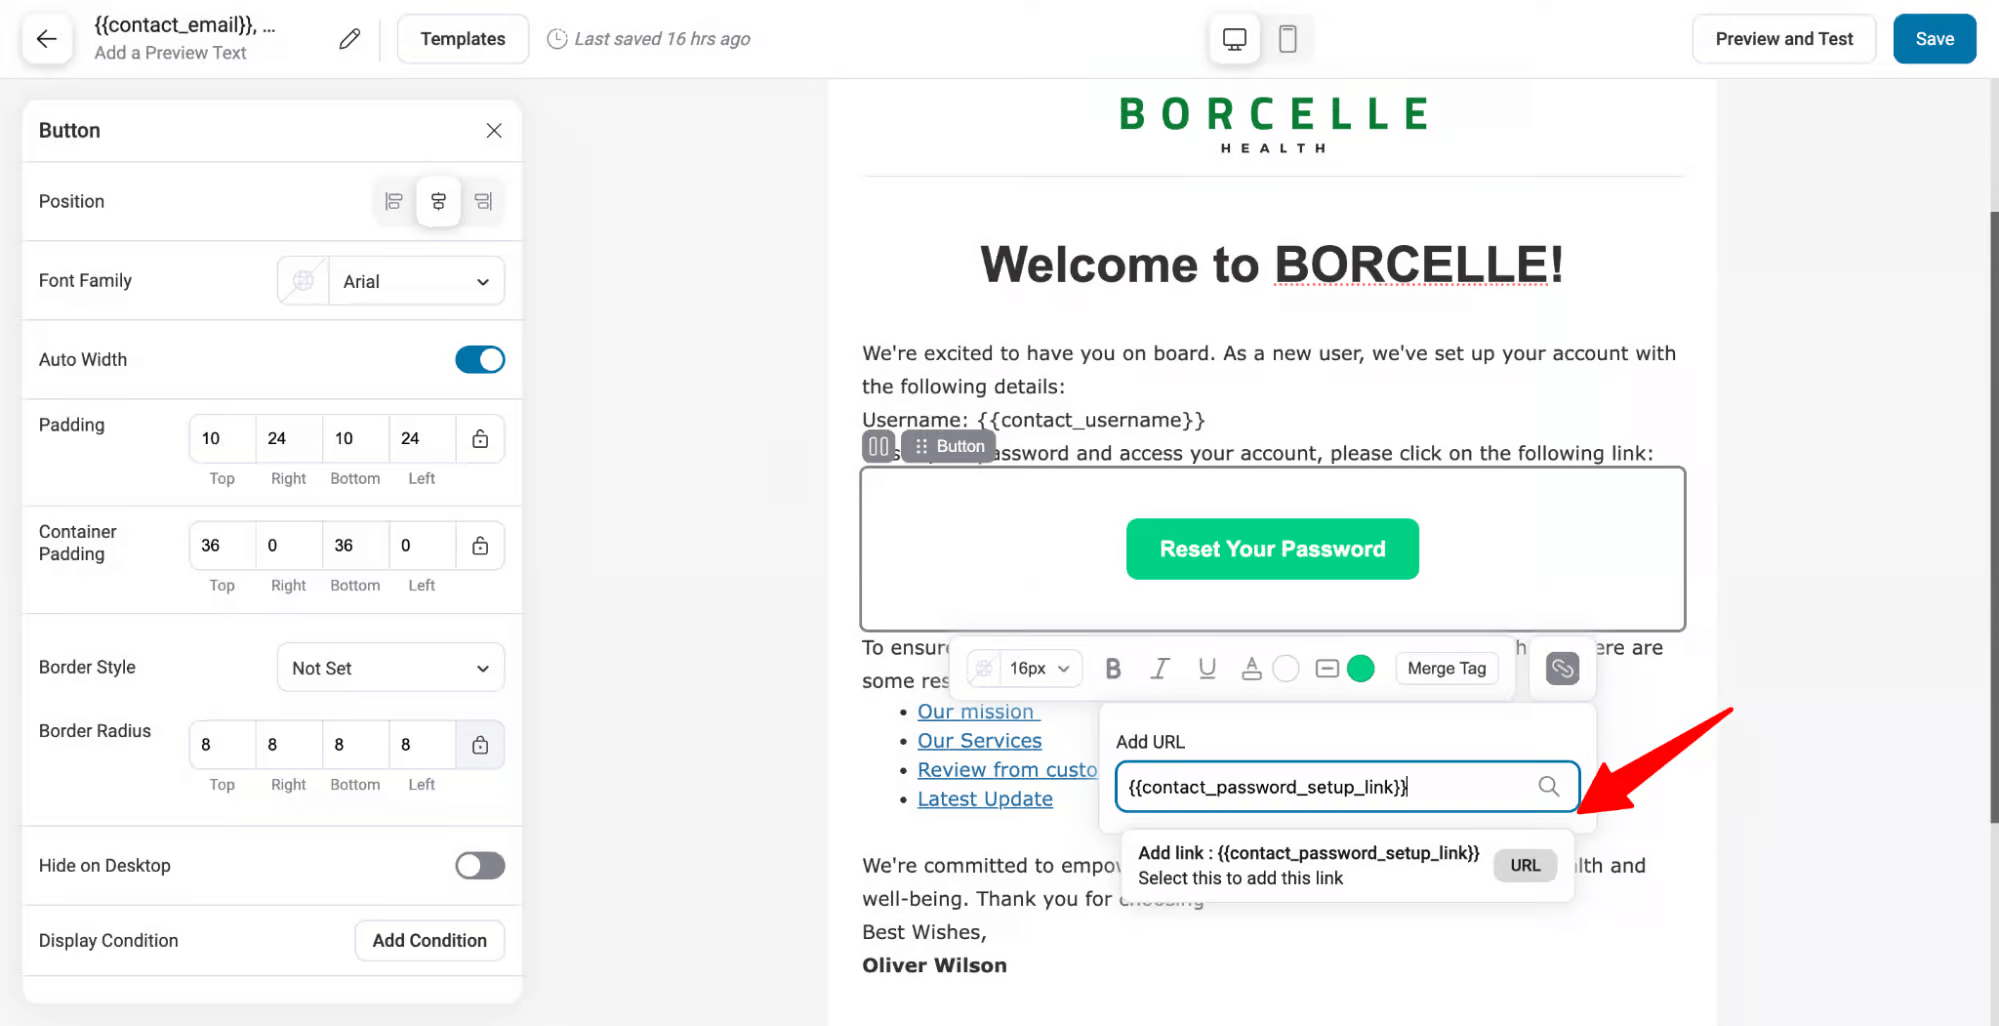
Now use different blocks and merge tags to design your email.
To display the user name, use merge tag {{contact_username}}, and for the password set-up link, use the merge tag {{contact_password_setup_link}}.
We have linked the {{contact_password_setup_link}} to the “Reset Your Password” CTA, so users who click on this go to the link to update the password.
For more details on how to design the email, read our blog, “Custom New User Registration Email in WordPress”.
After designing the email, make sure to save the template.
Step 5: Activate the automation
The final step is to activate the automation by turning on the toggle at the top right corner.
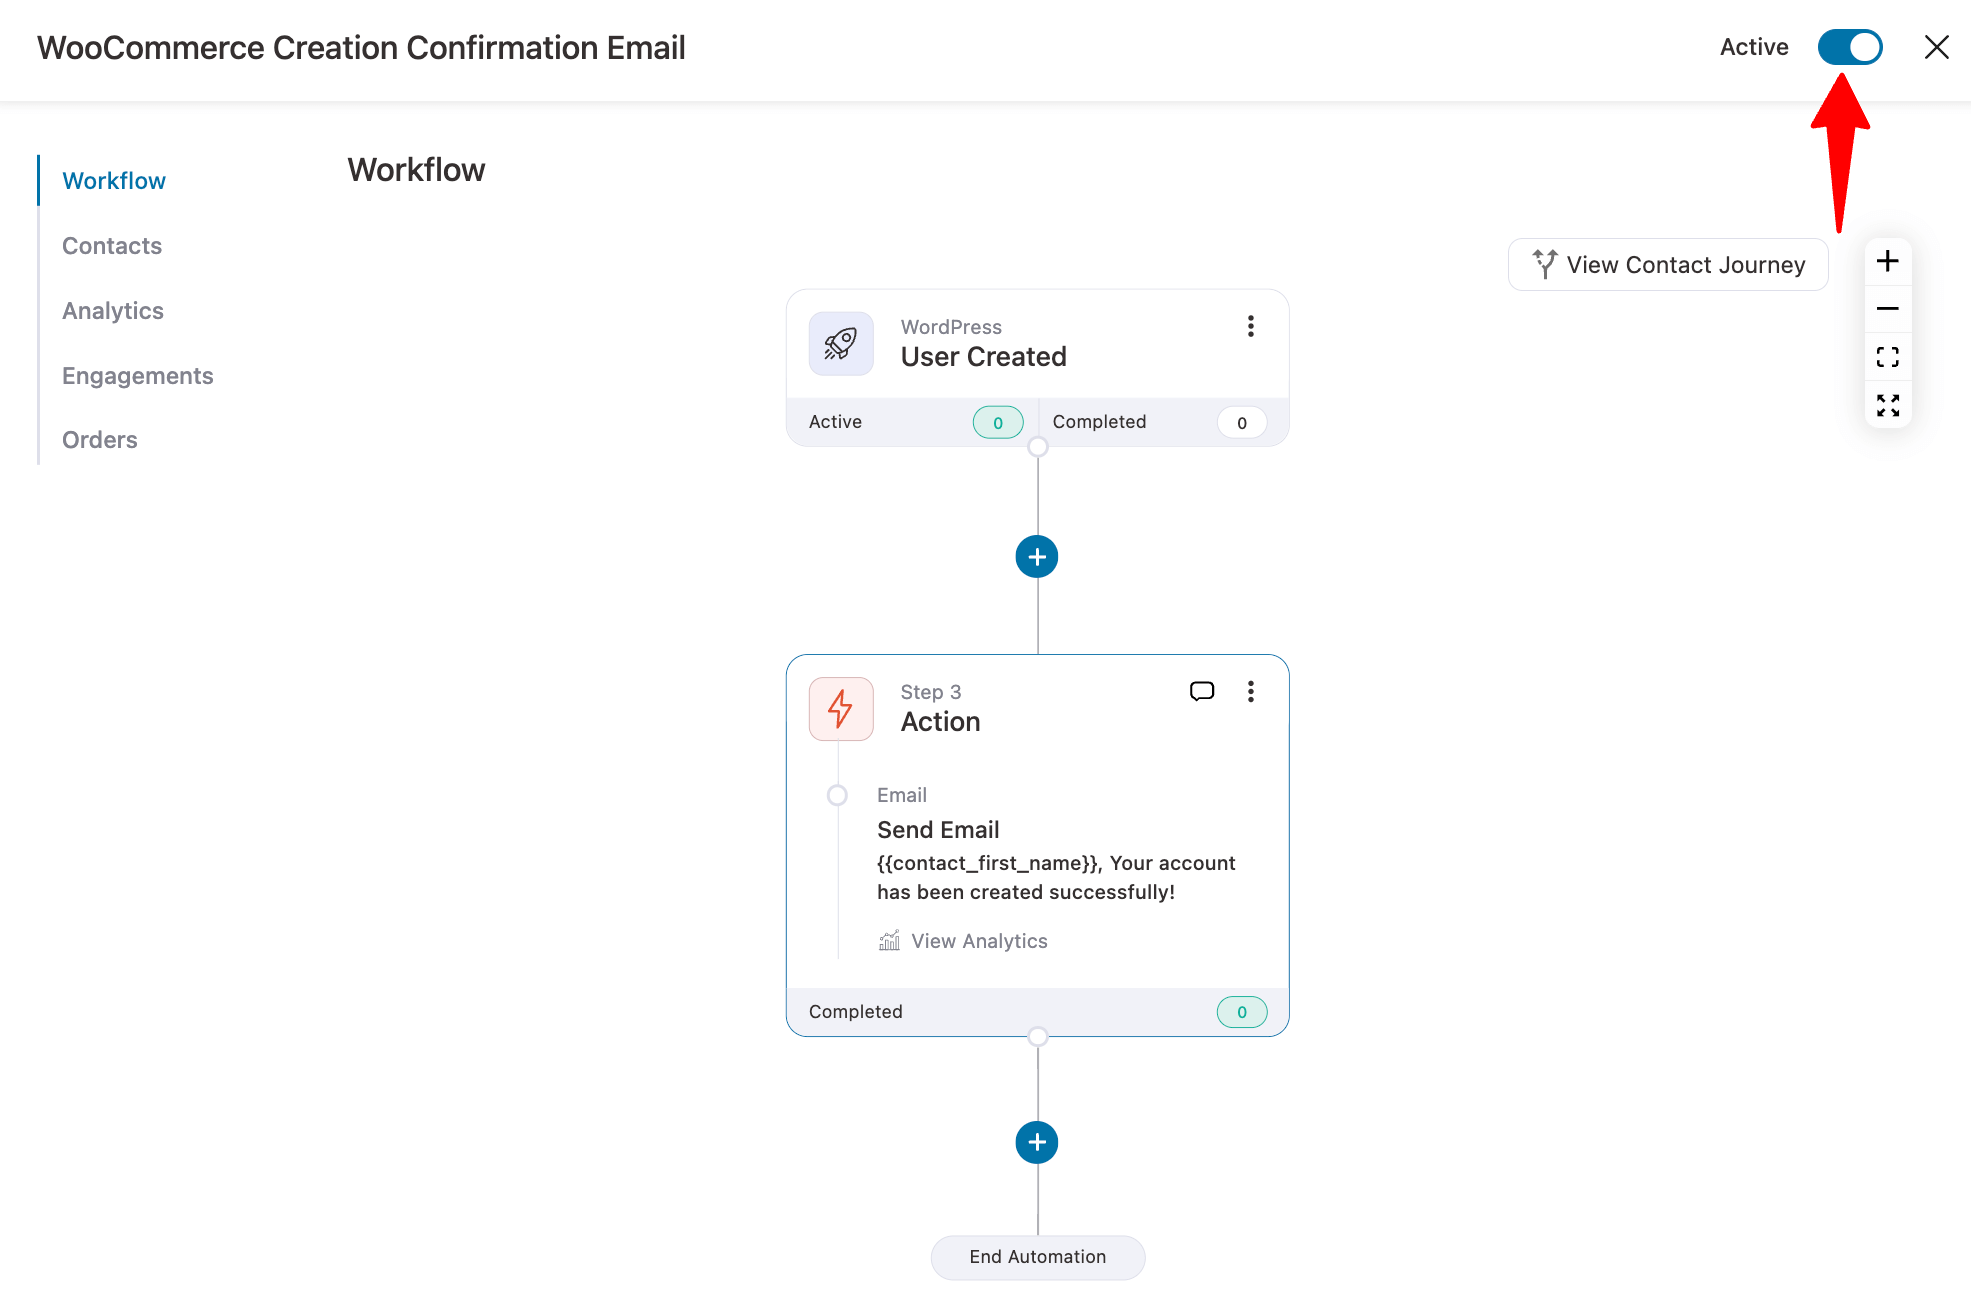
Now, new users will receive this email after automatic account creation on the WooCommerce checkout page:
Here is a preview of the email we created:
5 Tips to Follow Along With WooCommerce Account Creation on Checkout Page For Better Conversions
- Offer a multi-step checkout process
28% of shoppers abandon shopping carts in the middle due to a long and confusing checkout process.
A well-designed multi-step checkout can solve this problem by splitting the checkout fields into different steps, simplifying the buying process.
- Inline checkout field validation
A poorly validated checkout process frustrates customers and leads to lost sales.
A proper WooCommerce checkout field validation reduces errors, enhances satisfaction, and boosts conversions, ensuring a seamless experience.
- Enable Google Address autocomplete
Google Address Autocomplete provides real-time suggestions, reducing errors, ensuring accuracy, and speeding up checkout.
Besides, incorrect addresses cause 41% of delays and 39% of delivery failures, which Google address autocomplete can easily solve.
- Auto apply coupons
Offering discount always encourages users to complete an purchase. And automatically applying coupons at checkout makes things even smoother. It's like a shortcut that makes the checkout page friendlier and boosts the chances of more people completing their purchases.
- Offer convenient payment gateway
Make sure you offer enough payment gateway options so everyone has their convenient payment options to pay. For instance, make sure to add express checkout, which makes it faster and easier for people to pay with complete one-click checkout. Also, add local payments, buy now, pay later to hold on to the people with low budgets, and so on.
Follow these steps along with setting up automatic account creation on checkout to boost the sales of your WooCommerce store.
Ready to Automatically Create an Account On WooCommerce Checkout?
Automatically creating accounts during checkout ensures that users don’t abandon their carts and complete their purchases.
In this competitive world, you can’t afford to make it harder for users to place an order. That’s why experts highly recommend setting up automatic account creation on the checkout page.
To ensure users engage with your brand even after a guest checkout, replace the default new user email with a custom one.
In this blog, we have shared both the account creation process and how to send a custom email, along with some tips to boost your store's conversion rate.
The good part is that all of these can be implemented using FunnelKit’s products.
So, get yourself FunnelKit Funnel Builder and FunnelKit Automations to start your journey towards multiple revenue streams!
The post How to Enable the Create Account Option at Checkout in WooCommerce? appeared first on FunnelKit.