Want to get the most out of your TikTok ads? Installing the WooCommerce TikTok Pixel on your store is the way to go.
With the TikTok pixel, you can monitor user activity, track sales, and fine-tune your ads to reach your ideal audience—all while gaining valuable insights to boost your campaign performance.
It’s a must-have tool if you use TikTok or are considering using this platform to attract visitors and track events on your website.
In this article, we’ll guide you through setting up TikTok ads pixel on WooCommerce and enabling event-based conversion tracking on your website.
What is a TikTok Pixel?
A TikTok Pixel is a powerful tracking tool that measures the effectiveness of your ad campaigns by monitoring actions users take on your website.
Originally a short-form video-sharing platform, TikTok has now evolved as a business services platform, outpacing Facebook and Instagram in popularity.
With a massive user base and high engagement, businesses use TikTok advertising to promote their products and services.
According to an official survey, about 58% of TikTok users discover new products and services through targeted ads on the platform.
Therefore, setting up TikTok Pixel on your website is necessary to optimize your ad campaigns, retarget them to different user bases, and track conversions.
For WooCommerce store owners, this feature allows you to track key events such as completed purchases, new signups, abandoned carts, and more.
By following this article, you’ll learn how to add WooCommerce TikTok Pixel to your store and track and test your event-based conversions on your website.
Why Integrate TikTok Pixel with WooCommerce?
Integrating the TikTok Pixel with WooCommerce can be powerful for businesses looking to maximize their marketing impact on TikTok.
Here are some key benefits:
- Enhanced ad targeting
TikTok Pixel tracks user behavior on your WooCommerce store, such as page visits, product views, and completed purchases.
This data allows you to create custom and lookalike audiences on TikTok, enabling highly targeted ads tailored to users who have shown their interest in your products.
- Optimize ad spends
By tracking user interactions and conversions, TikTok Pixel lets you allocate your ad budget quite effectively.
You can focus on high-performing campaigns, minimizing costs associated with less effective ads while improving your return on ad spend (ROAS).
- Accurate conversion tracking
TikTok pixel captures detailed conversion data, enabling you to see the number of sales, leads, or other valuable actions directly attributed to your TikTok ads.
This data insight is key for assessing the effectiveness of your ad campaigns while identifying areas for improvement.
- Retargeting capabilities
TikTok pixel allows you to target potential customers who visited your WooCommerce store but didn’t make a purchase.
By retargeting, you can re-engage these users with reminders, discounts, or promotions, increasing the likelihood of conversion.
- Valuable insights into user behavior
The TikTok pixel provides a deep understanding of how users interact with your WooCommerce site.
It helps you identify the most popular products, users’ buying behavior, and potential obstacles they face.
These valuable insights for improving the customer experience and optimizing your site.
Free Tools We’ll Use to Set Up TikTok Pixel in WooCommerce
To set up WooCommerce TikTok Pixel on your store, we will use the following free tools:
- FunnelKit Funnel Builder (WordPress plugin)
- TikTok Pixel Helper (Google Chrome extension)
Let’s look at how to install them.
FunnelKit Funnel Builder
We recommend you use the Funnel Builder by FunnelKit to set up the WooCommerce TikTok pixel on your website.
It not only lets you set up beautiful, high-converting checkout pages, opt-ins, upsell offers, etc., but has a deep integration with TikTok Pixel.
You don’t need any extra plugins, such as TikTok for WooCommerce, to track pixel events on your website.
Instead, FunnelKit Funnel Builder takes care of TikTok tracking pixels entirely.
Installation
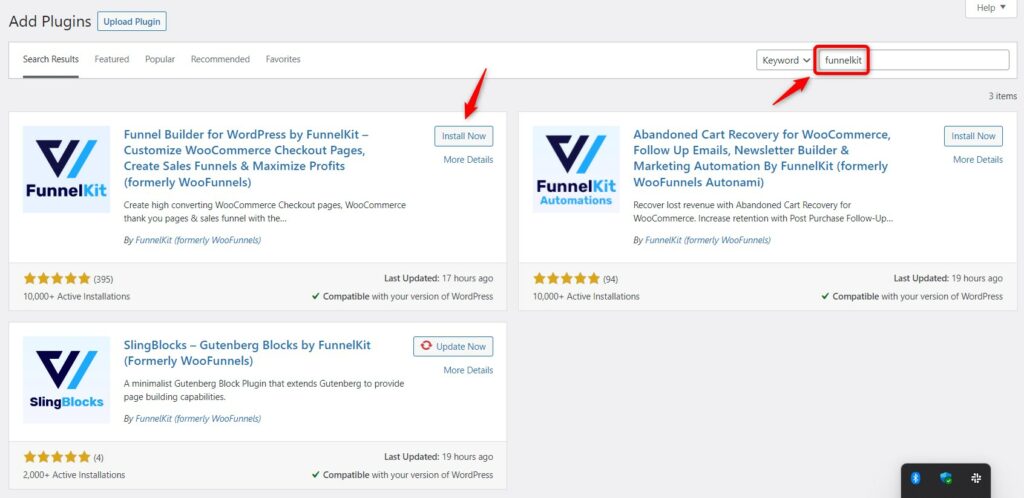
To install the FunnelKit Funnel Builder, go to the dashboard of your WordPress website.
Click on Plugins > Add New.
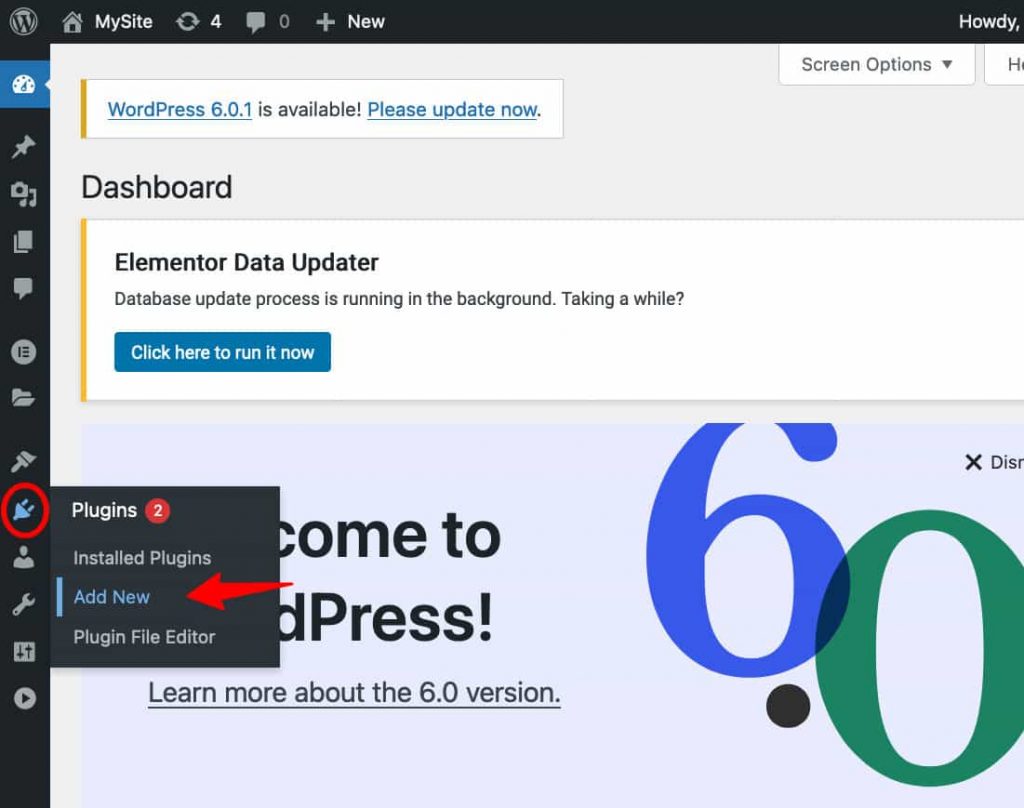
Search for the FunnelKit Funnel Builder there and click on 'Install Now'.
It’s a lite version and absolutely free to all users.
Now the plugin will get installed on your website.
Once done, click on the 'Activate' button.

Now the FunnelKit Funnel Builder is ready to set up WooCommerce TikTok Pixel on your store.
Well done! This is how you can install and make the Funnel Builder active on your website.
TikTok Pixel Helper
The TikTok Pixel Helper is a Google Chrome extension that helps you test and troubleshoot pixel installation on your website.
It gives you conversion-related information along with real-time feedback.
With this extension, you can go deeper into troubleshooting your pixel installation. You get real-time information about detailed diagnostics and parameter-level implementations.
Installation
Click on this TikTok Pixel Helper link on your Google Chrome browser.
Hit the 'Add to Chrome' button.
It’ll ask you for your confirmation to install this extension.
Confirm the installation by clicking on 'Add Extension'.
TikTok Pixel Helper will get installed on your Chrome browser now.
You can now use it to check if the conversion events are triggering or not.
Types of Events That Can Be Tracked
Here are some events that you can track with WooCommerce TikTok Pixel on your store with the help of FunnelKit Funnel Builder:
- Page view - A user views any page on your website.
- View content - The user views the product pages on your store.
- Add to cart - When a user adds the product to their shopping cart.
- Order bump - A user accepts the order bump and the product gets added to the cart.
- Initiate checkout - When the user starts the checkout process on your online store.
- Place order - Tracks this event when a user purchases from your store. It’s usually denoted when the user goes from the checkout page to the thank you page.
- Complete payment - An order gets placed with successful payment completion.
You can also track the events site-wide using the Funnel Builder. It eliminates the need for an extra plugin or app to track events on your website.
How to Install TikTok Pixel on WooCommerce and Track Events on Your Store?
In this section, we will demonstrate an easy, step-by-step process on how to install TikTok Pixel on WordPress.
Further, we’ll enable event-based tracking on our WooCommerce website.
Step 1: Go to Events Manager inside your TikTok business account
Go to TikTok Business Manager and login into your account.
Next, click on Events under Tools.
Hit Get Started to start the process.
Step 2: Manage web events for your TikTok ads manager account
This option will track events that happen on your website by installing TikTok Pixel for WooCommerce.
Next, click on Web, which lets you connect your website to share events.
Click Next.
Enter the URL of your website.
Next, choose the type of pixel installation you want on your WooCommerce website.
- Automatically set up web events through partner integrations
- Manually install pixel code
Here, we will select Manual setup.
🔔 Note: You don't need to copy and paste any code into your website. FunnelKit takes care of your WooCommerce TikTok pixel integration.
Choose the connection method. It basically means how you want your WooCommerce website to send data to TikTok.
Select TikTok Pixel + Events API and hit the ‘Next’ button.
Click Next when done.
Step 3: Create TikTok Pixel
Enter the name of the TikTok Pixel you want to create for your WooCommerce website.
Click on Create.
Next, the WooCommerce TikTok pixel setup guide to copy and install the base code on your website.
But you don’t have to worry about it because FunnelKit takes care of it. You just need to generate the Pixel ID and paste it into FunnelKit settings.
You can enable Automatic Advanced Matching. It helps you improve your ad targeting by capturing key visitor information more effectively.
When it’s enabled, AAM captures email addresses and phone numbers that visitors provide during their interaction with your WooCommerce website.
Here are some of its benefits:
- Better audience matching
- Privacy-protected data handling
- Enhanced retargeting potential
- Improved conversions
- Optimized lookalike audiences
You’ll be asked to set up events using the TikTok Event Builder.
🔔 Note: You don't have to add any code or set up events anywhere here. FunnelKit automatically manages everything related to your WooCommerce TikTok pixel integration.
Hit Next once done.
Now, you’ll be asked to verify your pixel setup. Go to the Test Events to see your TikTok Pixel ID generated.
Your TikTok Pixel will be successfully created.
Copy this TikTok Pixel ID from here.
Step 4: Add the TikTok Pixel ID to WooCommerce
Go to the ‘Settings’ section under the FunnelKit Funnel Builder.
Under TikTok, paste the Pixel ID.
That’s it! You have successfully added the TikTok Pixel to WooCommerce using FunnelKit.
This is how you can successfully configure TikTok for WooCommerce integration.
Step 4: Enable the TikTok Pixel Events You Want to Track
Enable the events that you want to track with your TikTok pixel.
Funnel Builder gives you various events such as:
Site-wide events
- Page View
- Add to Cart
- View Content
Sales Page events
- Page View
Optin Page events
- Page View
Order Bump events
- Add to Cart
Checkout events
- Page View
- Add to Cart
- Initiate Checkout
Purchase Events
- Page View
- Place Order
- Complete Payment
Advanced
- Enable this option to send parent product ID in case of variable products
Click on ‘Save’ once done.
That’s it! This is how you can set up WooCommerce TikTok Pixel and enable event-based tracking on your online store.
How to Test if the TikTok Pixel is Working Correctly on Your WooCommerce Store?
Follow the method given below on how to check Pixel installation and test the events on your WooCommerce store.
You can even test browser and server-side events from the TikTok pixel dashboard.
Here, we will use TikTok Pixel Helper (Google Chrome extension) to test the events on our website.
Test the firing of events by navigating to our product catalog in your WooCommerce store.
Here, the TikTok Pixel Helper will notify you of the number of pixels running on a specific page.
Here, you’ll see the 'PageView' event being fired.
Next, click on any product.
You’ll see the 'Page View' and 'View Content' events on the extension.
Next, add this item to your cart and start the checkout process.
You’ll see the 'Page View', 'Add to Cart' and 'Initiate Checkout' events here.
Complete the purchase and you’ll see the ‘Place an Order’ and ‘Page View’ events.
Since all the events got reflected in the extension, it means the events are being fired correctly. And your WooCommerce TikTok Pixel installation has been done.
That’s it! This is how you can check the TikTok Pixel implementation and test the events on your WooCommerce website.
Frequently Asked Questions (FAQs) on WooCommerce TikTok Pixel
Here, we have answered the top questions asked by users related to WooCommerce TikTok integration:
1. What is the pixel for TikTok?
The TikTok pixel is a Javascript code that needs to be installed on your website. This pixel code helps you in tracking and capturing the actions that users take on your website. Actions such as adding an item to their cart, placing an order, etc. These events further help you in building custom audiences and optimizing your ad campaigns.
2. How do I connect TikTok pixel to WooCommerce?
You can connect TikTok pixel to WooCommerce with the help of FunnelKit. First, you need to create a TikTok pixel ID from the TikTok Ads Manager account. Then, enter the pixel ID into FunnelKit and enable the events you want to track. That's it, you're all set!
3. Where can I view TikTok pixel for campaign performance?
You'll be able to view TikTok pixel for campaign performance inside your TikTok Ads Manager account. Click on 'Reporting' to view how your ad campaigns are performing. It also has the option of automating your report generation in XLSX or CSV format. Therefore, you can view all the details related to your TikTok ads campaign performance tracking here.
4. Can I add TikTok pixels to my WordPress website?
Yes, you can add TikTok pixels to your WordPress website with FunnelKit. The process is same as we have shown here in this post.
5. How do I fire purchase events with multiple TikTok Pixels?
In case of firing events for multiple TikTok Pixels, add both your IDs separated by comma(s). Here's the screenshot for your reference:
All Set to Track Conversions with WooCommerce TikTok Pixel?
As a WooCommerce store owner, your goal should be to reach out to new audiences on different platforms.
Therefore, you must get your hands on TikTok, the most popular social media platform in the world, and its advertising tools.
Amplifying your TikTok advertising campaigns should be the first step toward taking your business to the next level.
For that, you must set up WooCommerce TikTok Pixel on your store to track the ROI of your ad campaigns.
With tons of guides and plugins available to do just that - isn’t really a solution!
But thanks to the FunnelKit Funnel Builder! It’s an all-around solution for setting up your sales funnels, and its deep integration with TikTok helps you track conversions on your website.
It also has site-wide event tracking, which eliminates the need for extra plugins that take up unnecessary space on WordPress.
FunnelKit is really a full-fledged solution for your TikTok campaign performance tracking needs.
Explore more about the Funnel Builder here >>
The post How To Add WooCommerce TikTok Pixel For Conversion Tracking & Ads Optimization (Updated 2024) appeared first on FunnelKit.