Are you struggling to keep your store visitors engaged? Displaying WooCommerce related products can help.
Without showcasing related products, your customers might leave after buying a single item—or worse, abandon their carts altogether.
It’s like leaving money on the table and watching your competitors take the win.
Don’t worry!
In this blog, we’ll share how to display WooCommerce related products in your store.
By default, WooCommerce offers the option to show related products in limited places, which is not necessarily optimized to convert or boost AOV.
In this blog, we will share how you can show related products throughout the purchase journey, such as on the product page, cart page, checkout, and as a post-checkout upsell.
Let’s dive in!
What Are WooCommerce Related Products?
WooCommerce related products are product recommendations shown to shoppers at various stages of the buying process to boost order value.
These suggestions help boost customer engagement and encourage them to explore and purchase additional products that complement their interests, resulting in increased order value.
You can strategically display related products in the following key areas of your WooCommerce store:
- On the product page: Encourage customers to add more items by showcasing related products below the product description.
- In the sliding mini cart: Display related products as customers review their cart, enticing them to make a last-minute addition.
- At checkout as order bump: Suggest relevant add-ons or complementary items before customers finalize their orders.
- Right after checkout as one click upsell: Offer higher-value alternatives or bundles after the checkout as a one-click upsell.
For example, if someone comes to your WooCommerce store to buy a laptop, you can offer related products like a laptop backpack or sleeve, wireless mouse, laptop cooling pad, external hard drive, or SSD on the product page and in the sliding mini cart.
On the checkout page, you can offer add-ons such as noise-canceling headphones or a portable laptop stand as an order bump.
Once users complete their checkout, you can offer an extended warranty plan, an extra monitor, or a docking station as a one-click upsell.
By showing related products on these places, you can turn casual browsers into loyal customers while increasing your store’s average order value!
Why Offer Related Products in Your WooCommerce Store?
Displaying related products can effectively increase the average order value of the store, but the benefits go beyond just boosting revenue.
Here’s how showcasing related products can positively impact your WooCommerce store:
- Increases average order value (AOV)
When customers see related products, they’re more likely to add additional items to their cart. According to Salesforce, shoppers who click on product recommendations are 4.5 times more likely to complete a purchase.
By promoting complementary products like accessories or add-ons, you encourage shoppers to spend more per transaction. This could potentially increase your average order value without additional customer acquisition costs.
- Enhances user experience
A personalized shopping experience makes customers feel like your store understands their needs. 65% of shoppers prefer stores that recommend products based on their interests or previous purchases.
By suggesting relevant related products, you can make the shopping process more intuitive and enjoyable. This personalization reduces decision fatigue, helping customers find what they need quickly and making them more likely to return for future purchases.
- Reduces cart abandonment
Customers are often distracted or unsure about completing a purchase. By showing related products, you can provide them with options they hadn’t considered, increasing the chance of a sale.
Thus, showing related products can help you to reduce cart abandonment in your WooCommerce store.
- Boosts product discovery
When customers come to your store for a specific product, they might not explore your entire catalog. By featuring related products, you increase the chances of customers discovering additional items.
You can strategically showcase related or popular products and give shoppers more opportunities to find something new that interests them.
- Encourages repeat purchases
According to Invesp, 56 percent of shoppers are more inclined to return to a site that offers product recommendations, and 44% say they’ll become repeat buyers.
By promoting items that complement past purchases, you foster brand loyalty and increase the chances of customers making repeat visits, ultimately driving long-term revenue.
Now that you know about the power of WooCommerce-related products, let’s examine how you can show related products at various stages of a shopping journey to boost your store's AOV successfully.
Method 1: Show Related Products on the Product Page in WooCommerce
By default, WooCommerce automatically displays related products on the product page based on shared categories and tags.
Plus, you can manually set Upsell products for each product that will show up on the as related products of a single product page under the heading “You may also like”.
Here is a step-by-step guide on how to show related products on the WooCommerce product page:
Step 1: Organize products with categories
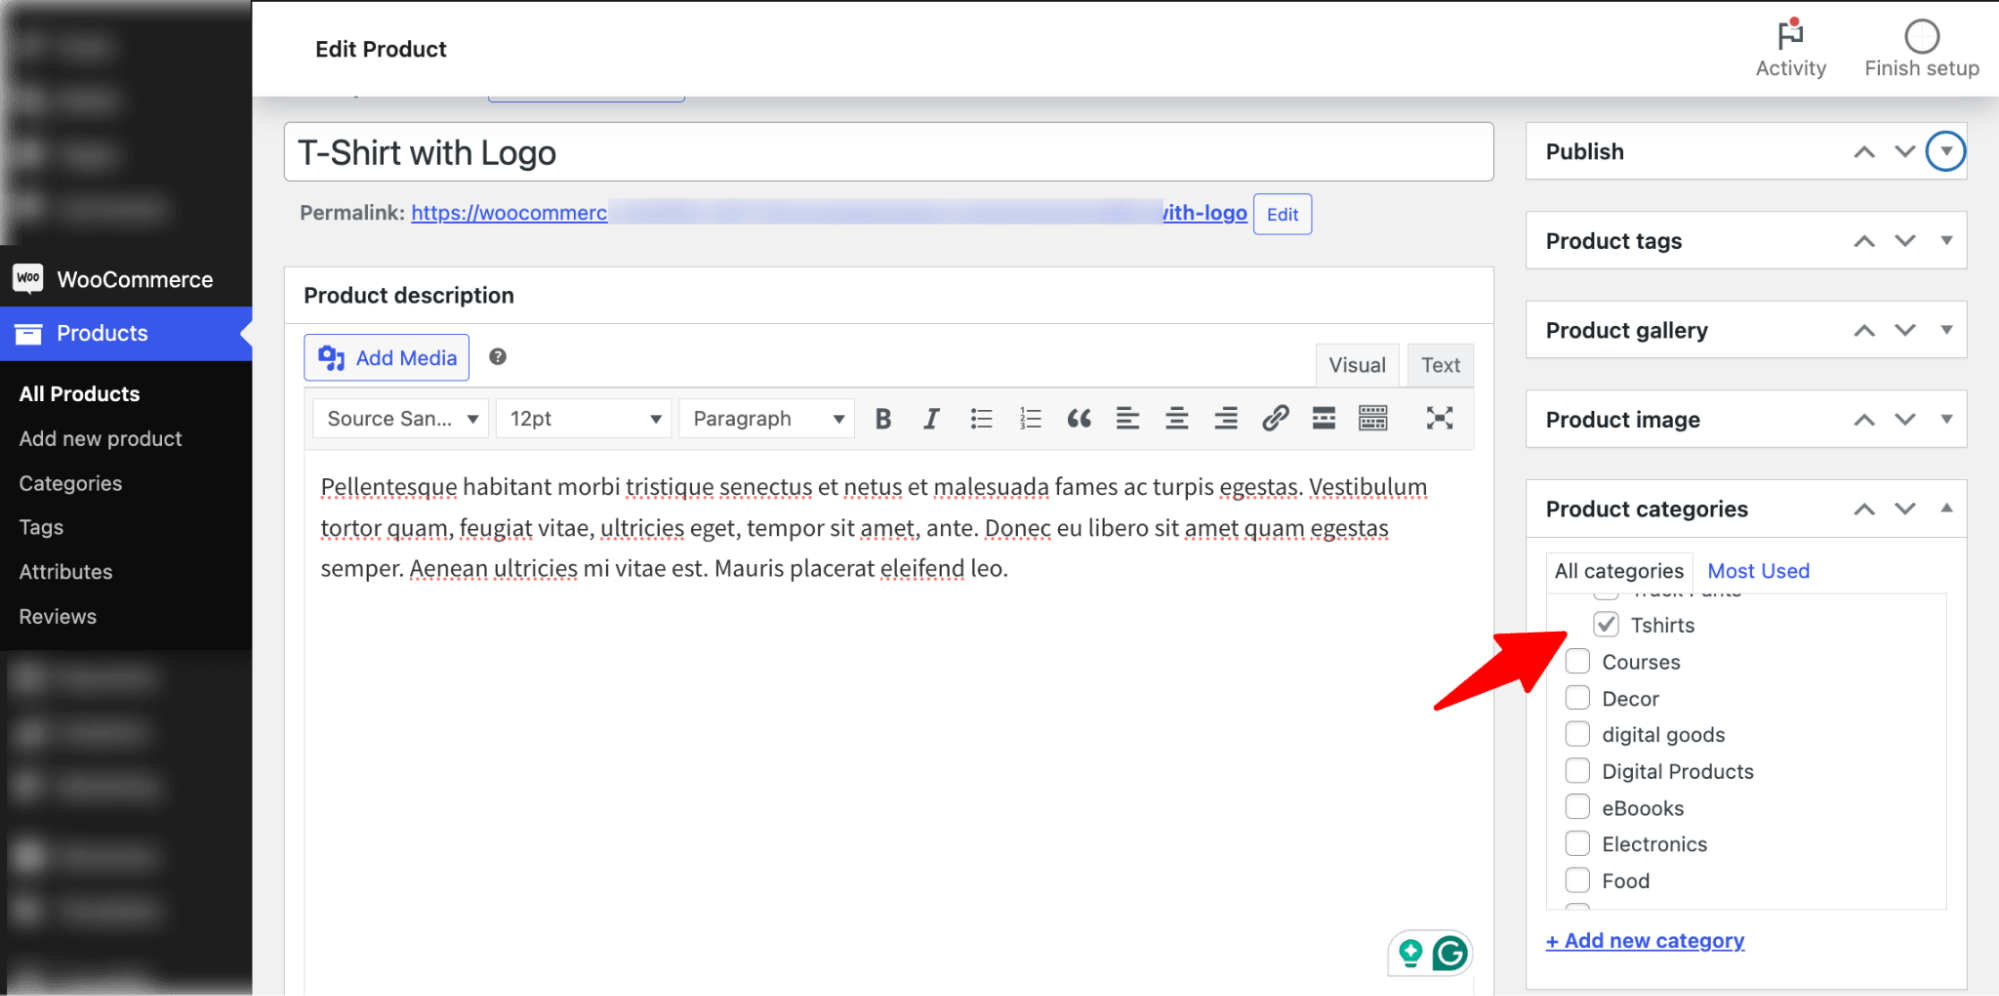
From the WordPress Dashboard, navigate to Products ⇒ All Products. Click Edit under the product you want to modify.
In the Product Categories panel (on the right, select a category that matches other related products.
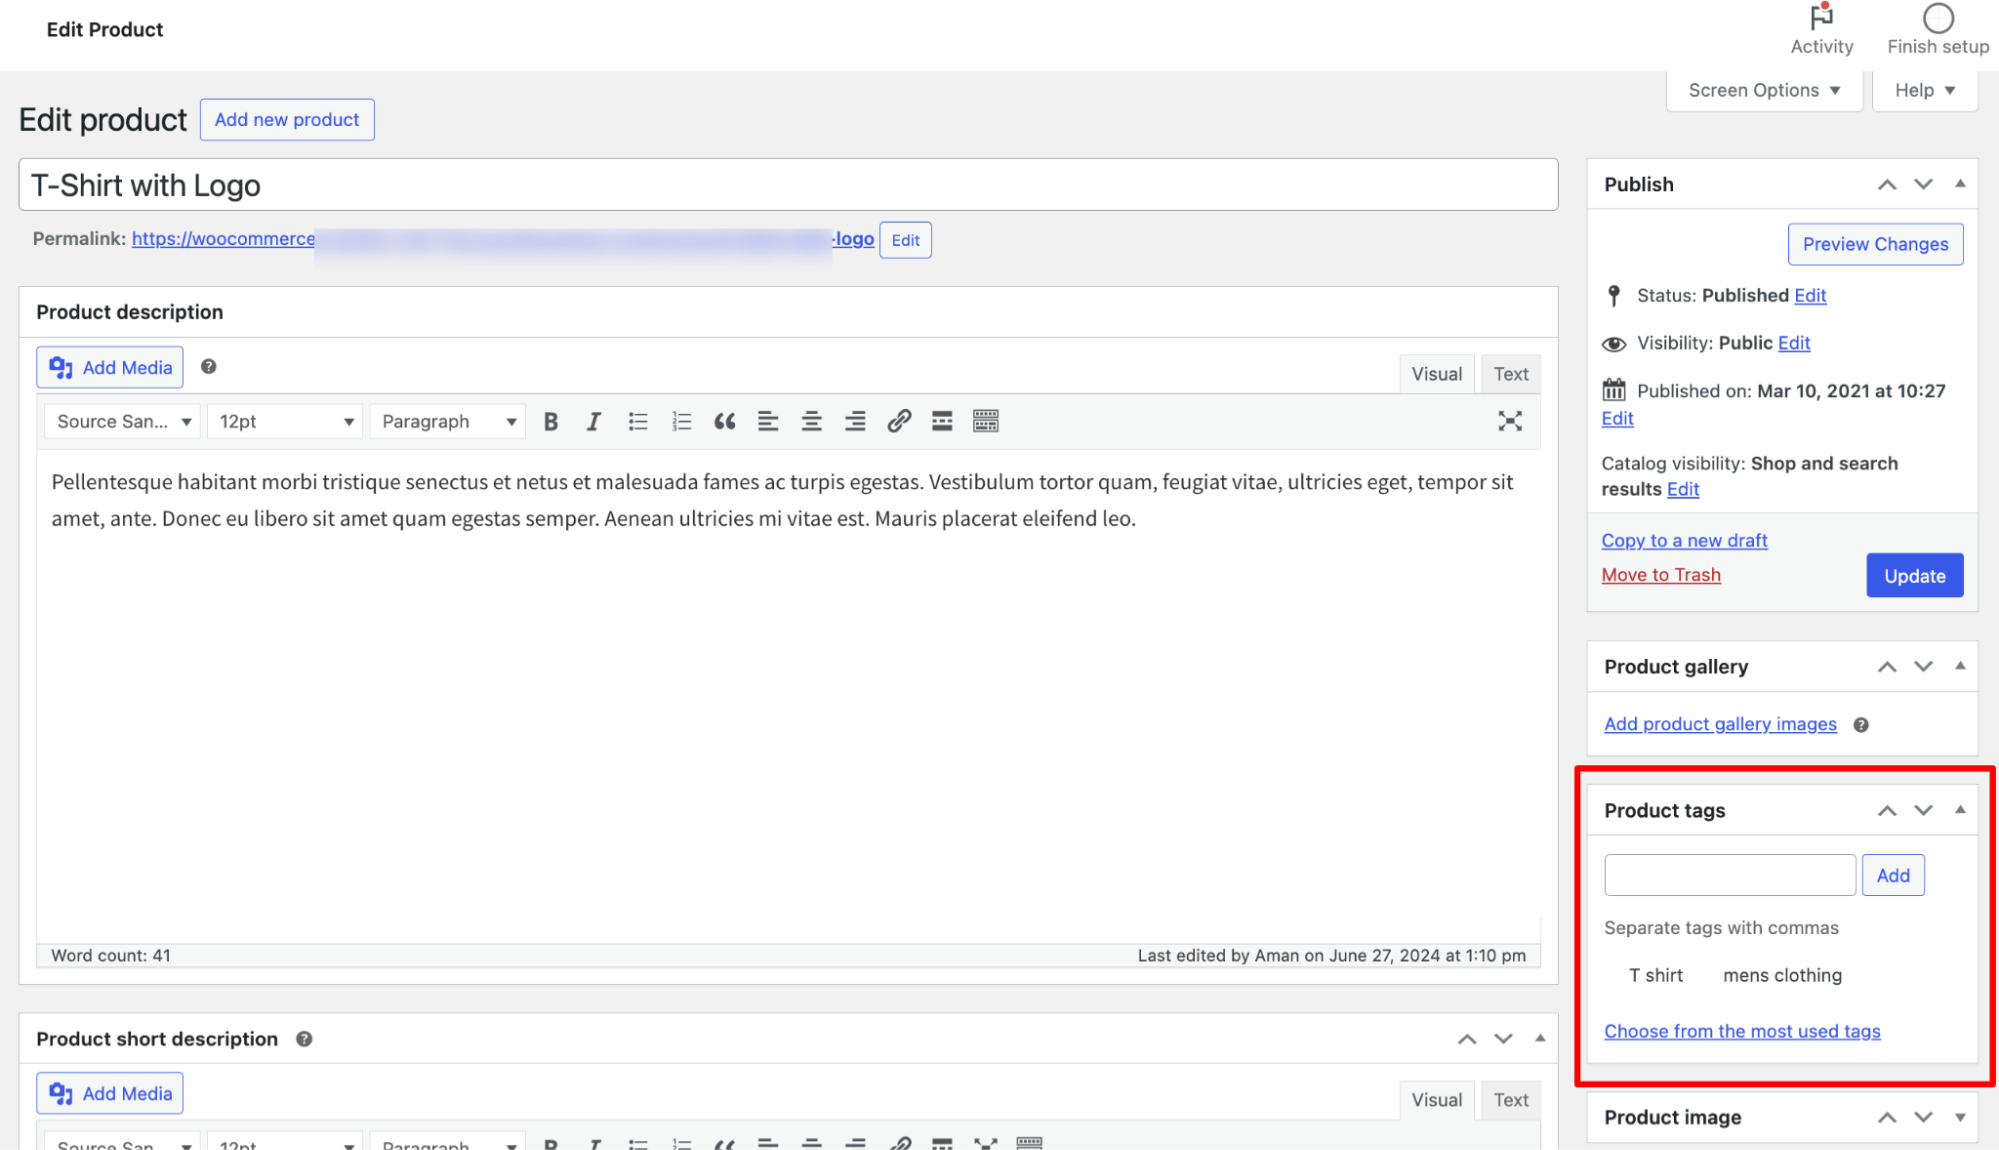
Step 2: Add tags to your products
On the same product editing page, find the Tags section. Add relevant tags that describe the product (e.g., "t-shirt", "mens clothing").
Ensure the tags are consistent with other products you want to link as related.
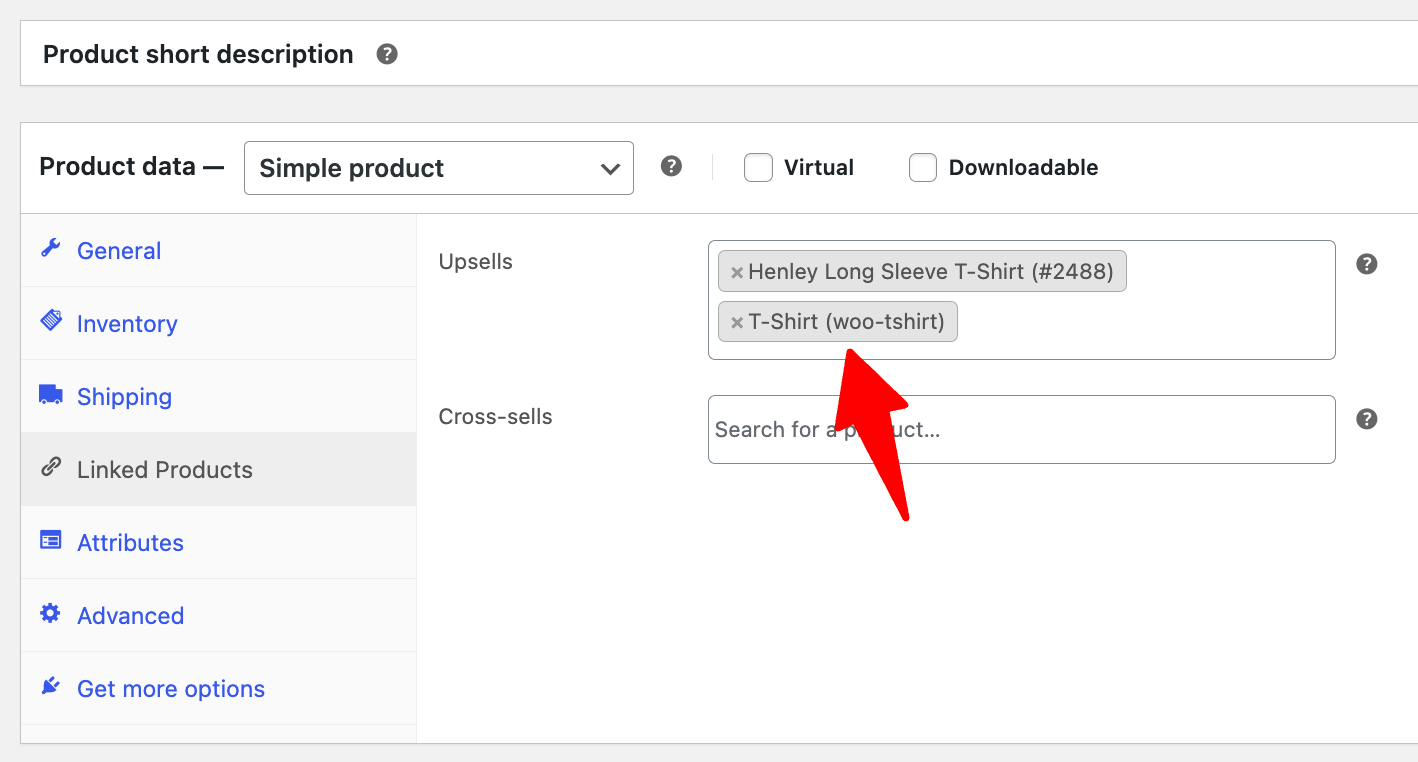
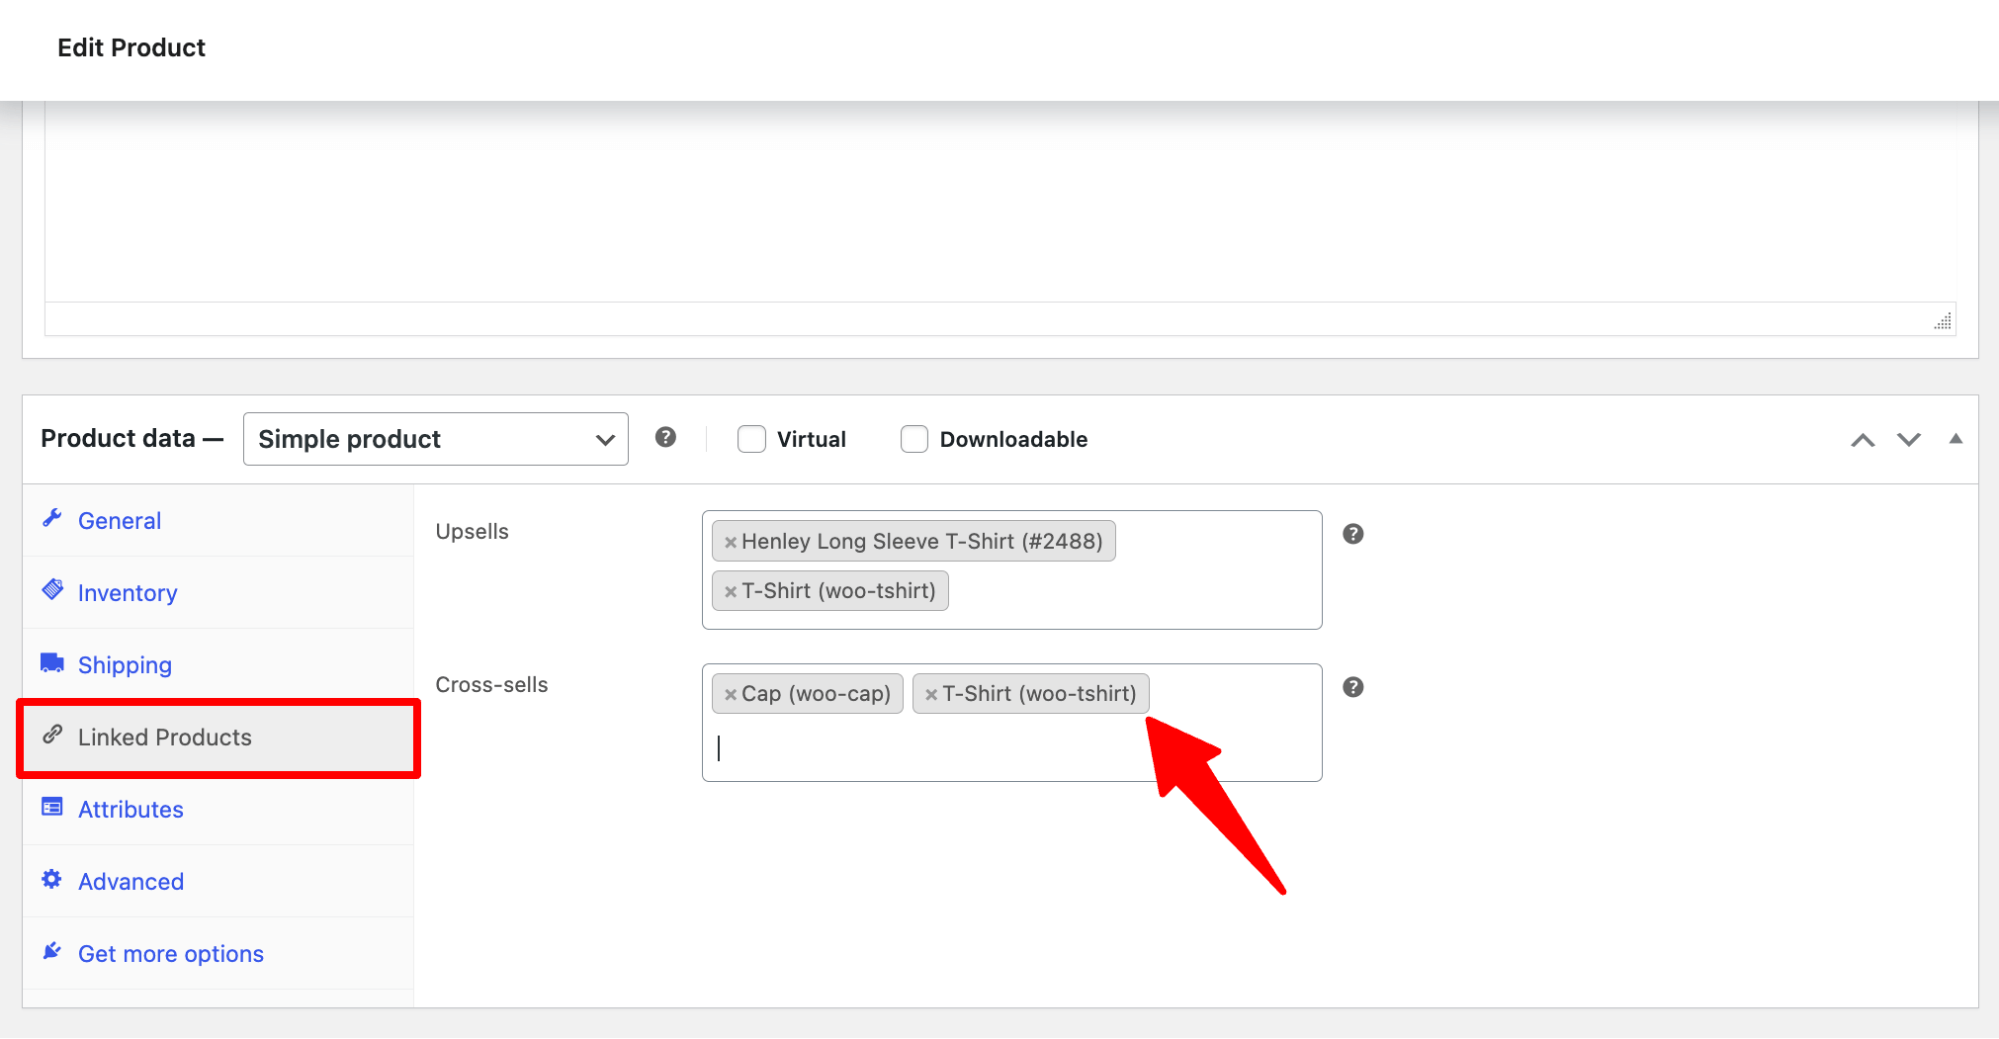
Step 3: Add upsells
Scroll down to the “Linked Products” section, and under Upsells, search and add the products you want to show up as related products under the “You may also like” section on the product page for that specific product.
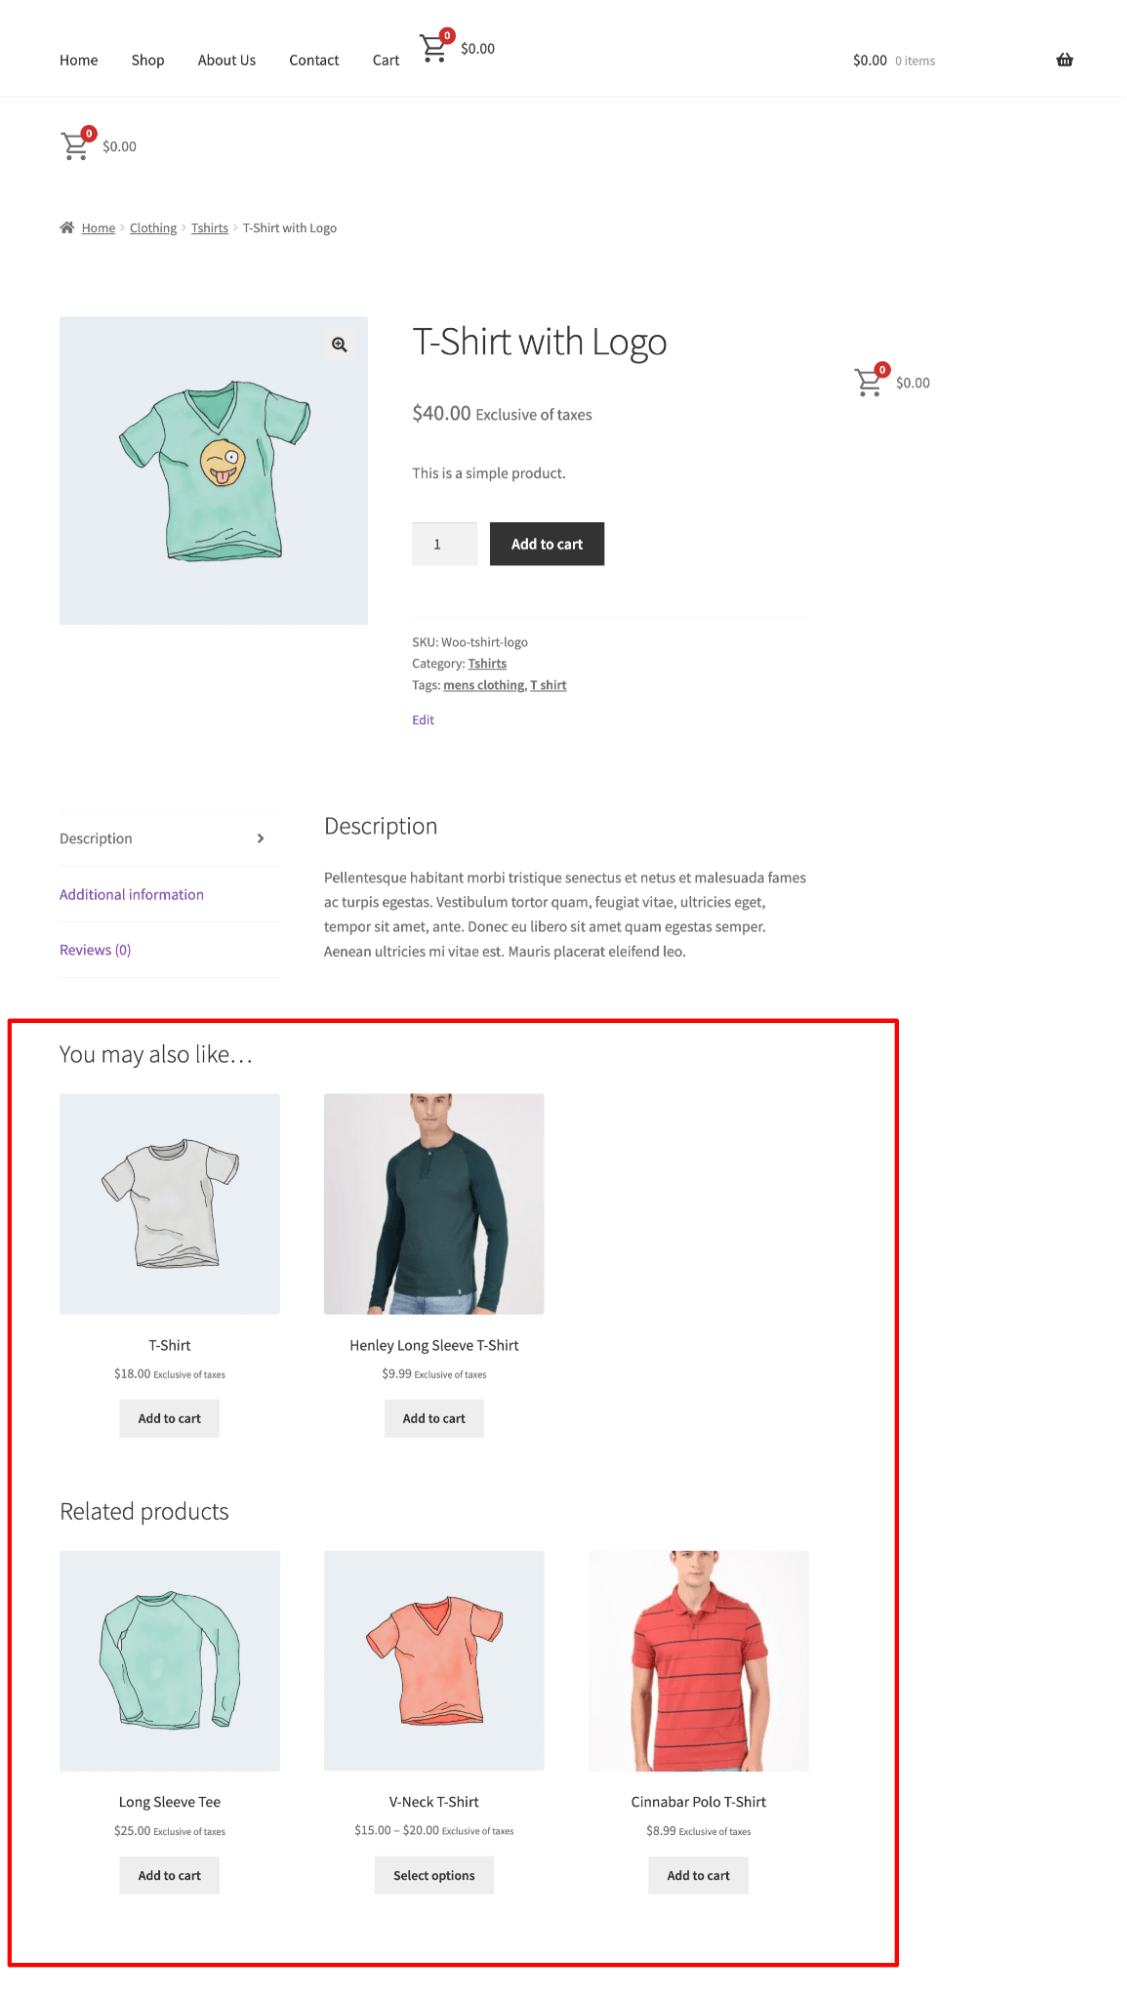
Step 4: Save settings and check related products on the product page
After configuring the settings. Click Update to save your changes. Open the product page on your site (front end).

Scroll down to the "Related Products" section below the main product details.
Products here will share at least one category or tag with the current product.
Method 2: Show Related Products On Cart Page
On the Cart page, WooCommerce shows the cross-sell items of the products that users have added to their cart.
Here are the steps you need to follow to show related products on the cart page in WooCommerce.
Step 1: Set cross-sell products
As mentioned earlier, in WooCommerce, related products on the cart page are called Cross-Sells. So, first, you need to set the cross-sell products.
To edit any product, scroll to the Product Data section and make sure you are on the Linked Products tab.
Now, search and add the cross-sell items.
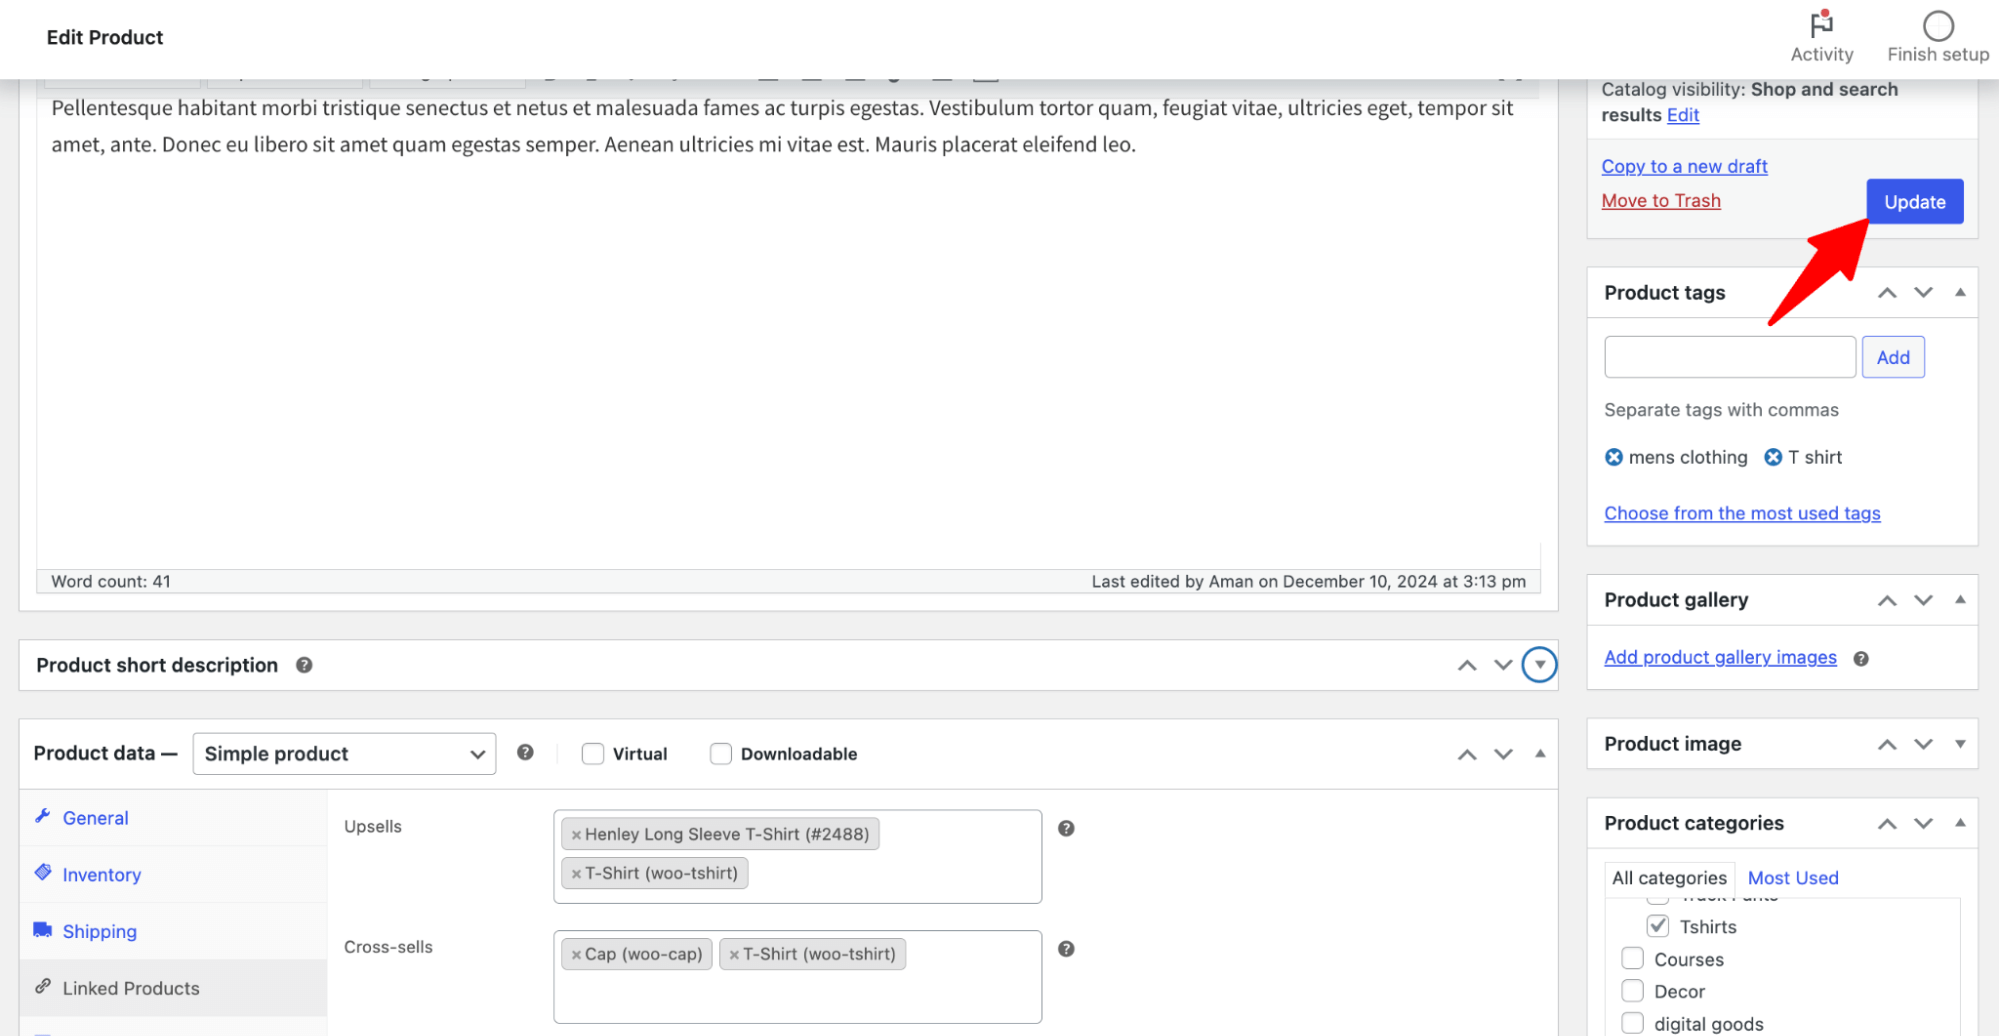
Step 2: Update the products
After adding Cross-Sells, ensure Update the product changes. Cross-sell products will now be linked to the main product and appear on the cart page.
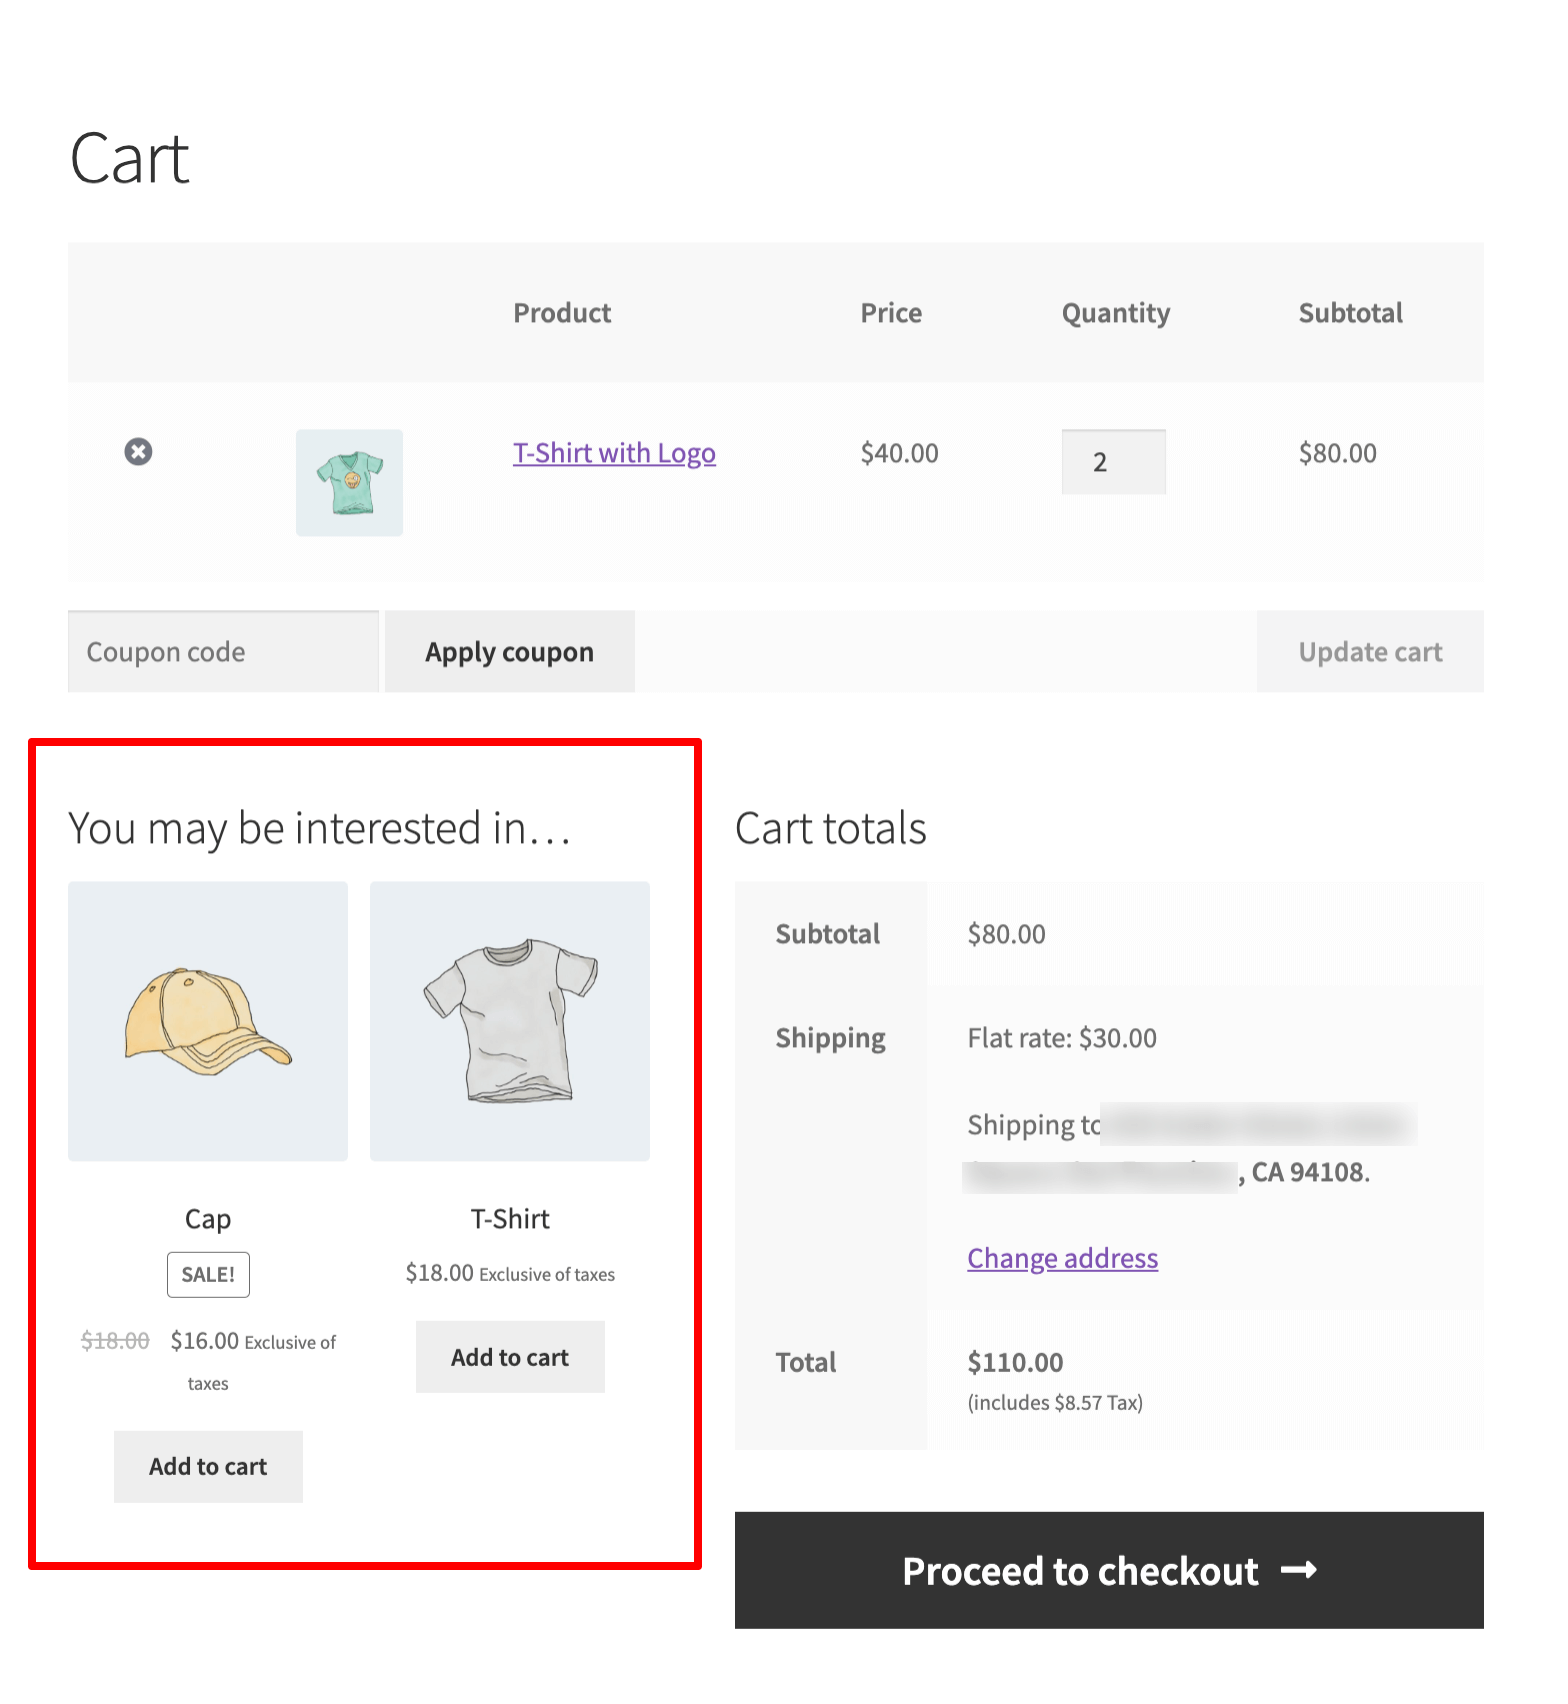
Step 3: Test the Cart Page
Add the product to the cart and go to the Cart Page.
Now, the cross-sell product should show up below the cart table as related products under the heading “You may be interested in…”.
Note: Experts recommend skipping the cart page as it adds an extra step to the buying process, making it more lengthy and complex, which can lead to cart abandonment.
You can fix this issue by replacing the cart page with a slide-in cart that allows users to view order details and update them from anywhere with a single click and provides them the option to go directly to the checkout page, streamlining the checkout process.
Method 3: Show Related Products Inside a WooCommerce Sliding Mini Cart
Here, we will show you how you can show related products inside a mini cart.
This will shorten the buying process by eliminating the cart page while still allowing customers to preview and update their cart items from anywhere on the site before checkout.
For this process, we will use FunnelKit Cart (both free and pro). You will get the pro version of FunnelKit Cart with FunnelKit Funnel Builder Plus and above.
Once, you have both the plugins installed and activated, follow these steps:
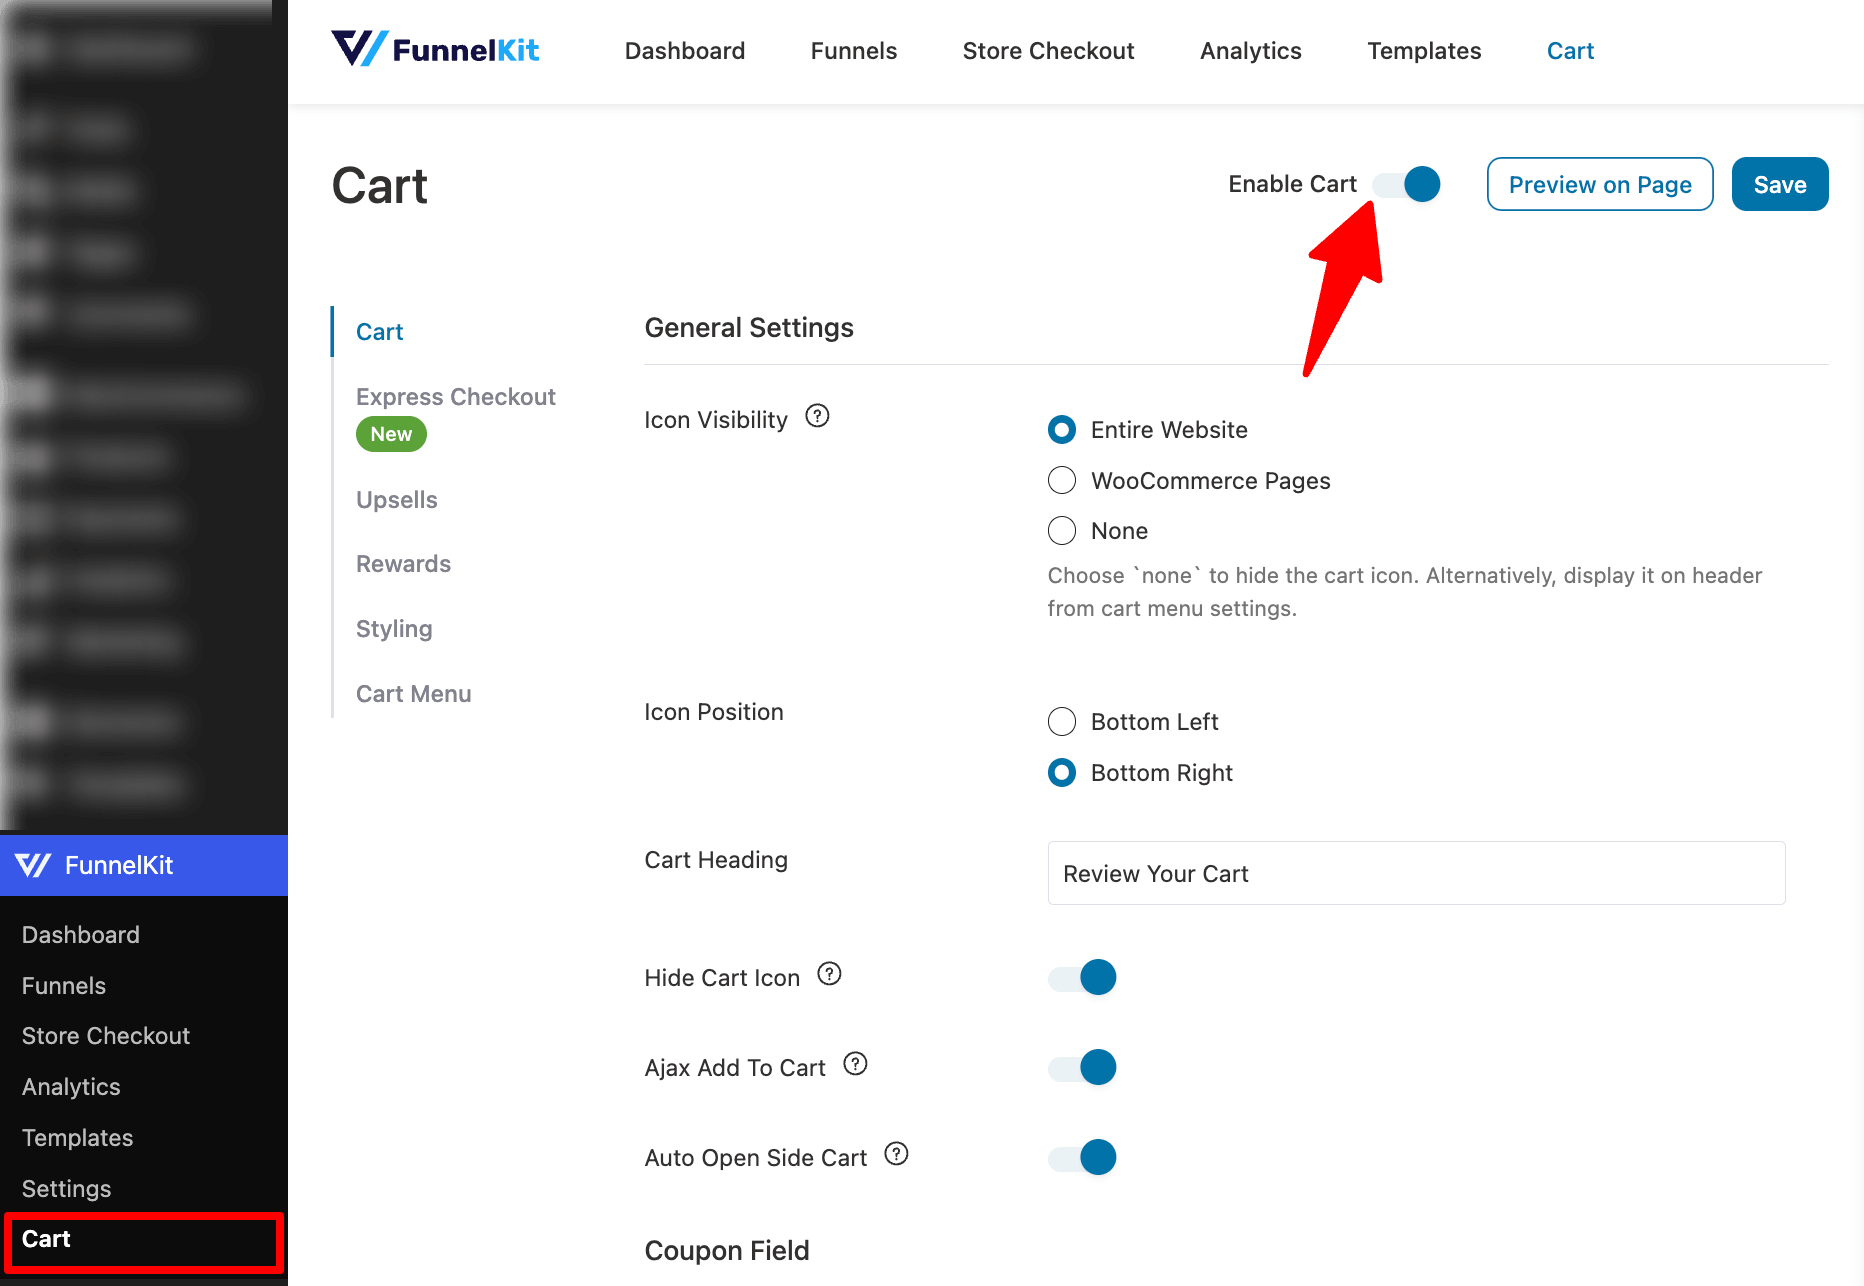
Step 1: Turn on the slide-in cart by FunnelKit
First, go to FunnelKit ⇒ Cart and hit the “Enable Cart” toggle button to turn on the FunnelKit Cart.
For more details on how to customize the FunnelKit Cart, read our blog how to add a mini cart in WooCommerce.
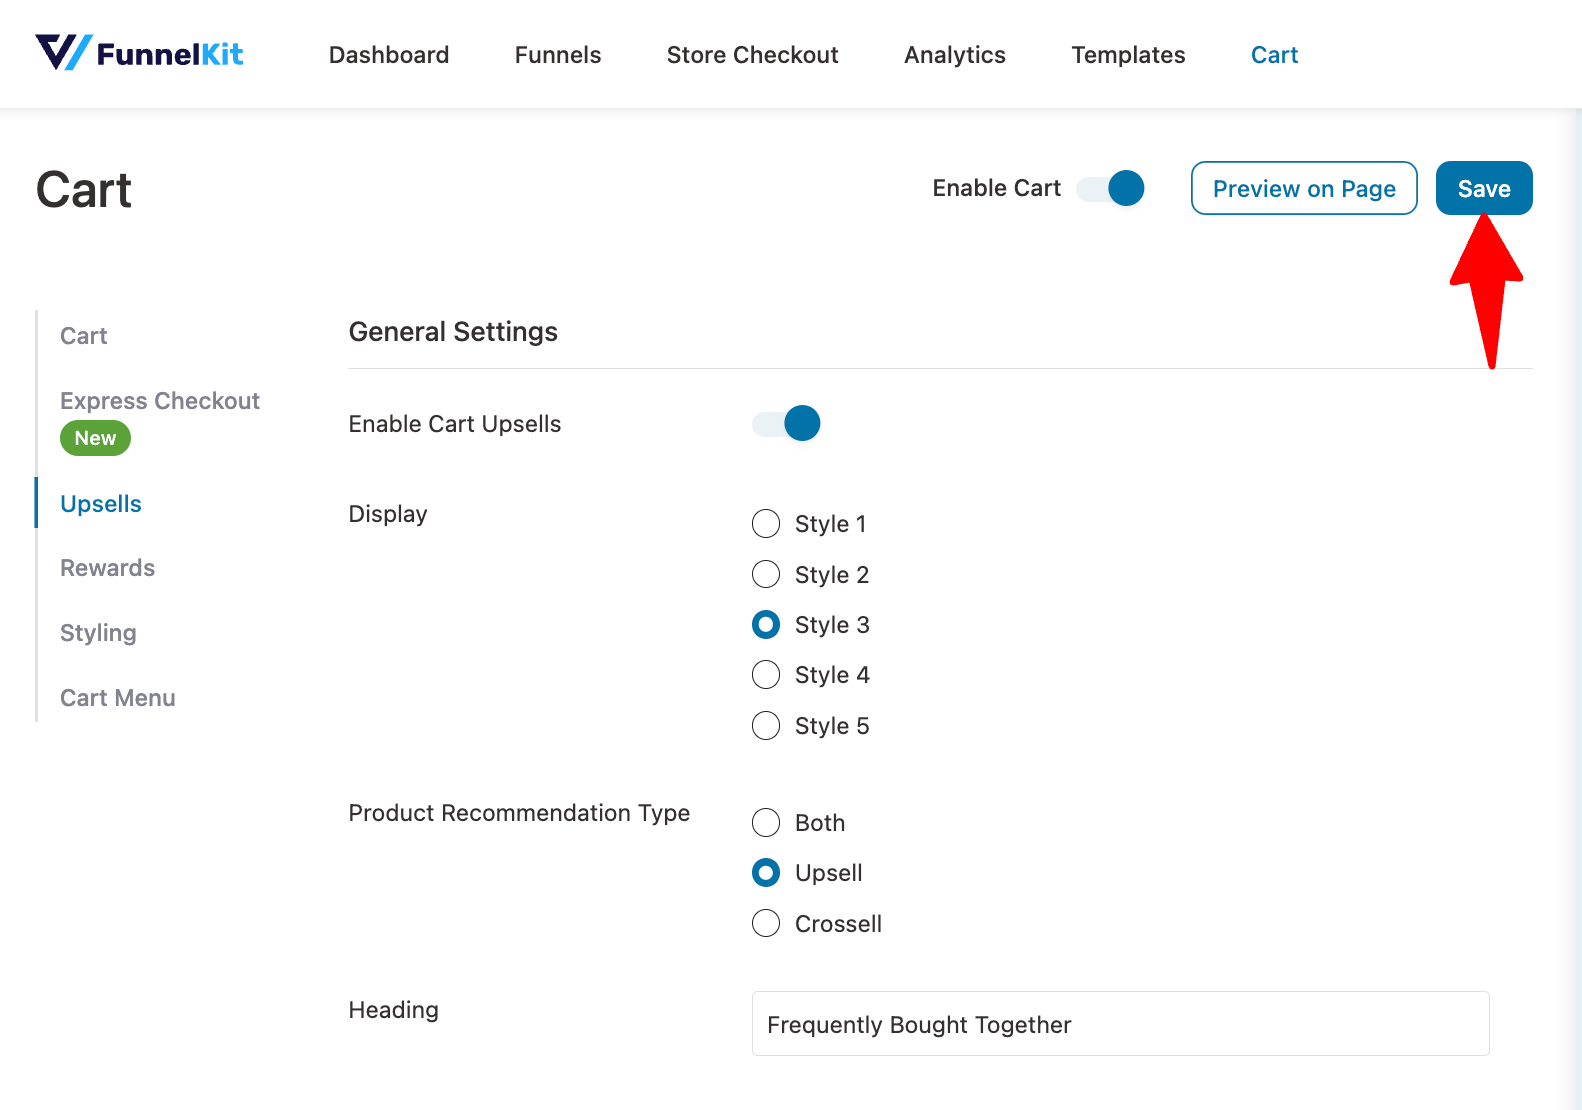
Step 2: Manage cart upsell settings
Go to the Upsells tab and turn on the “Enable Cart Upsells” option.
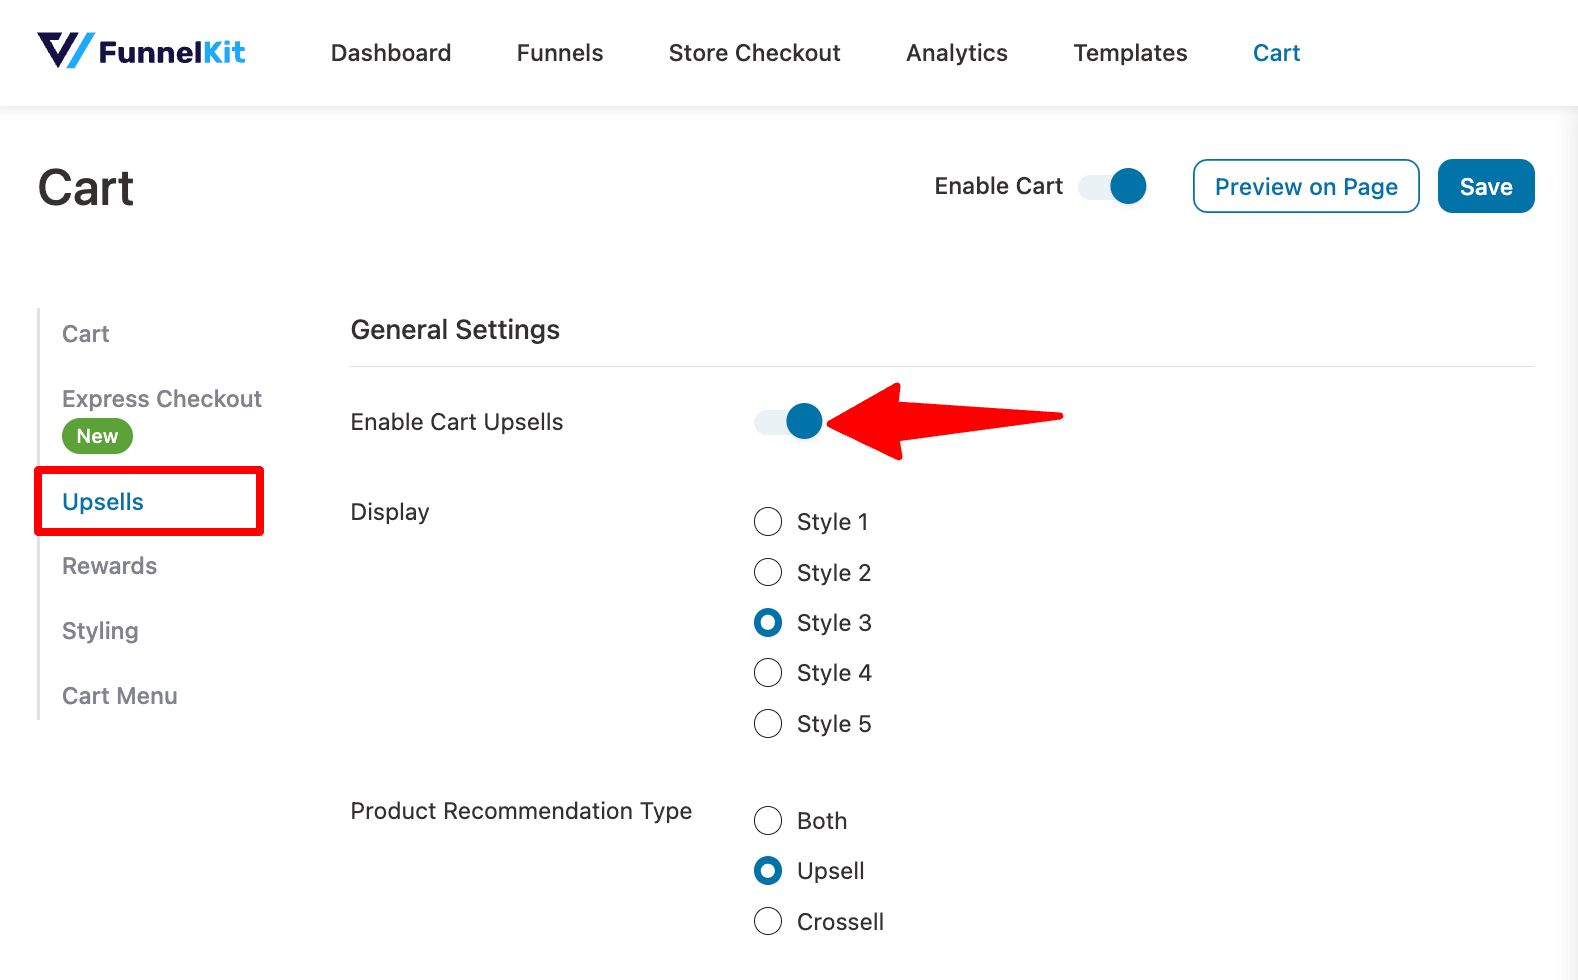
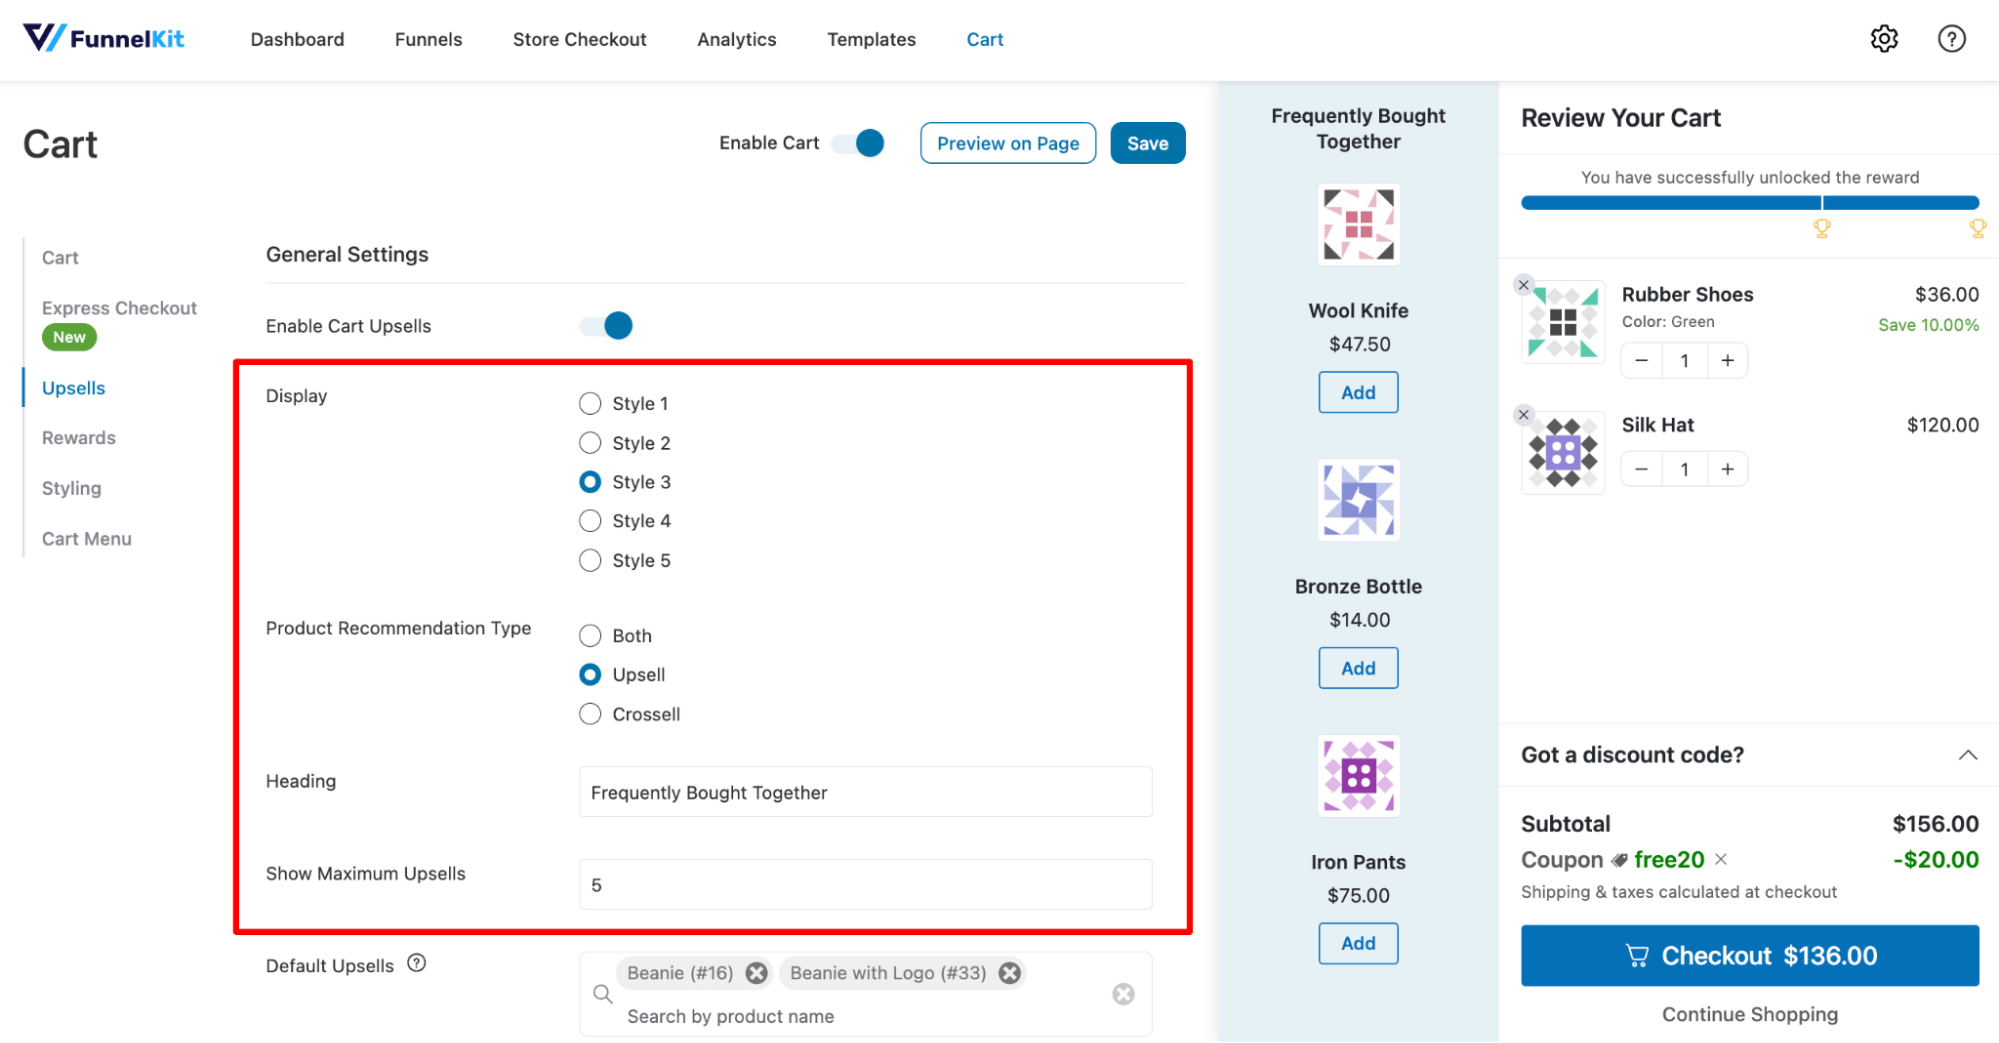
You get four different display styles to show related products on the cart page. Chose the one you like and configure the following:
- Product Recommendation Type: Recommend product upsells or cross-sells, or both. We recommend choosing both.
- Heading: This heading will show up above the related product section. The default option is "Frequently Bought Together".
- Show Maximum Upsells: Specify the maximum number of products you want to display as upsells.
Step 3: Add default upsells
The “Default Upsells” option lets you add items to show up as recommendations in case the existing cart products don’t have any upsell products assigned to them.
Search products by name and add them to the default upsell in WooCommerce. Add as many related products as you want, but the “show maximum upsells” option will limit the number of items on the front end.
Turn on the “Always Show Default Upsells” option to recommend the default upsell products.
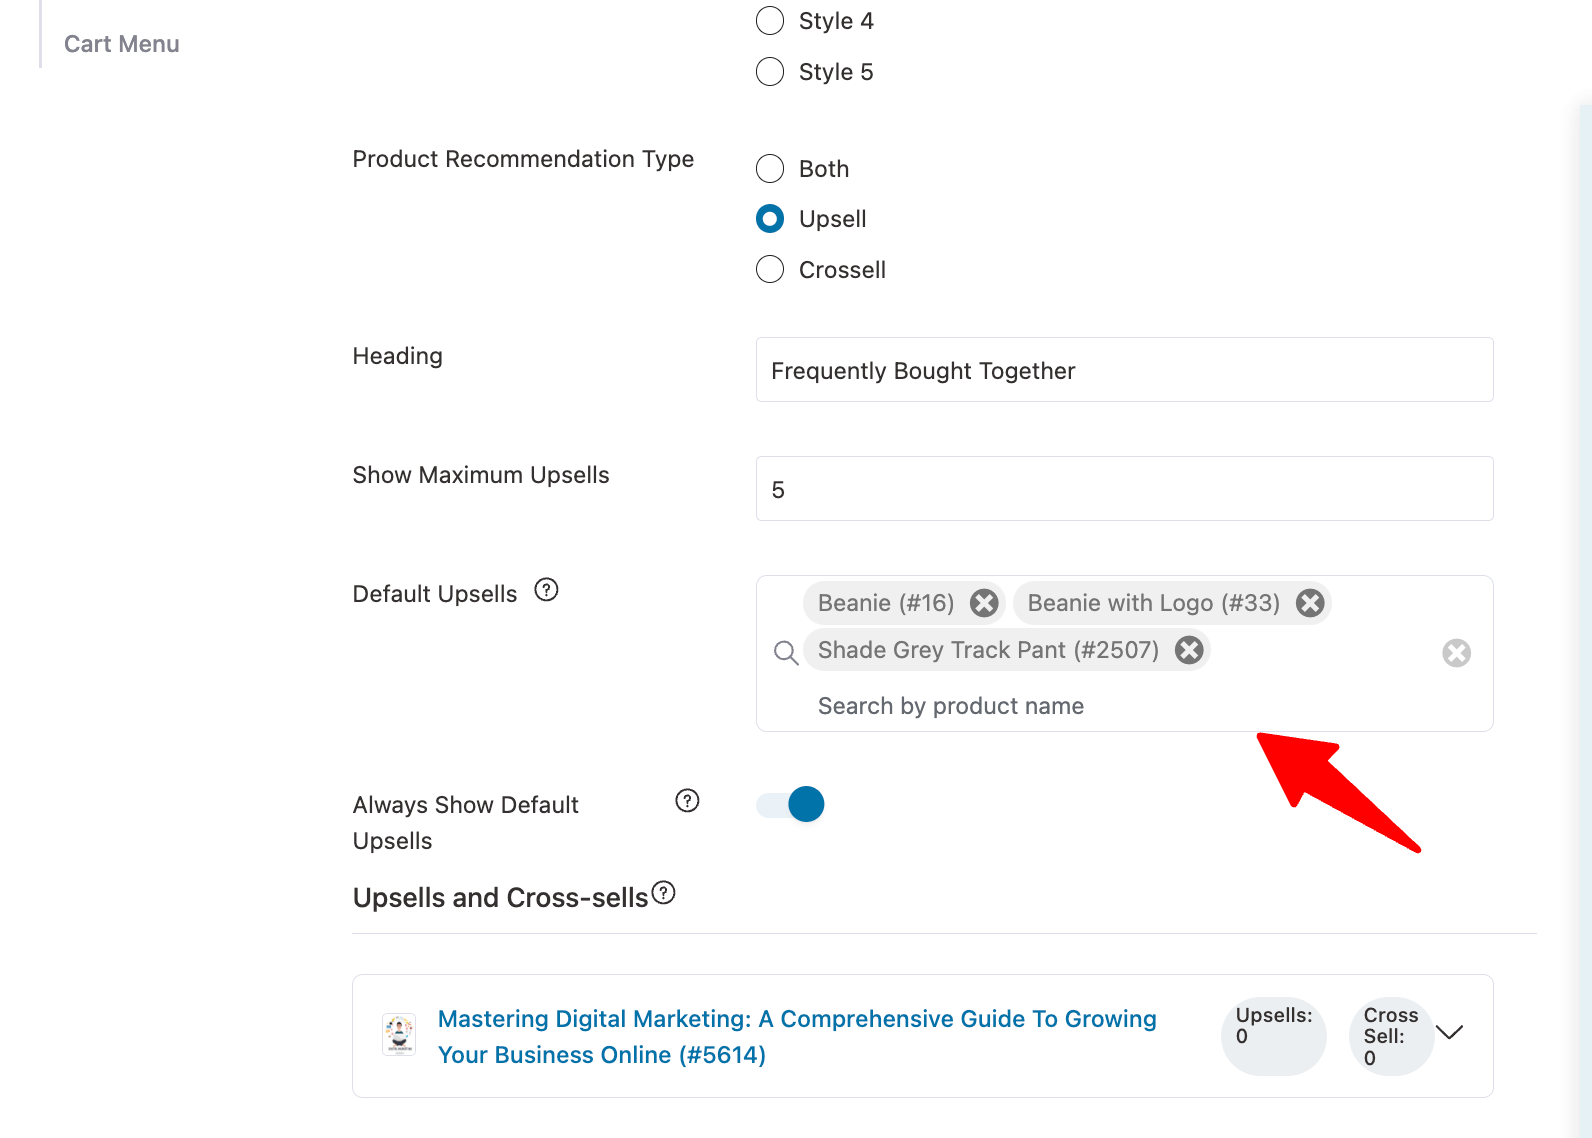
Step 4: Set up individual upsells and cross-sells
FunnelKit Cart has a sleek interface allowing you to add upsells and cross-sells from the cart setup page itself.
🔔 Note: This way, you don’t have to go back and forth to each WooCommerce product and edit to add upsell or cross, as we showed in methods 1 and 2.
To add upsell or cross to any product from the Funnel Cart page, click on the “View All Products” link under the “Upsells and Cross-sells” section.
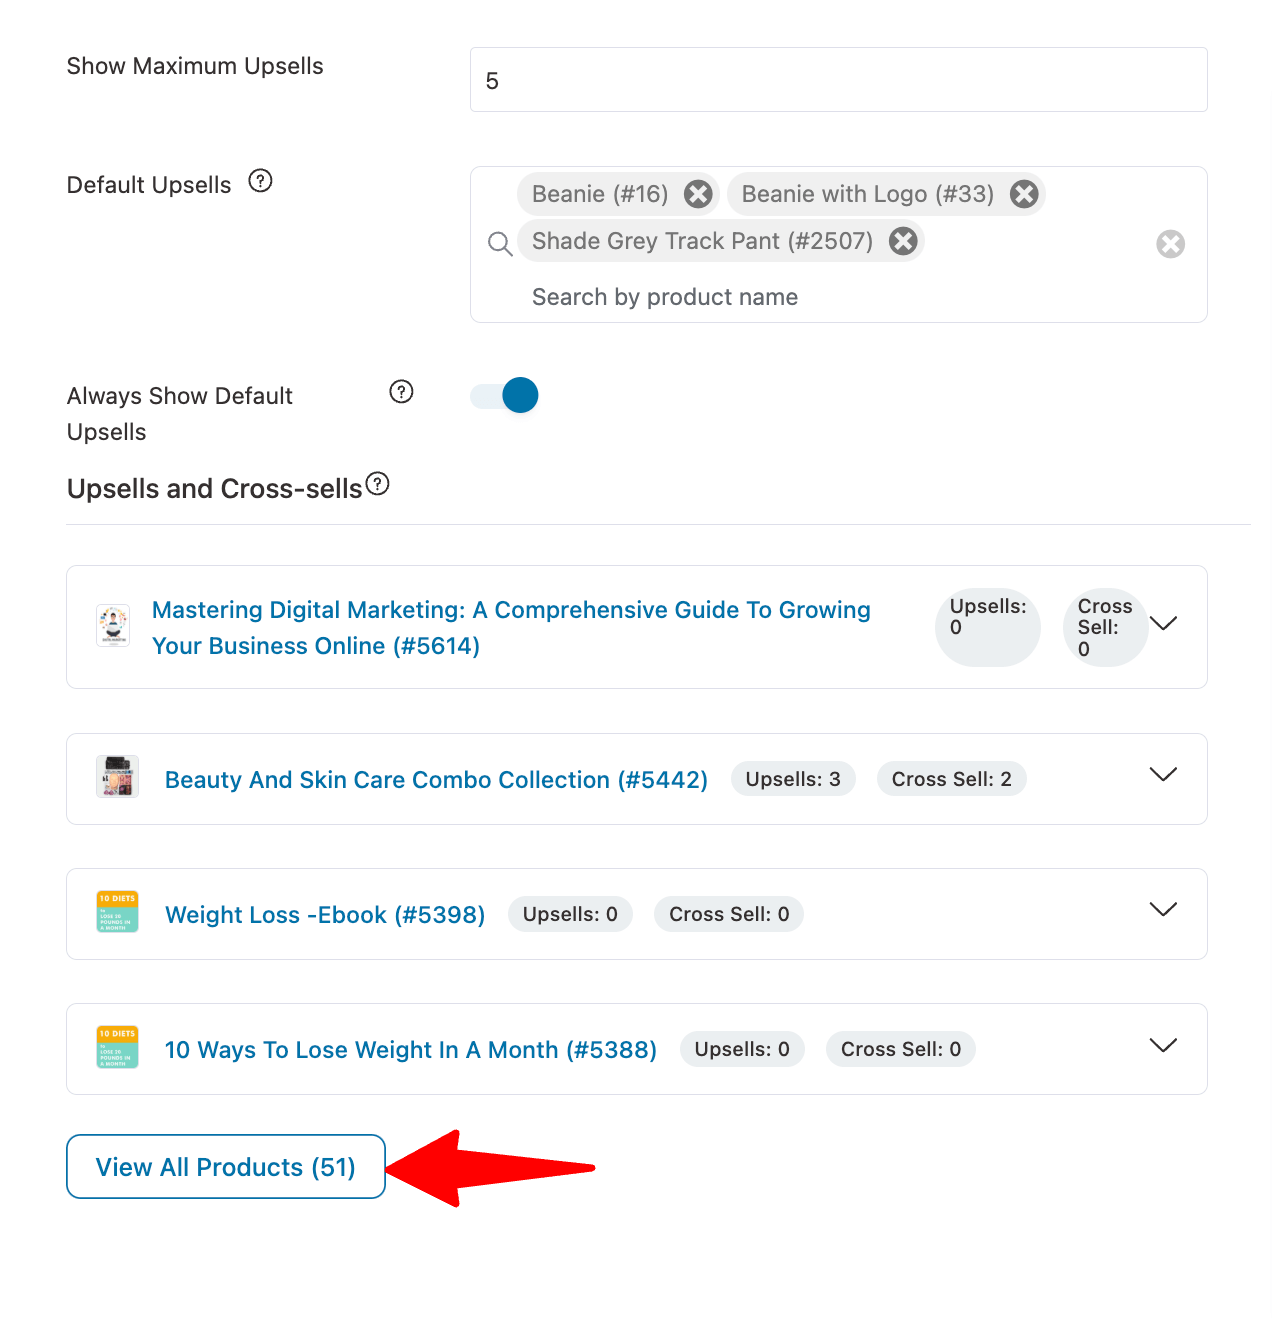
Now search for the product for which you want to add related products, expand, and add the upsell and cross-sell.
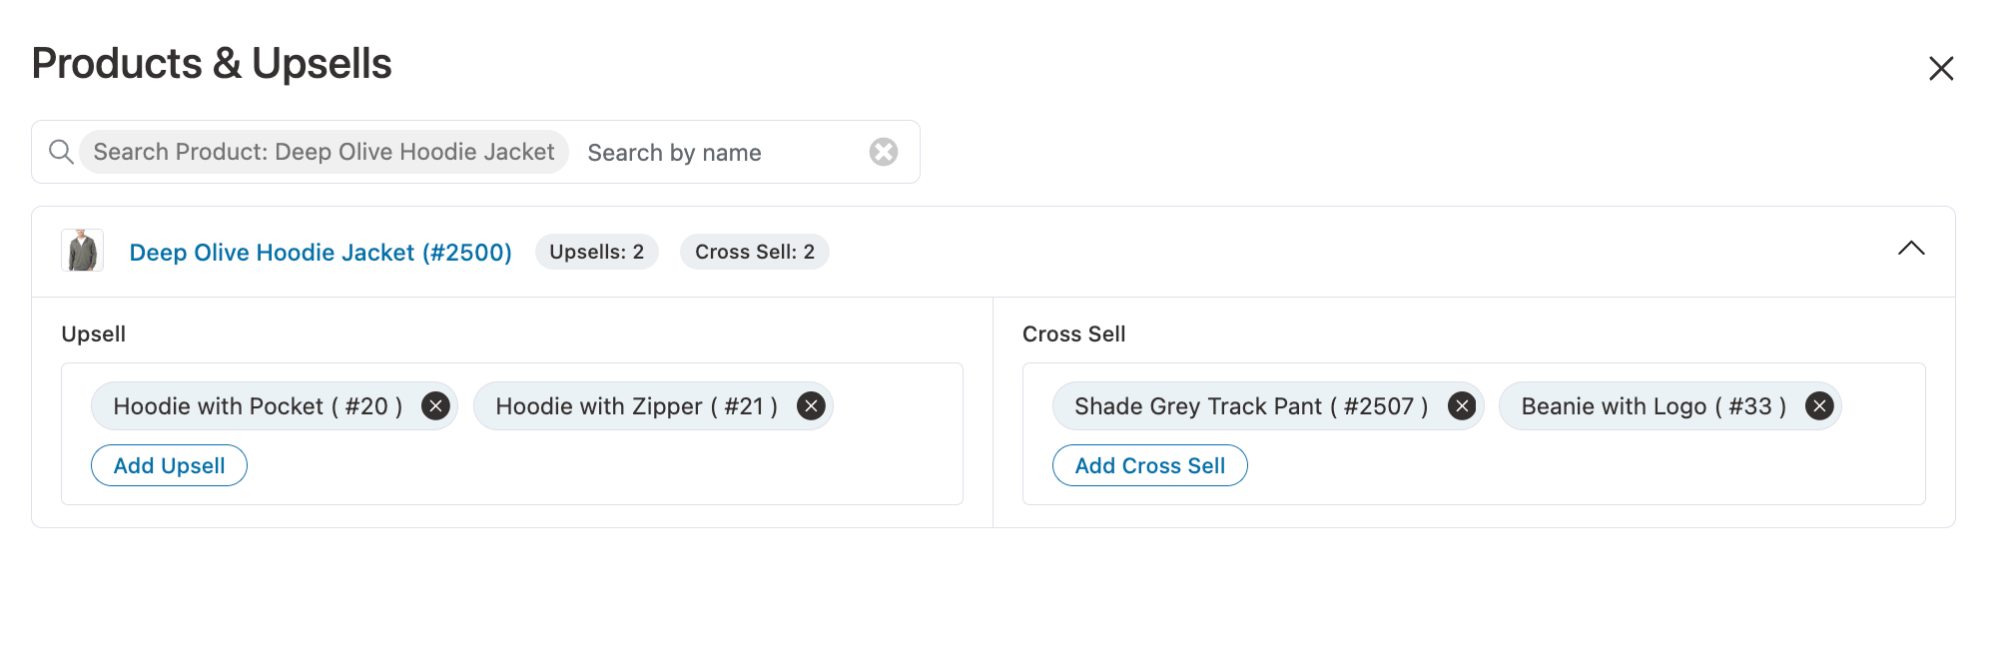
After adding the related product recommendations, click the Save button to update the settings you just modified.
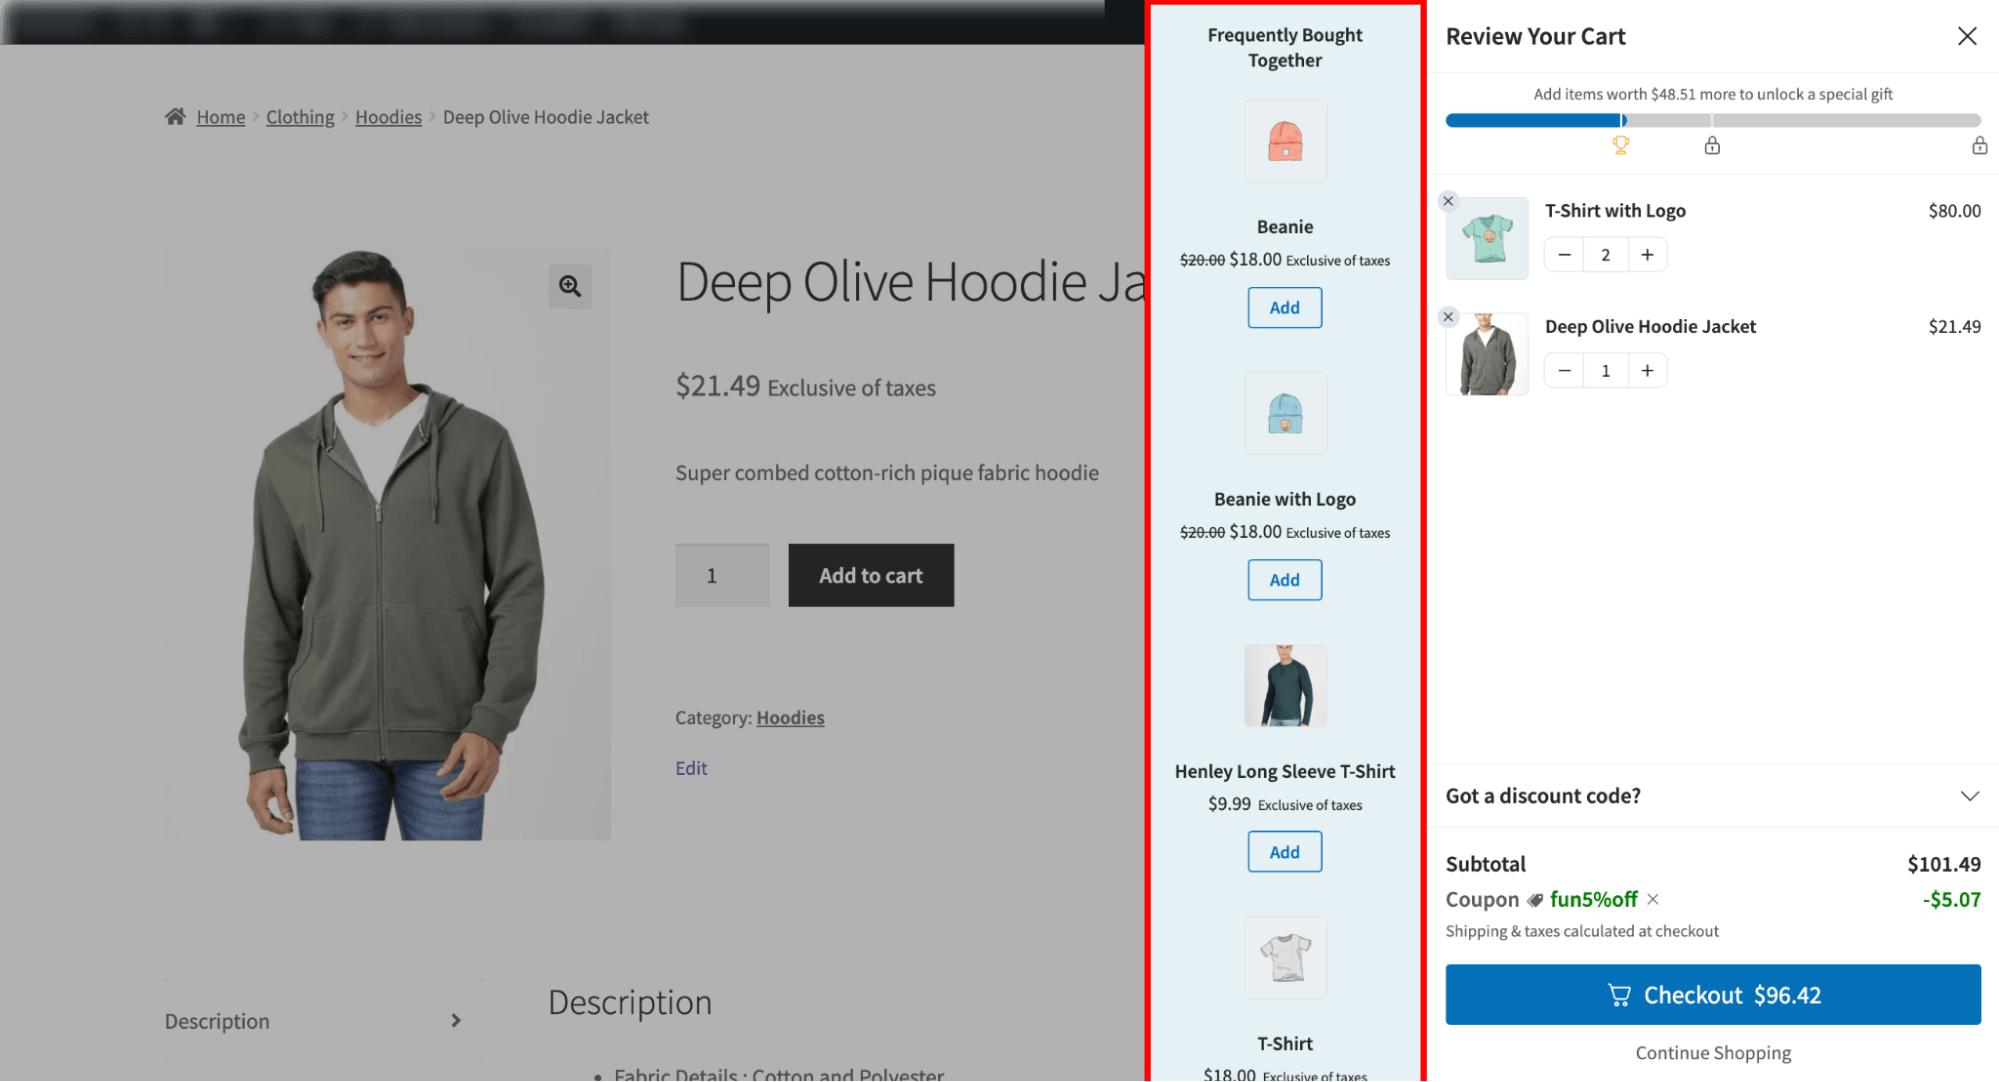
Here is a preview of how the related products in the Woocommerce sliding mini will look:
🔔 Note: With FunnelKit Cart, you can show mile-stone-based rewards to encourage users to add more items,as shown in the image below.
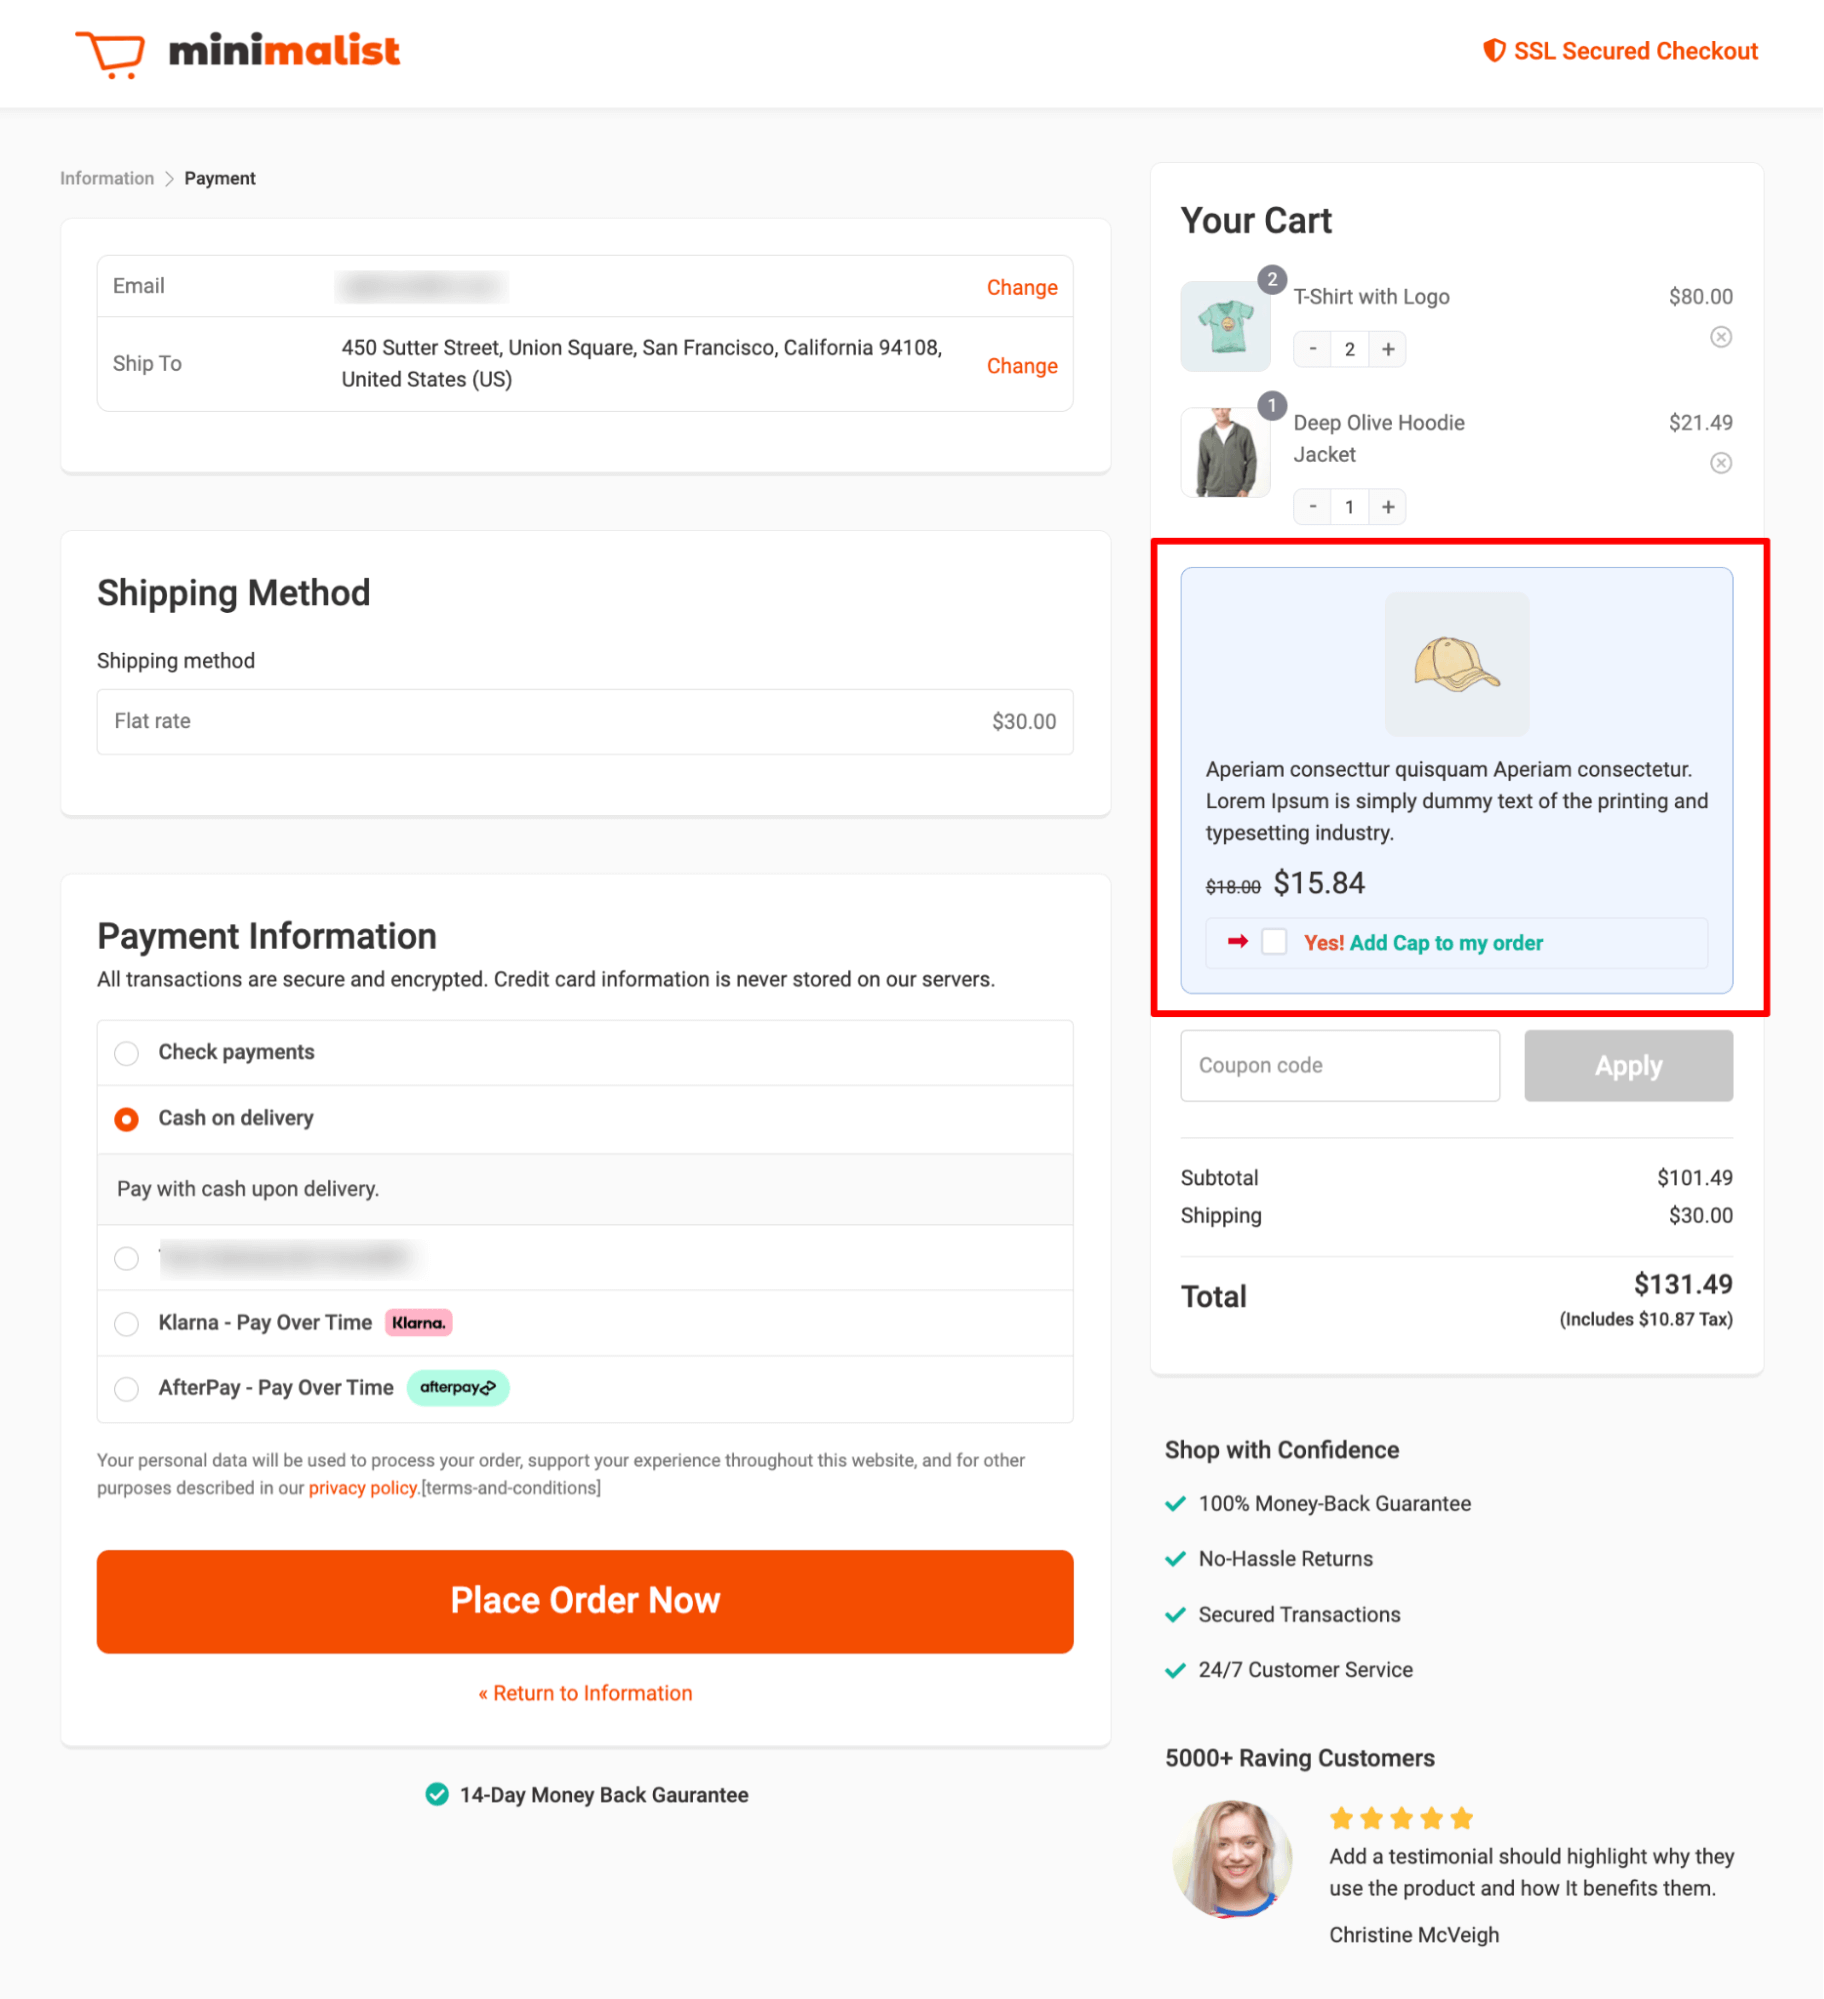
Method 4: Offer Related Product as Order Bump at Checkout Page?
Order bumps are related items that you can show up on the checkout page right before they hit the place order button that customers can accept with a single click.
This related product recommendation capitalizes on the user's current buying momentum, offering them a low-cost, relevant product that can be added to their order with a single click.
We will use FunnelKit Funnel Builder to offer related products as the order bump on the checkout page.
You need to install and activate both:
After activating the plugins, follow these steps:
Step 1: Create a store checkout
Firstly, we need to create a store checkout that will replace the default WooCommerce checkout page. To do so, navigate to FunnelKit ⇒ Store Checkout and click on “Create Store Checkout.”
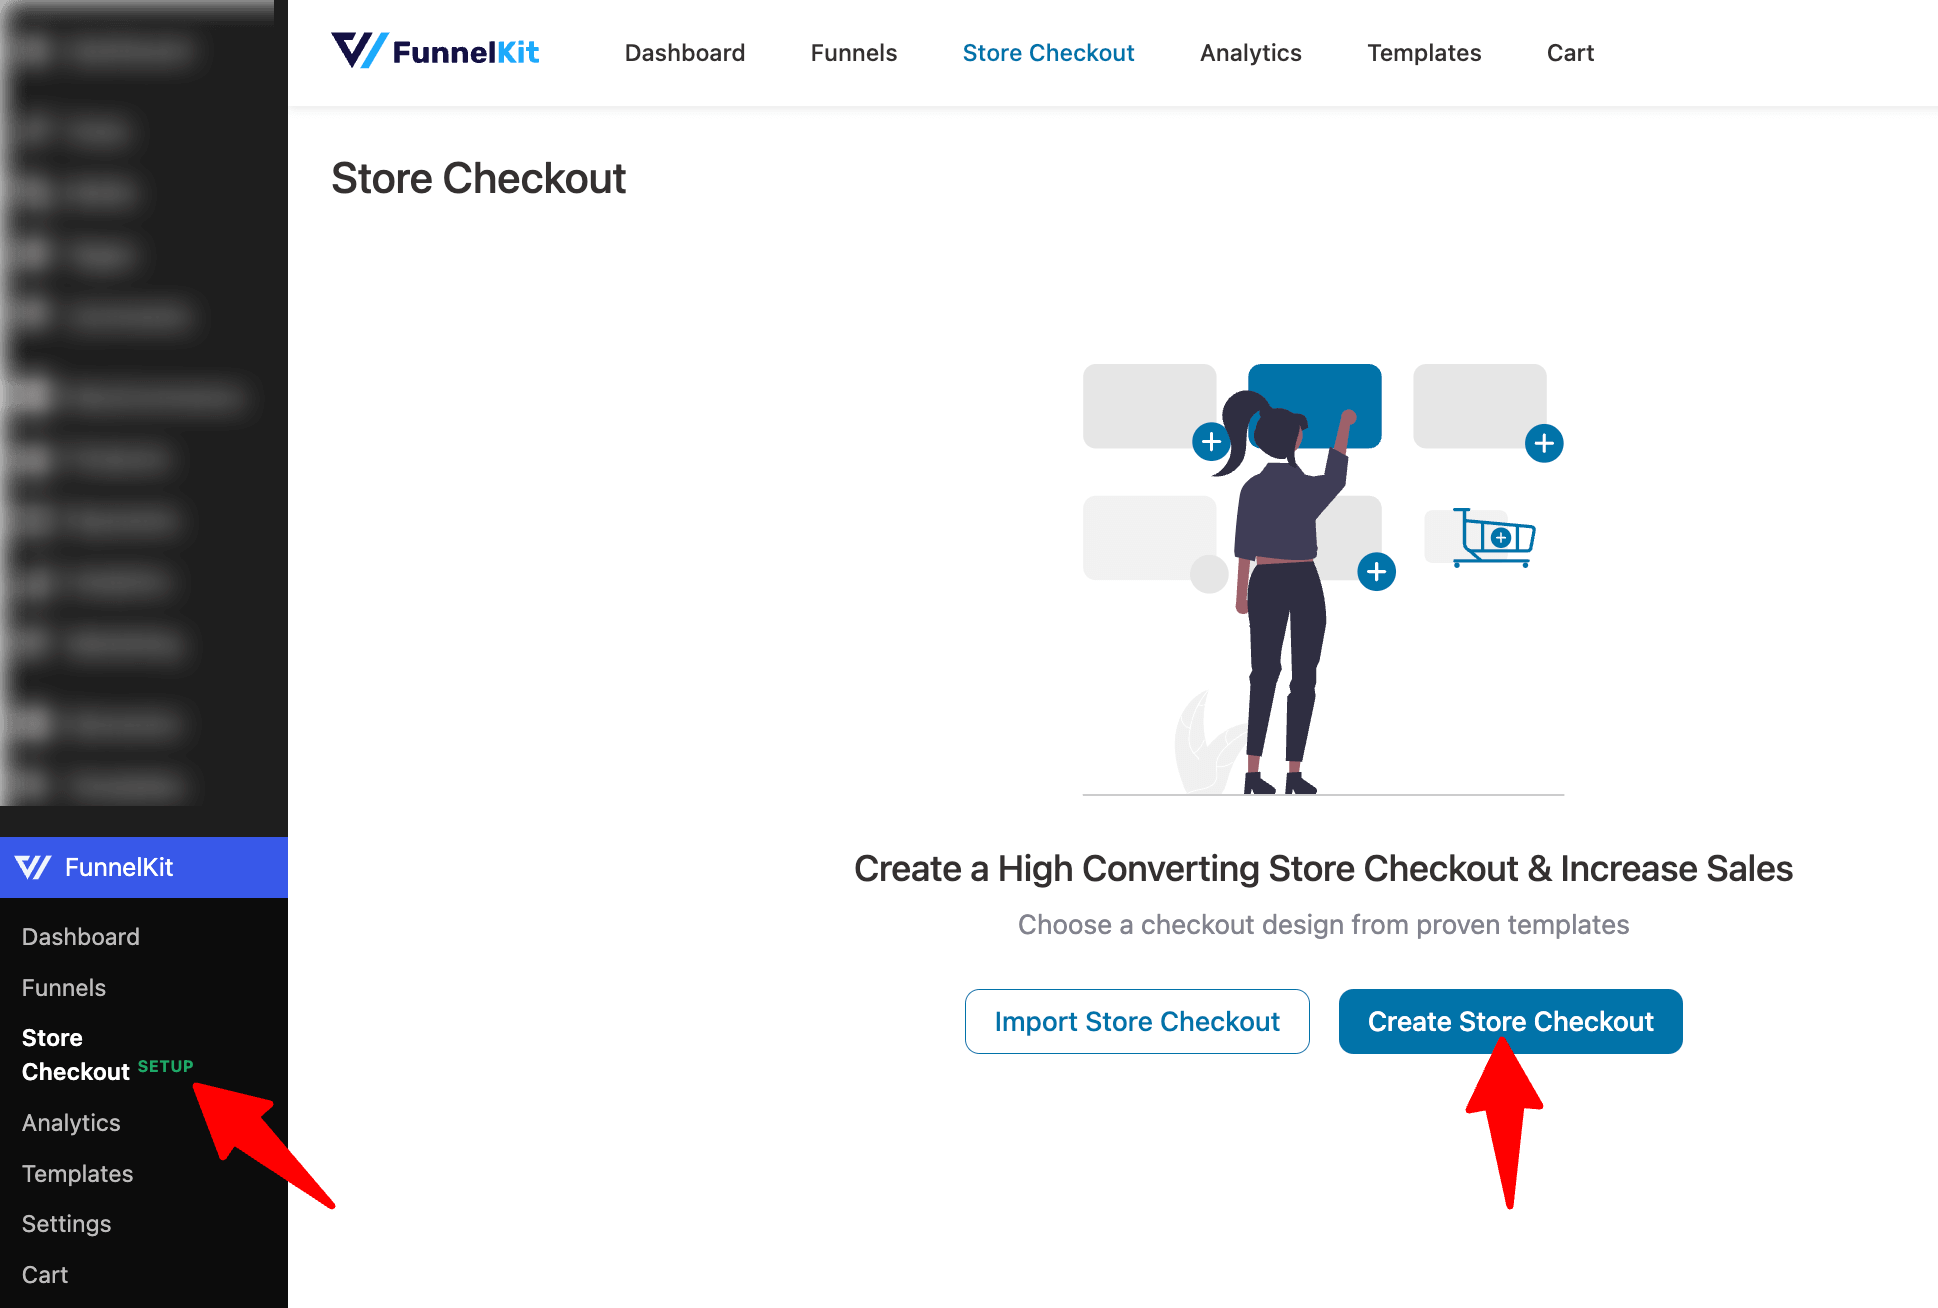
Now, choose your favorite page builder and then the template you like from the list of prebuilt ones. FunnelKit is compatible with all the popular page builders, including Elementor, Divi, Bricks, Oxygen, Gutenberg, etc.
Here, we are going with Elementor and Minimalist.

Now, choose whether you want a single-page checkout or a multi-page checkout. After that, click on “Import This Funnel,” provide a name, and click on "Done" to import this funnel as your default checkout.
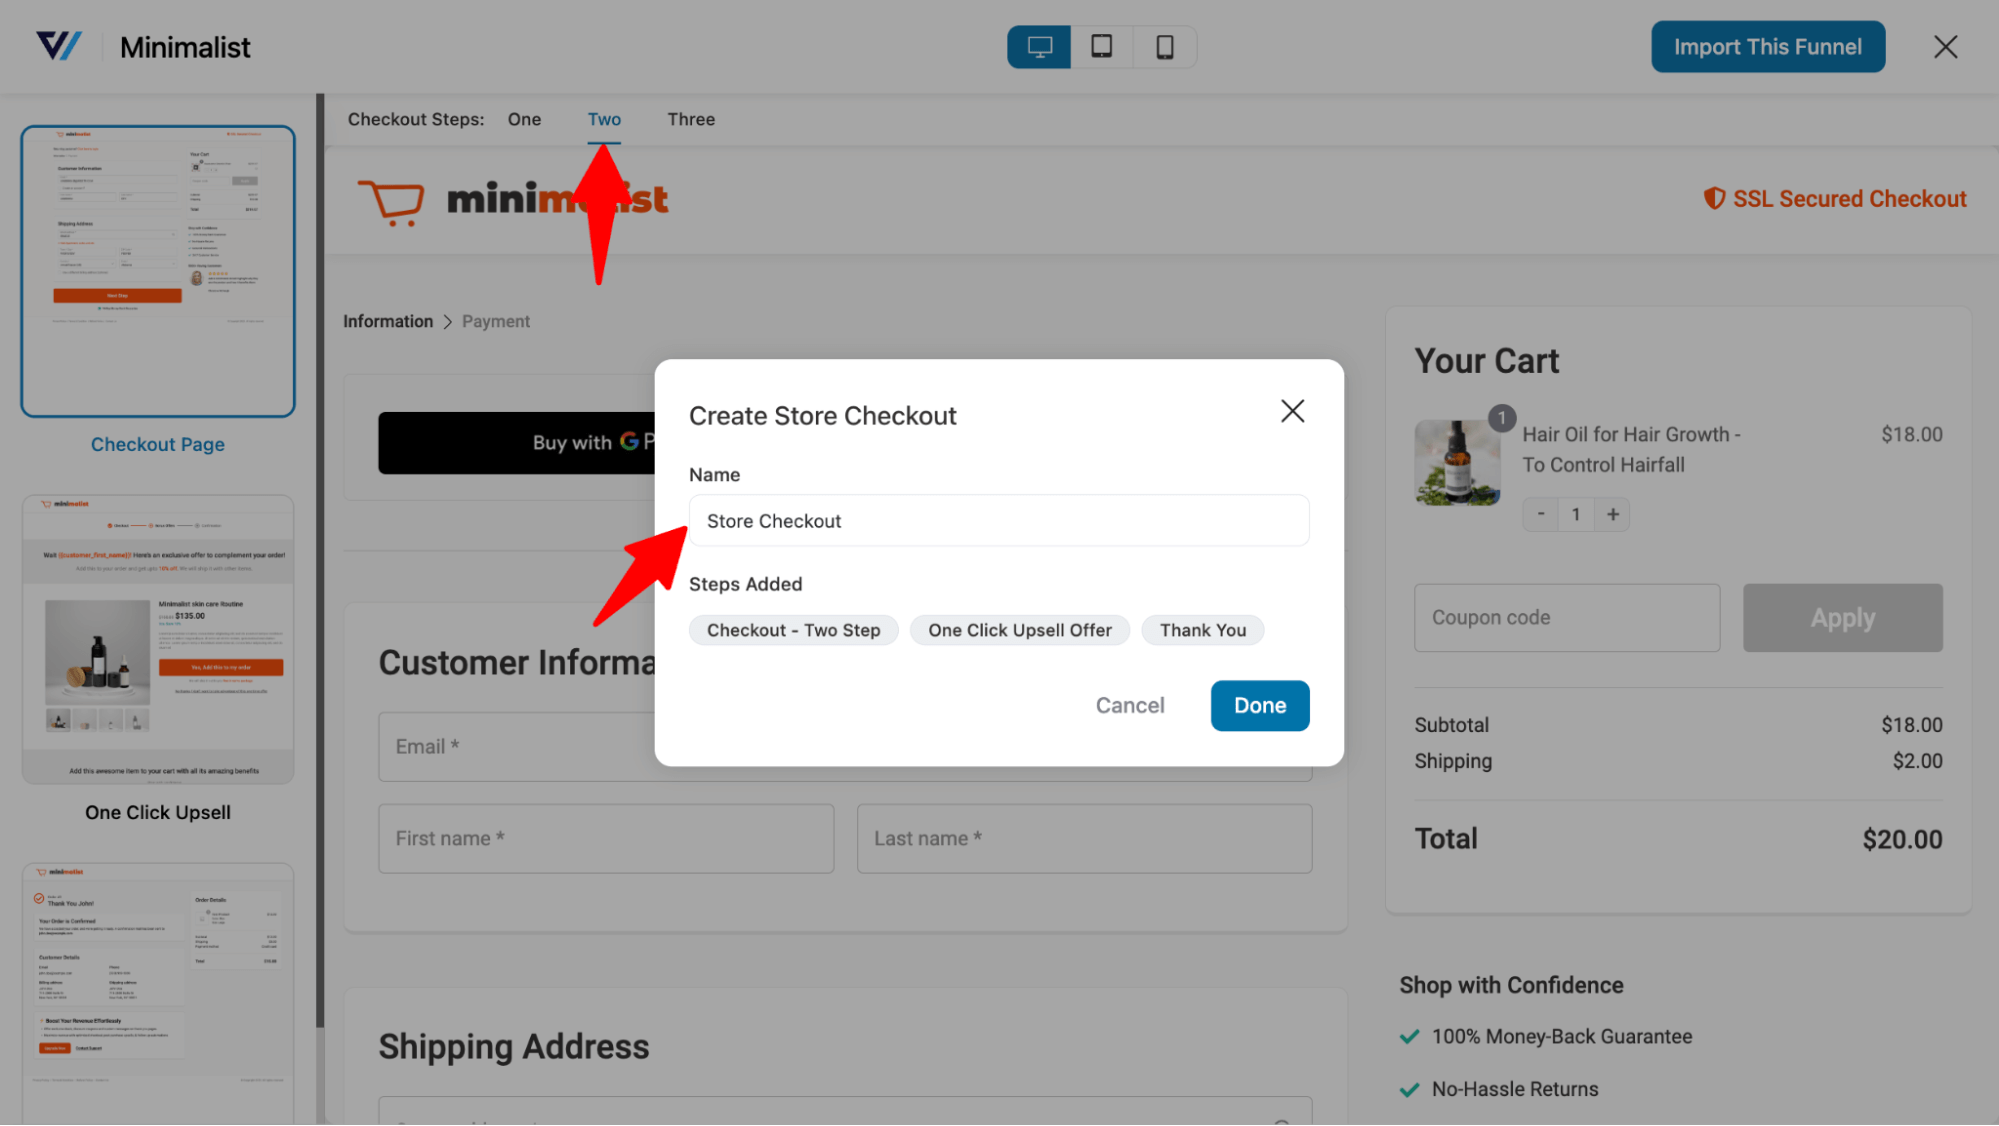
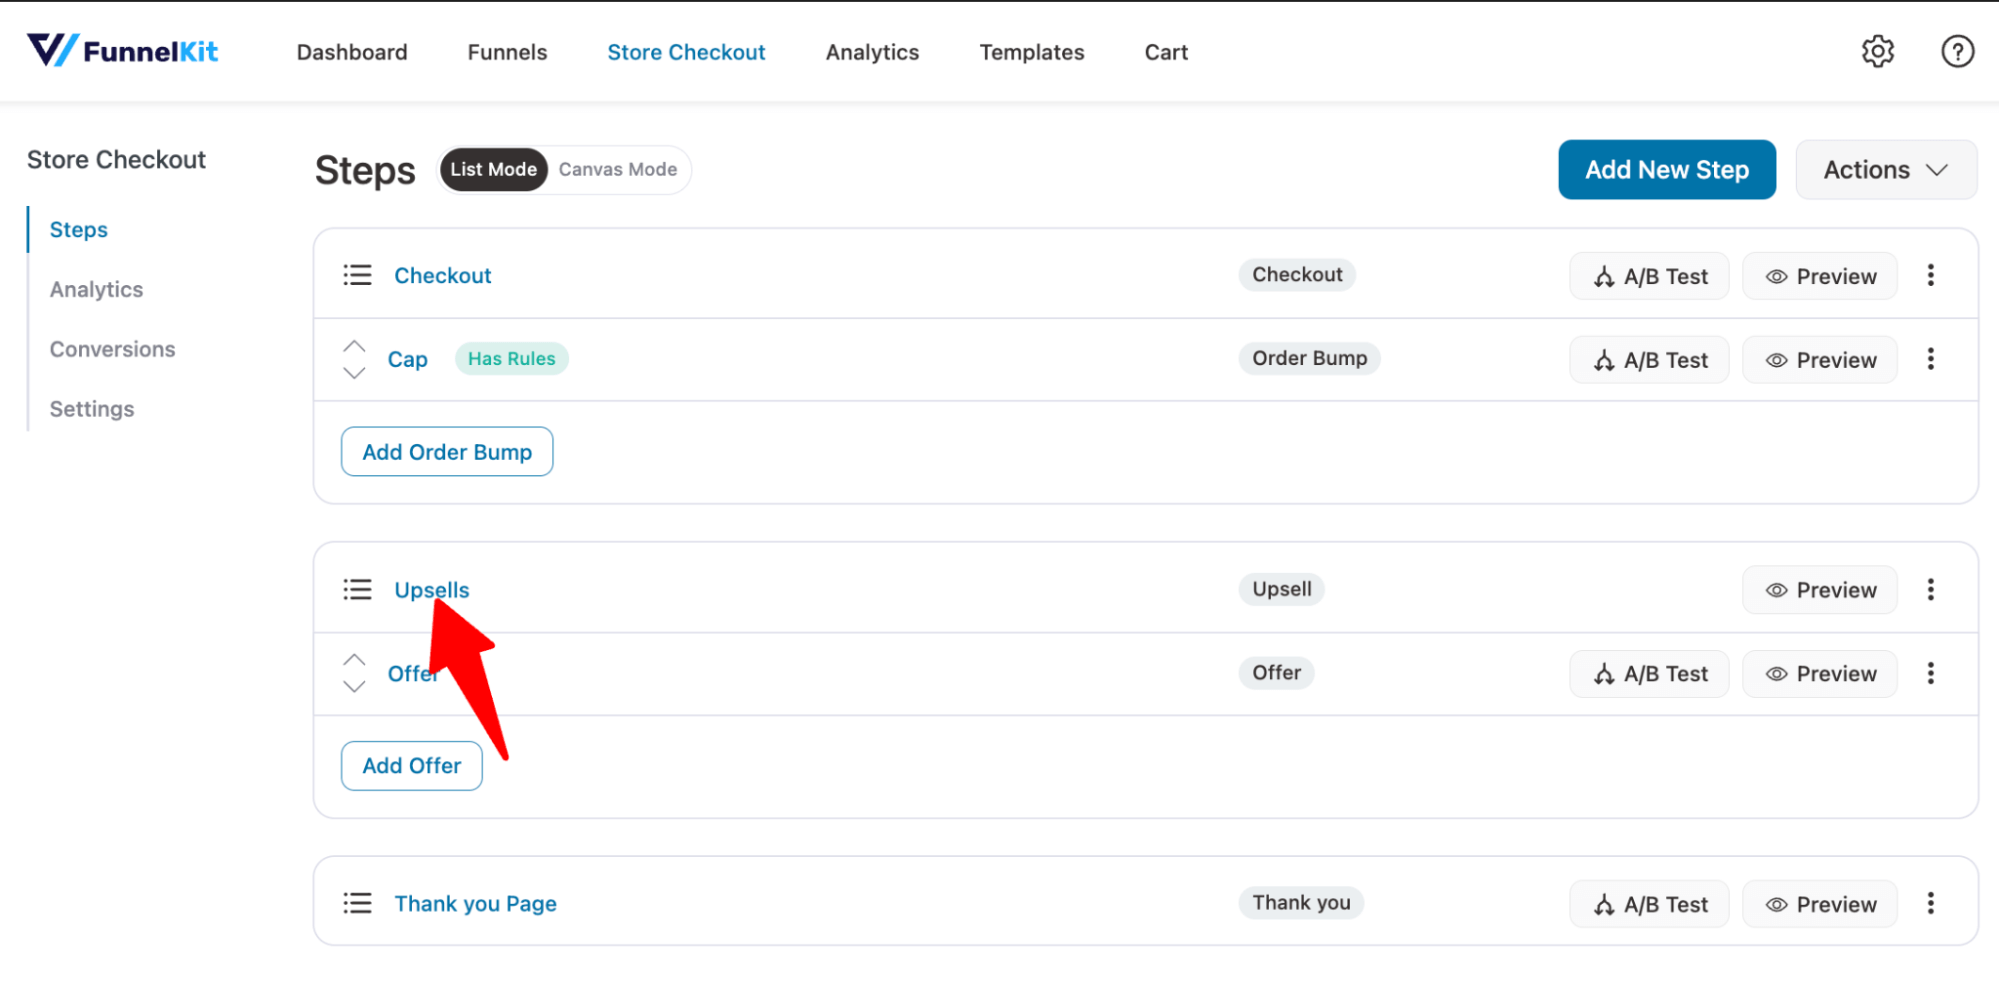
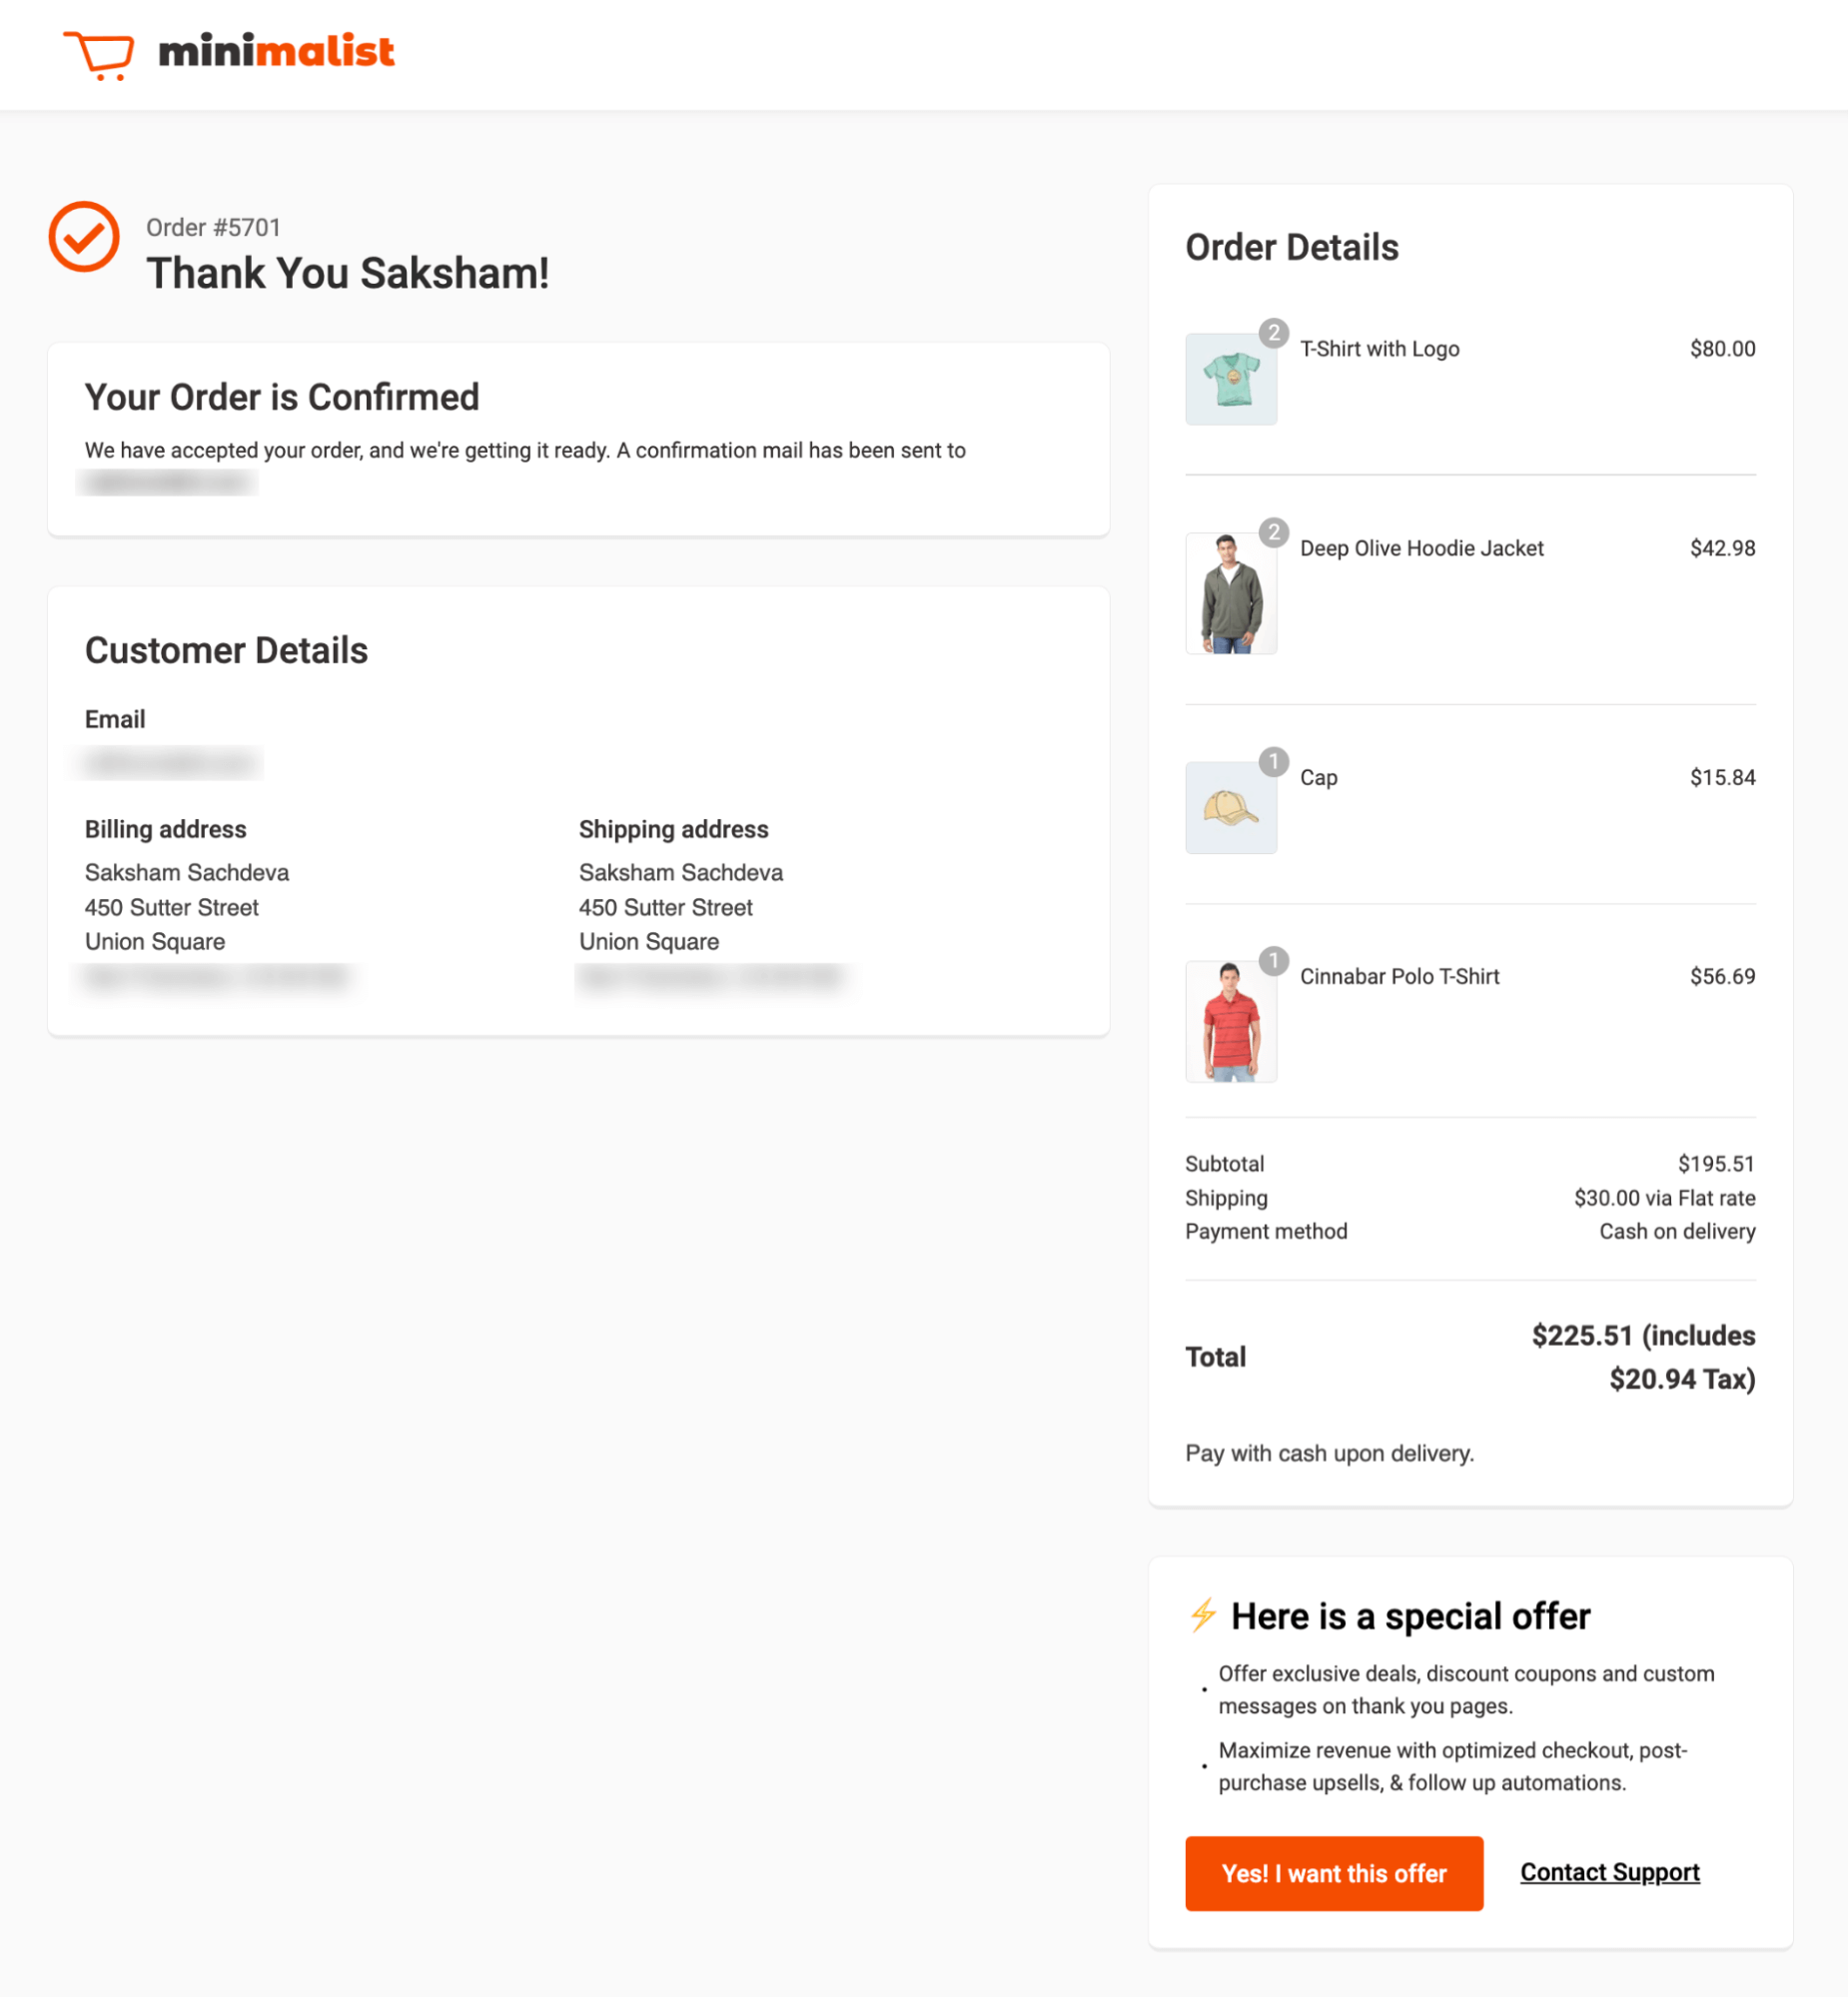
This will import a store checkout with three steps: checkout, one-click upsell, and a Thank you page.
🔔 Note: You can read our customization guide for the checkout and thank you pages. Also, you can read our blog on 23 WooCommerce Checkout Optimization Hacks.
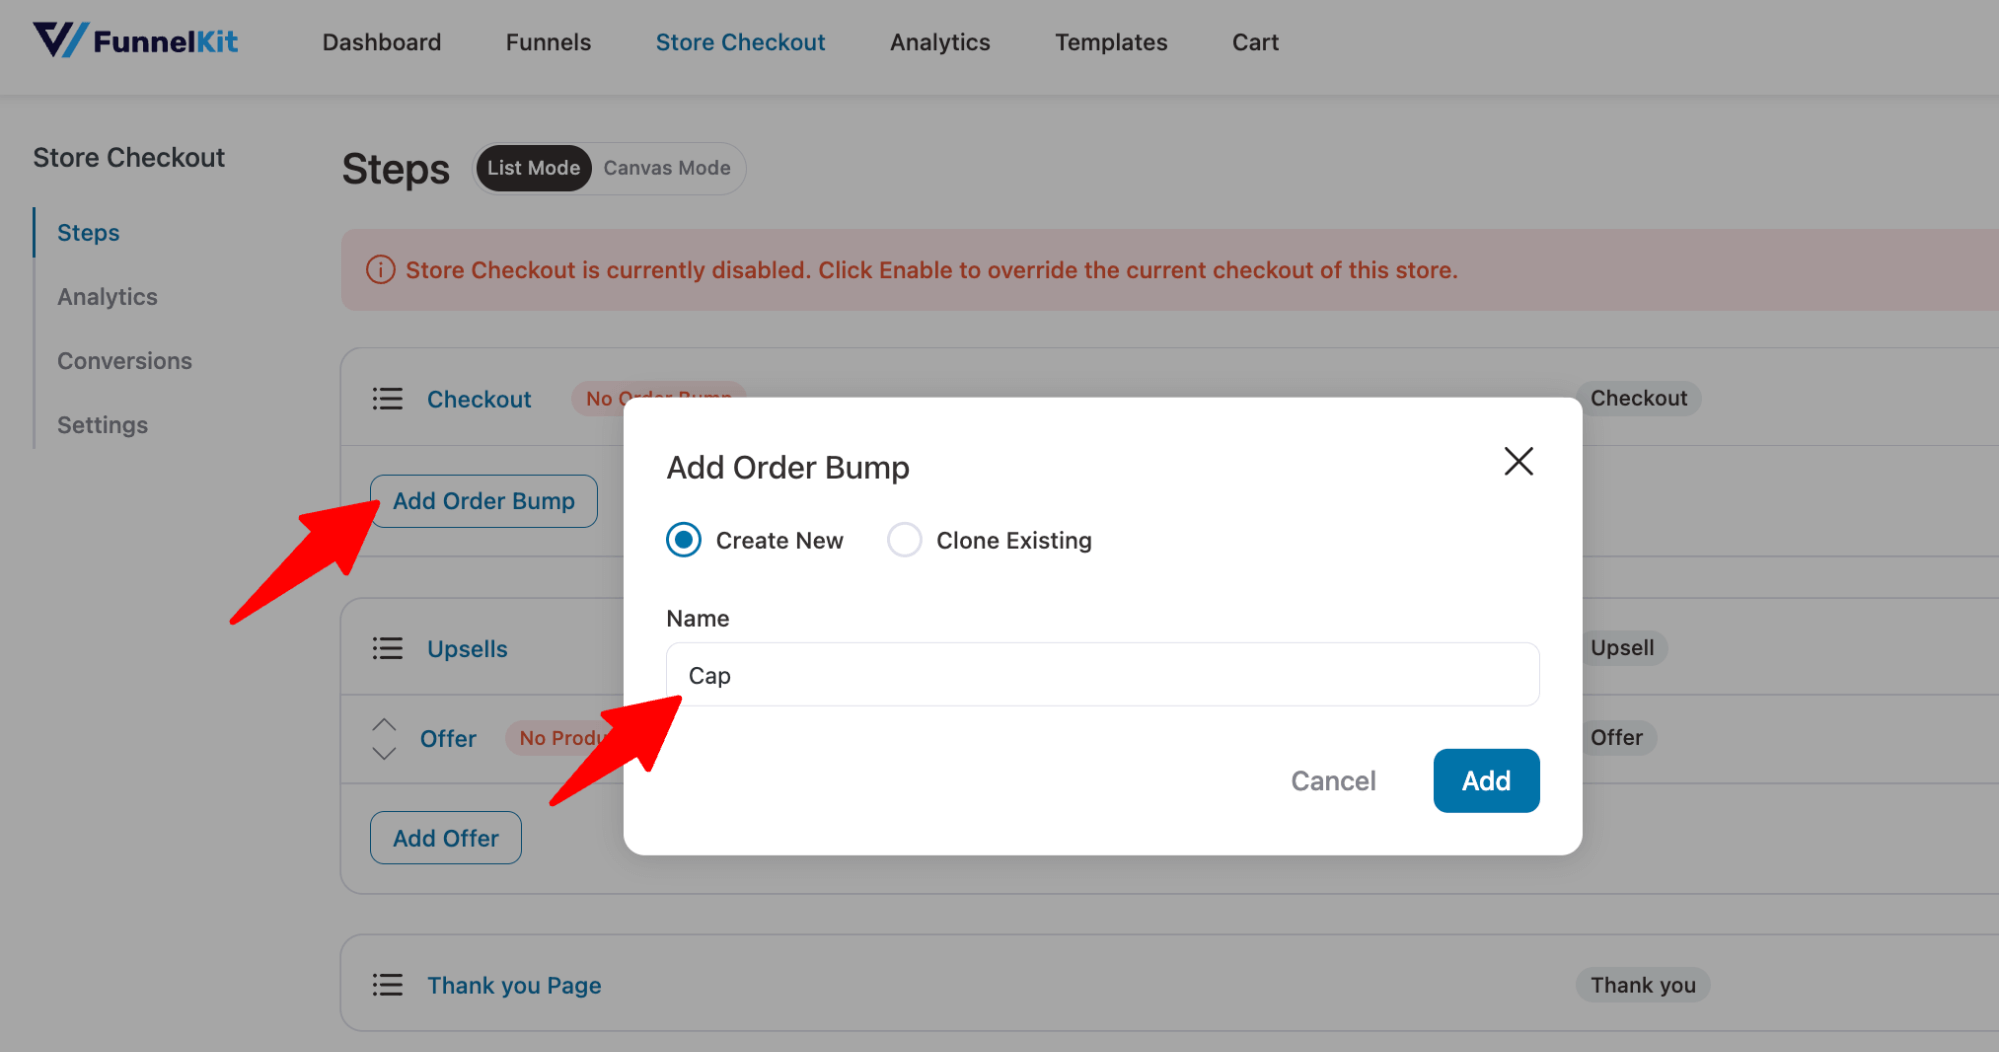
Step 2: Add the order bump offer
Now it’s time to configure the order bump offer. For that, click on “Add Order Bump,” provide a title, and click on Add.
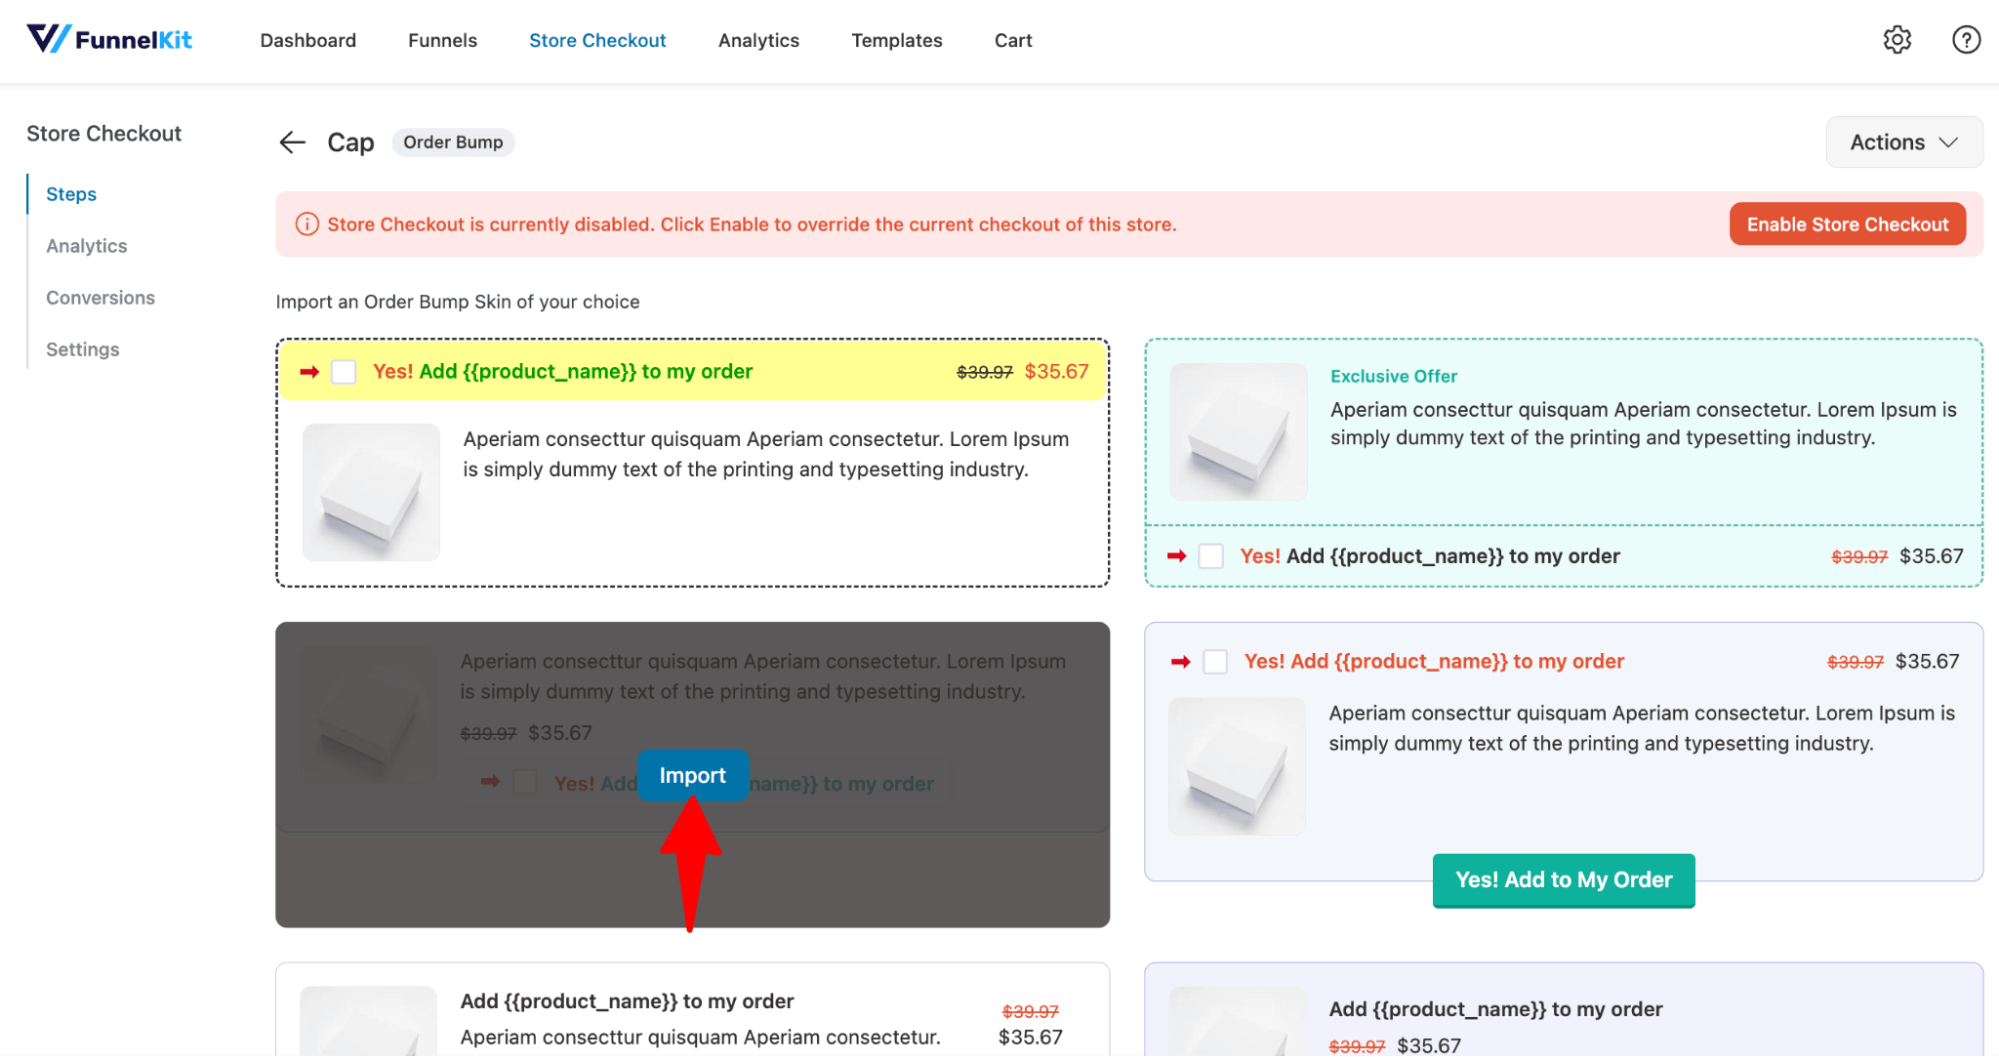
After that, choose an order for bump skin.
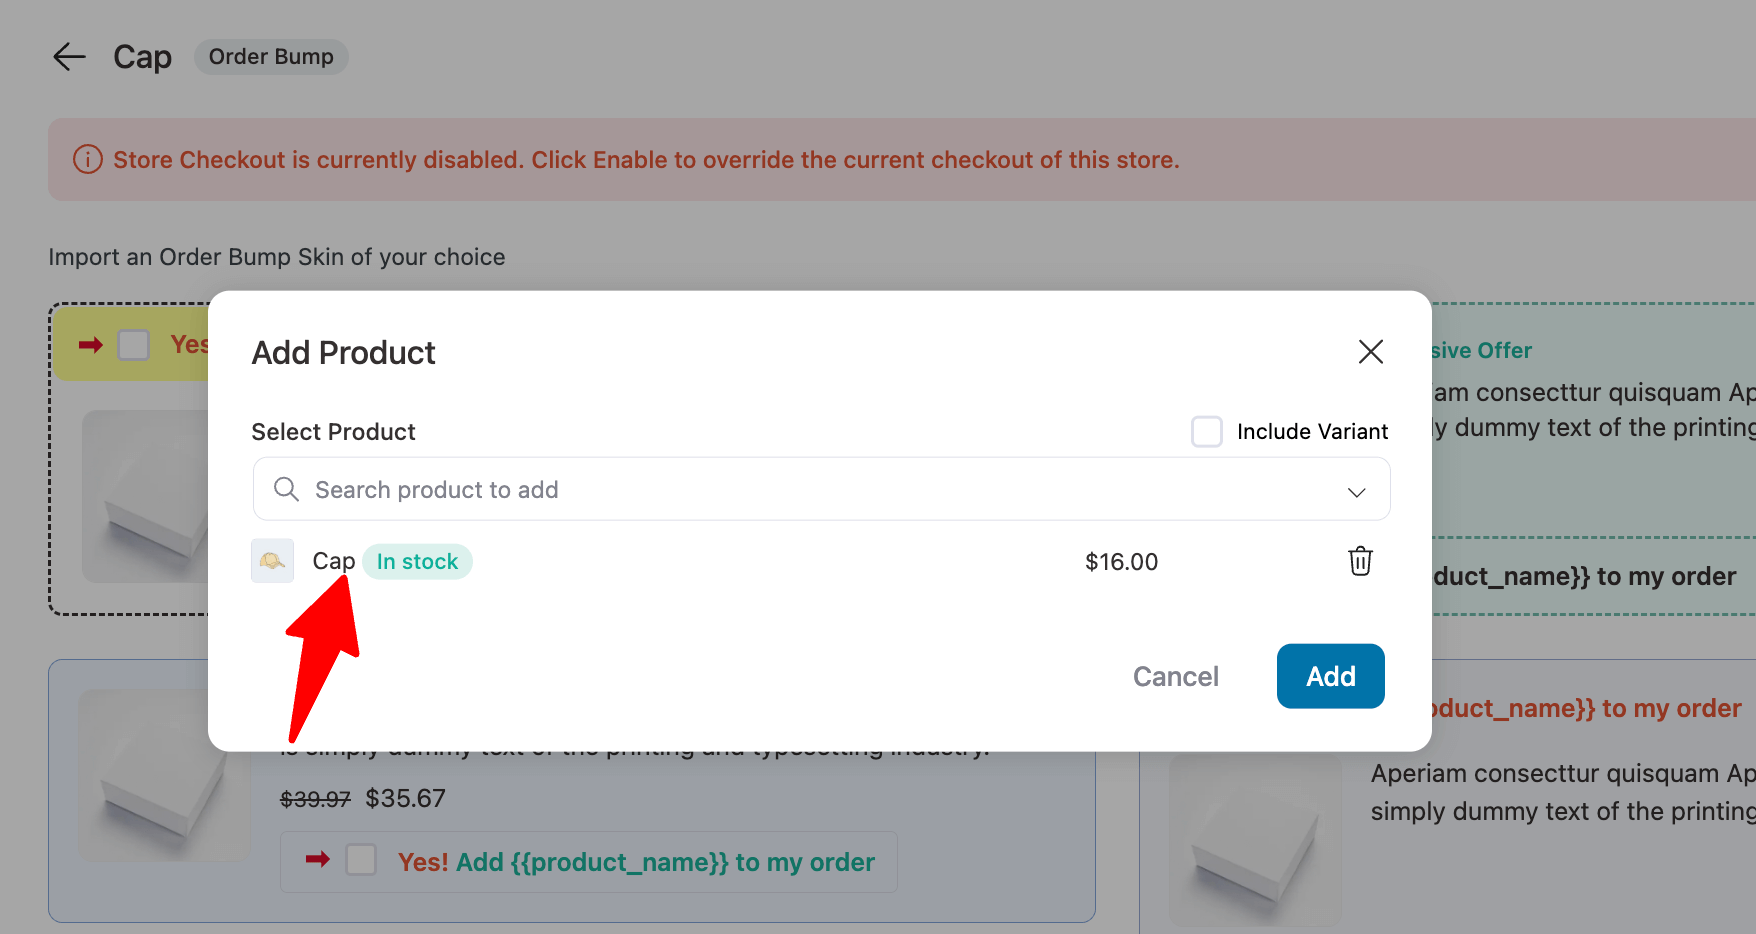
Now search for the product and click on Add.
This will add an order bump step to your store checkout funnel.
Step 3: Customize the content and style of order bump offers
Set the call-to-action text and description that will show up on the checkout page.
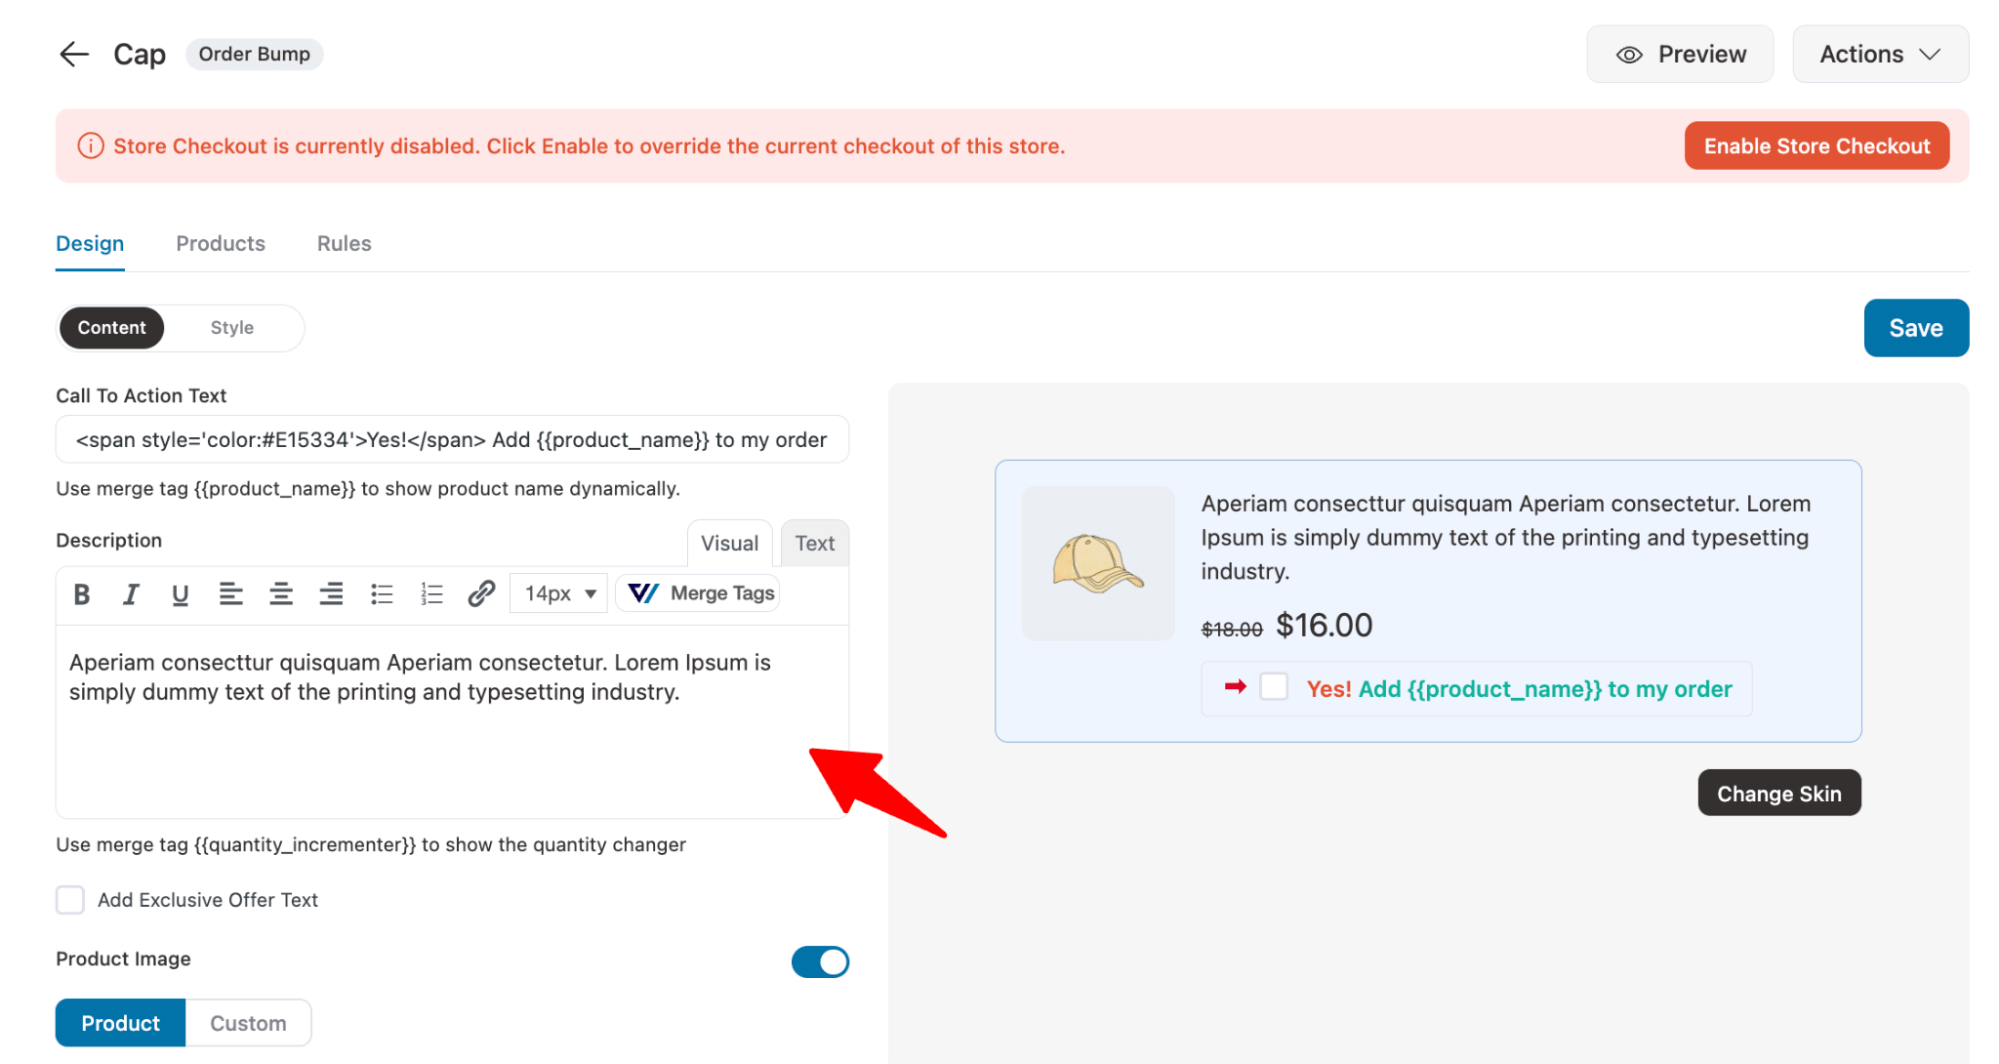
Move to the Style tab. Here you can choose the position where the order bump will show up on the checkout page.
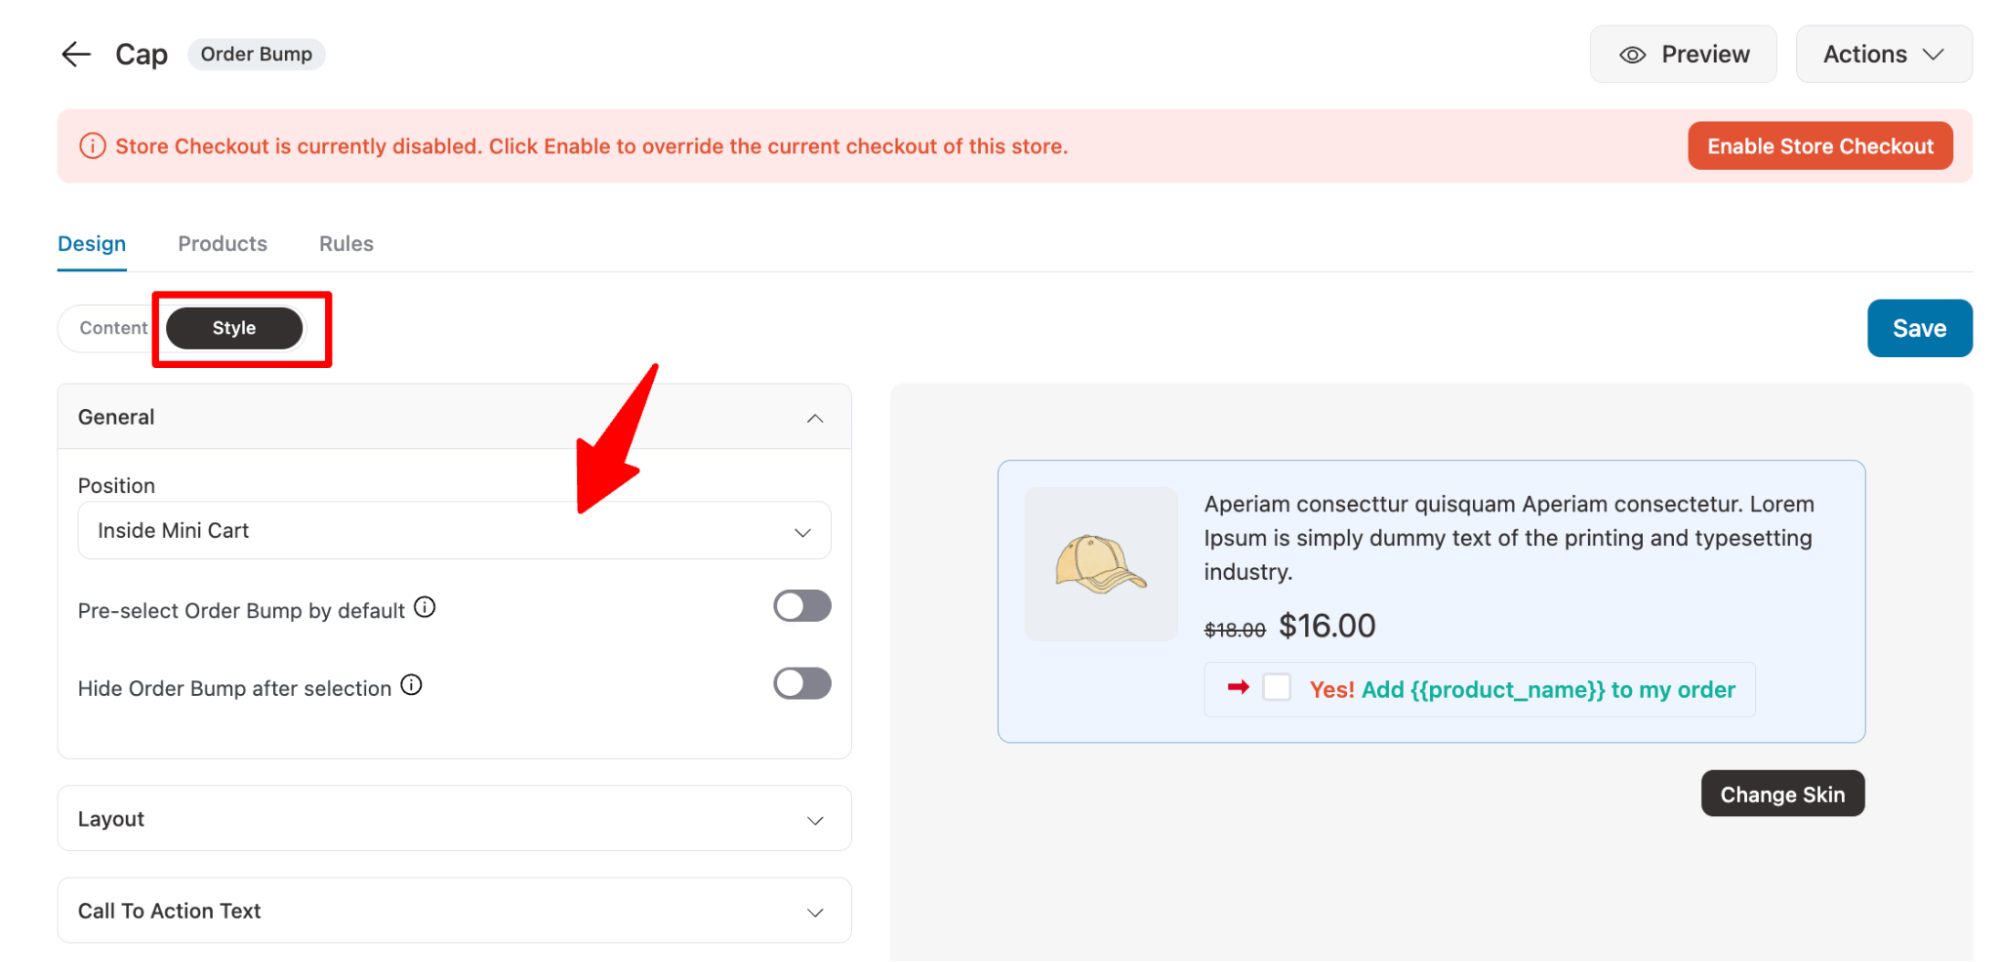
Make sure to click on Save to update the changes.
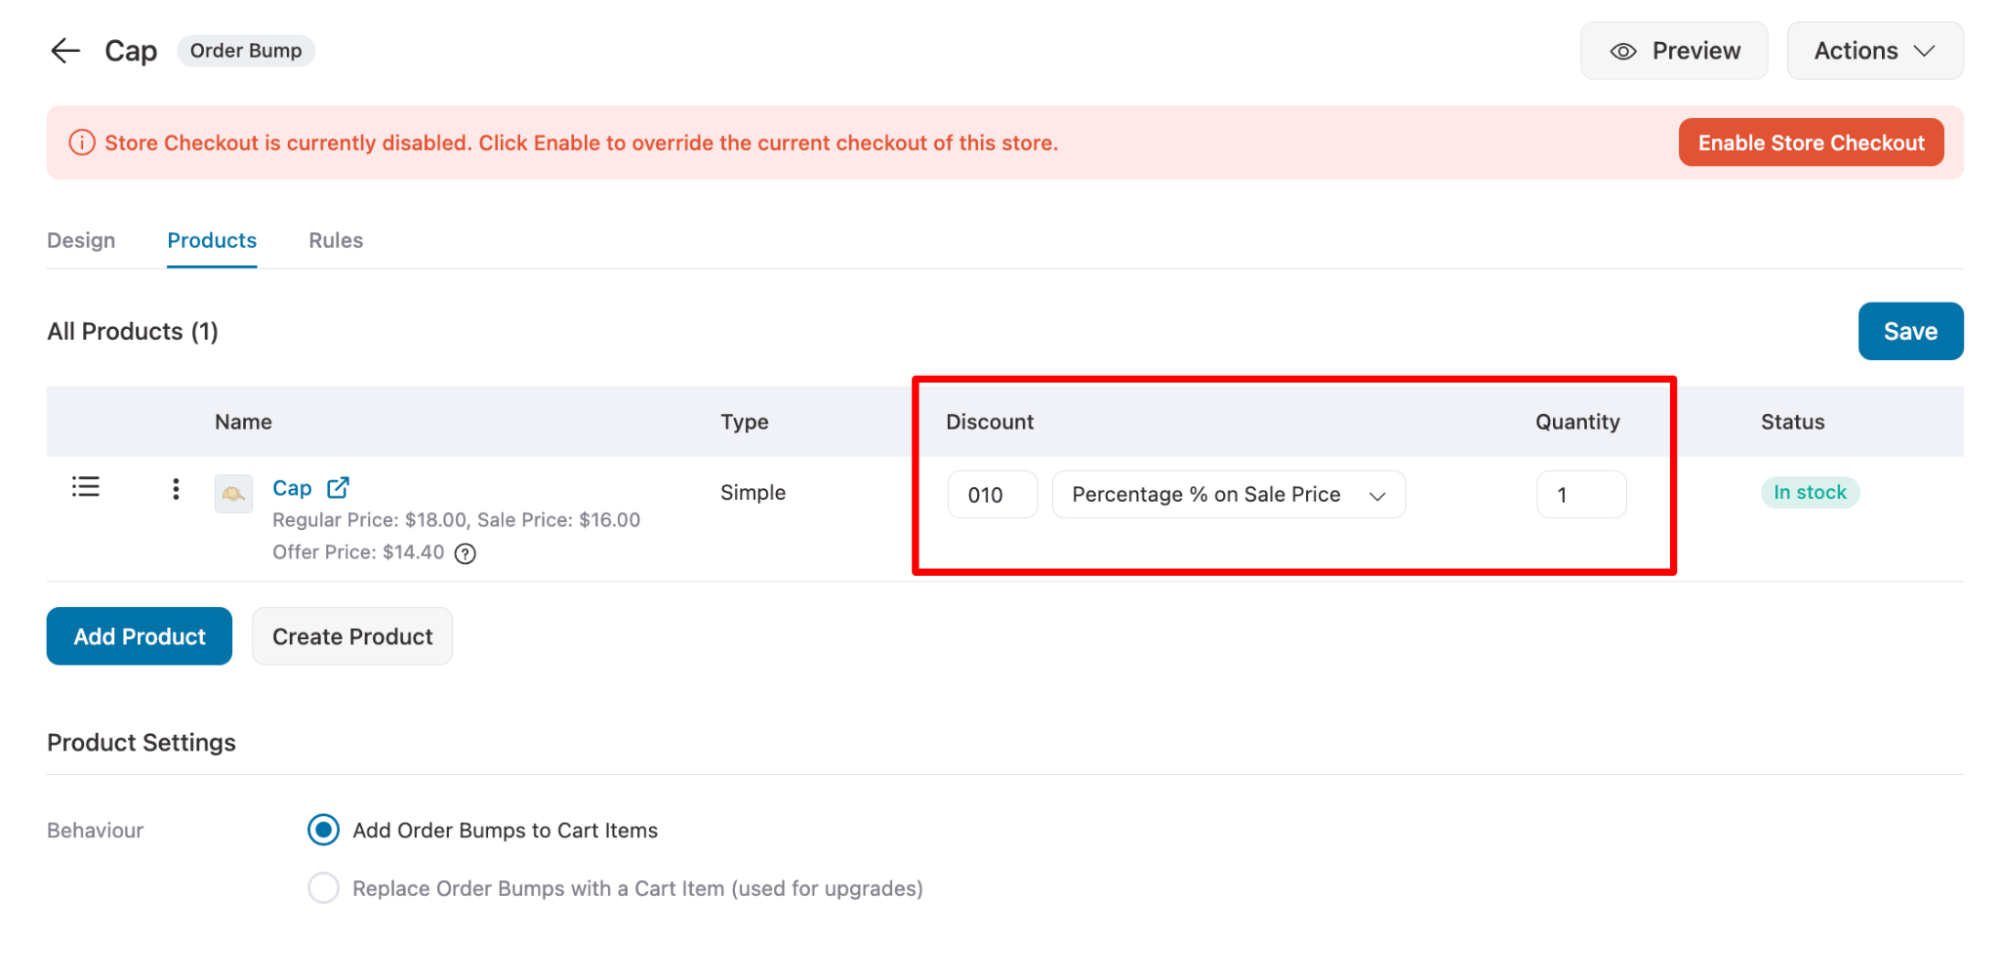
Next, move to the products tab to set the product quantity and discount.
Step 4: Add conditions order bump offer (optional)
To make the related product offer more relevant, you can set different conditions using the Rules Engine.
For example, trigger order bumps for those who buy from a certain category or previously purchased a certain item.
To do so, move to the Rules tab and click on “Add Rules”. Next, select the parameter, condition, and value. Add multiple rules based on your strategy.
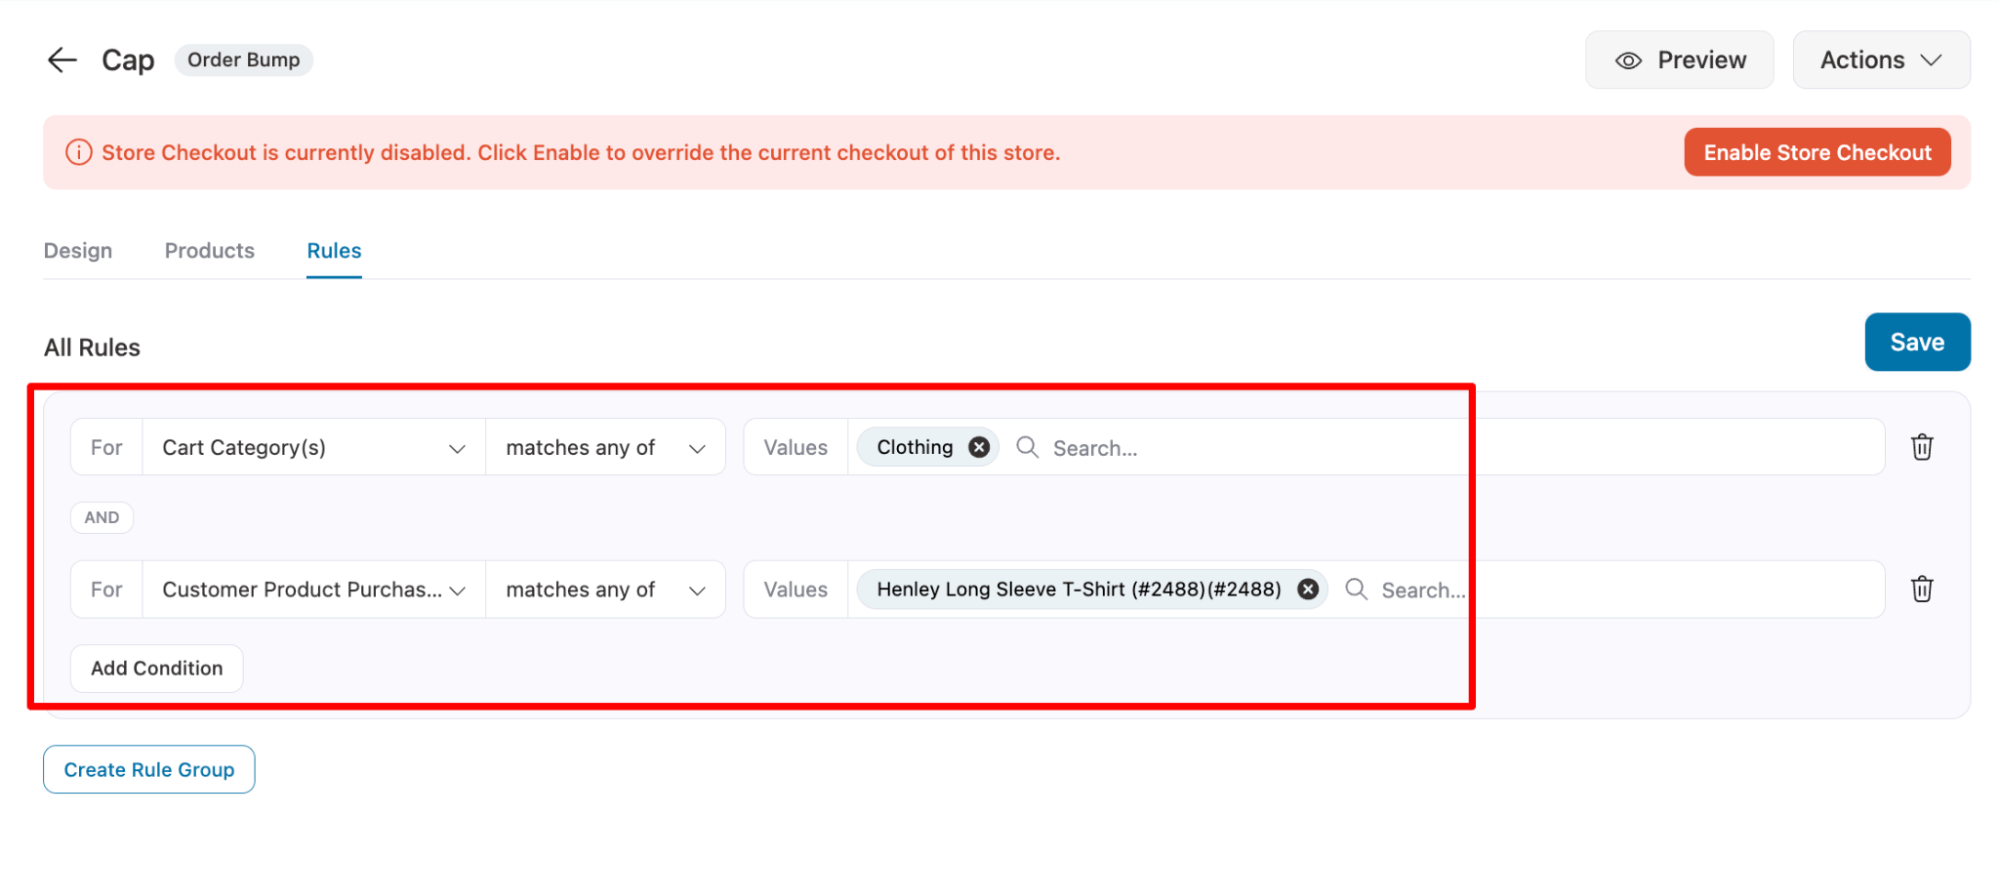
Make sure to click on Save.
Step 5: Activate the store checkout
Lastly, enable the “Enable Store Checkout” option.
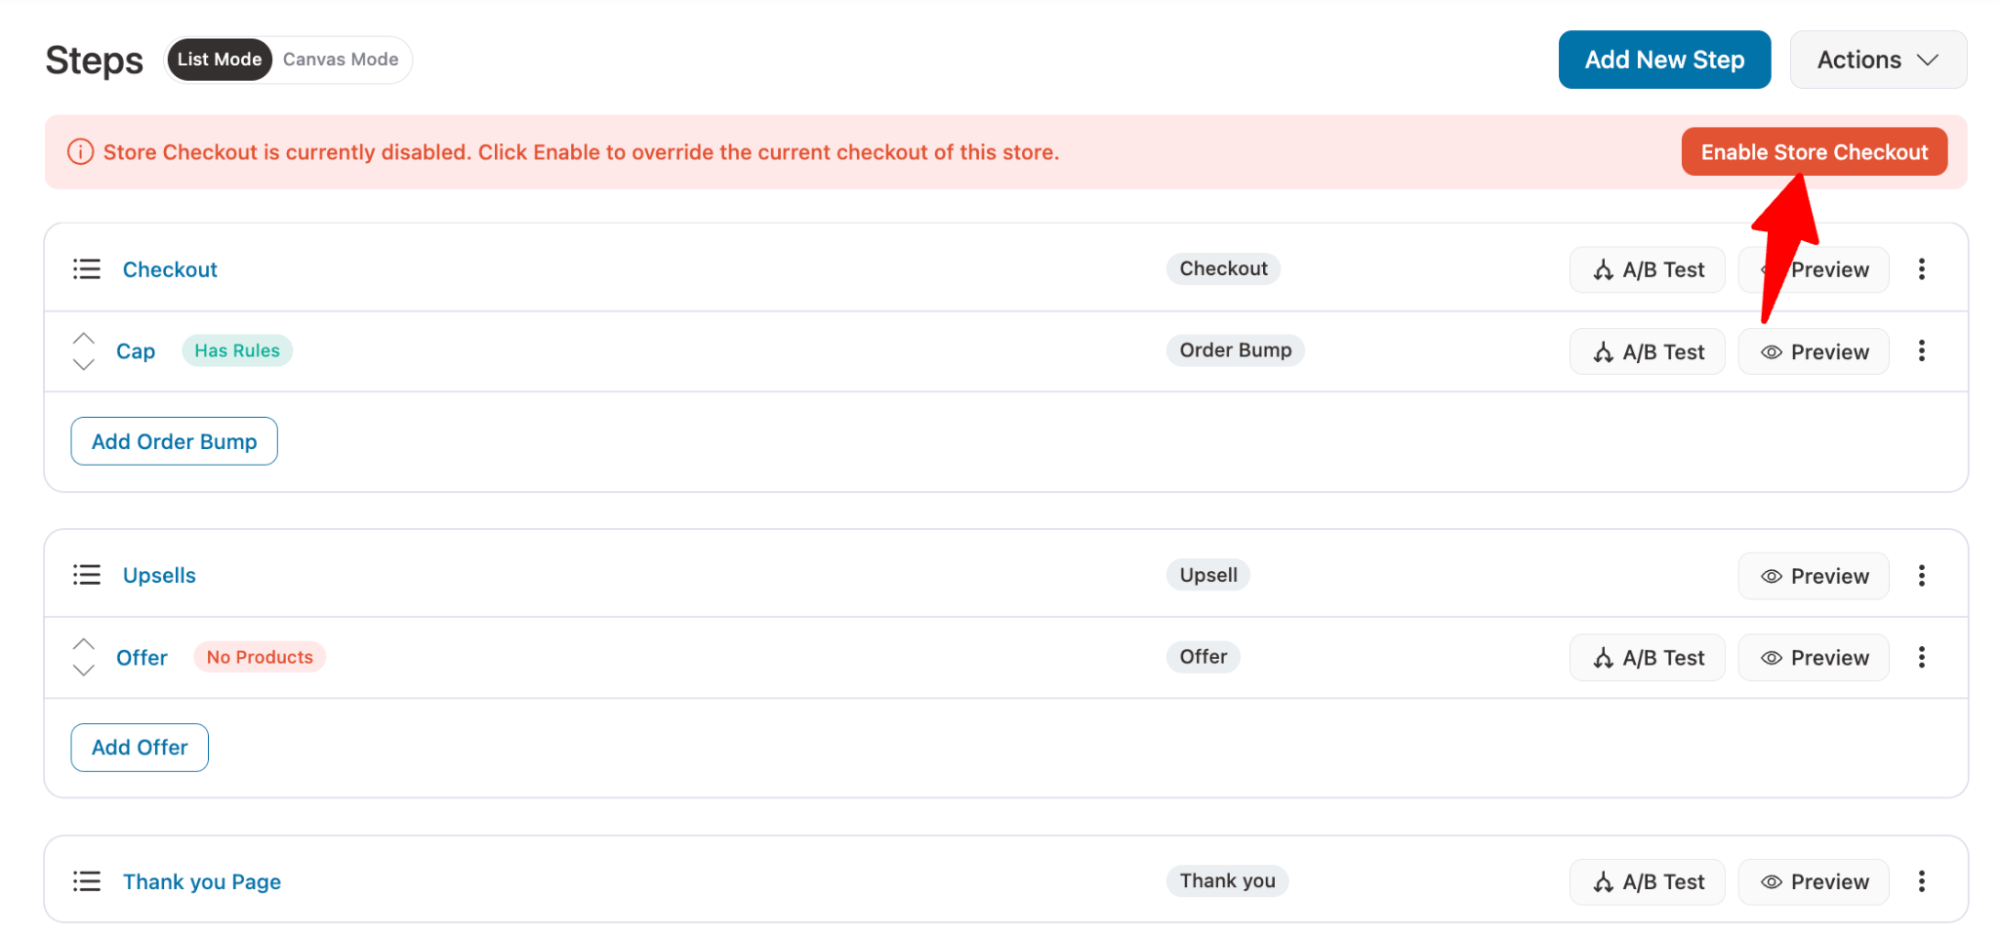
Now try placing a test order and make sure you meet all the rules you set to see the order bump offer on the checkout page.
That’s how simply you can offer related products as order bumps on the checkout page.
Move to the next section to learn how you can offer related products as one click upsell.
Method 5: Offer WooCommerce Related Products as One Click Upsell Post Checkout?
Post-purchase upsells are offers you can make to users right after they check out. The system tokenizes the payment details, so customers can add the offer to their existing order with a single click without re-entering the details.
🔔 For this, you need both FunnelKit Funnel Builder free and pro and an active store checkout, as we showed in method 4.
After replacing the WooCommerce default checkout with a custom one using FunnelKit Funnel Builder, follow these steps:
Method 1: Add the upsell offer
To offer a one-click upsell, hit on the Offer step.
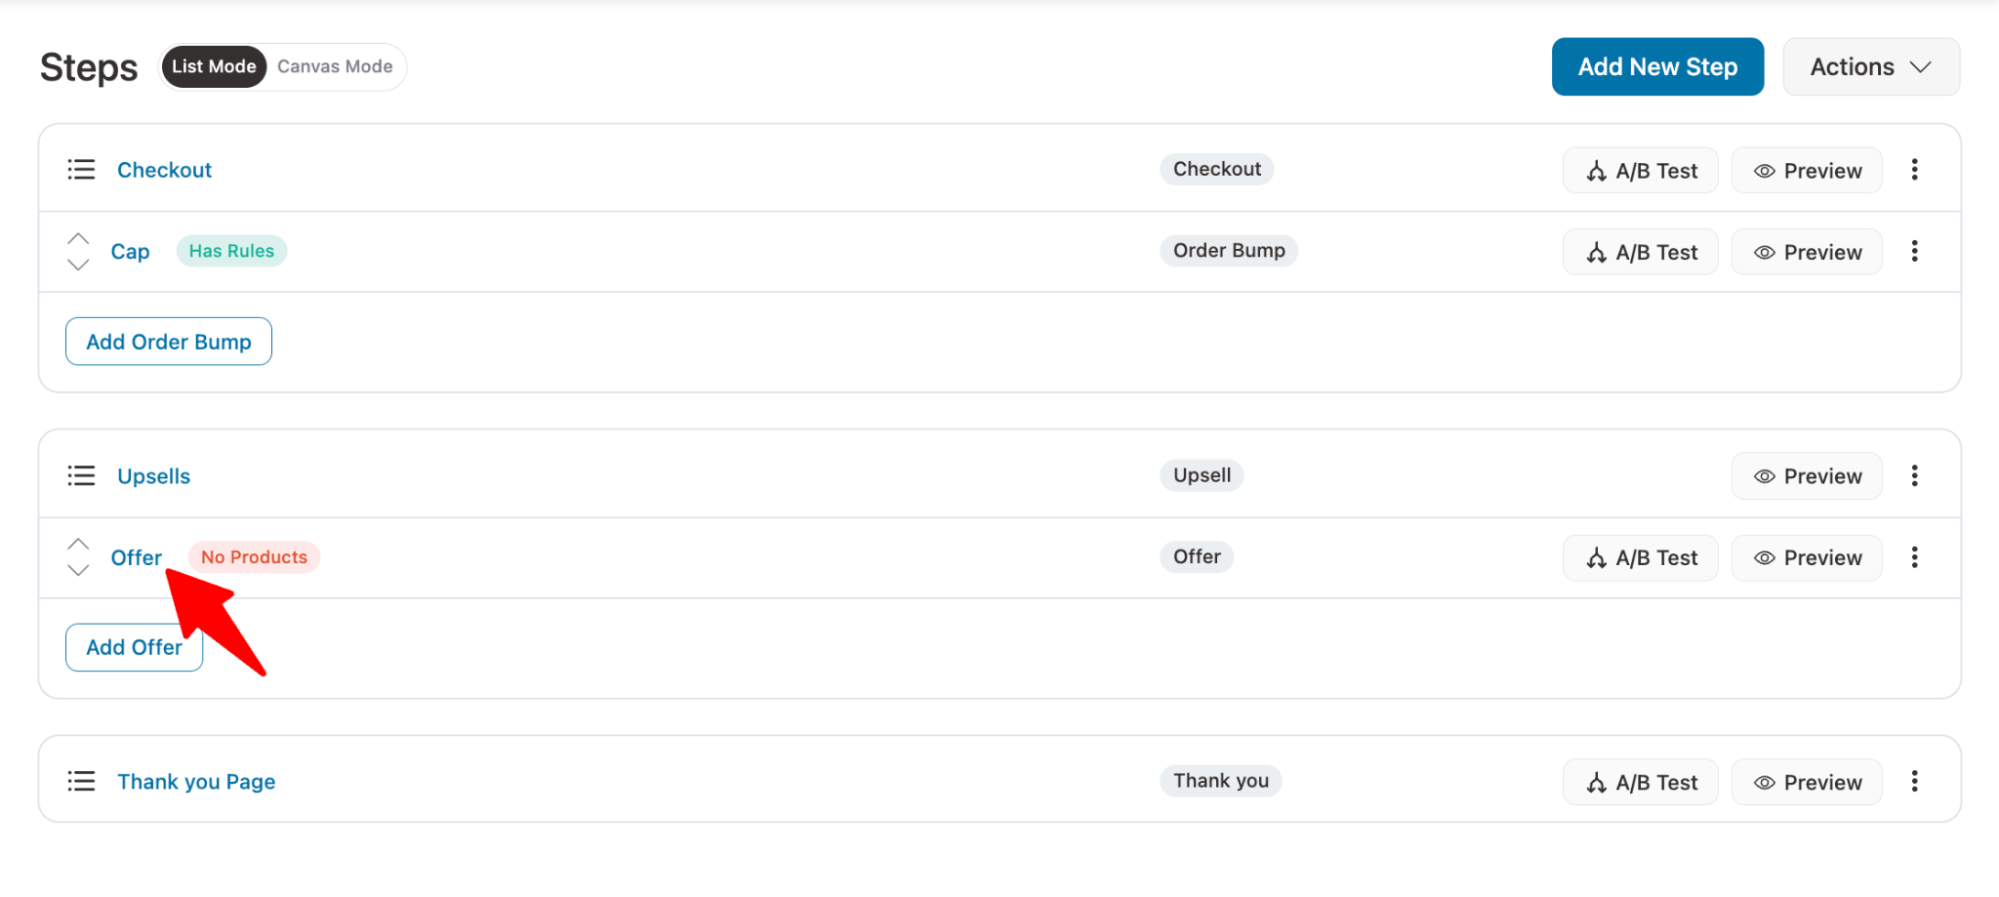
On the design tab, you can customize the content and look of the upsell template.
Now, move to the Products tab. Click on "Add Product," search for the product, and select it from the dropdown. After that, click on the "Add" button to add the product as an upsell offer.
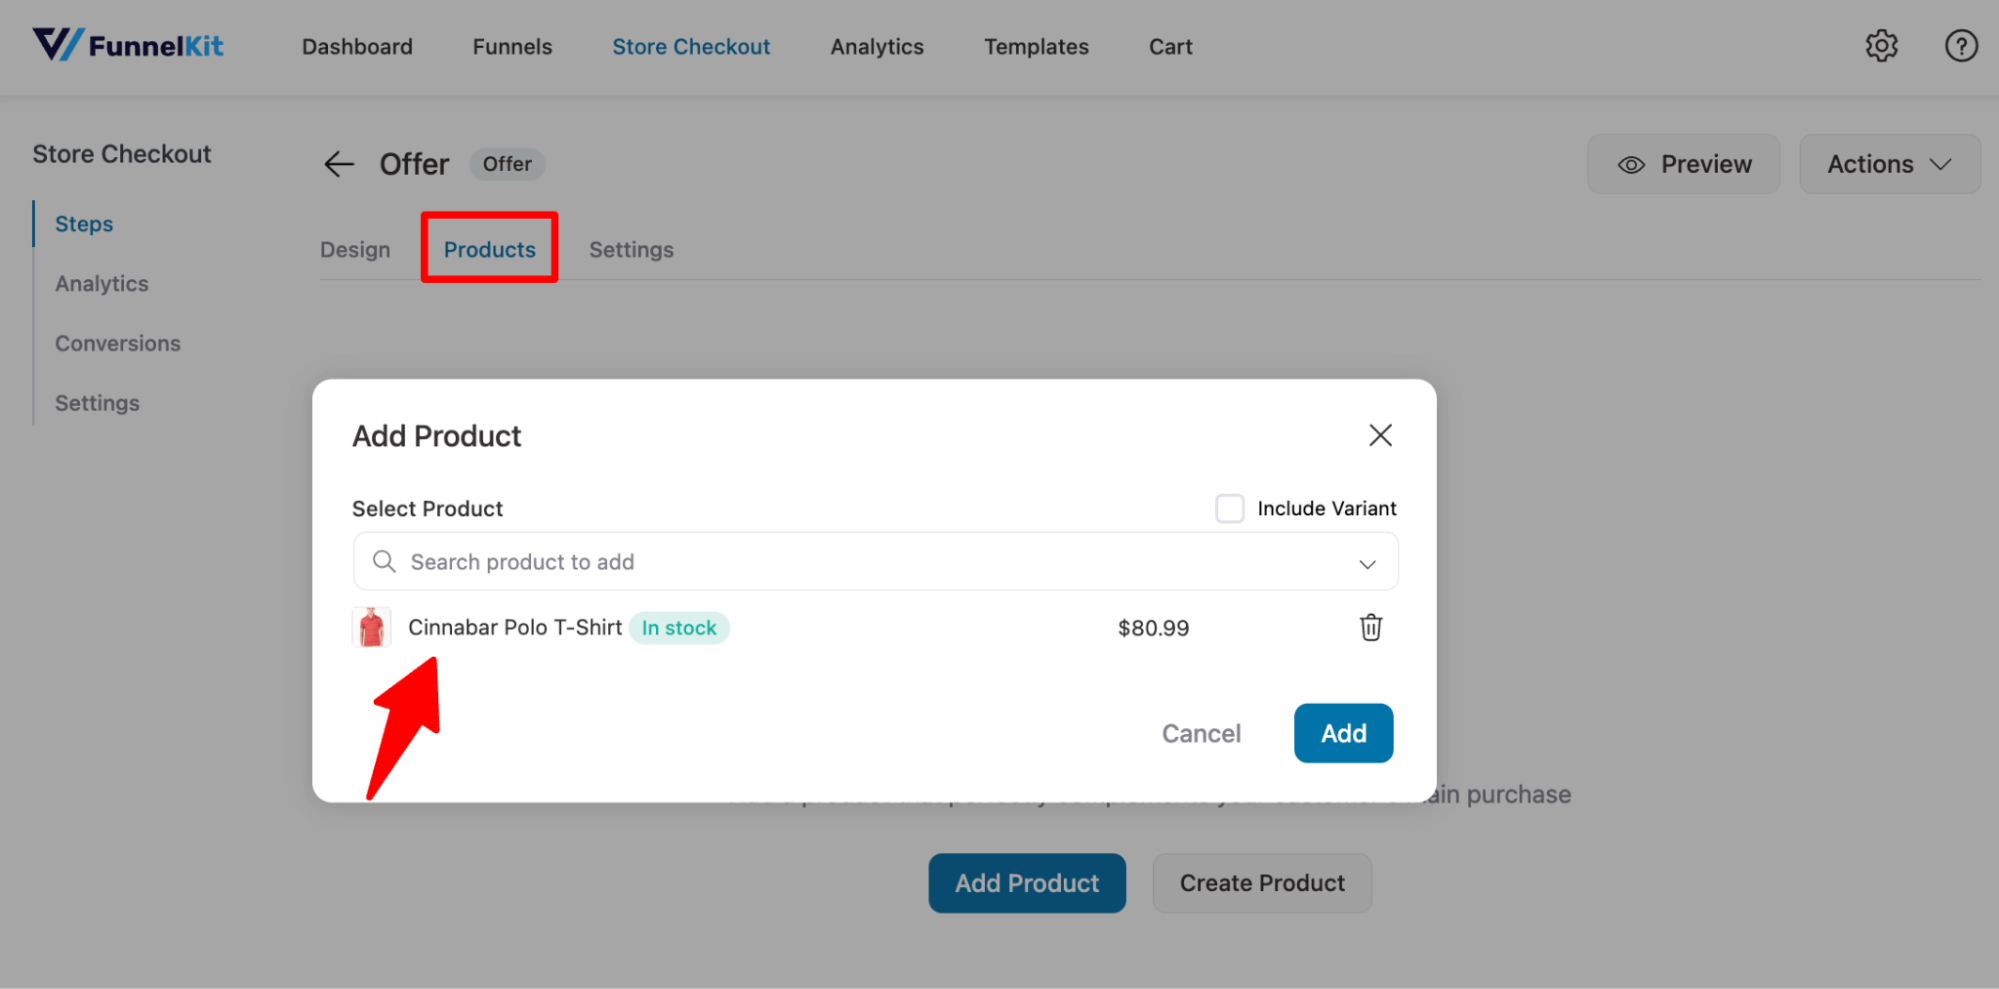
Add a discount if you want. We recommend checking the option “Skip this offer if the product(s) exist in parent order.” You can also allow users to choose the quantity.
🔔 Note: You can set flat shipping also if needed.
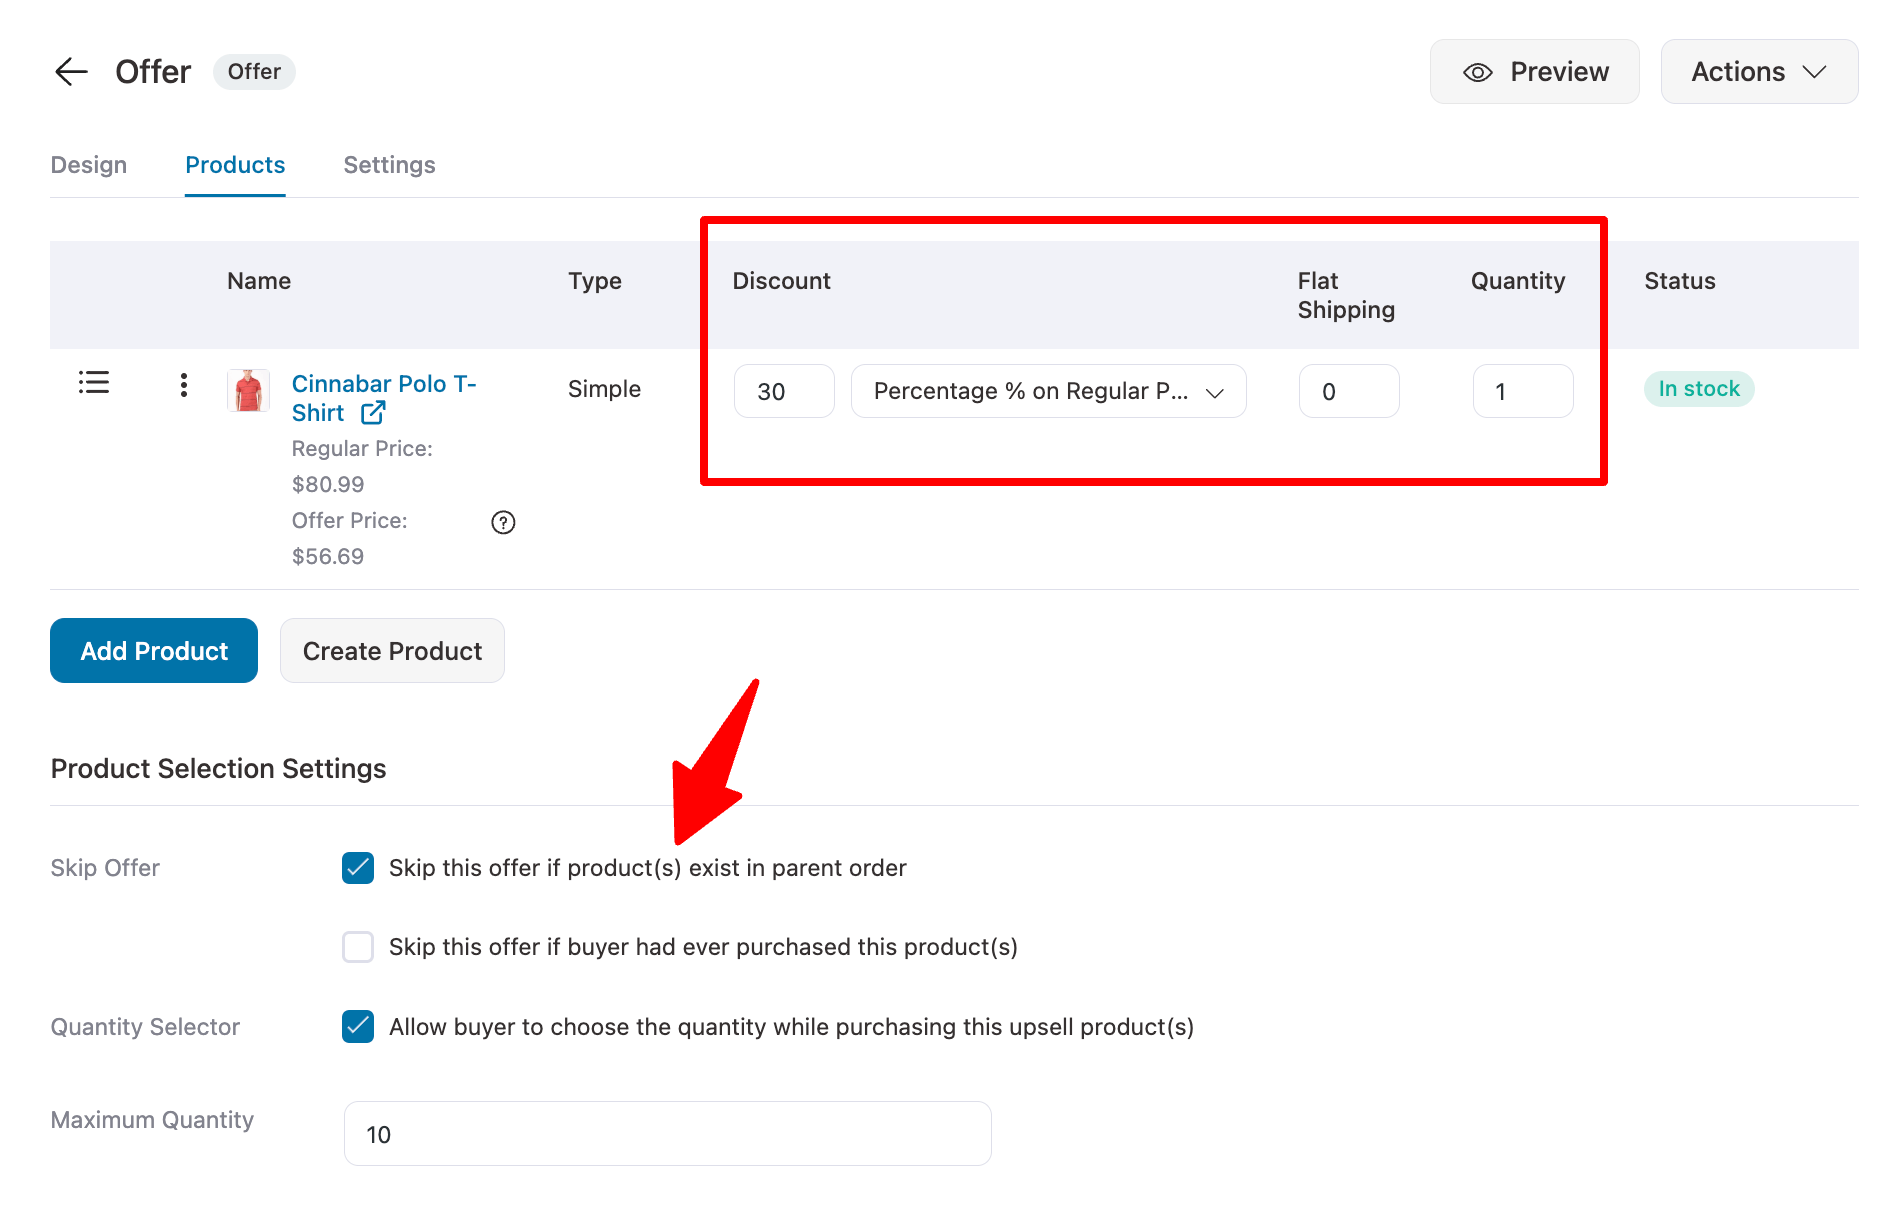
Make sure to click on Save to update.
Method 2: add a condition on the upsell offer to make it relevant (optional)
You can apply rules like you did with the order bump to make the offer more effective. To do so, click on the Upsell step.
Next, move to the rules tab and click on Add Rules. Then, set the conditions. To make the offer relevant, you can add a condition like a customer previously purchased from the same category. Also, you can only offer to your VIP customers or who have items worth over $100 dollars as they are more likely to accept a high-value offer after checkout.
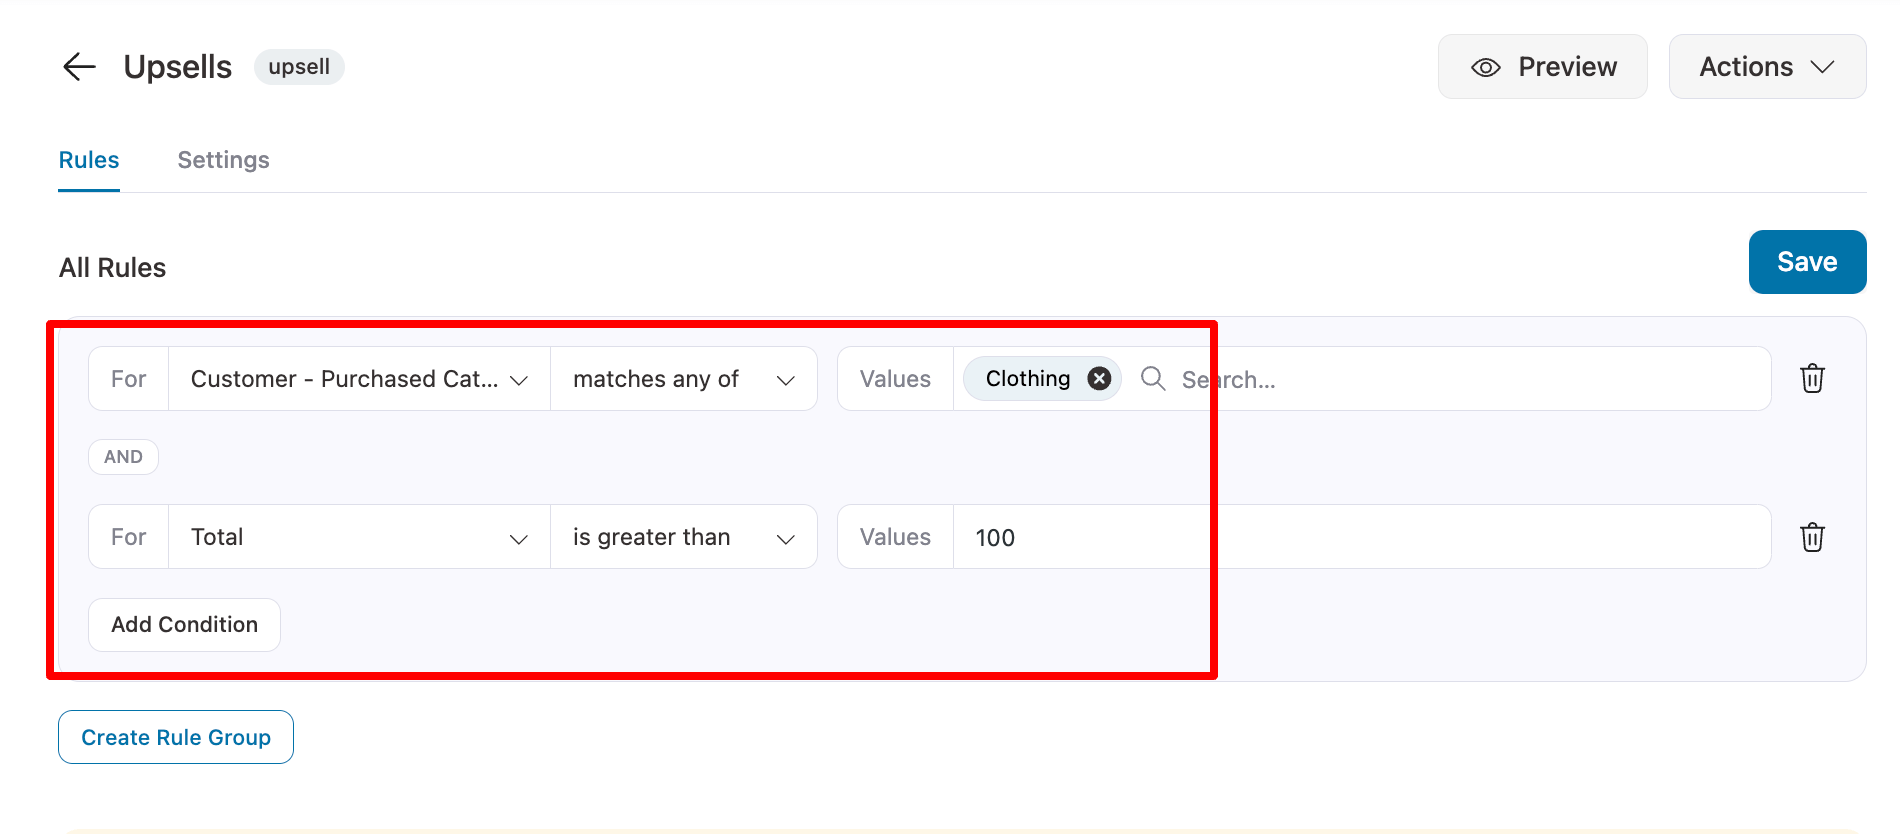
Make sure to click on the 'Save' button when done.
Method 3: Test the upsell offer
After right after checkout, if the customer qualifies for the upsell, they will be offered this related product. For this place a test order and see if you can adjust the quantity of the upsell (depending on your settings) and successfully place the order.
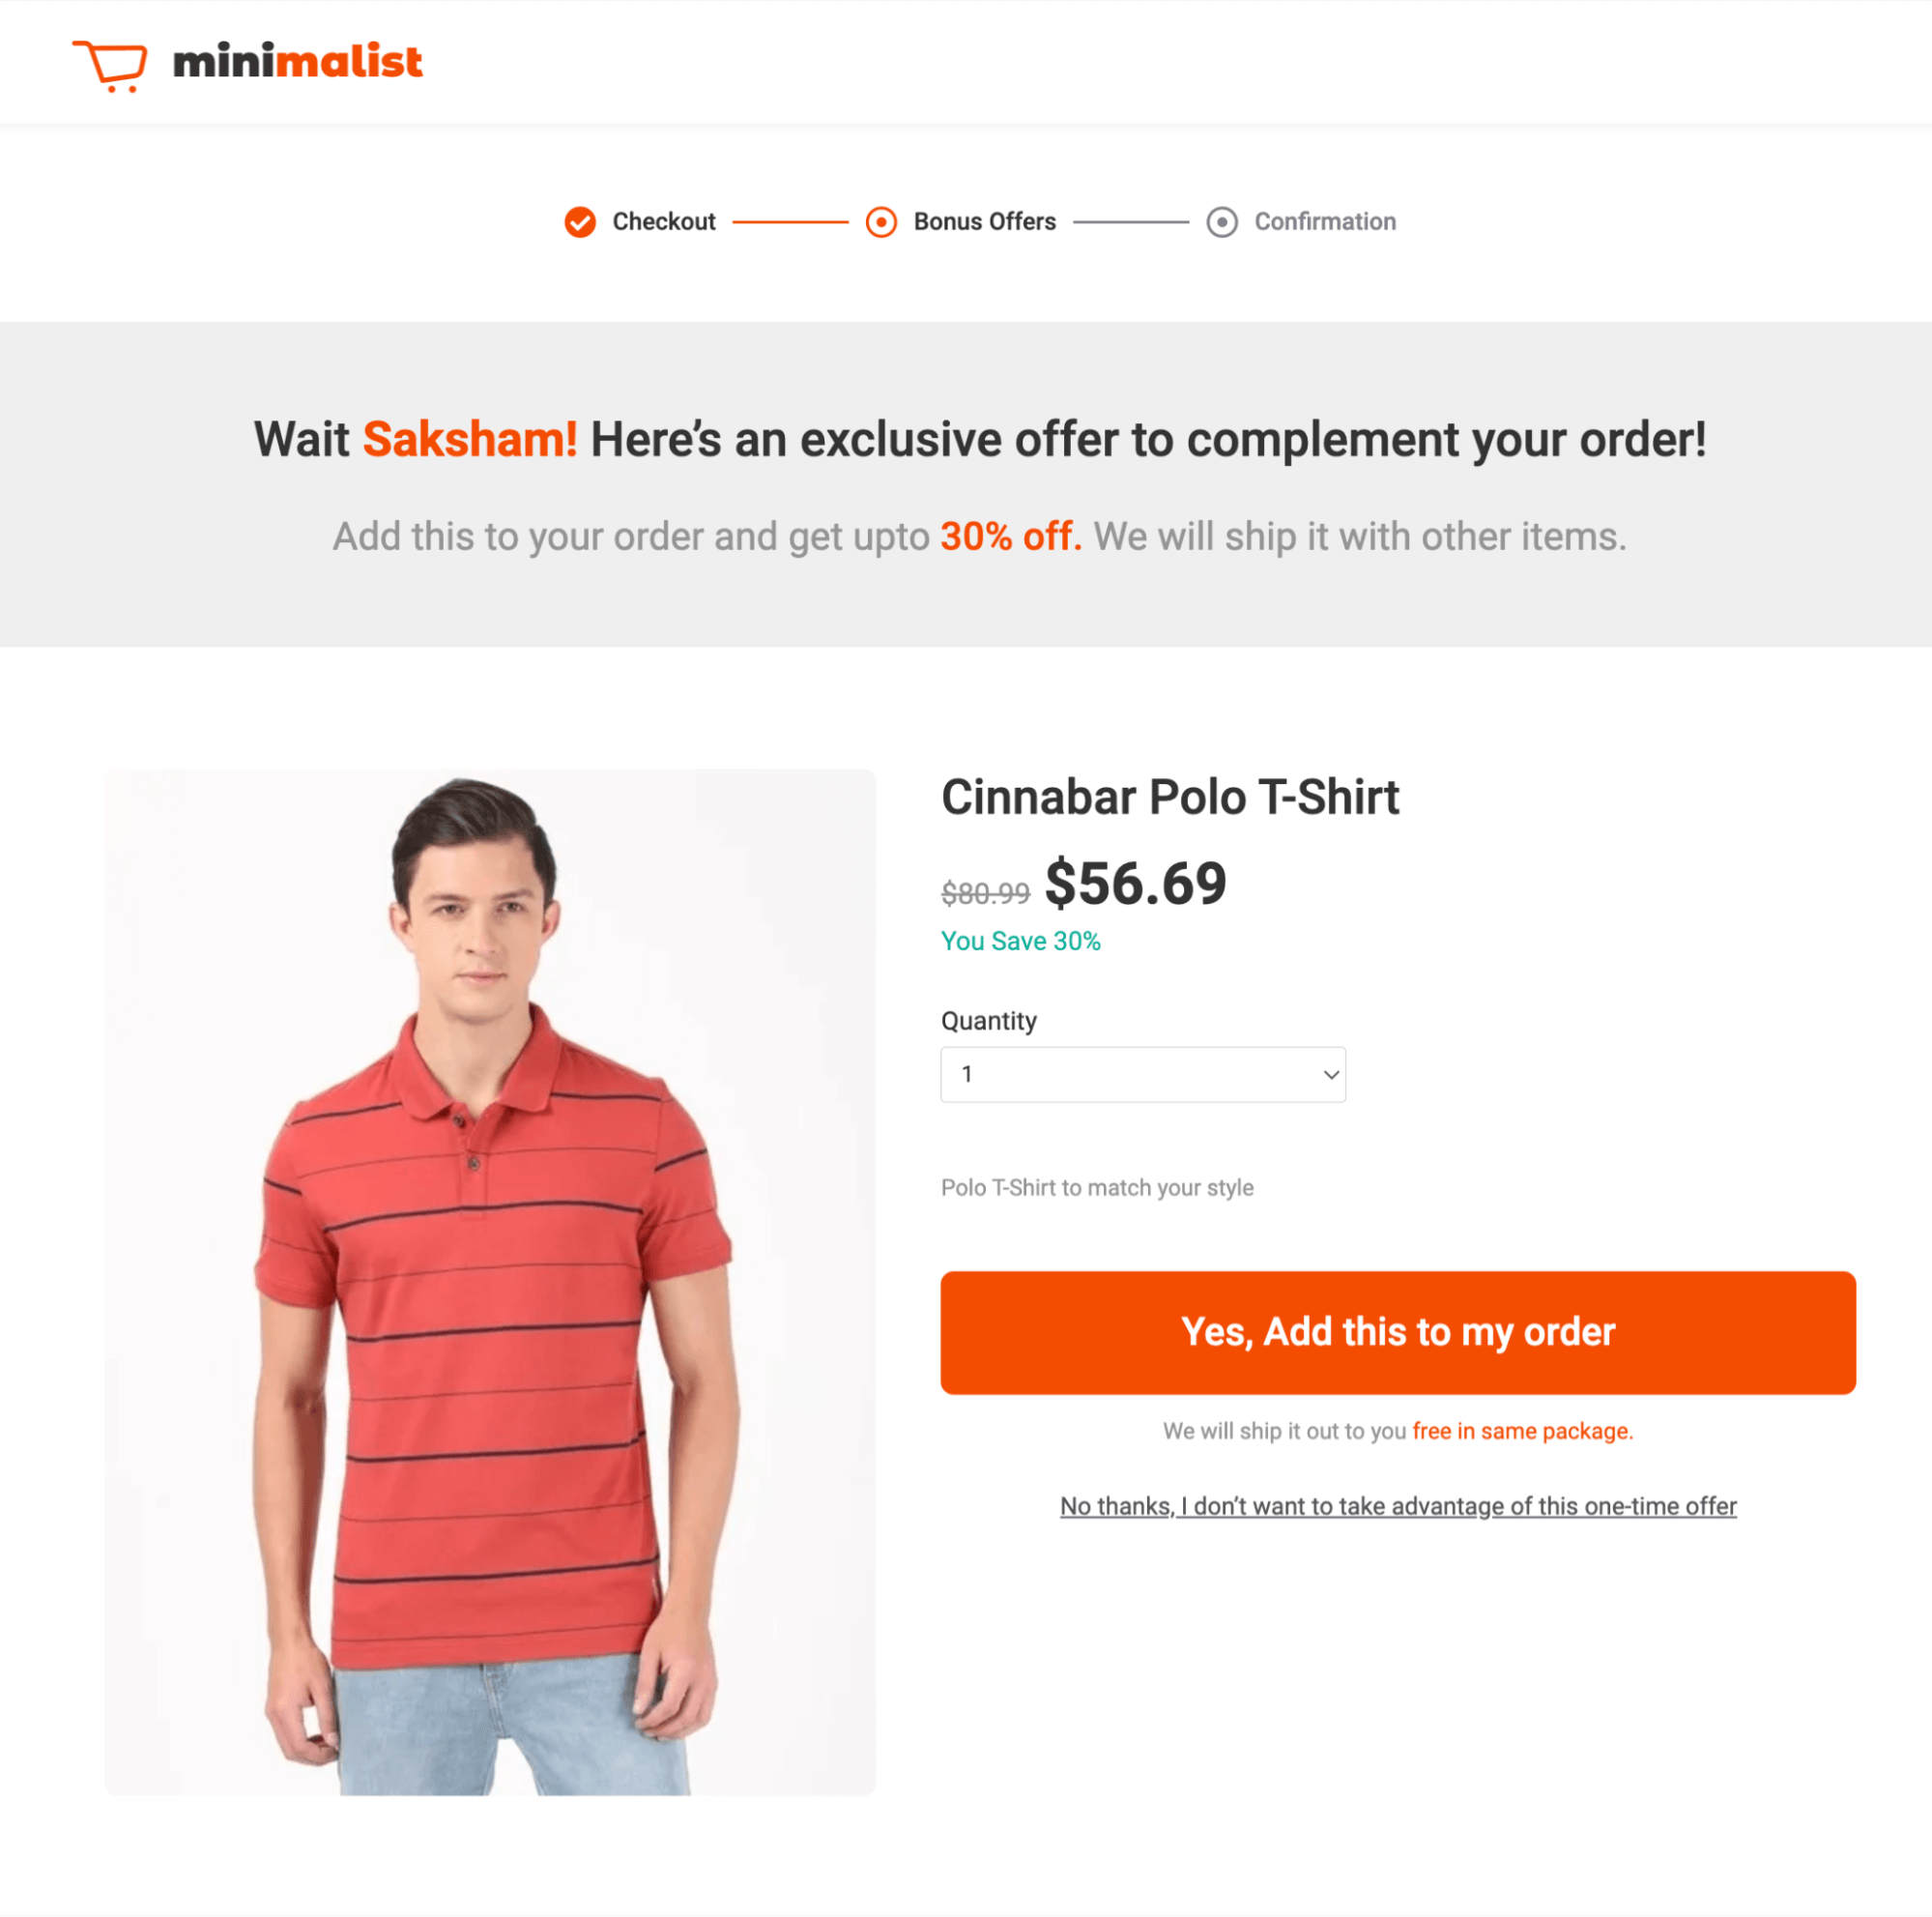
After successfully accepting the upsell, you will be redirected to the custom thank you page.
There should be another method of showing related products in the email..
5 Best Practices for WooCommerce Related Products
- Make sure the related products you show are super relevant
Ensure that related products are highly relevant to the customer’s interests by using product categories, tags, etc.
FunnelKit Funnel Builder’s Rule Engine allows you to display precise recommendations, such as order bumps and one-click upsell, tailored to customer preferences.
- Offer milestone-based rewards to boost order value
Sometimes, showing related products might not be enough to get customers to add them to their cart.
In such cases, you can offer milestone-based rewards to encourage users to shop more. With FunnelKit Cart, you can easily offer mile-stone-based rewards.
- Limit the number of related products.
Display a limited number of related products (ideally 3-6). Too many options can overwhelm customers, causing indecision or even cart abandonment.
By limiting choices, you simplify the process, making it easier for customers to make a purchase.
- Personalized recommendations based on customer purchase history
Use personalized recommendations based on the customer’s browsing history, past purchases, or specific preferences.
With FunnelKti Funnel Builder, you can create conditions using the customer’s previous history to offer conditional order bumps and upsell.
- Use high-quality images & descriptions with clear CTA
Ensure that related products feature high-quality images and engaging descriptions. The description highlights the benefits of the product in relation to their current purchase.
Clear visuals and descriptions drive customer confidence, increasing the chances of conversion. Also, ensure your CTAs are attractive and drive users to buy the related products.
Frequently Asked Questions About WooCommerce Related Products
Here are some of the commonly asked questions about related products in WooCommerce:
- What’s the difference between related products, up-sells, and cross-sells?
Here is a breakdown of the difference between related products, up-sells and cross-sells in WooCommerce
- Related Products: Automatically generated based on shared tags or categories.
- Up-Sells: Products manually added to encourage customers to buy higher-value items. Displayed on the product page.
- Cross-Sells: Complementary products are manually added to appear on the cart page.
- How to disable/hide related products in woocommerce?
To disable the default WooCommerce related product recommendations, you can add the following code snippet to your theme’s functions.php file:
remove_action('woocommerce_after_single_product_summary', 'woocommerce_output_related_products', 20);You can also remove upsell and cross-sell products from each product. As per FunnelKit Cart, you can turn on The Upsell options. Also, for order bumps and one-click upsell, you can either put them on draft or delete them.
- How do I track the performance of related product recommendations?
With FunnelKit Funnel Builder, you can easily track the how many related products users have added to their cart in the form of order bump and one click upsells.
Utilize WooCommerce Products and Boost the Average Order Value of Your Store!
WooCommerce related products allow you to boost sales by recommending the right products at the right time.
Without them, customers might purchase only a few items before leaving your store, forcing you to invest more resources into securing repeat purchases.
Why not make more money with the same customer acquisition cost just by showing related products?
With FunnelKit’s in-cart recommendations paired with milestone-based rewards, encouraging users to add more related items to their cart has become effortless.
Don’t limit to cart- recommendations, use order bump and upsell as well to offer related items till users leave your site to get the maximum order value.
Start leveraging the power of FunnelKit today and watch your average order value soar. Showcasing related products in WooCommerce has never been more effective!
The post How to Display WooCommerce Related Products: 5 Different Ways appeared first on FunnelKit.