Are you looking to add a custom field to your WooCommerce checkout page?
While the default WooCommerce checkout page is functional, it lacks the flexibility to gather extra data your business might need.
Though it includes an ‘Order Notes’ field for additional information, it's not specific, and customers aren’t required to fill it out.
If you require your customers to fill out specific data, the default setup isn’t sufficient.
Not being able to collect specific or additional information from shoppers may hinder your goal of providing a personalized shopping experience to them. This limits your ability to optimize the shopping experience for users.
Fortunately, you can solve such issues by adding custom fields to your WooCommerce checkout form.
In this blog, we'll show you a step-by-step guide on how to add custom checkout fields to your WooCommerce checkout page through two methods:
- Add a custom field in the checkout page programmatically [Using code]
- Add a custom field using a plugin [Without code]
Short on time? Watch the video 👇
What Are WooCommerce Checkout Fields?
WooCommerce checkout fields are the input areas on the checkout page where customers enter their information to complete their purchases on a WooCommerce-powered e-commerce website.
These fields help collect essential information from customers to complete their orders and provide a smooth shopping experience.
Let’s look at the default woocommerce checkout and form fields it offers.
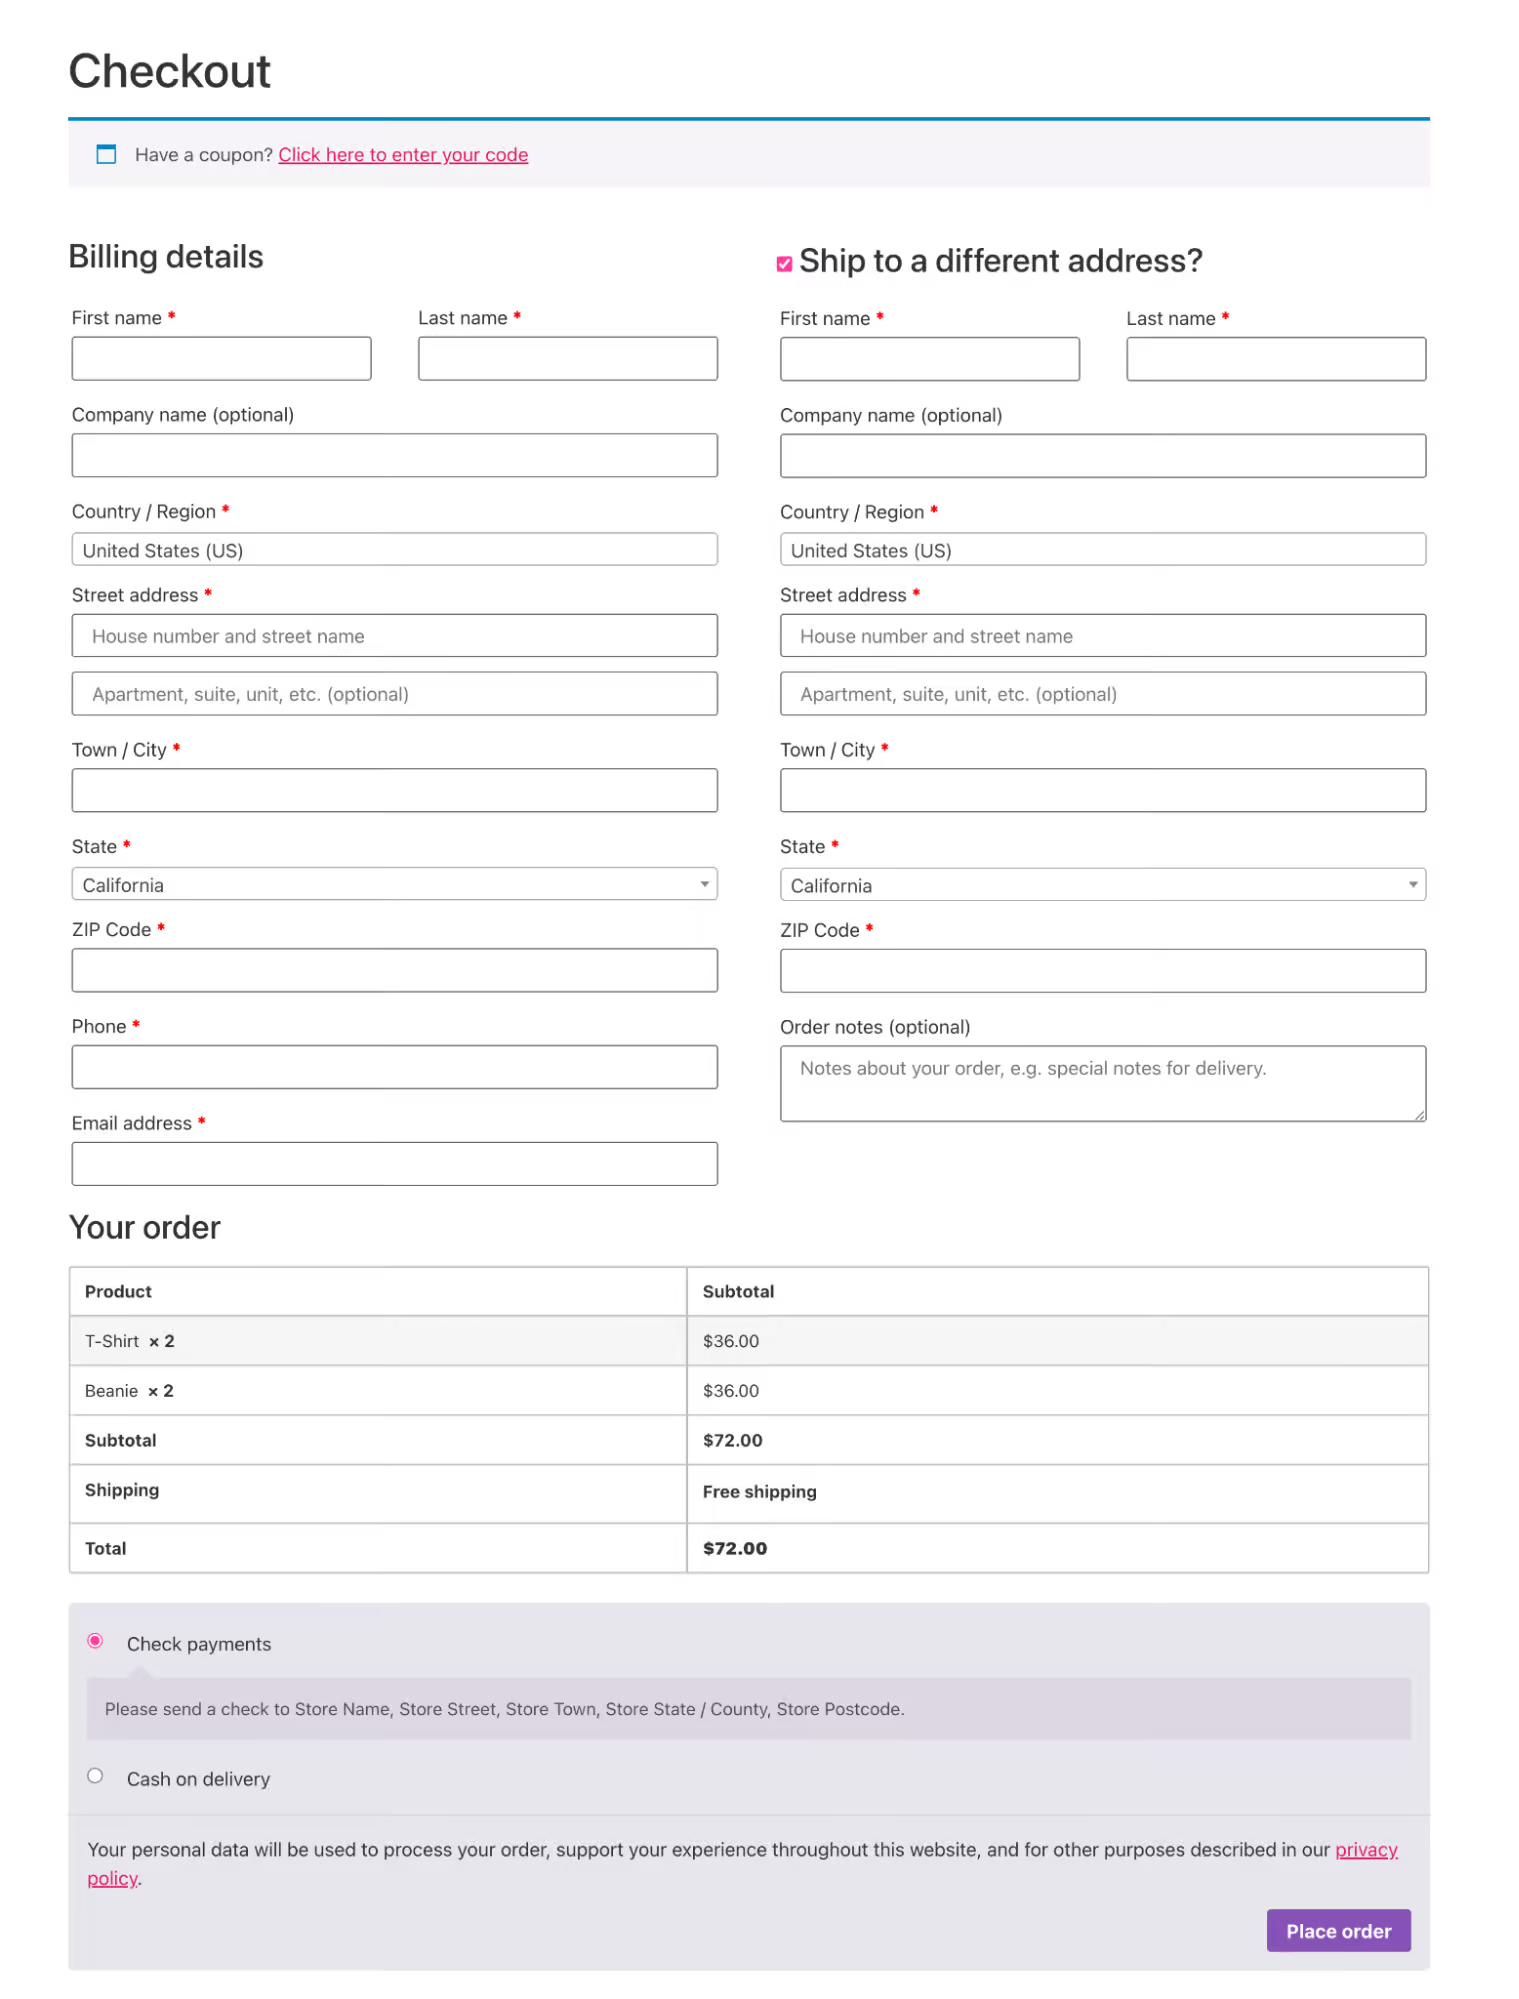
Default WooCommerce checkout fields include:
- Coupon code - If the “Enable the use of coupon codes” option is enabled in the WooCommerce settings, then the checkout will offer a coupon code field where users can apply the coupon code to get discounts.
- Billing information - This includes the customer's name (first name and last name), company name (optional), address (country, town, state, zip code, etc.), email, and phone number. It's used for billing purposes and shipping addresses if people don’t choose to give a different shipping address.
- Shipping information - If the shipping address differs from the billing address, customers must provide this information, including name, address, company name (optional), and contact address.
- Order notes - A field where customers can leave comments or special requests about their order.
- Payment information - Customers enter their payment details, such as credit card information, cash on delivery, or alternative payment methods.
As you can see, these are extremely basic fields. You may need extra fields on your checkout page for various reasons, like collecting special instructions or additional details about the order.
Types of Checkout Fields You Can Add
There are different types of checkout fields you can add to your WooCommerce store to gather specific information.
Here are the main types:
- Single line text input - A basic field for short text entries like names or simple information.
- Number field - This field allows whole numbers.
- Checkbox - It allows multiple selections from a list of given options.
- Radio button - Presents options as a list where only one response can be selected.
- Multi-line text area - This field allows longer text input and is useful for providing special instructions or comments.
- Dropdown - Offers a list of options in a collapsible menu.
- Email address - It’s specifically formatted to accept valid email addresses.
- Multi-select - Allows the selection of multiple options.
- Phone number - Can be formatted to accept phone numbers in specific formats.
- Hidden - These fields are not visible to customers but can store data for internal use.
- Password - A secure input field for password entry, typically used for password creation.
- File upload - This field enables customers to upload files, which is useful for custom orders such as printing designs and translation services.
- Billing and shipping address - A group of fields designed to enter address details.
- Conditional field - These fields appear or disappear based on selections or conditions.
- Custom validation field - Fields that require input in a specific format (for example, VAT numbers or date of birth).
- Terms and conditions - A checkbox for customers to agree to terms and conditions, often legally required.
- Google reCAPTCHA - An anti-spam measure that displays reCAPTCHA to ensure the user is human.
Now, look at why these fields are important to implement in your WooCommerce store.
Why Add Extra Fields to Your WooCommerce Checkout Page?
Adding extra fields to WooCommerce checkout offers numerous benefits to your business and customers by enhancing the overall shopping experience.
Here are some compelling reasons why you should consider adding custom fields to your checkout:
- Collecting specific customer information: Custom checkout fields allow you to gather unique data essential for your business, such as product preferences or customization details.
- Product customization: Custom fields are invaluable for businesses offering customizable products, allowing customers to specify their preferences accurately.
- Special instructions: Customers may have special delivery requests or important instructions for their orders. For example, they may want the product to be gift-wrapped. You can collect such information with a custom field.
- Legal and compliance requirements: Fields for tax ID numbers or VAT details are necessary for B2B transactions on international orders.
- Membership or subscription data: For businesses offering membership or subscription services, custom fields can collect data necessary for onboarding, billing, or other membership-specific information.
- Enhanced product recommendations: By collecting data on customer preferences, you can provide more accurate product recommendations, increasing the likelihood of upselling and cross-selling revenue.
- Improved customer service: Fields for comments or feedback help address customer concerns promptly and improve the quality of customer service.
Method 1: How to Add an Extra Field to the WooCommerce Checkout Page? [With Code]
Here, we will share how to add a custom field to the checkout page of WooCommerce programmatically.
We will also validate the form field and update the data so store owners can view the information from the backend.
Note: You need to add custom code to your theme's function.php file.
Step 1: Navigate to the function.php file
First, navigate to Appearance ⇒ Theme File Editor and select the functions.php file.
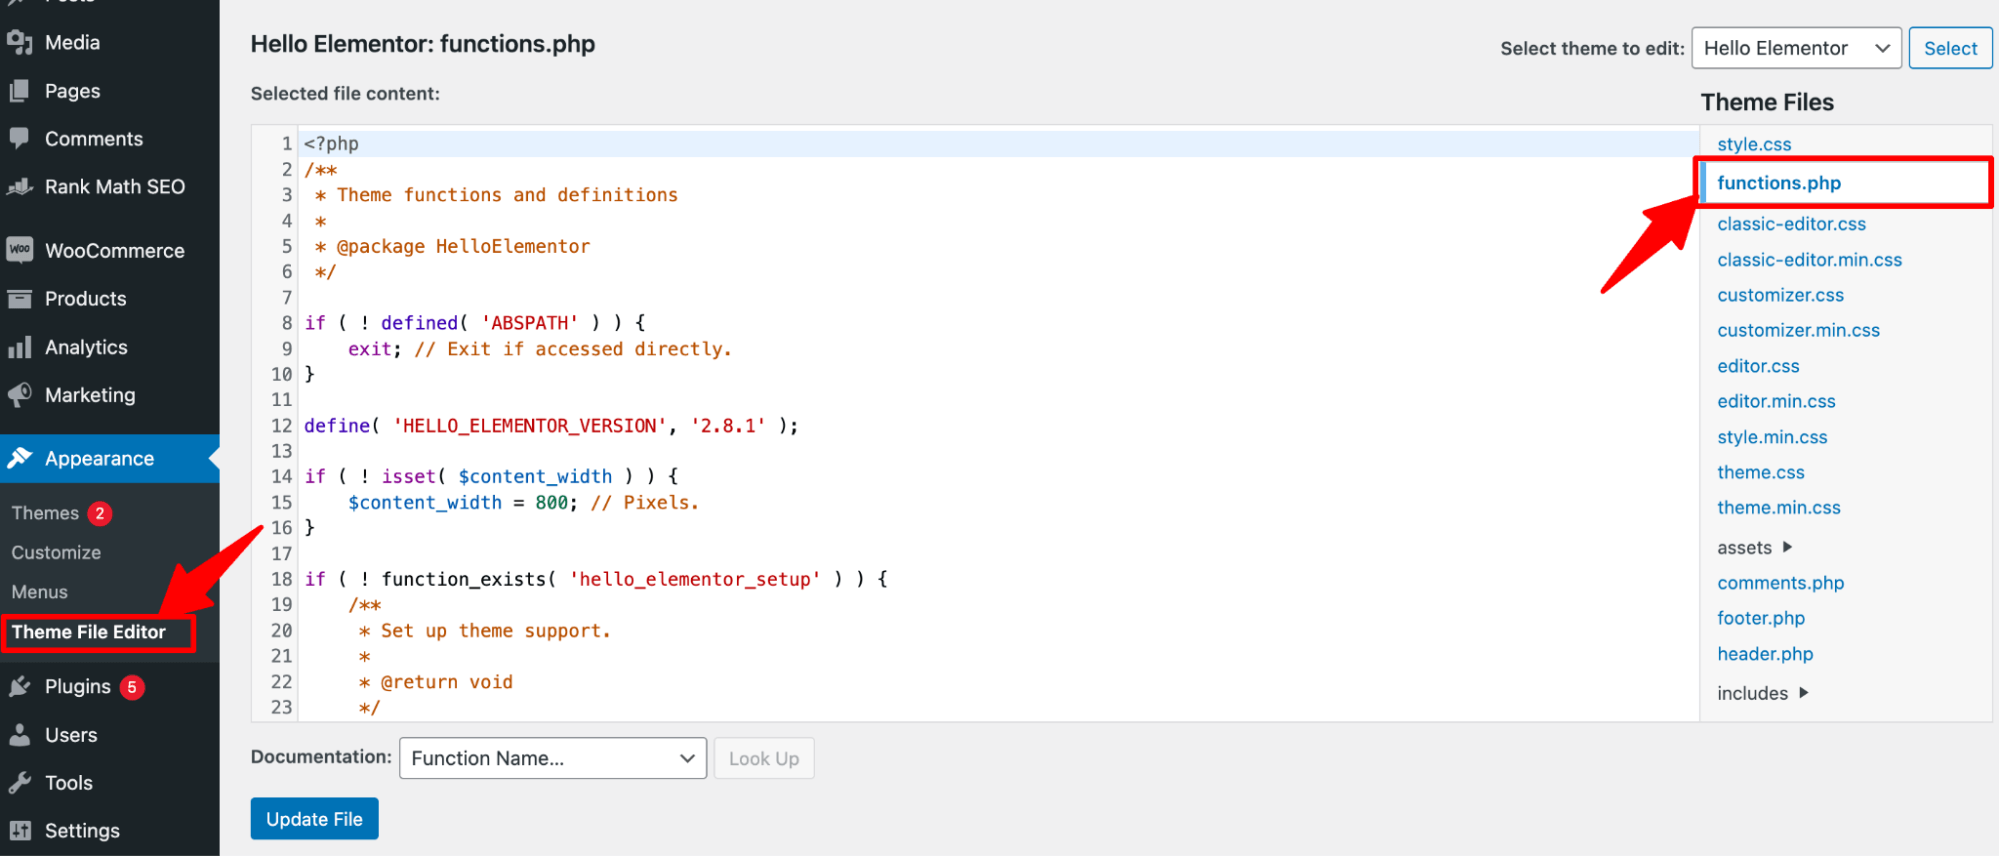
You’ll need to add your custom code here.
Step 2: Insert the code to add a custom field
To add a custom field, add the code below to the functions.php file. You can change the label, placeholder, and other details as needed.
If you want to make the field required, add the line ‘required' => ‘true’; otherwise, skip it.
/**
* Add a custom field to the checkout page
*/
add_action('woocommerce_after_order_notes', 'custom_checkout_field');
function custom_checkout_field($checkout)
{
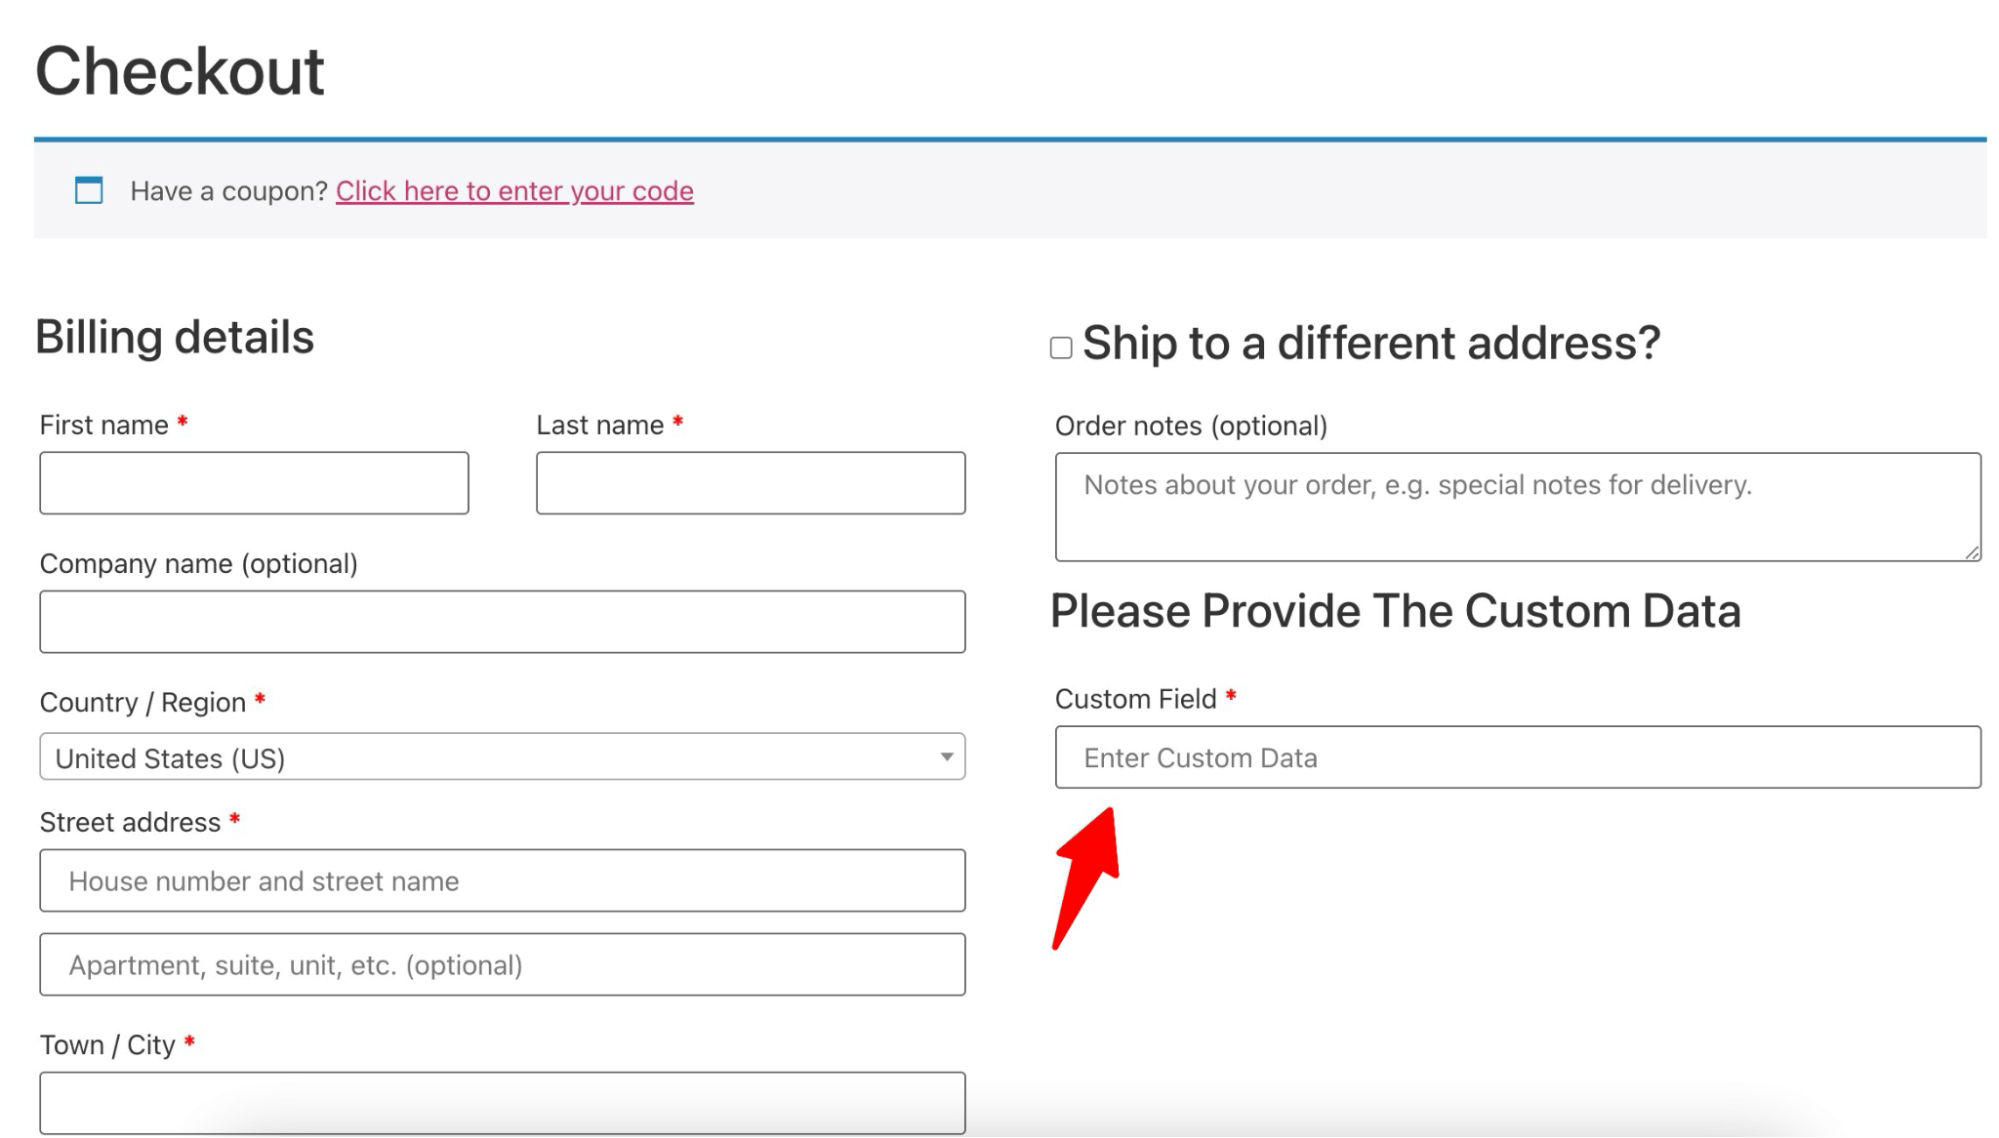
echo '<div id="custom_checkout_field"><h3>' . __('Please Provide The Custom Data') . '</h3>';
woocommerce_form_field('custom_field_name', array(
'type' => 'text',
'required' => 'true',
'class' => array(
'my-field-class form-row-wide'
) ,
'label' => __('Custom Field') ,
'placeholder' => __('Enter Custom Data') ,
) ,
$checkout->get_value('custom_field_name'));
echo '</div>';
}
Add the above code at the end of the file and click on the 'Update File' button.
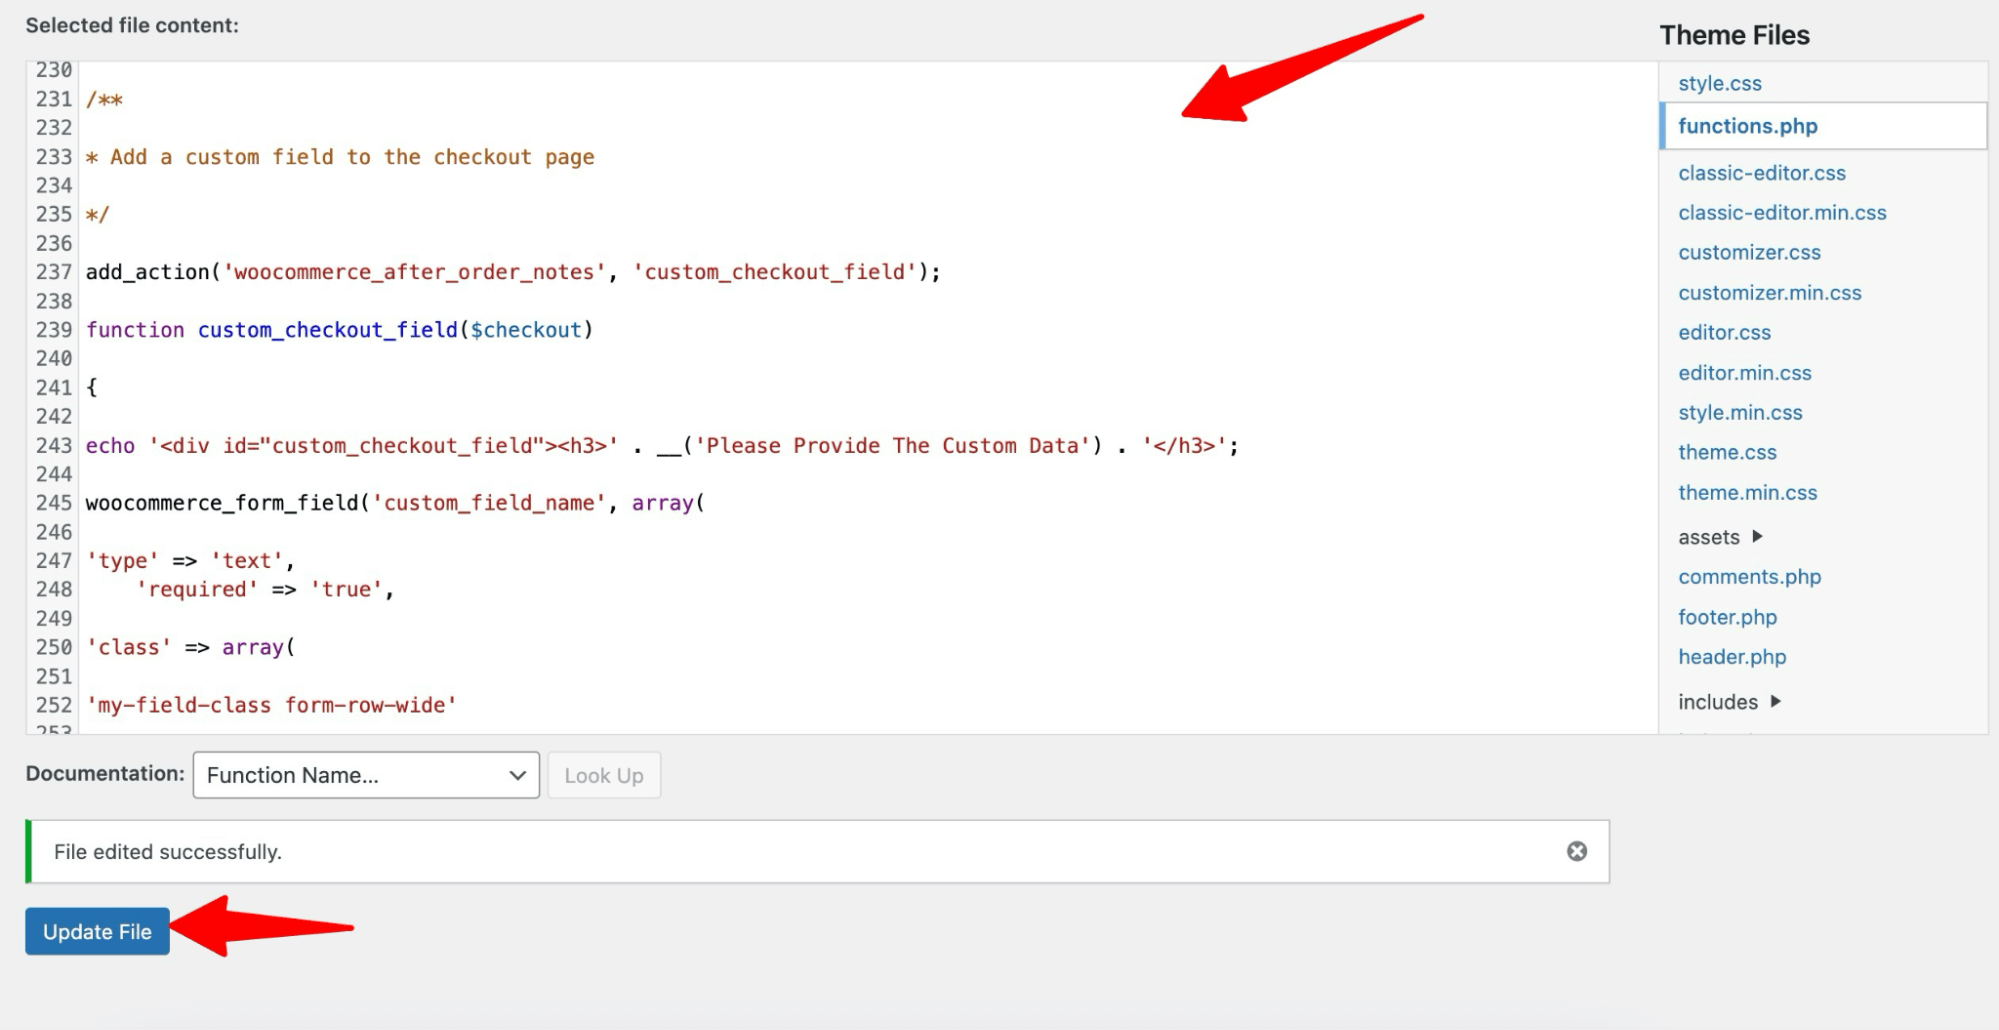
Here, we have added one custom field that is required.
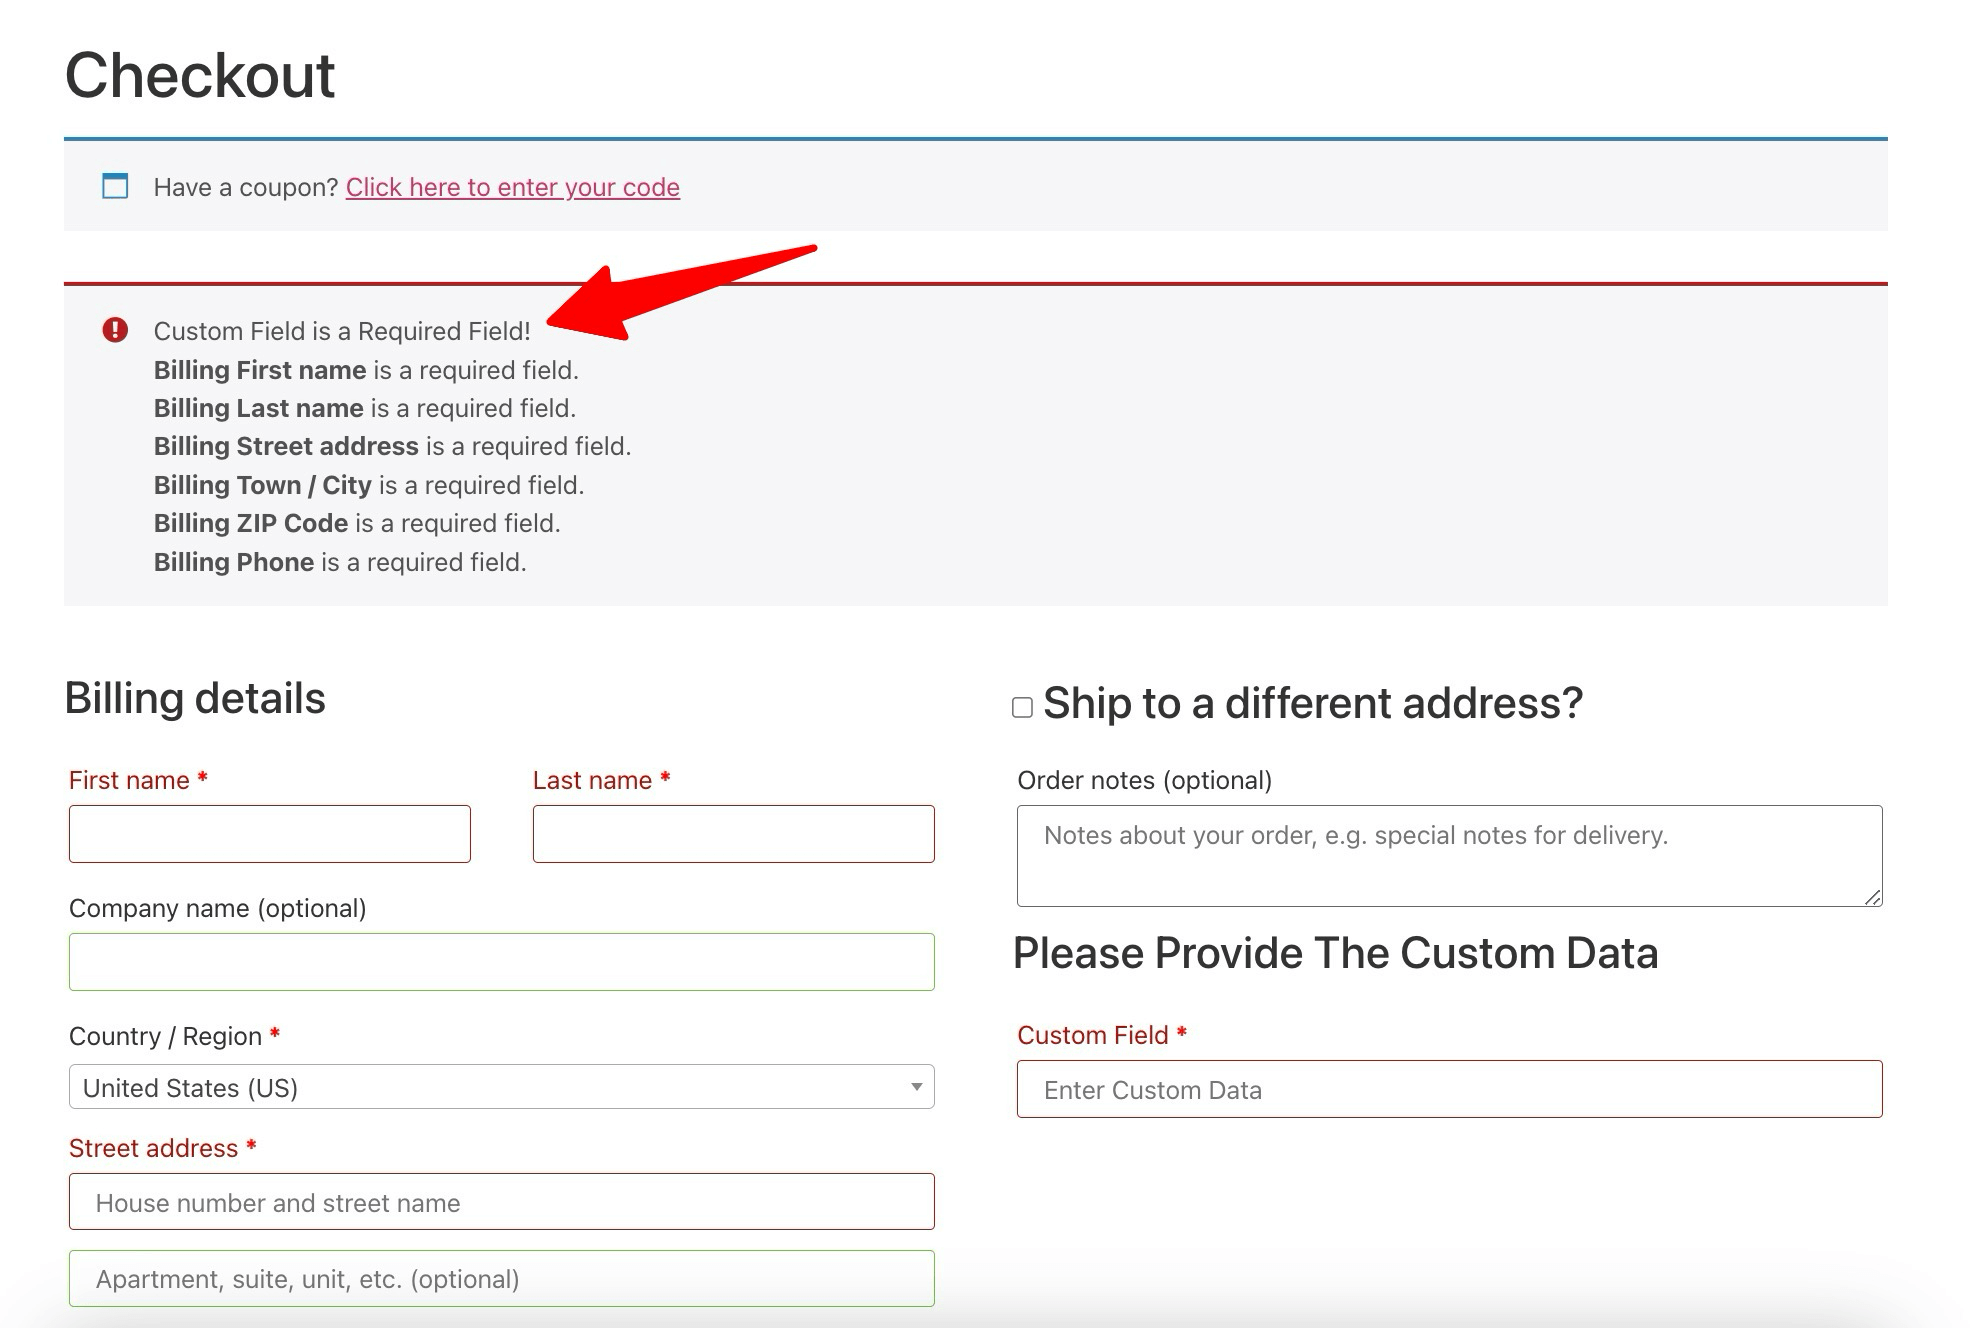
Step 3: Add the validation message
Making your custom WooCommerce checkout field required isn’t enough. To make the checkout process user-friendly, you need to show a message to users telling them the field is required.
To show an error message, add the following code to your function.php file.
/**

* Validate Checkout field

*/

add_action('woocommerce_checkout_process', 'customised_checkout_field_process');

function customised_checkout_field_process()

{

// Show an error message if the field is not set.

if (!$_POST['custom_field_name']) wc_add_notice(__('Custom Field is a Required Field!') , 'error');

}
Here is how the error message will be displayed:
Step 4: Save the custom data
Now, it’s time to ensure that the details the client entered into the custom field are saved.
You can do this by adding this code below:
/**

* Update the value given in custom field

*/

add_action('woocommerce_checkout_update_order_meta', 'custom_checkout_field_update_order_meta');

function custom_checkout_field_update_order_meta($order_id)

{

if (!empty($_POST['custom_field_name'])) {

update_post_meta($order_id, 'Custom Field',sanitize_text_field($_POST['custom_field_name']));

}

}
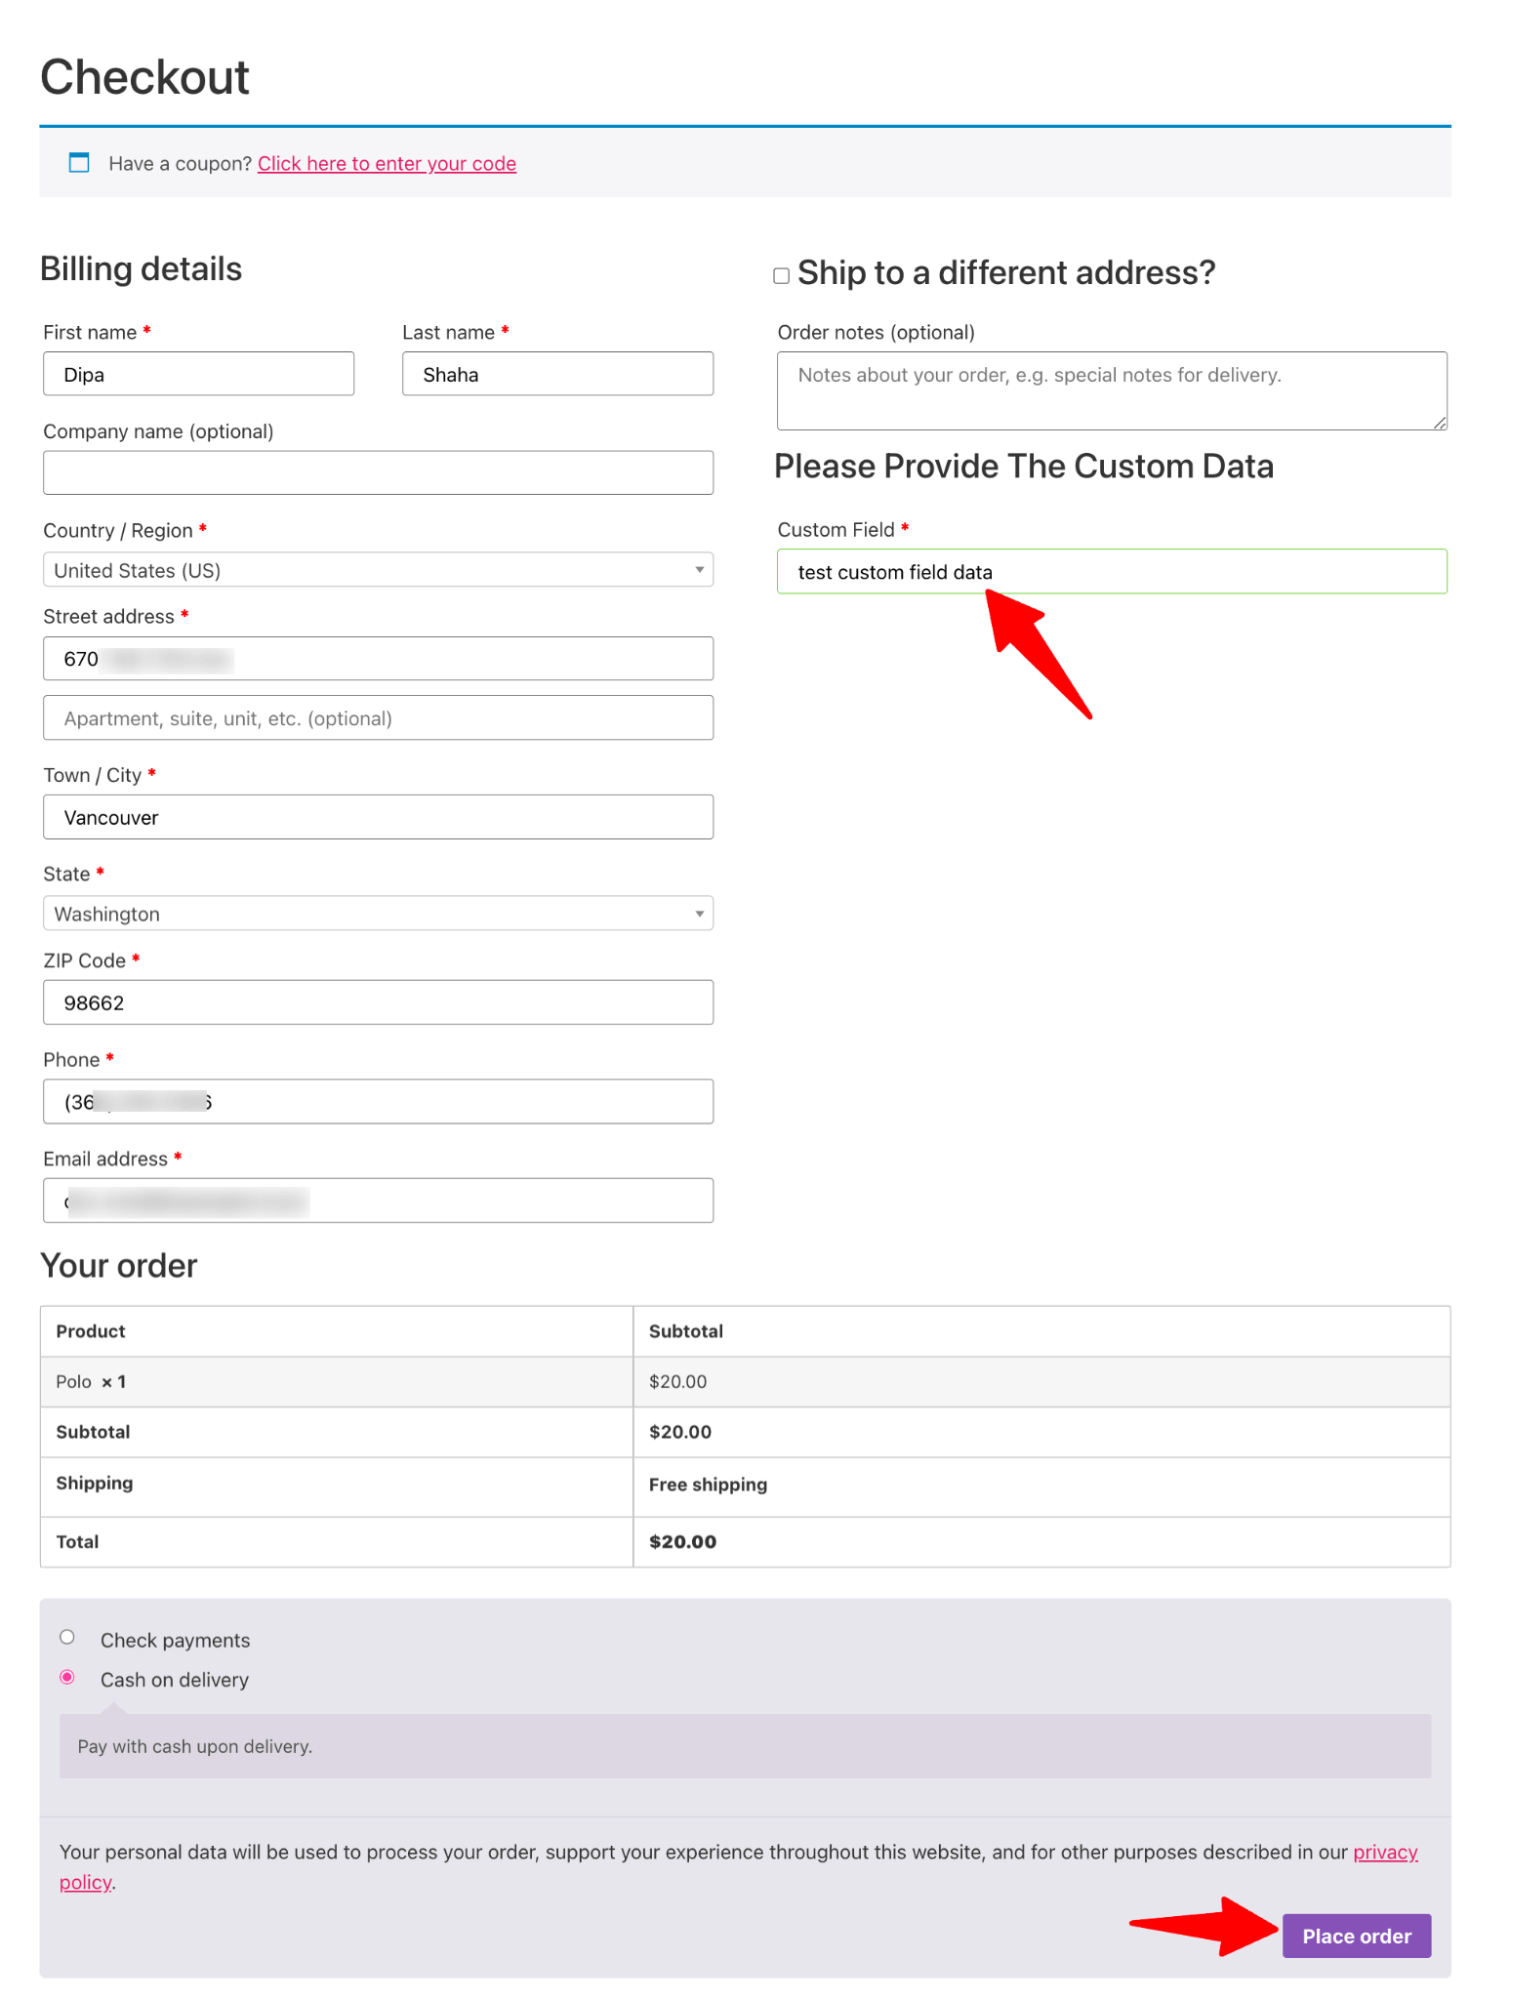
Now place a test order with some random value for the custom checkout field.
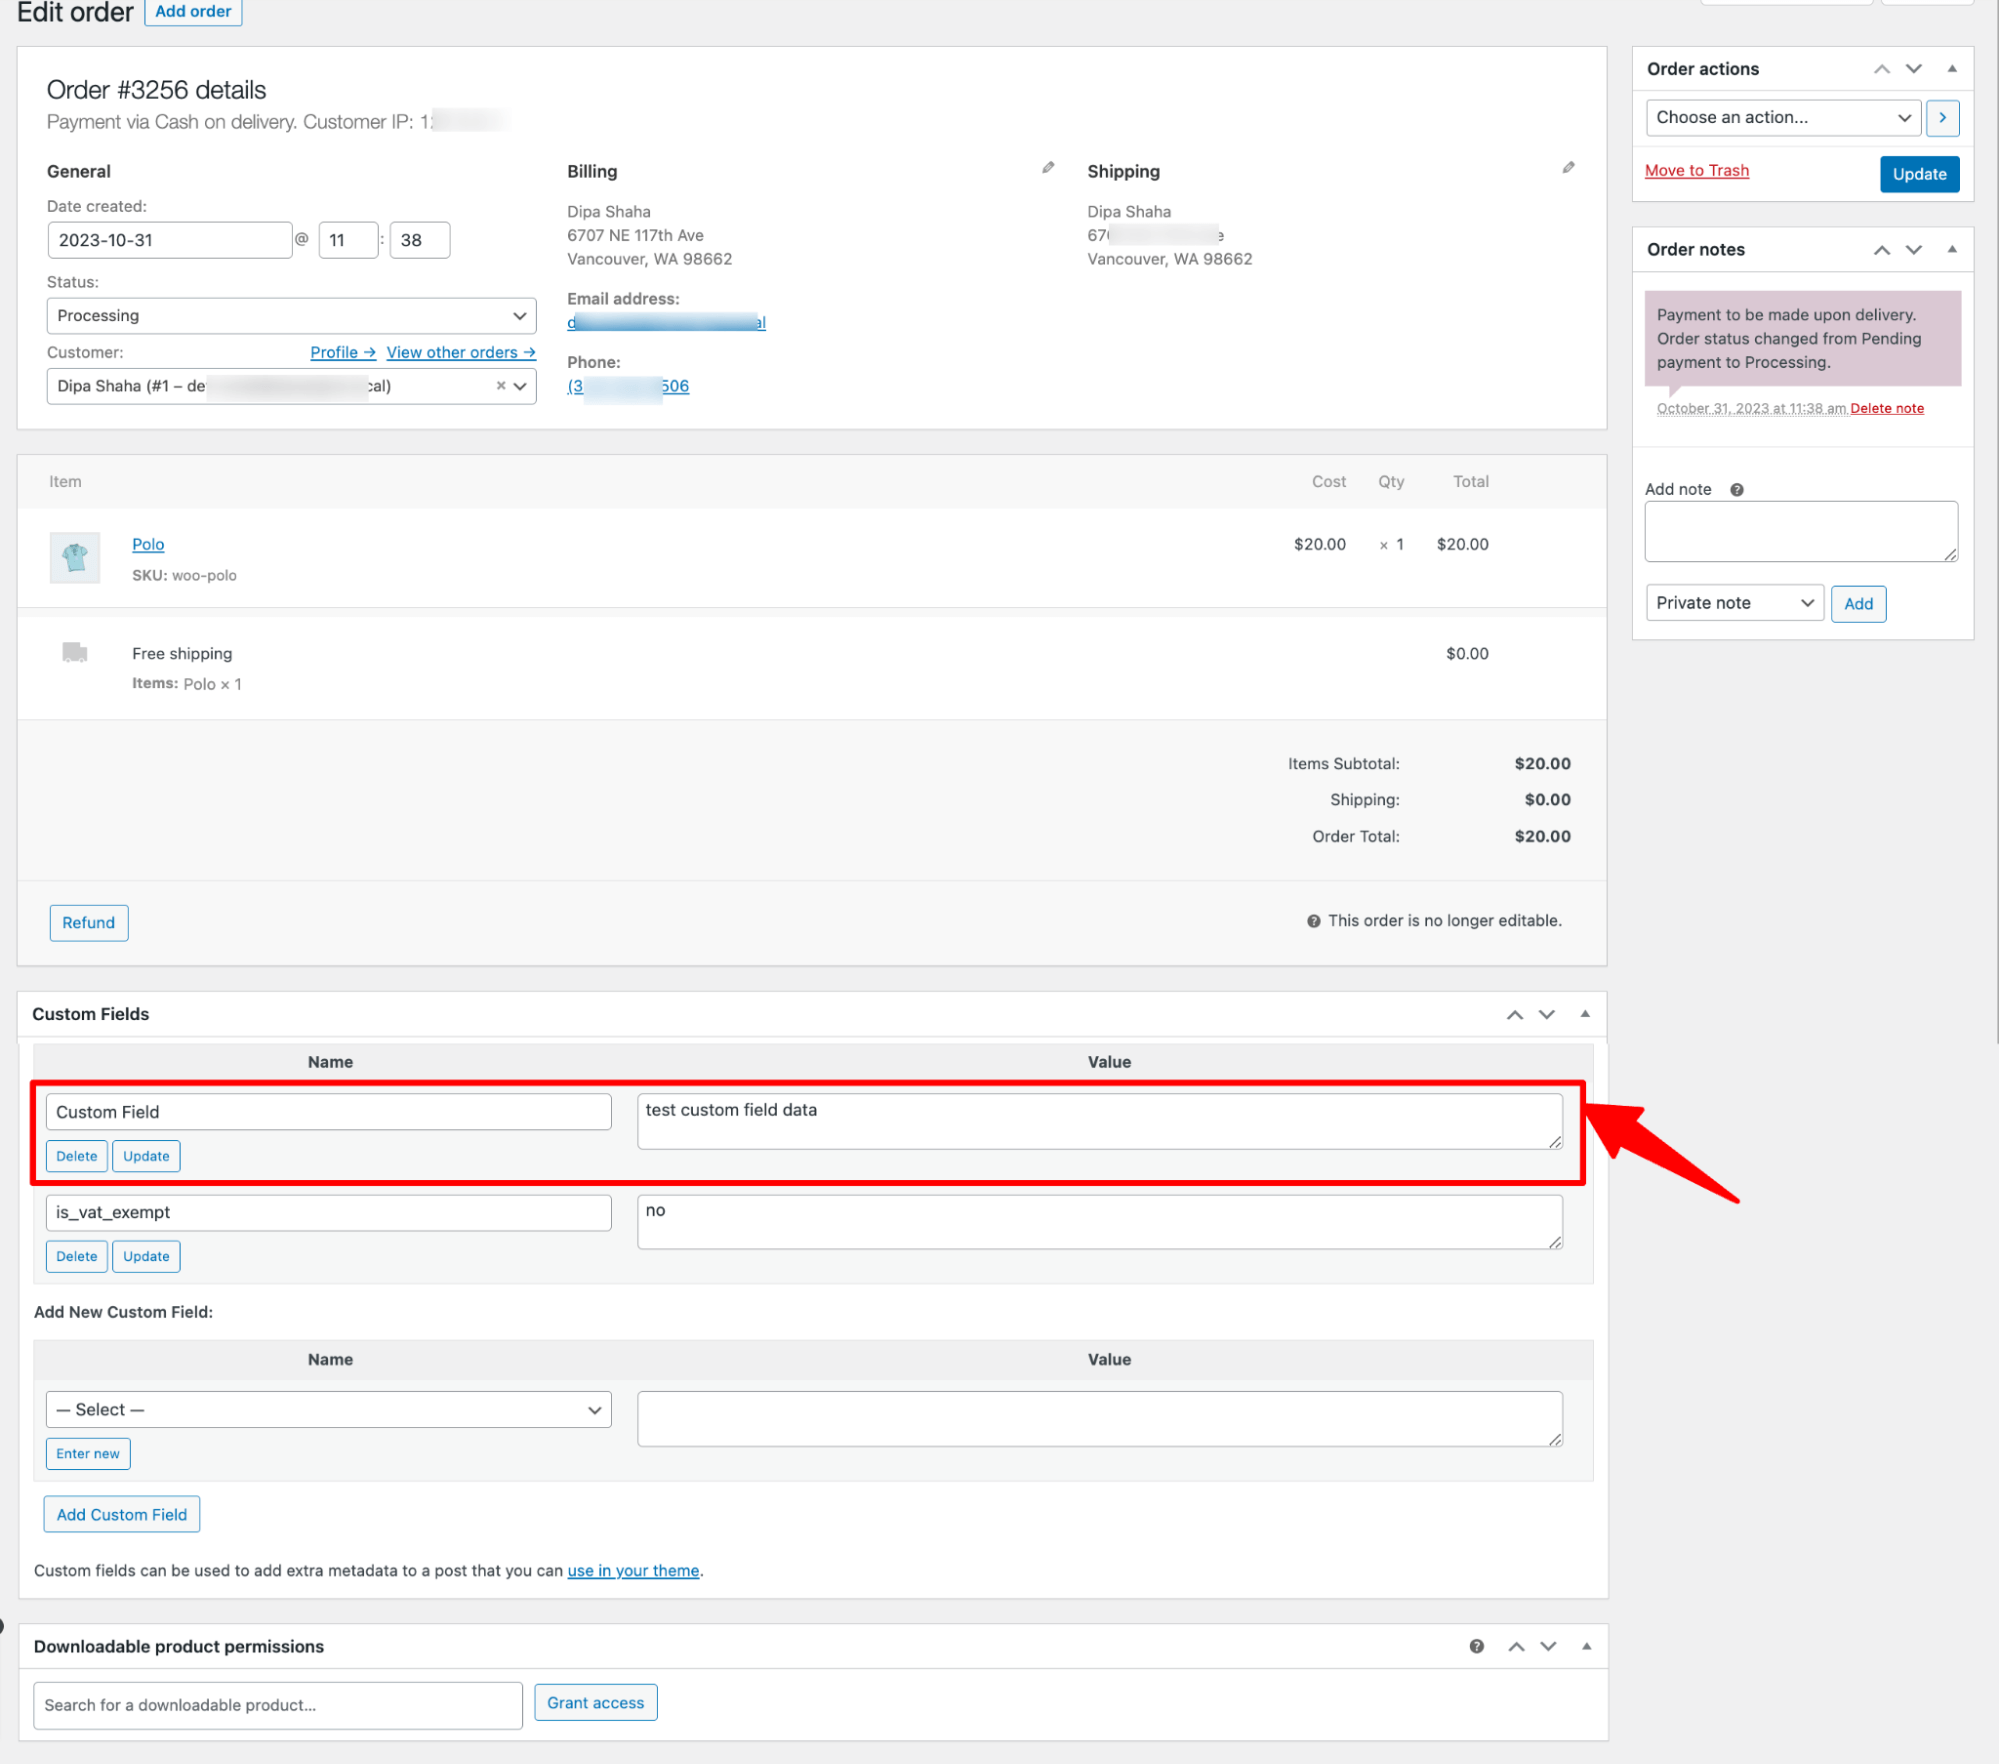
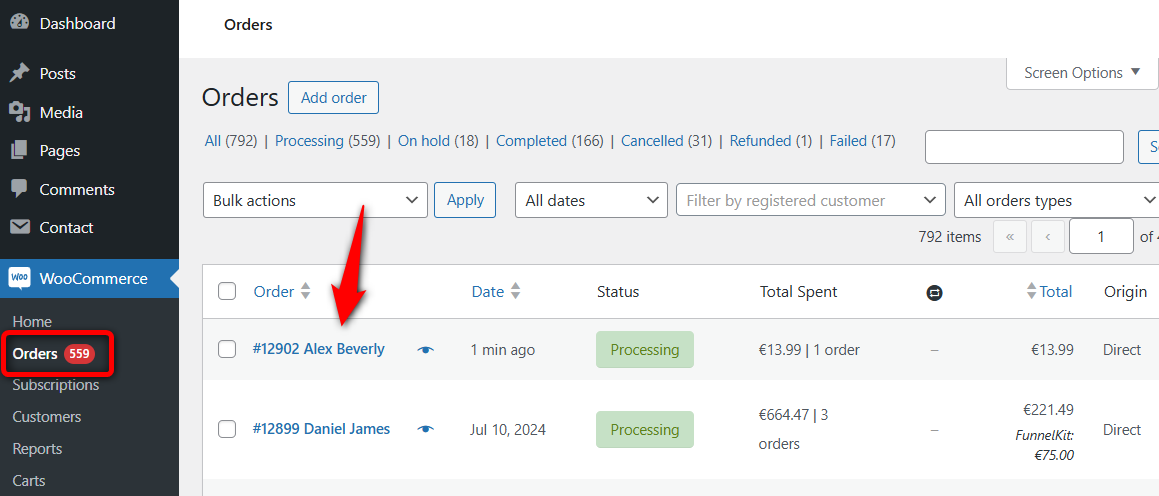
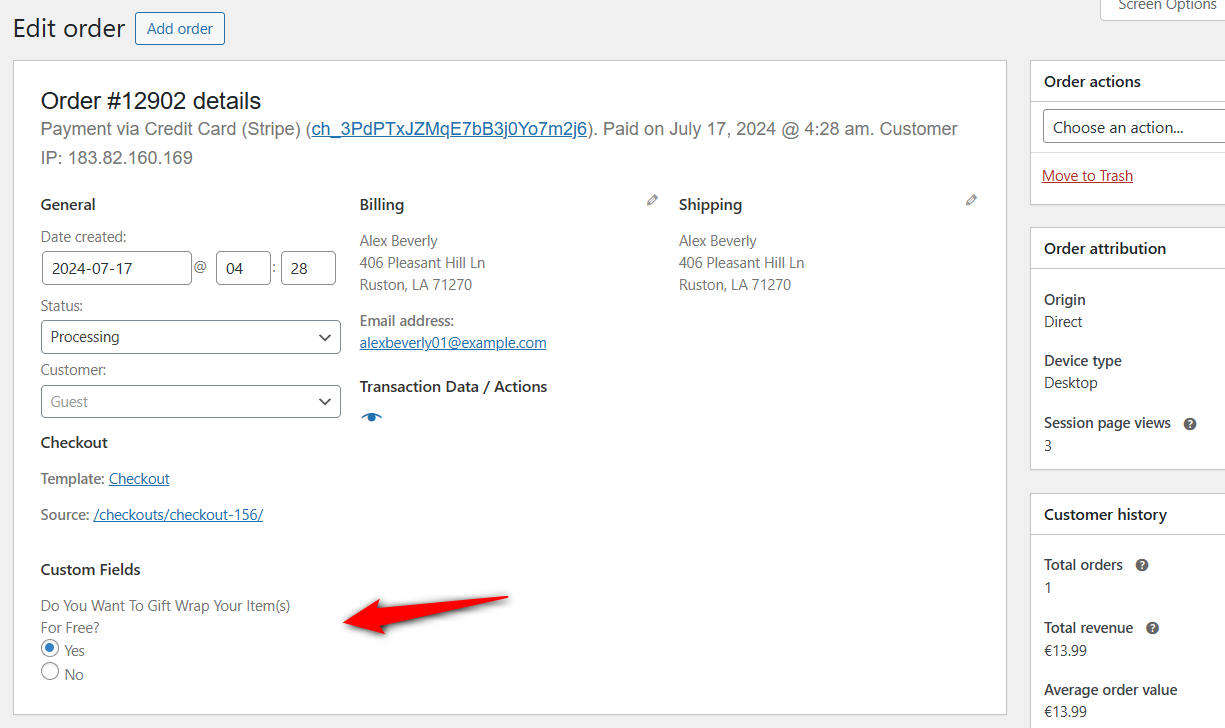
After placing the order successfully, check its details by navigating to WooCommerce ⇒ Orders.
You will find the custom field with the entered value here.
This is how you can add a custom checkout field to the WooCommerce checkout page with coding.
Note: FunnelKit allows you to create a VAT number field on the checkout page. Learn more on our blog on how to add an EU VAT Number Field to WooCommerce Checkout.
Why Adding a Custom Field to Your WooCommerce Checkout with Coding Isn’t a Good Idea?
While adding a custom field using code isn’t the worst idea, it’s not the best option either.
Here are some of the reasons why you shouldn’t use raw coding to add a custom field to the checkout page:
- PHP expertise required: Adding custom fields through raw coding demands a professional level of PHP knowledge.
- Ongoing code monitoring: Even for those skilled in coding, constant code monitoring is necessary to ensure compatibility with the latest WooCommerce versions, themes, and plugins.
- Code conflict risk: Incorporating code directly into theme files can lead to conflicts. Updates to your theme or WooCommerce may render custom code incompatible, potentially causing functionality issues.
- Only partial solution with child themes: While creating a child theme can help with some customization issues, it doesn't resolve all potential problems when adding custom code to your WooCommerce checkout.
- Lack of flexibility: Hard-coded fields are difficult to modify or remove without further coding.
- Time-consuming: Writing, testing, and debugging custom code takes significant time. You may need the help of a professional developer for any further customizations.
- Potential for errors: Manual coding increases the risk of bugs or security vulnerabilities, where small mistakes can lead to major checkout issues.
That’s why we suggest you use a renowned WooCommerce plugin to add a custom field to your WooCommerce checkout page.
In the next section, we will show you how to add a custom field to the WooCommerce checkout page without a plugin.
Method 2: How to Add a Custom Field to a WooCommerce Checkout Page using FunnelKit Funnel Builder? [Without Coding]
To add an extra custom checkout field to the WooCommerce checkout page, we will use FunnelKit Funnel Builder. This highly popular plugin powers over 20,000 WooCommerce websites worldwide.
We chose this plugin because it allows adding a custom field to your WooCommerce checkout form by simply dragging and dropping the fields without coding. Along with adding, you can also control the order of your checkout form fields.
FunnelKit Funnel Builder is not just a WooCommerce checkout field editor; it's a complete WooCommerce checkout manager plugin that helps you create a multi-step checkout page and optimize it for a frictionless checkout process.
To follow along with the process, you need to install and activate both:
- FunnelKit Funnel Builder (free)
- FunnelKit Funnel Builder Pro
After activating the plugins, follow these steps:
Step 1: Create a store checkout
Firstly, we need to create a store checkout that will replace the default WooCommerce checkout page.
For that, navigate to FunnelKit ⇒ Store Checkout and click on the ‘Create Store Checkout’ button.
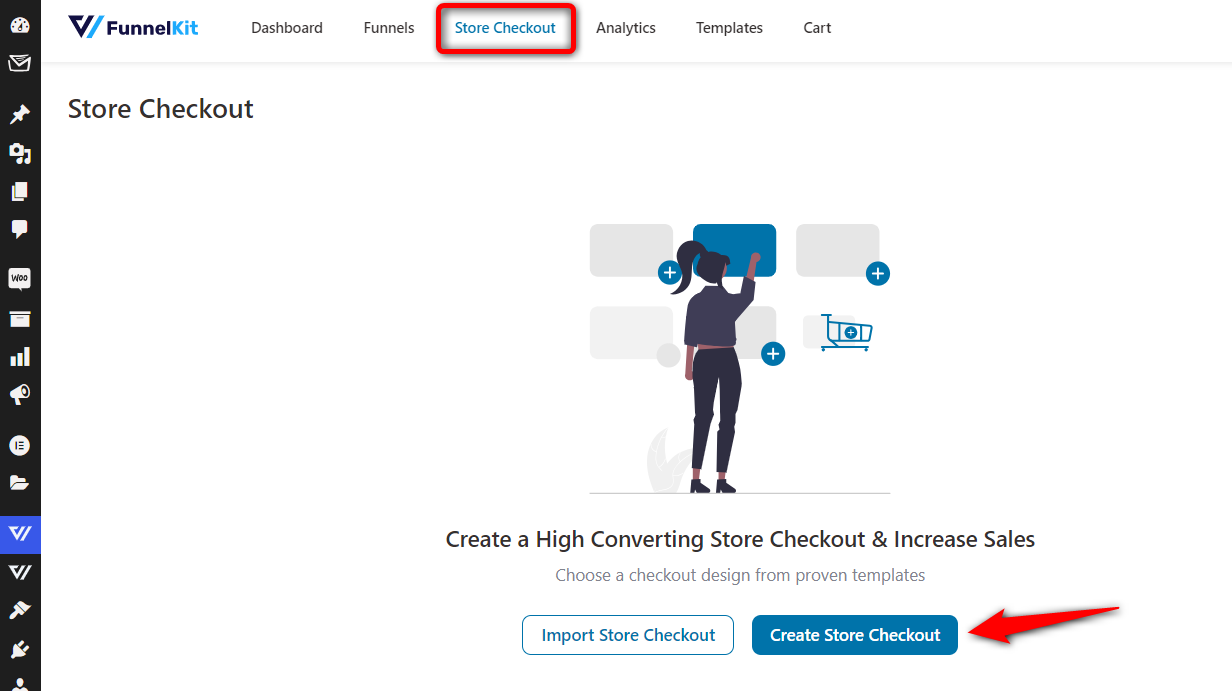
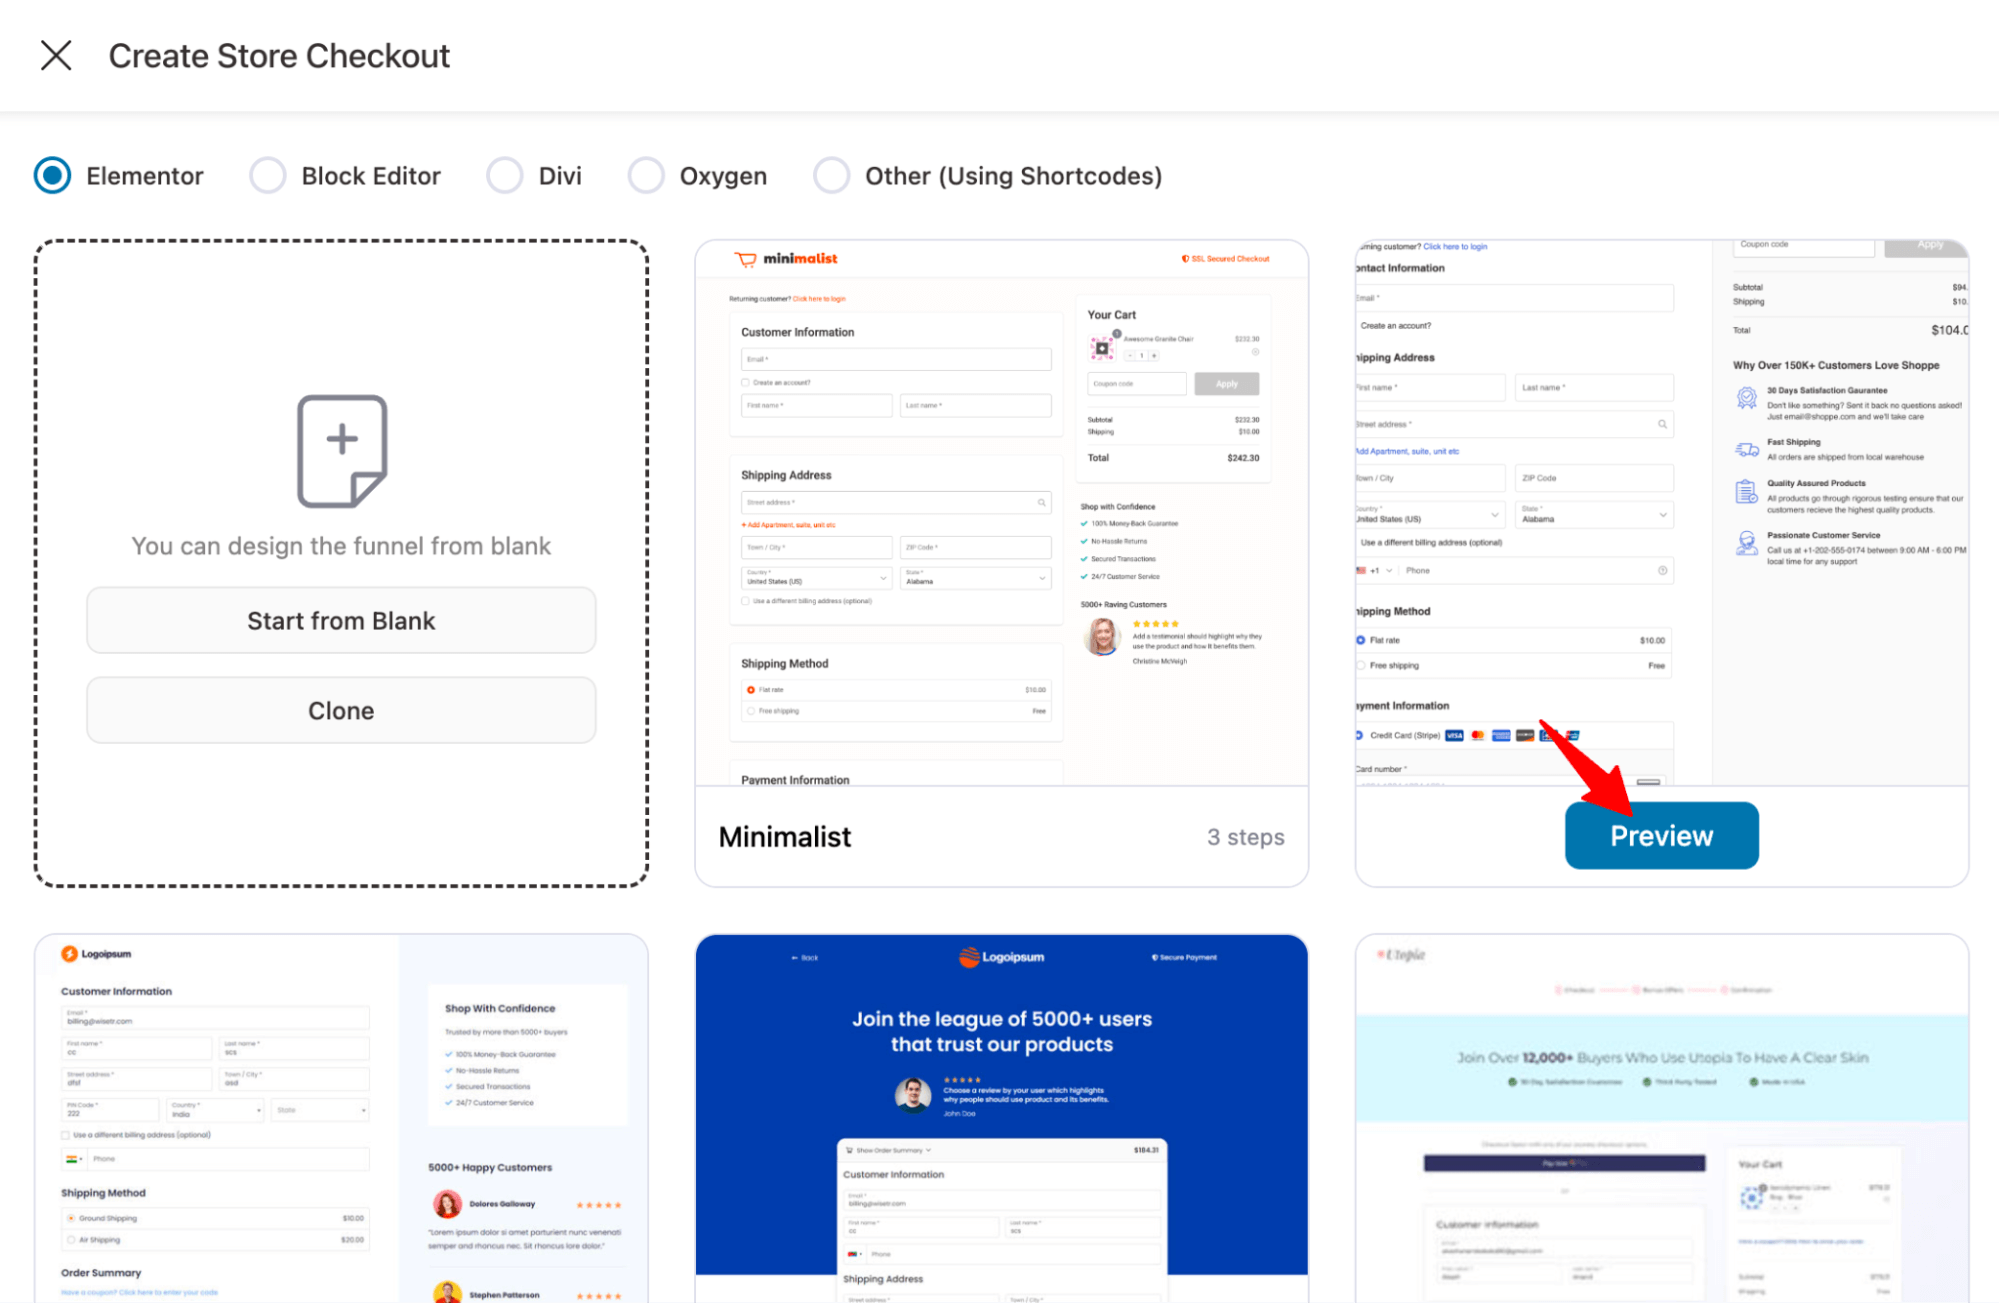
FunnelKit offers many pre-built templates for sales funnels and checkout pages.
Choose your favorite page builder. After that, hover over the template you want for your Global checkout and click on Preview. We are going with the Shoppe template here.
Now, choose whether you want a single-page checkout or a multi-page checkout. After that, click on “Import This Funnel,” provide a name, and click ‘Add’ to import this funnel as your default store checkout.
We are choosing a two-step checkout here.
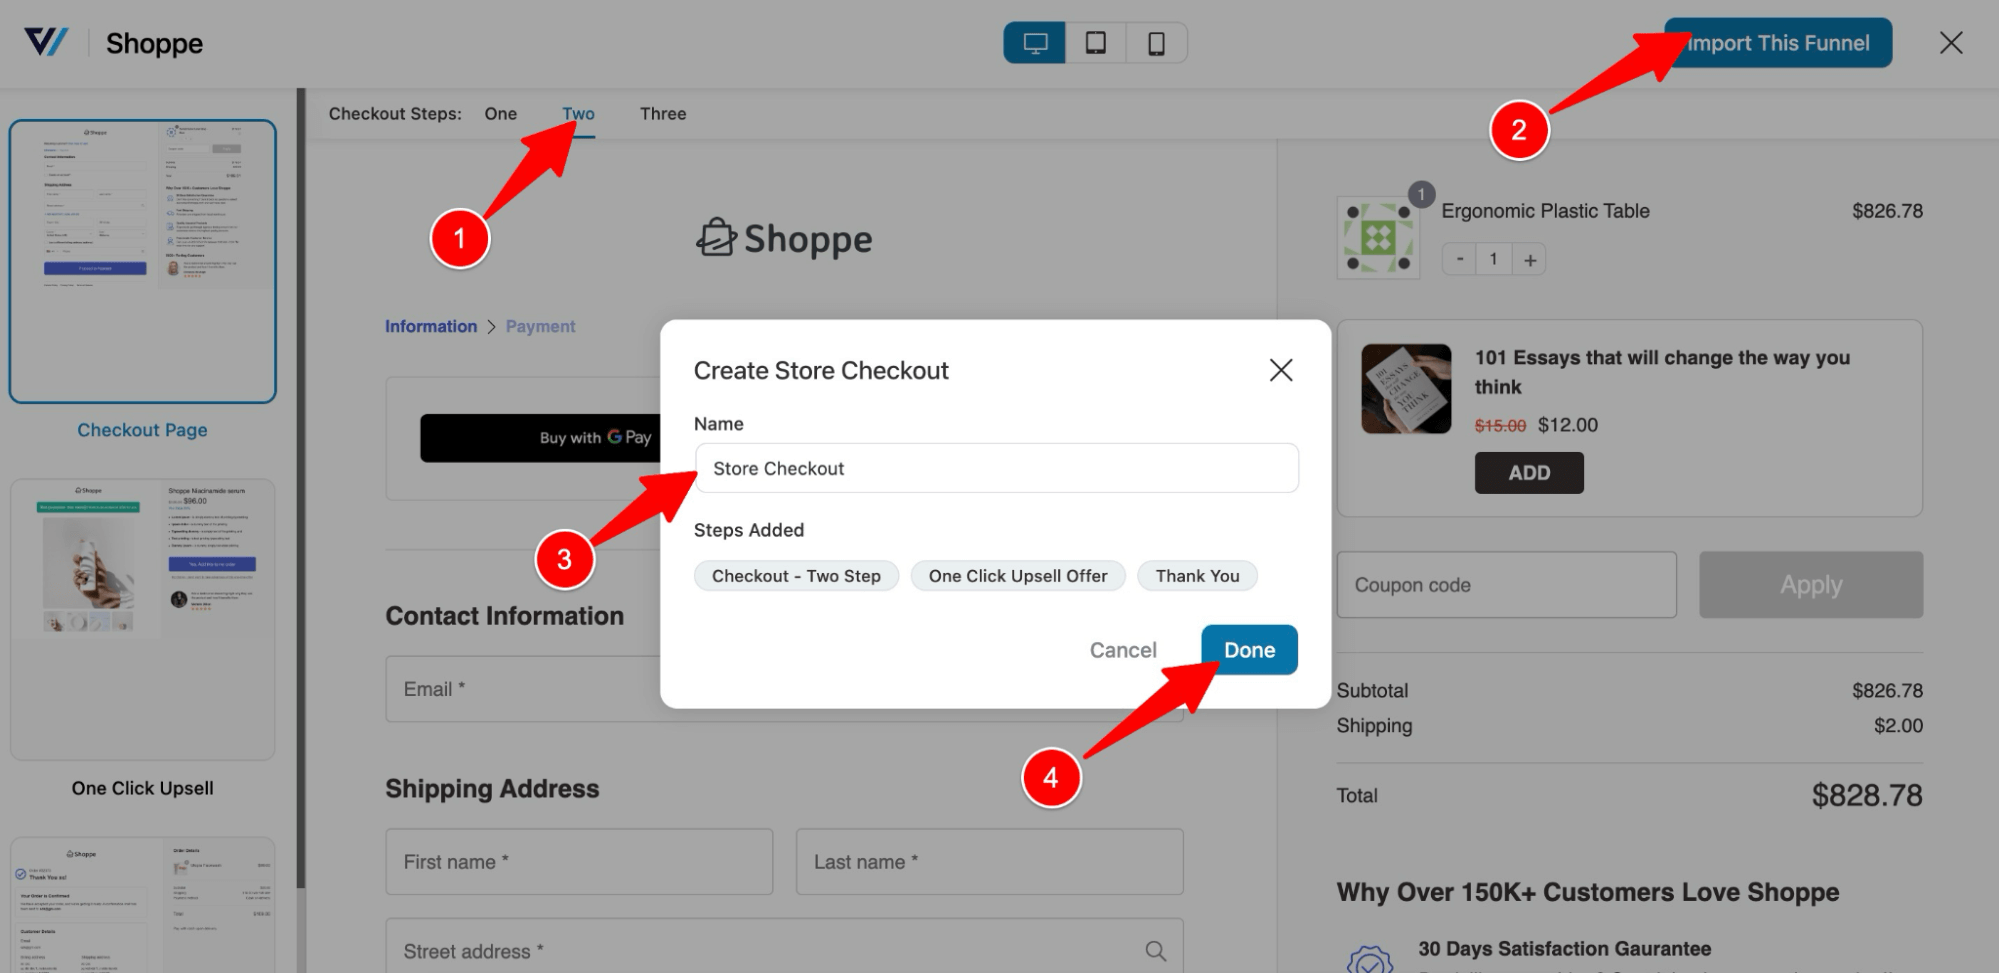
This will import a store checkout with two steps: Checkout, Upsell, and Thank you page.
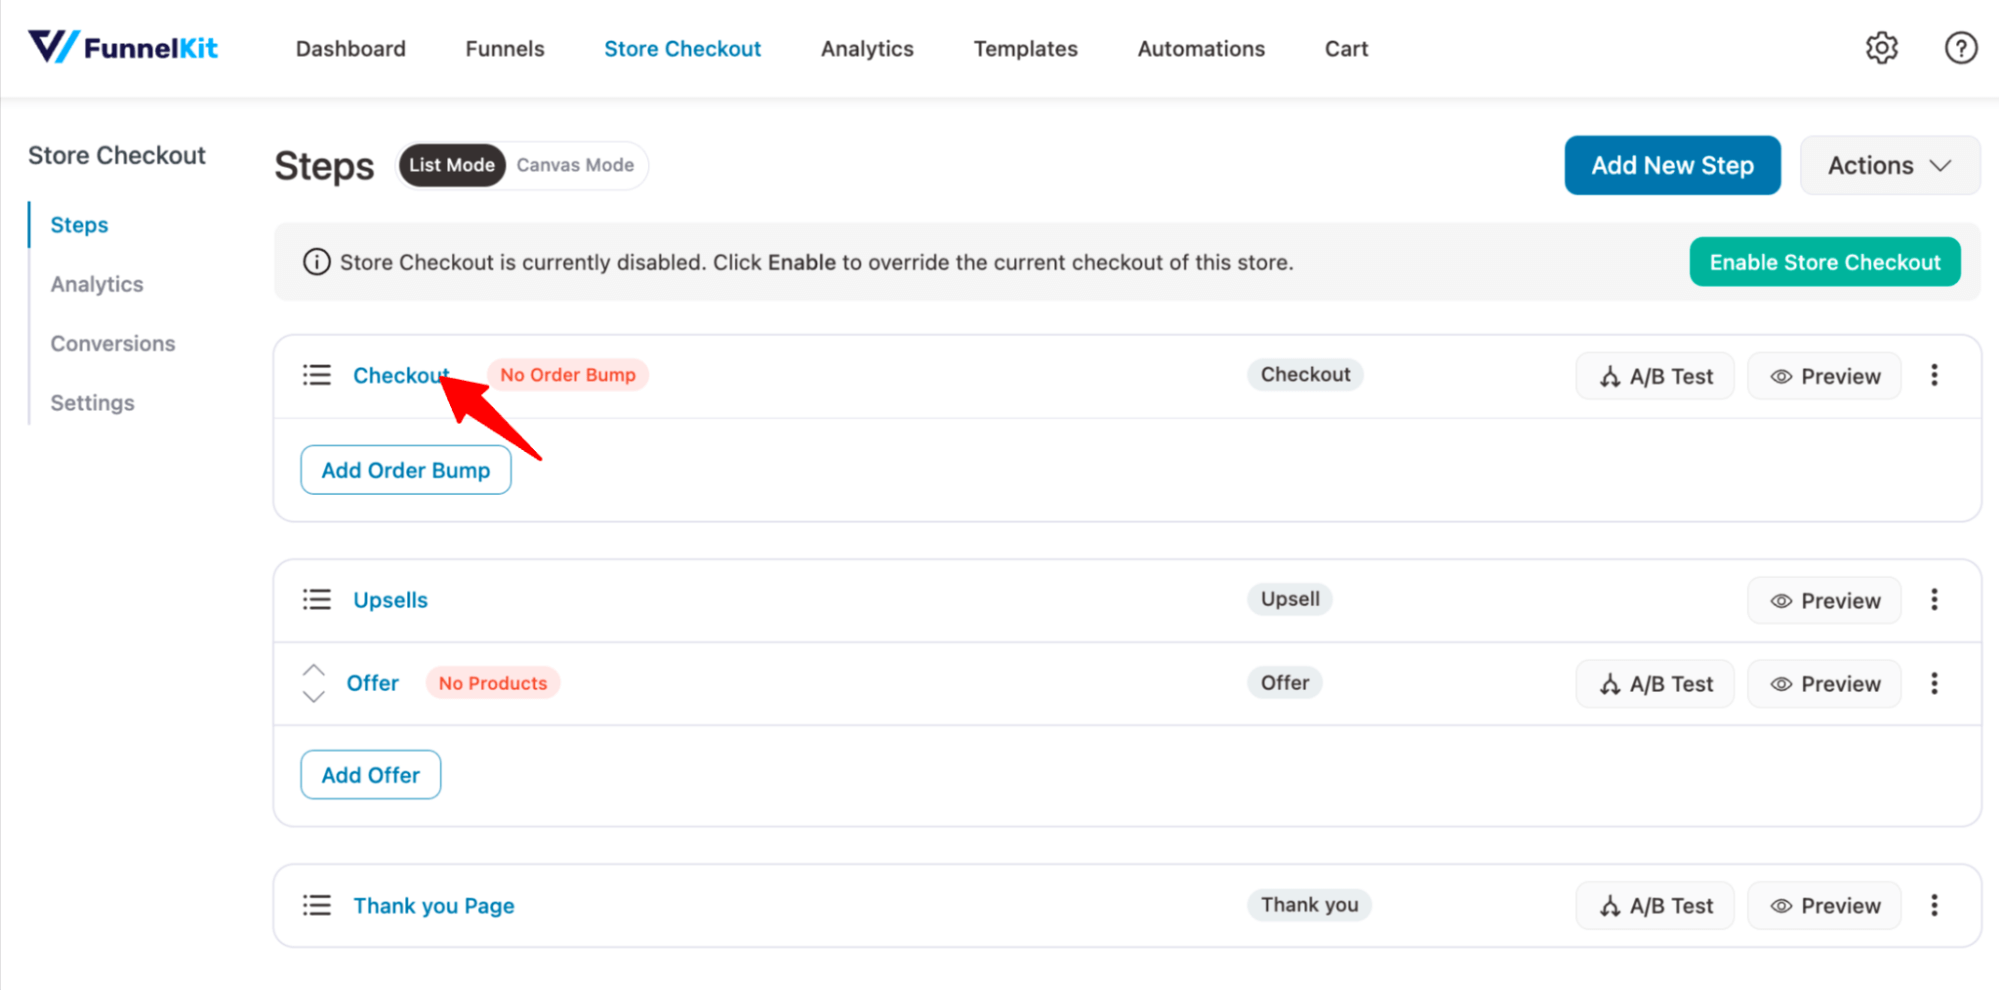
Step 2: Create a custom checkout field
Now, to edit the WooCommerce checkout page and add a field, click on the “Checkout” step.
On the design tab, you can customize the design and content of the checkout page.
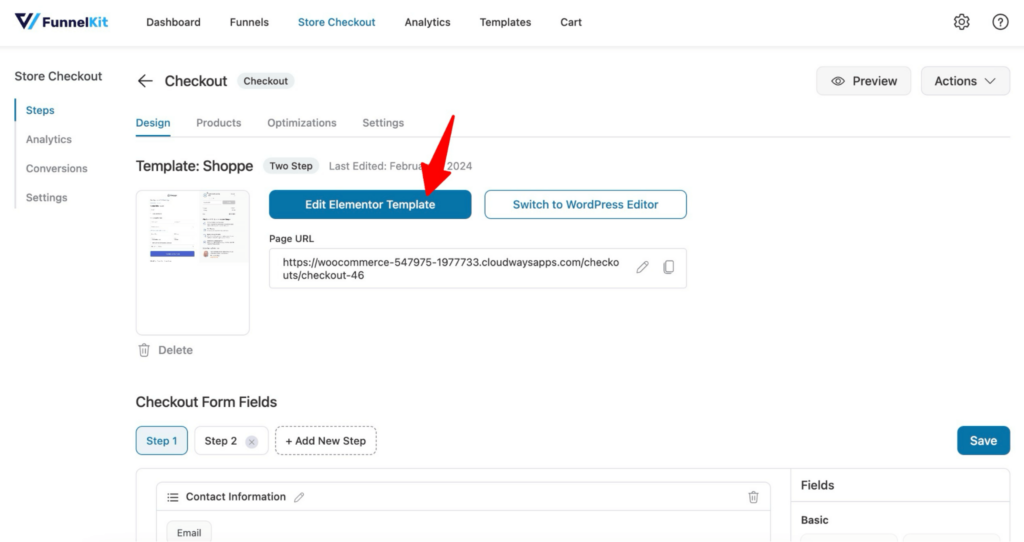
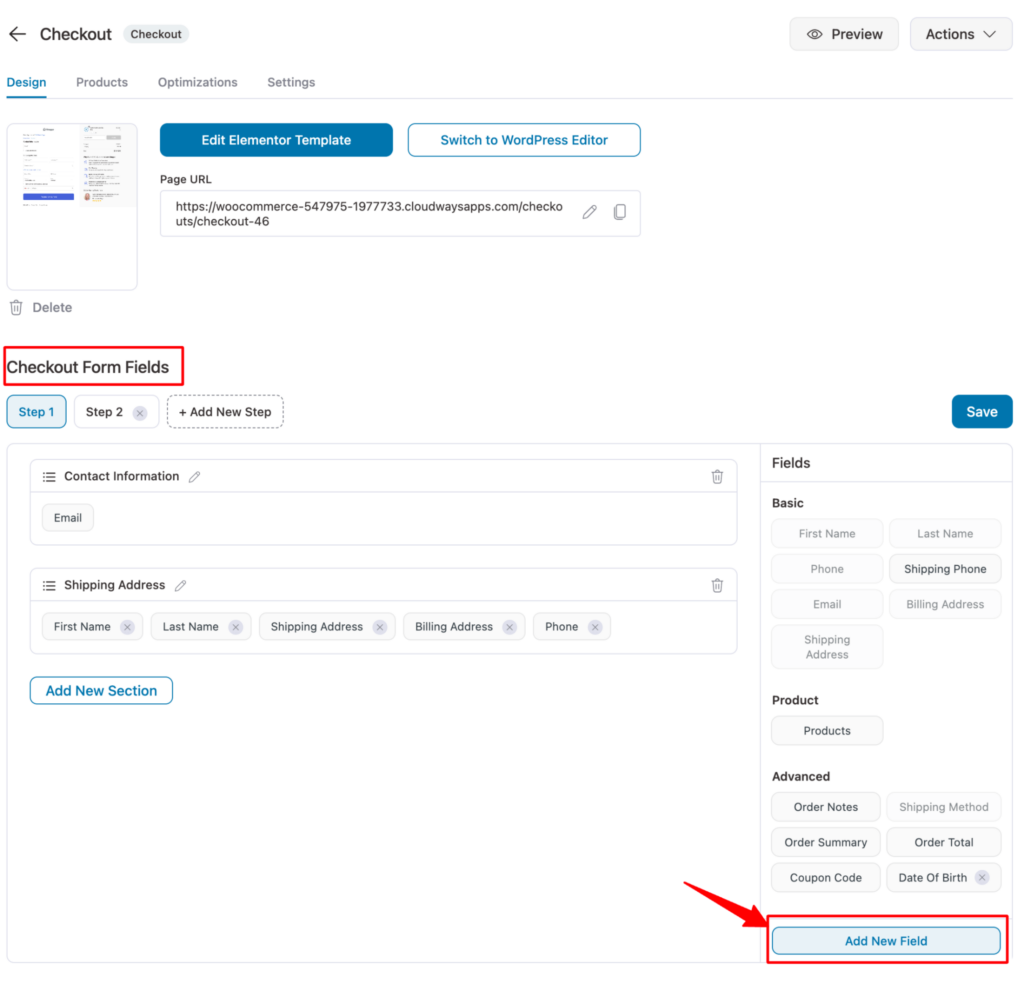
After customizing, scroll down to the “Checkout Form Fields” to create an extra field. You will find the default form fields have already been added to the checkout form.
To add a custom field, click on “Add New Field” under the Advanced section.
Note: Along with the default fields, FunnelKit also allows you to add a Date of Birth field to your checkout field so you can use their birthdate to send automated birthday emails to customers.
Here, you can create an extra custom checkout field. You can create different types of WooCommerce custom fields, such as:
- Single line text
- Checkbox
- Radio
- HTML
- Dropdown
- Select2
- Multi-select
- Paragraph text
- Number
- Telephone
- Hidden
- Password

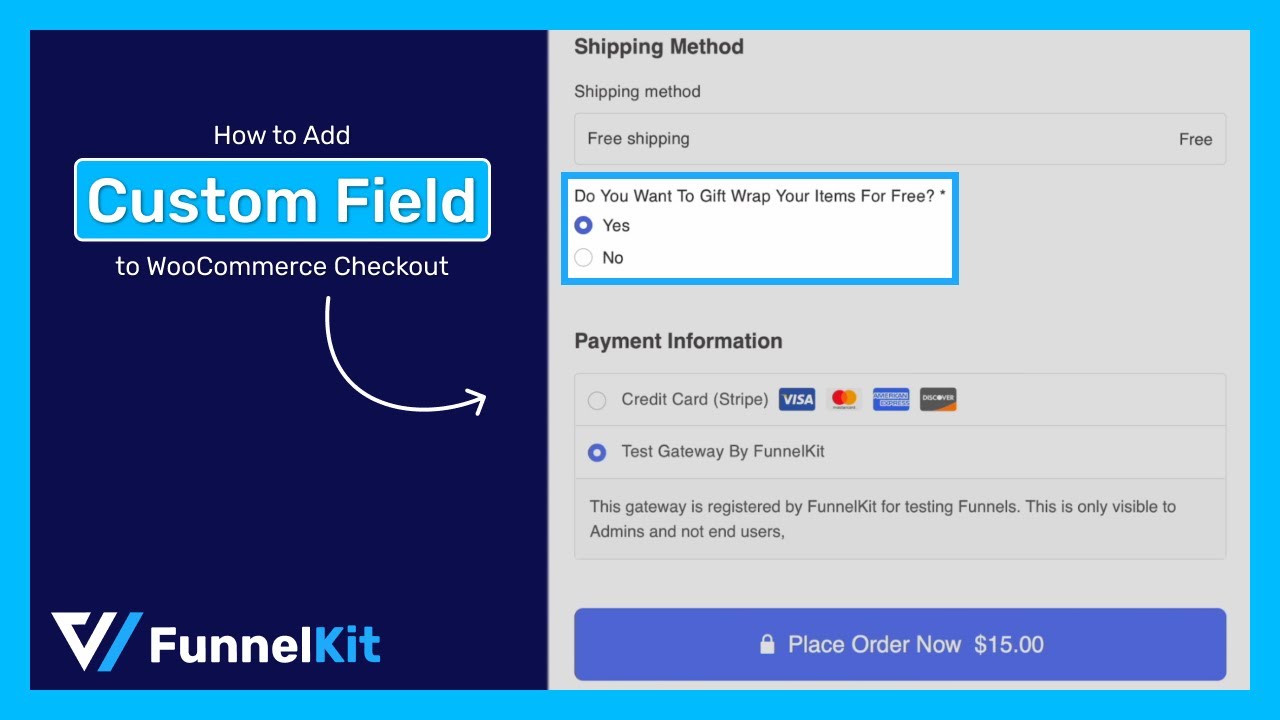
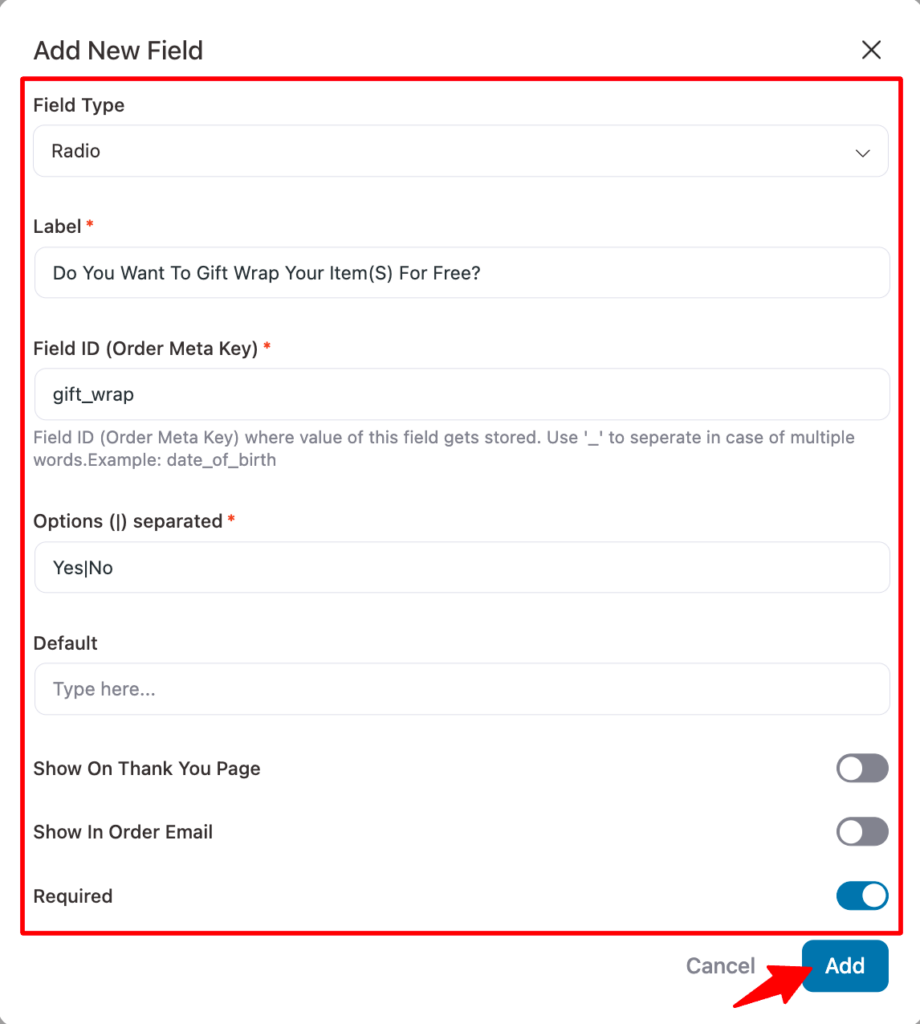
Here, we will share how you can create a custom Radio field “Do You Want To Gift Wrap Your Item(s) For Free?” for your checkout page.
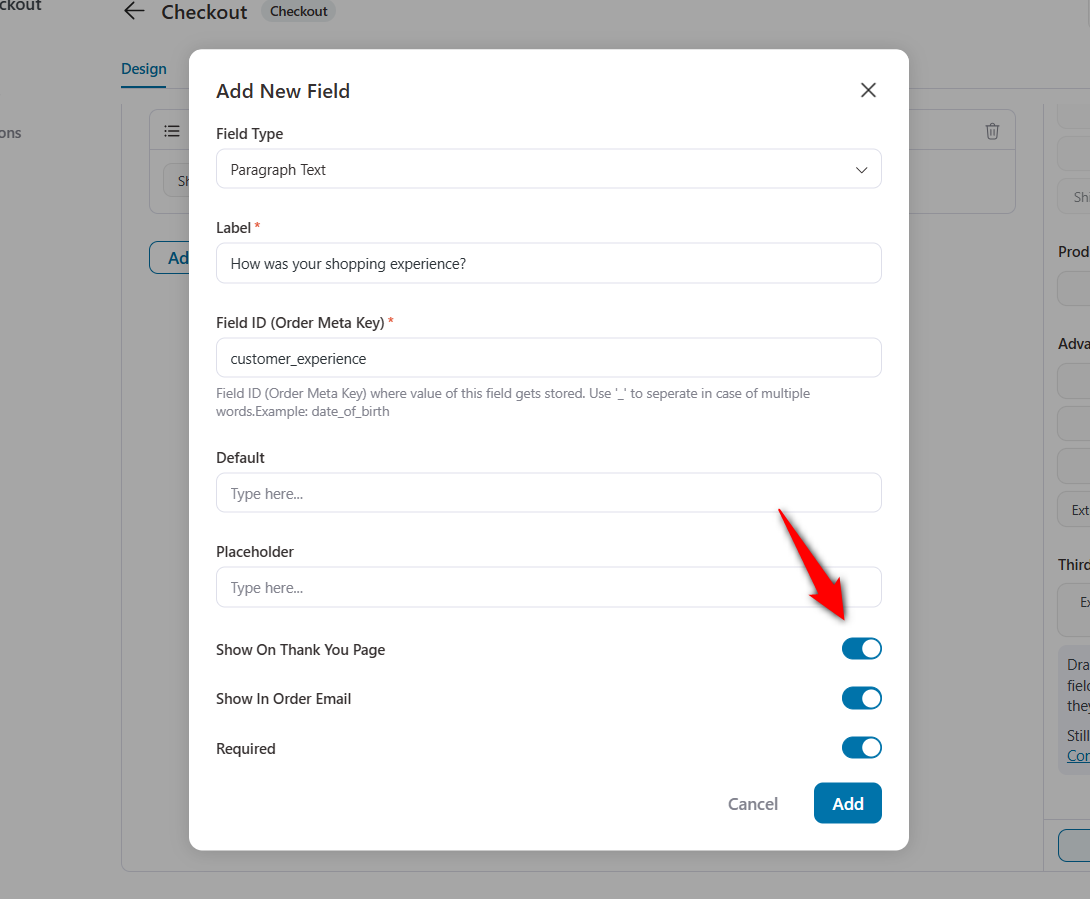
For that, select the Radio as Field Type and provide the following options:
- Label: Provide a level for the custom field.
- Field ID (Order Meta Key): You need to add a field ID; in case you use multiple words, you can append them using “_”.
- Options (|) separated: Add the options separated by “|”. We are adding two options: yes and no.
- Default: Provide the default value for this custom field. However, this is optional.
- Show On Thank You Page: Check this option if you want the value passed by this field to be shown on the thank you page.
- Show In Order Email: If you want to include this field in your order emails, check this option.
- Required: To make the field required, check this option. To make it optional, leave it unchecked.
Finally, click on “Add Field” to create the field.
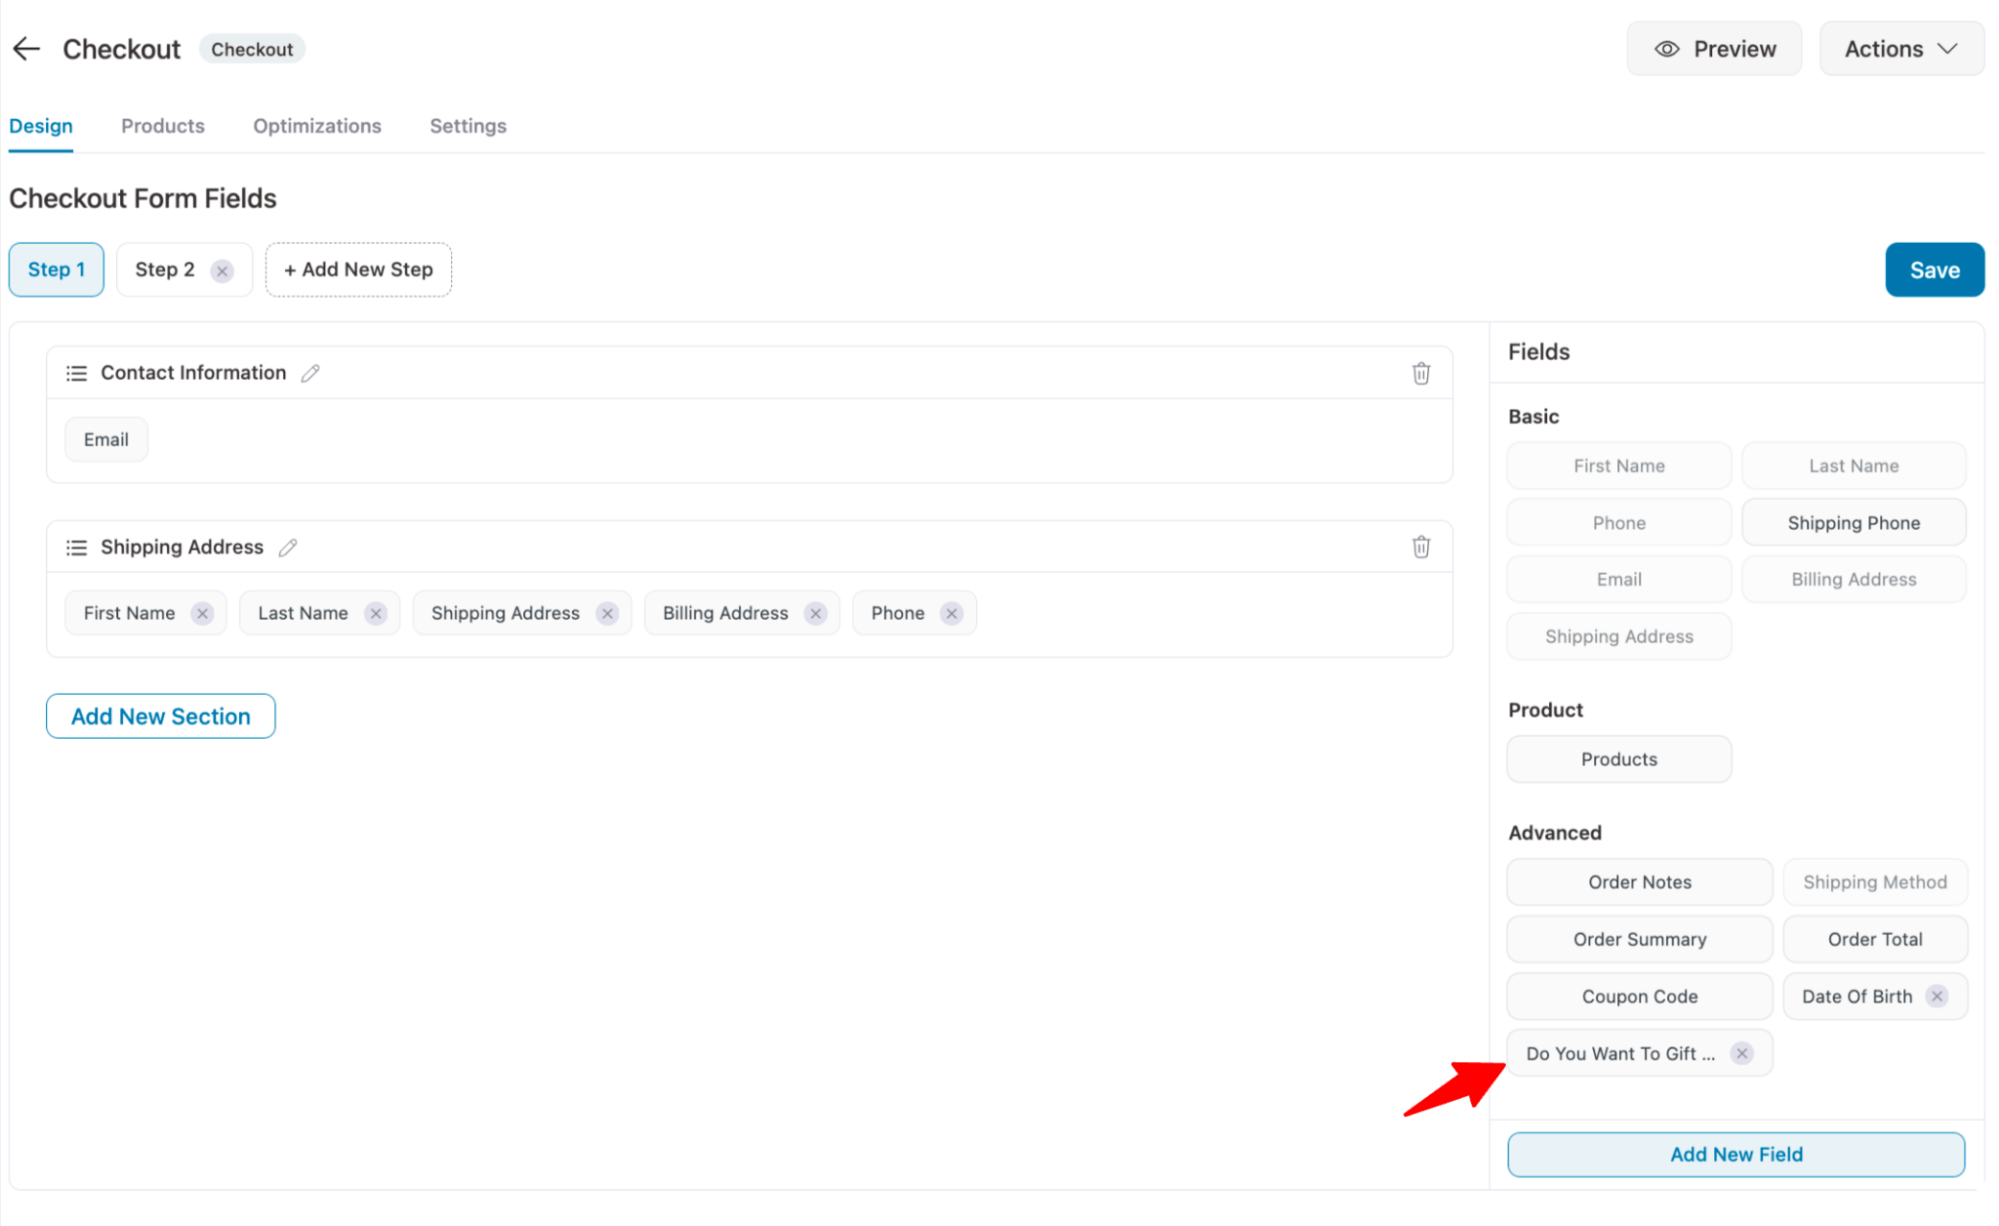
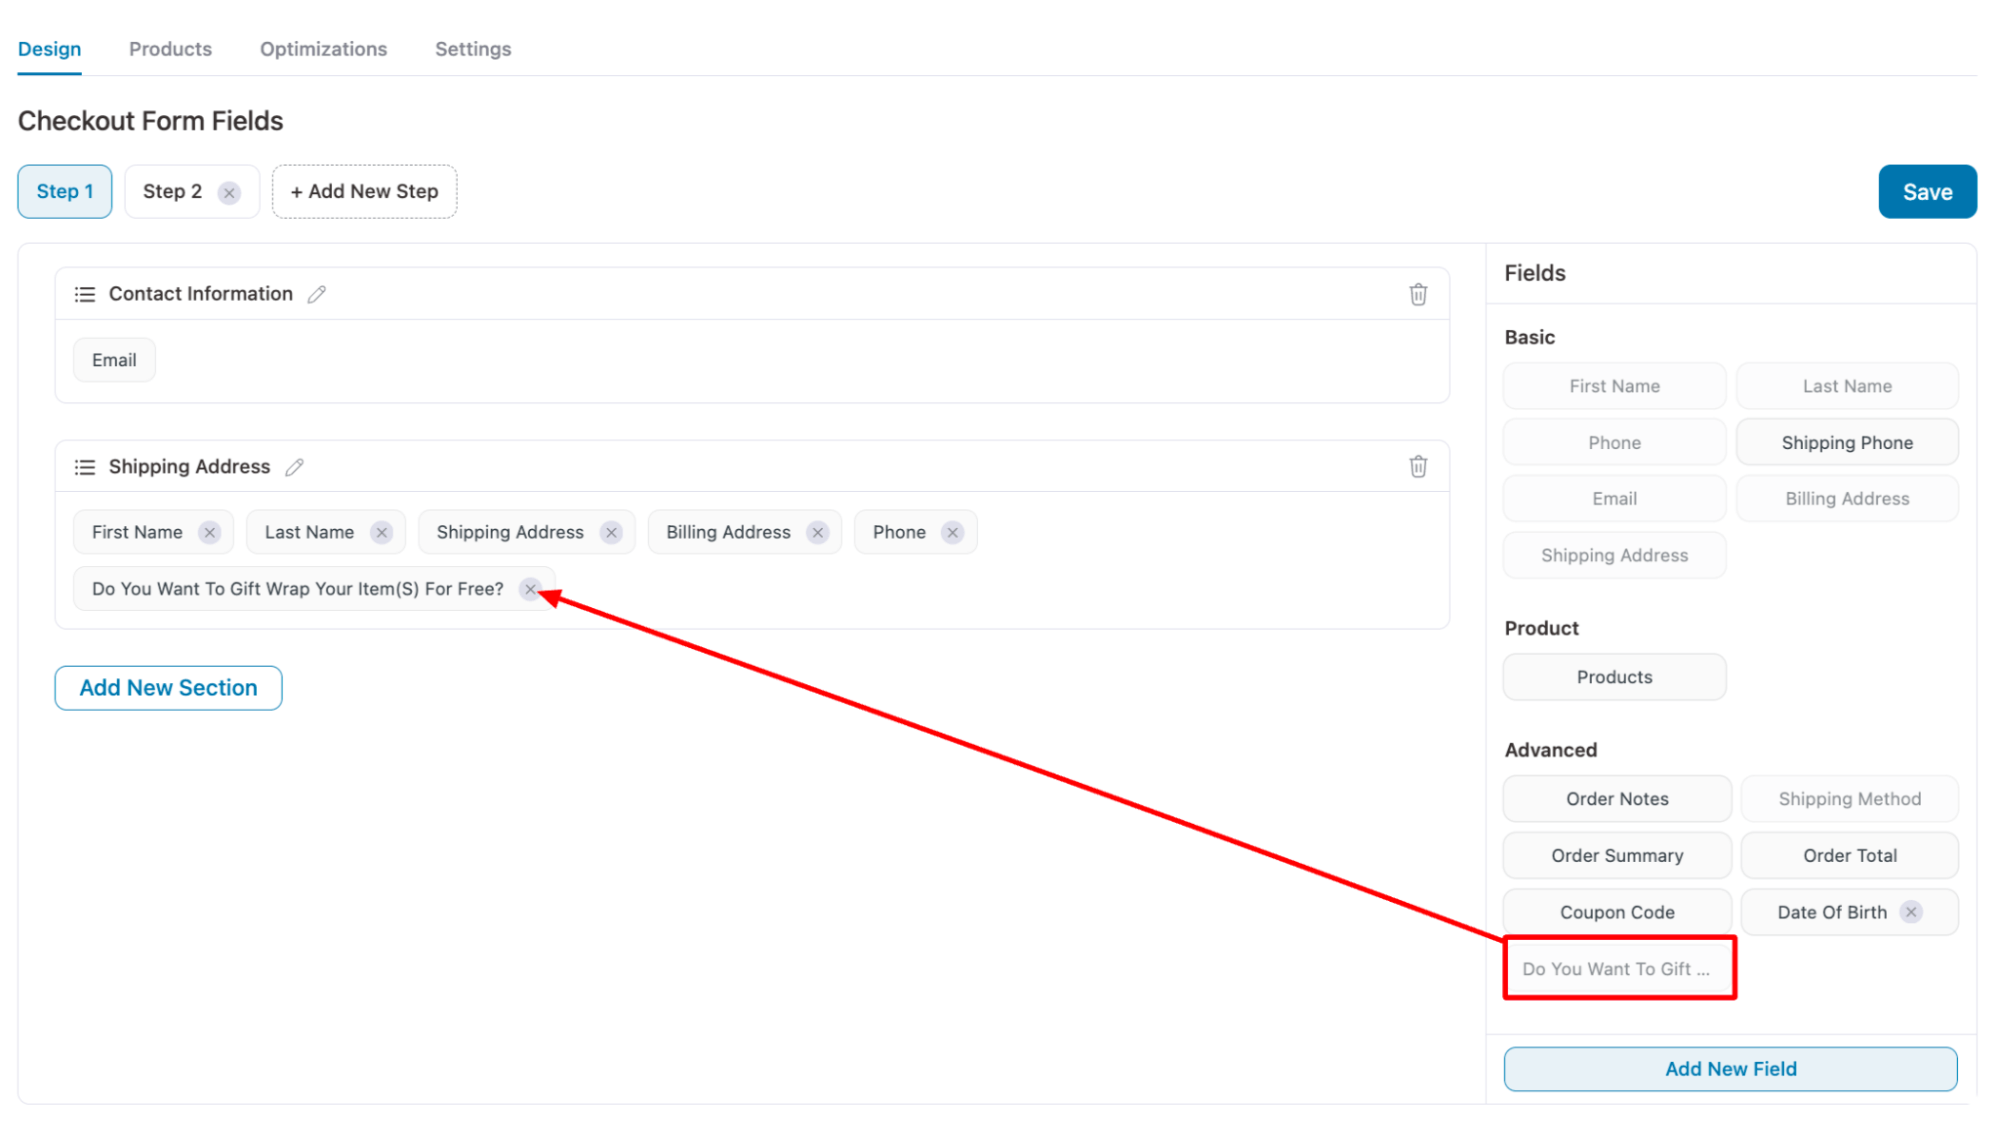
Now, you should see an extra checkout field you just added in the Advanced section.
Step 3: Add a custom field to the WooCommerce checkout form
To add the custom field you just added to the checkout form, drag and drop the field there and place it in any section on the checkout form.
We are going to add it to the “Shipping Address” section here.
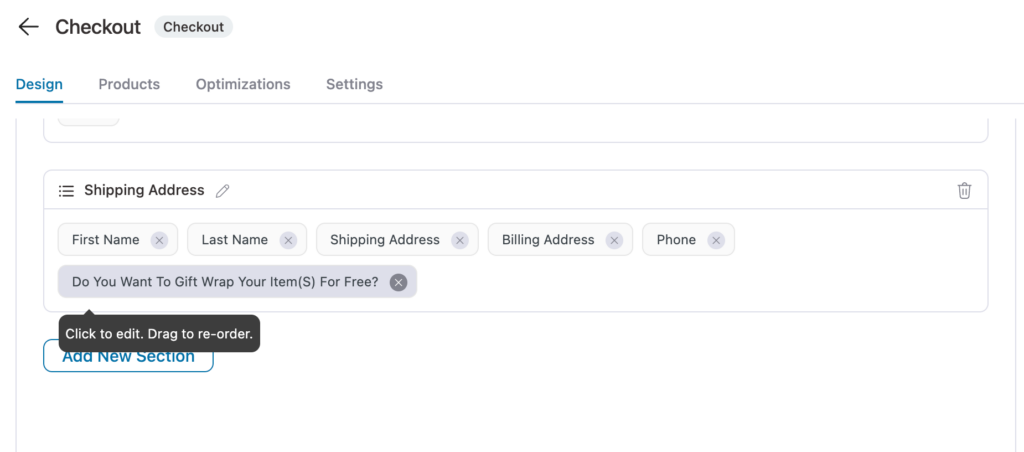
You can also change the order of the extra checkout field by dragging and dropping. Just hold the field and drag and drop in the order you want.
After adding the custom field to your WooCommerce checkout page, click on ‘Save Changes’.
Note: You can add any WooCommerce custom fields following the abovementioned process.
Step 4: Optimize your checkout form fields for frictionless checkout
FunnelKit Funnel Builder provides many checkout optimization options so your customers can enjoy a frictionless checkout experience.
To ensure a seamless checkout experience, it's crucial to incorporate inline validation for your checkout fields. This allows users to view error messages as they fill out the form.
To allow inline validation, move to the Optimizations ⇒ Inline Field Validation and enable it. Make sure to click on ‘Save Changes’ to update the settings.
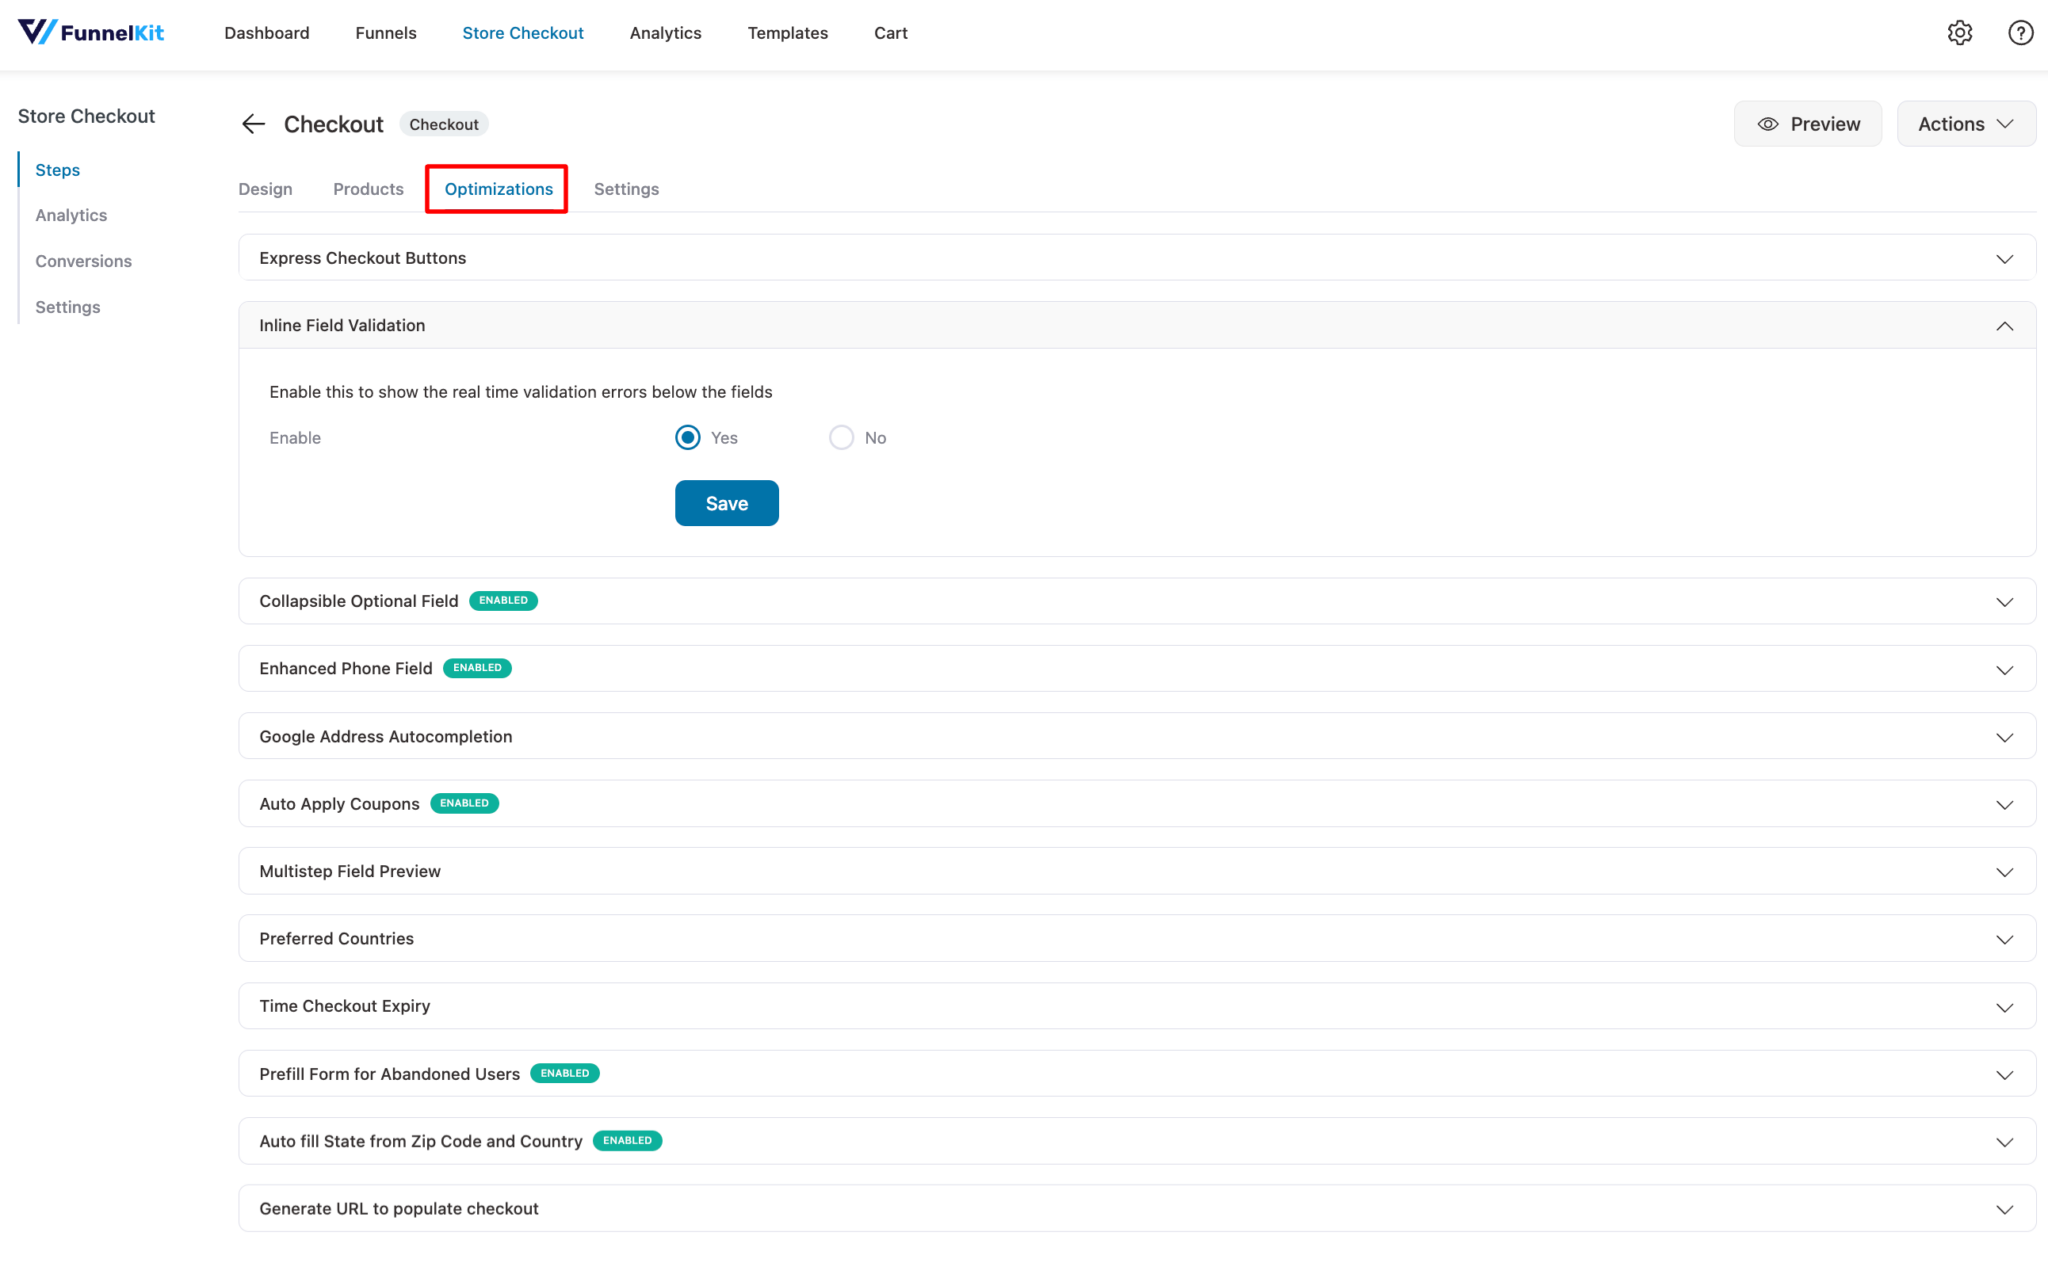
Align with inline validation; you can also make the following optimizations:
- Collapsible optional fields to shorten the checkout form length
- Add express checkouts like Apple Pay and Google Pay
- Enable Google Address auto-completion
- Auto-apply coupon codes
- Enhanced form field, and so on.
Note: With FunnelKit’s Funnel Builder, you can add an order bump on the checkout page and customize the upsell and thank you page.
Step 5: Activate the store checkout
After optimizing the checkout forms, you need to activate the store checkout. To do so, enable the ‘Enable Store Checkout’ option.

That’s how easily you can add an extra custom field to the WooCommerce checkout page using FunnelKit Funnel Builder.
👉 Read our post on How to Add a File Upload Field to the WooCommerce Checkout Page.
Testing the Process and Accessing Custom Fields in the Admin Area
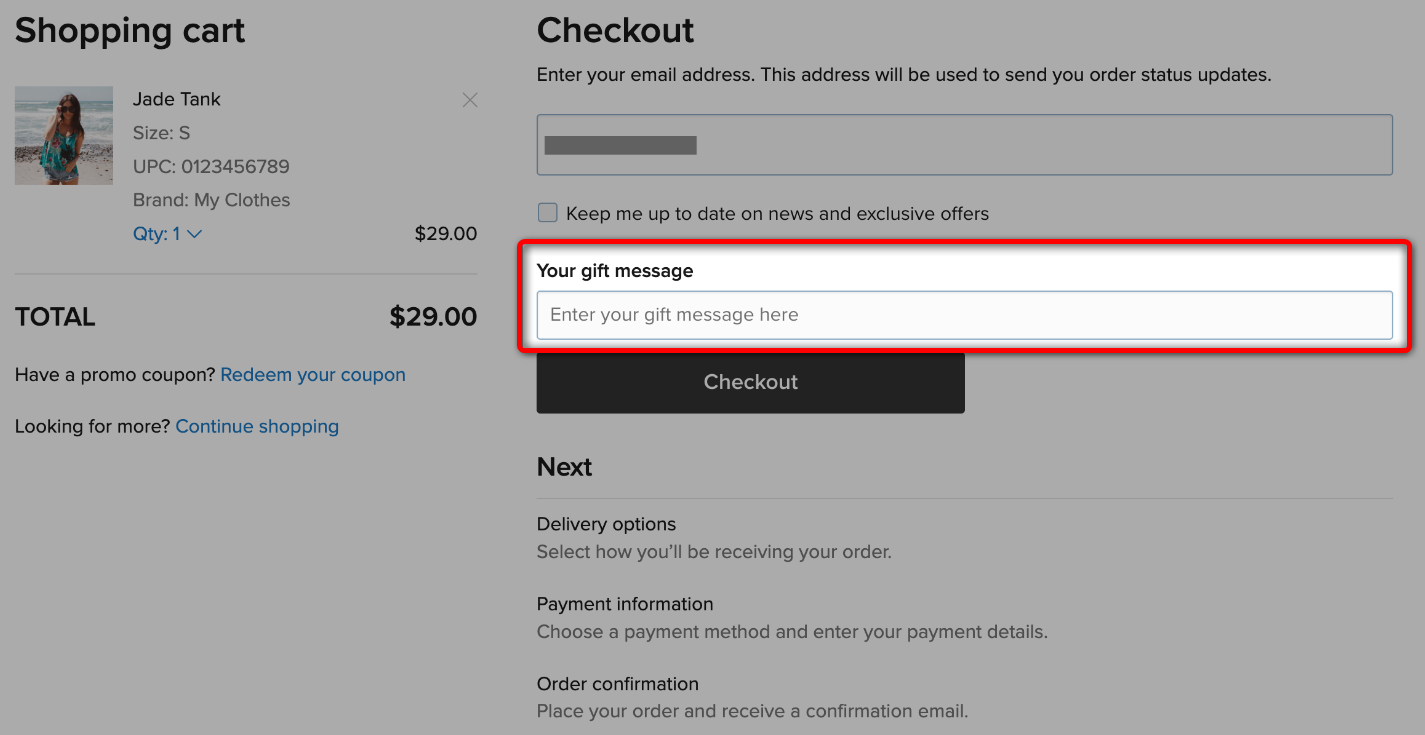
Go to your WooCommerce storefront and go to the checkout page to add items to your shopping cart.
Here’s what the WooCommerce checkout page with a custom extra field looks like:
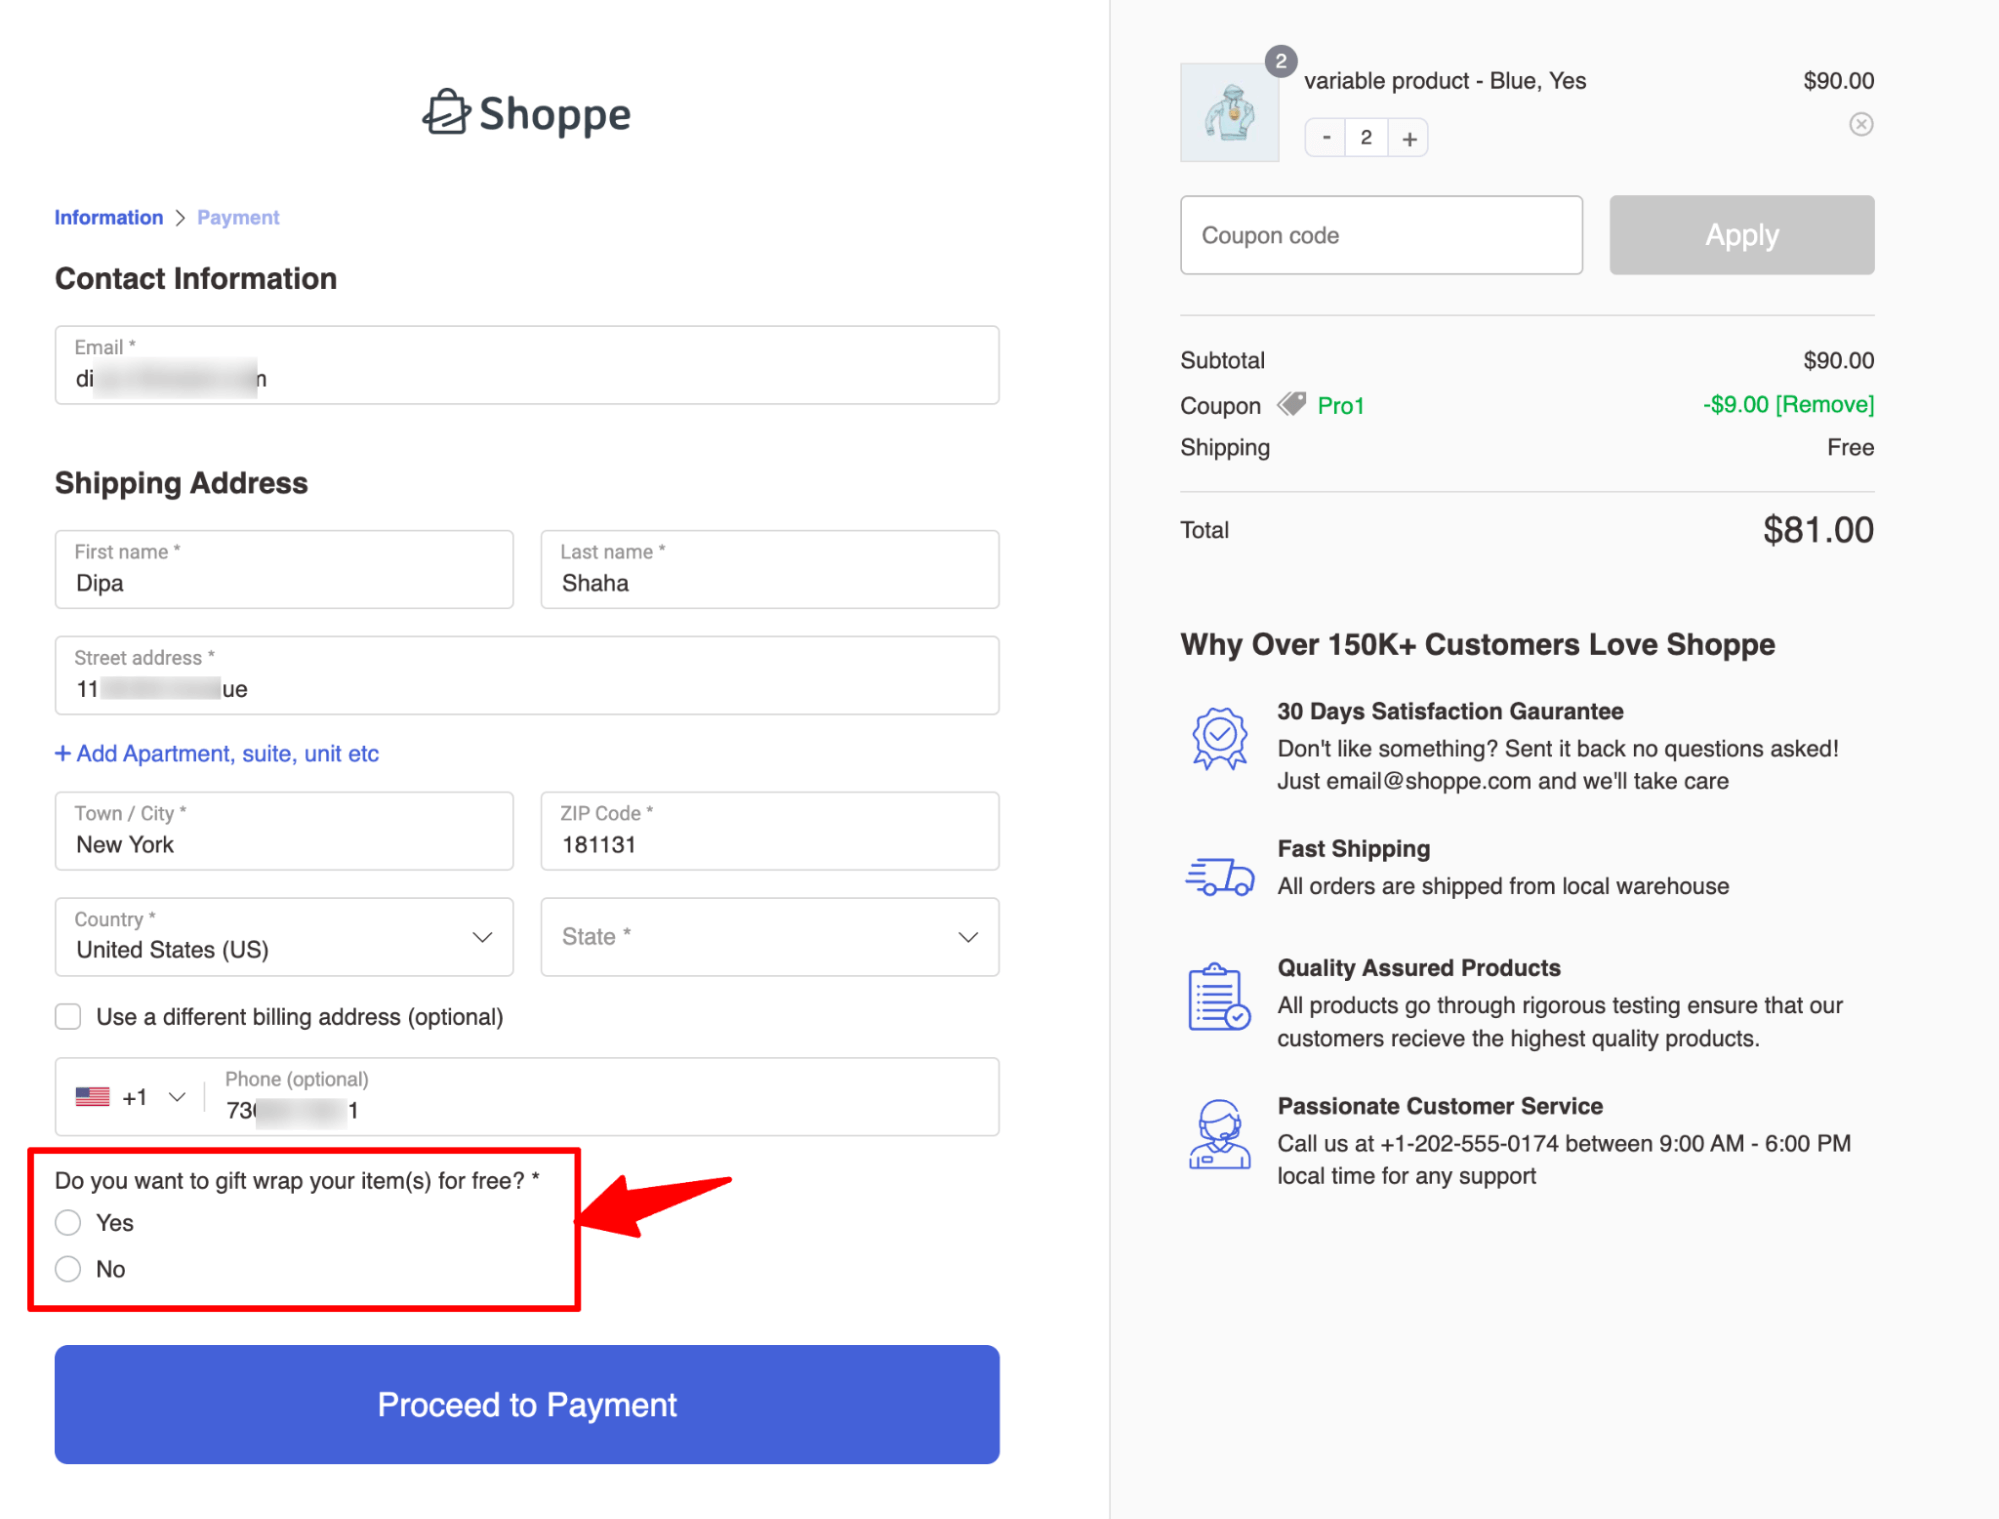
Select an option and proceed to make the test payment. This will place your order and redirect you to the order confirmation page.
Next, navigate to WooCommerce ⇒ Orders to access the custom field.
Here, you’ll be able to see the custom field:
You can use this custom field order during order processing by adding it to automated order emails and sending it to customers.
Or you can even include WooCommerce checkout custom fields in PDF invoices and packaging slips.
Frequently Asked Questions (FAQs)
We have answered the most frequently asked questions about adding custom fields to WooCommerce checkout.
1. How to add fields to checkout in WooCommerce?
You can add fields to checkout in WooCommerce by going through the ‘Design’ section inside the FunnelKit Funnel Builder.
Scroll down to Checkout Form Fields and click the ‘Add New Field’ button. Select the field type, enter the label and order meta key, etc., and hit ‘Add’ to create the field.
Once done, drag and drop the field to the checkout form and save the changes.
2. How do I customize my checkout in WooCommerce?
You can customize the checkout in WooCommerce using any page builder with FunnelKit Funnel Builder.
In the Design section, click on the ‘Edit Template’ button, and you can customize the page using your favorite builder.
3. What hooks can I use to add custom fields?
The most common hooks for adding custom fields are:
- woocommerce_before_checkout_billing_form
- woocommerce_after_checkout_billing_form
- woocommerce_before_checkout_shipping_form
- woocommerce_after_checkout_shipping_form
- woocommerce_before_order_notes
- woocommerce_after_order_notes
Read our detailed guide on WooCommerce checkout hooks here.
4. How do I display the custom field data in the order details?
You can display custom field data in the order details and order confirmation page as well using the FunnelKit Funnel Builder.
Make sure to add the field and drag and drop it to the checkout form (which we’ve discussed in this article).
On the WooCommerce thank you page, enable the toggle to display the custom field data on the order confirmation page.
This will show the data on the order confirmation page in WooCommerce.
5. Can you help me with examples of custom fields on checkout pages?
Let’s look at some examples of custom fields on checkout pages:
- Gift messages
- Delivery date and time
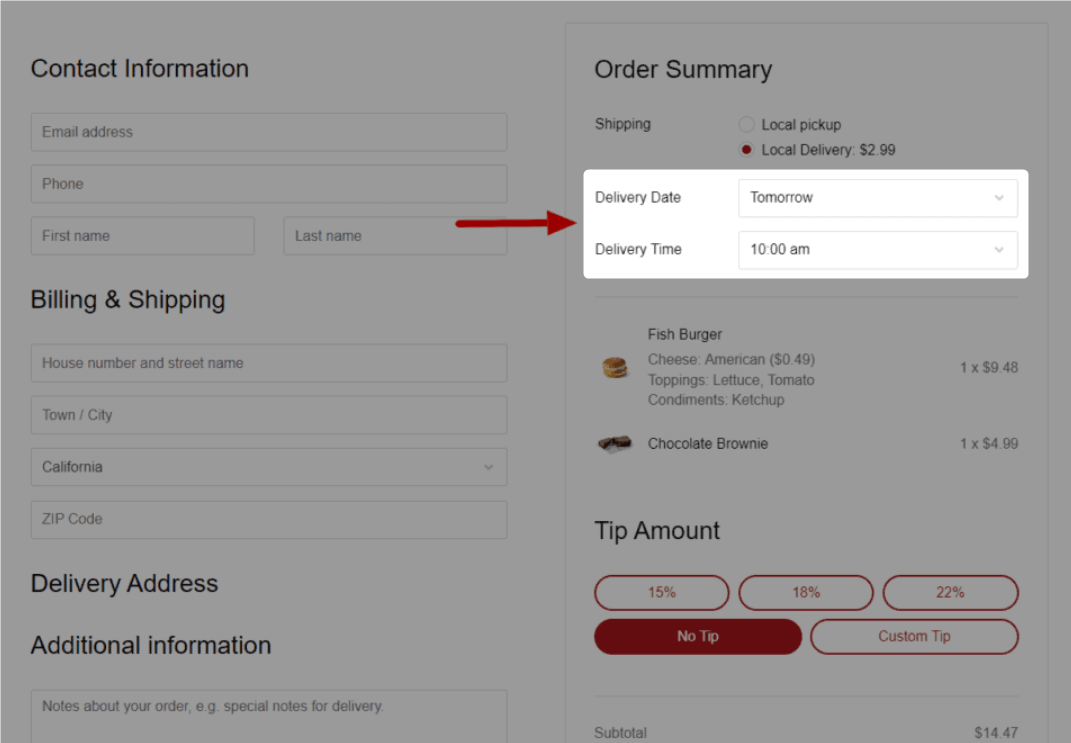
- Gift wrap
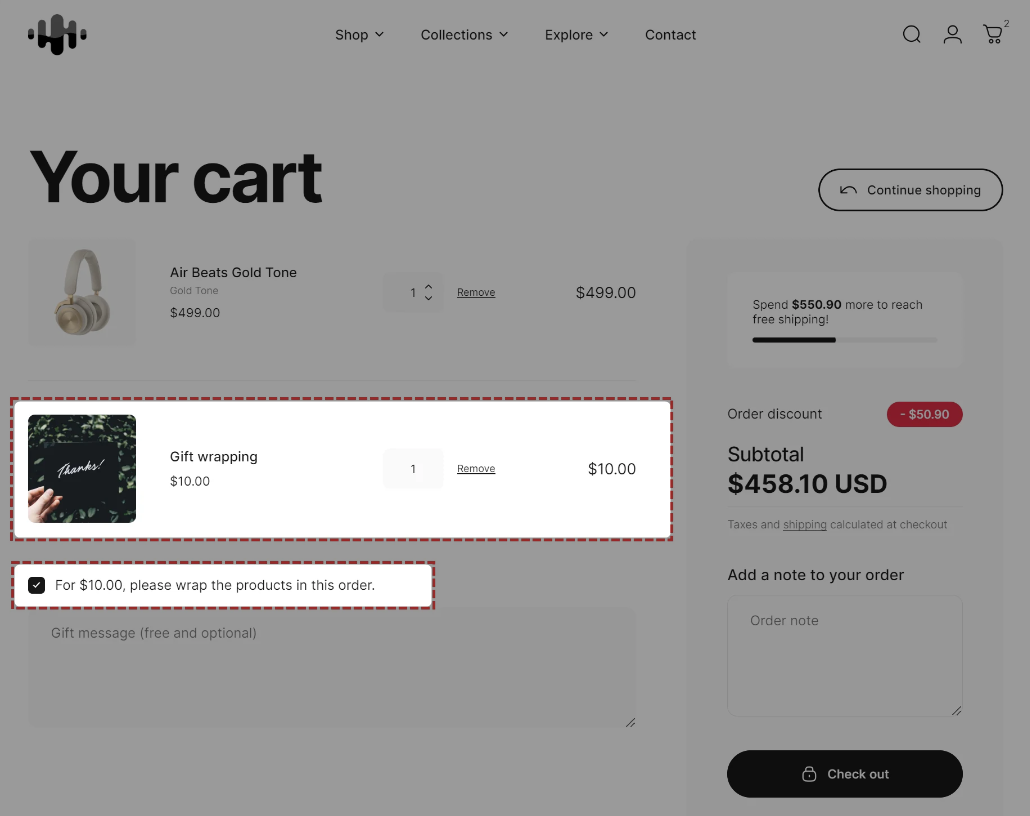
There are many other custom field examples, such as shopping experience rating, uploading a design to a T-shirt or mug, etc.
Ready to Add Custom Field to WooCommerce Checkout?
Adding a custom WooCommerce checkout field allows you to collect specific information and give your customers a more personalized and smooth buying journey.
As shown above, you can add additional fields to the WooCommerce checkout page in two ways: programmatically with code or with drag-and-drop using the FunnelKit Funnel Builder plugin.
In our expert opinion, FunnelKit Funnel Builder is the superior option for a checkout field editor for WooCommerce. It offers a more efficient method for incorporating a custom field into your checkout page.
You can easily include any type of checkout field without worrying about validation, as FunnelKit takes care of that in the background.
Furthermore, there's no need to be concerned about compatibility with WooCommerce. The dedicated plugin team consistently maintains and releases new versions, ensuring seamless compatibility with WooCommerce and essential plugins.
Moreover, this tool can do more than just add an extra field. You can create beautiful checkout pages using pre-designed templates and optimize the checkout process for a seamless shopping experience.
What’s more? You can even offer order bumps and one-click upsells to increase the average order value in your WooCommerce store.
So, start collecting custom data with an extra WooCommerce checkout field and enhance customers' shopping experience with a personalized touch today!
The post How to Add a Custom Field to WooCommerce Checkout Page appeared first on FunnelKit.