Did you know that cross-selling can boost your WooCommerce store revenue by up to 30%? [Source: HubSpot]
It’s an effective way to increase average order value and boost sales.
Yet, many business owners miss out on this fabulous opportunity—not because it’s complicated, but simply because they don’t know how to properly set it up.
In this guide, we’ll show how you can go beyond WooCommerce’s default options to create powerful cross-selling strategies.
By using smart product recommendations, you can effortlessly encourage shoppers to add more items to their carts and grow your sales.
What is Cross-Selling in WooCommerce?
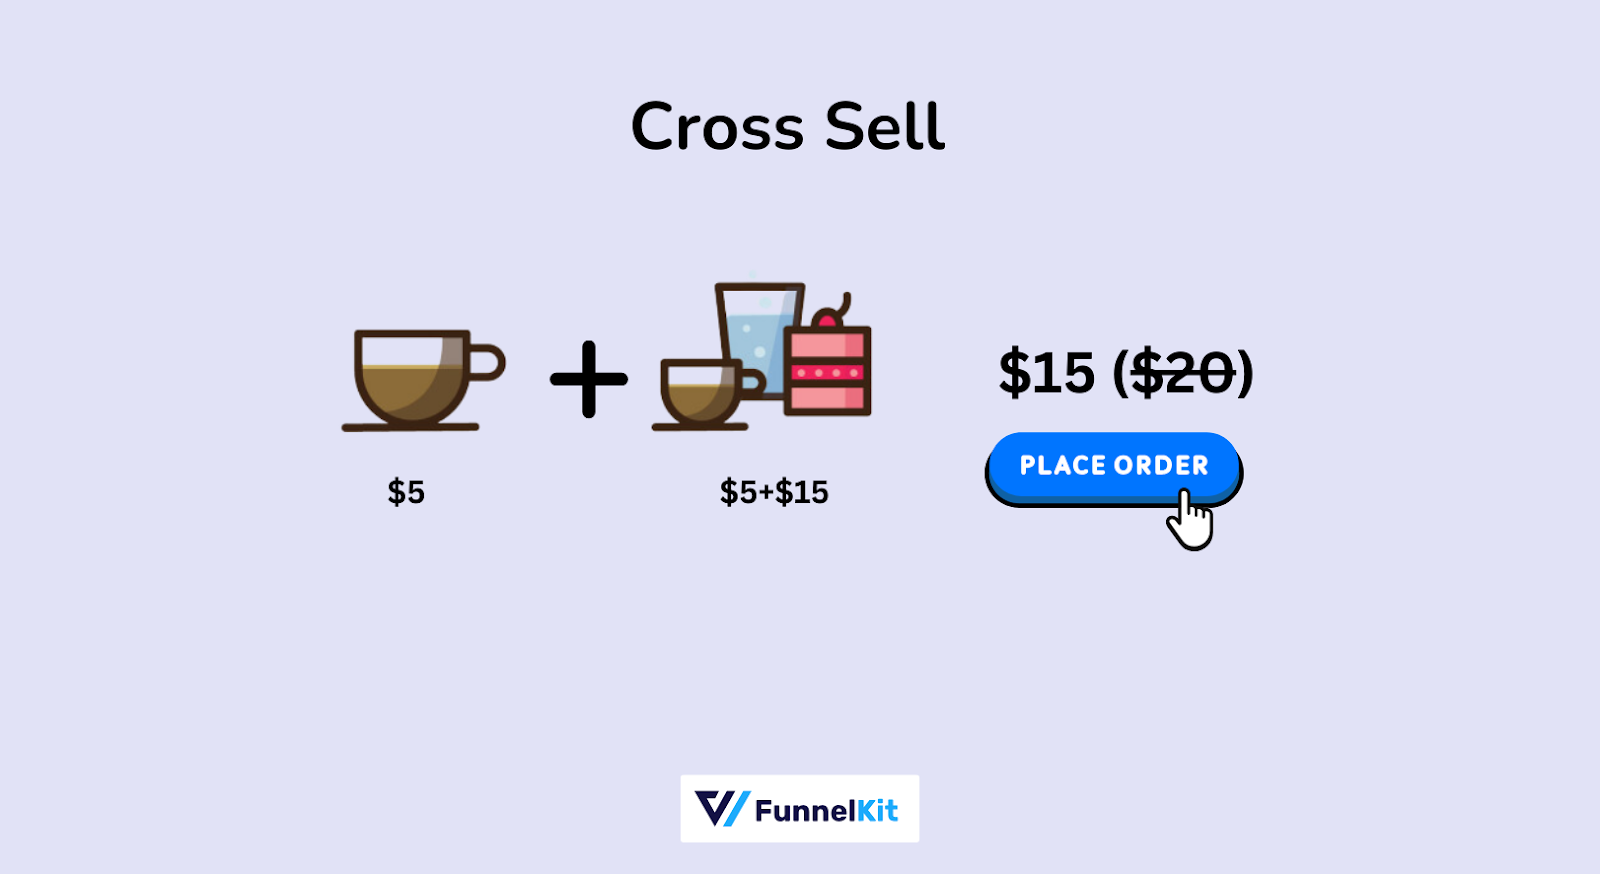
Cross-selling in WooCommerce is a sales strategy that suggests related products to the item a shopper is interested in buying.
These recommendations typically appear on the product page, inside the shopping cart, during the checkout, or even in cross-sell emails.
The aim is to boost the average order value by offering complementary products.
For example, if a customer buys a fresh bean coffee pack, you could suggest items like a fancy mug or a box of cookies.
Please note that cross-selling is different from upselling.
While cross-selling suggests related items, upselling encourages shoppers to buy a more expensive version of the product they’re purchasing.
For instance, more refined, premium coffee beans can be used for upselling with the above example.
Why Implement the WooCommerce Cross-Selling Strategy in Your Store?
Cross-selling can significantly boost your revenue.
According to HubSpot, 87% of sales professionals offer cross-selling, generating an average of 21% of their company’s revenues.
Here’s why it’s worth implementing this strategy in your business:
- Increased average order value (AOV): Cross selling encourages shoppers to add relevant items to their cart, boosting their total order value. For example, a customer buying a laptop may need a handy bag or a mouse.
- Enhanced customer experience: Offering complementary products simplifies shopping and makes purchases feel complete. For instance, suggesting a coffee mug or stirrers alongside coffee saves customers time and effort.
- Boosts customer retention: Helpful recommendations show you care about your shoppers’ needs, encouraging repeat purchases. For example, a customer buying running shoes may appreciate suggestions for running socks.
- Better product visibility: WooCommerce cross sell highlights items customers might overlook. For example, A shopper buying a coffee maker may not notice a coffee grinder unless it’s recommended to them.
- Higher conversion rates: Relevant suggestions increase the chance of completing a purchase. For instance, recommending a screen guard, headphones, or charger when someone buys a mobile phone encourages additional purchases.
By implementing cross-selling in WooCommerce, you increase revenue and create a smoother, more satisfying shopping experience for your customers.
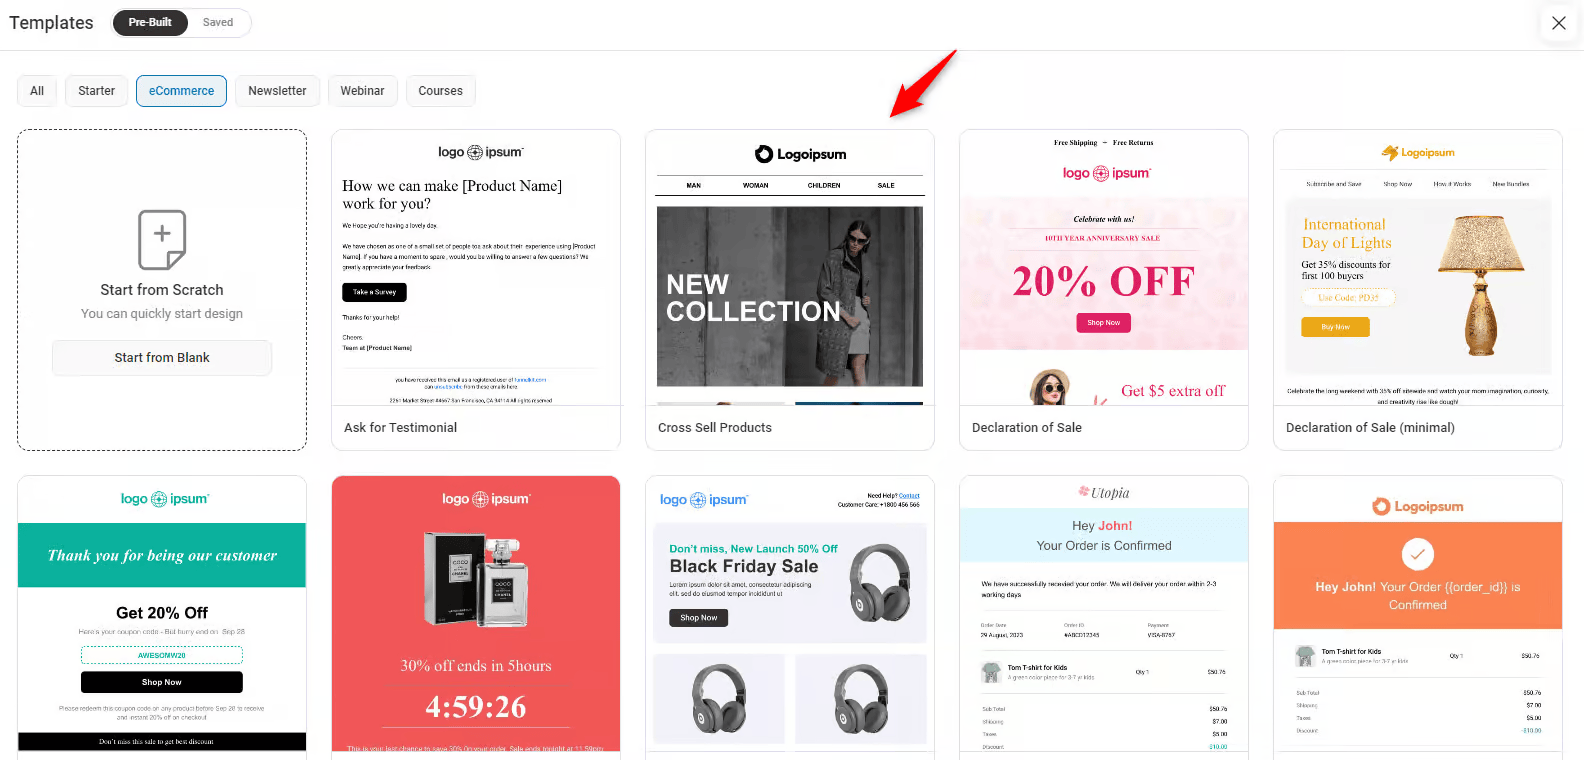
Method 1: Setting Up WooCommerce Cross-Sell on the Product Page (Frequently Bought Together)
In WooCommerce, you can link different products as upsells and cross-sells.
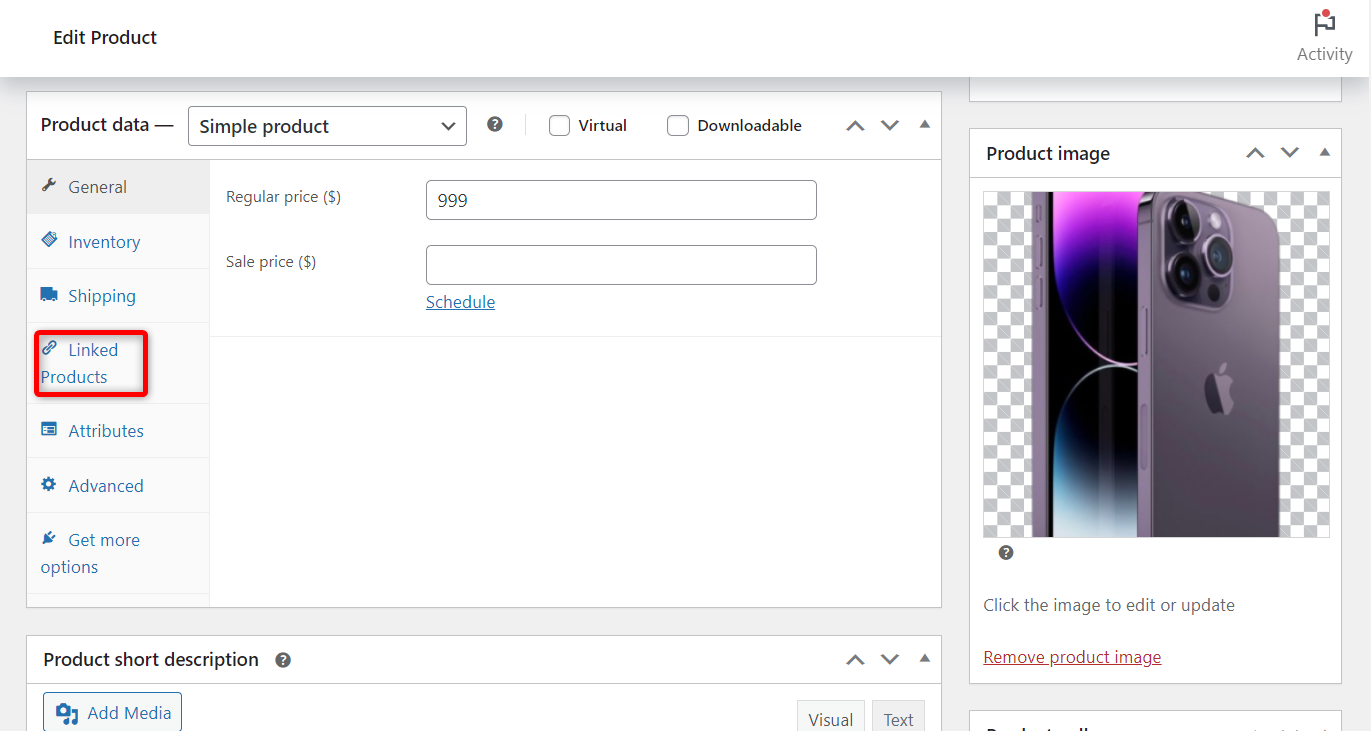
Step 1: Edit any product in your store
Click on any product under which you want to show cross-sell items.

Scroll down to the Product Data section and click on the ‘Linked Products’ tab.
Step 2: Add items to be displayed on the product page
Search and add a product from your WooCommerce store in the Upsells field.
You can add multiple items to be displayed as cross-sells on the product page.
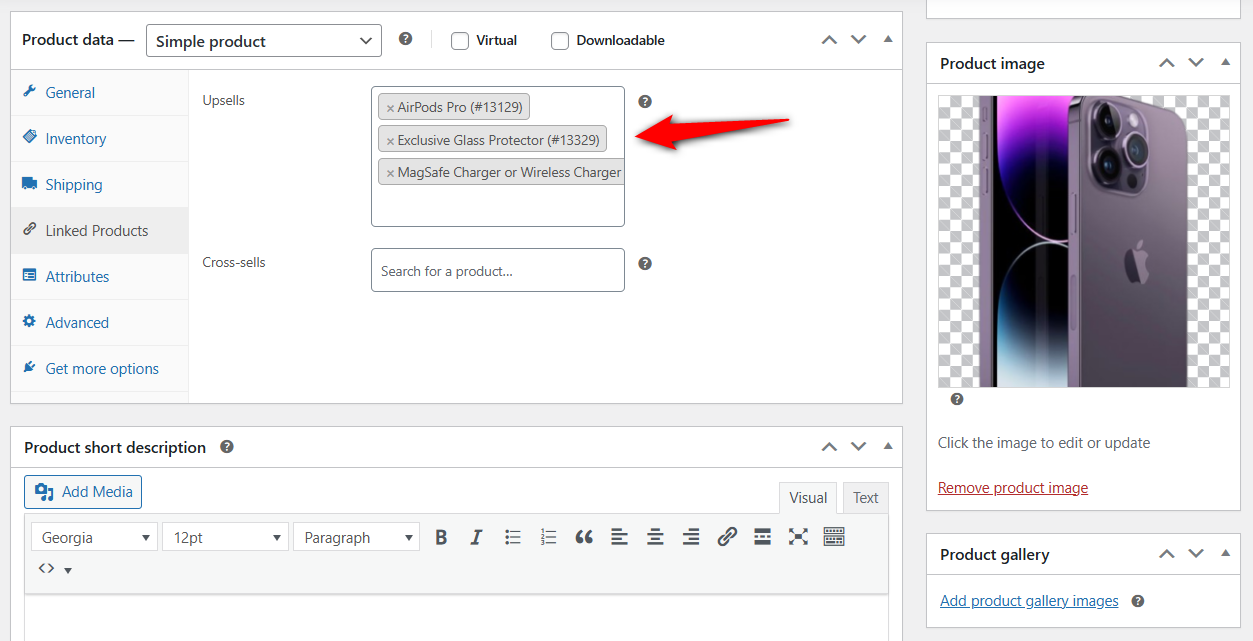
Once done, hit ‘Update’ to save the changes.
Step 3: Preview the cross-sells on the WooCommerce product page
Go to the product page, and you’ll be able to see cross-sells underneath the product description in the ‘You May Also Like’ section.
This section appears as the frequently bought together items:

Well done! This is how you can display cross-sells on the WooCommerce product page.
Method 2: Showing WooCommerce Cross-Sell on the Cart Page
Follow the instructions to show cross-sells on the default WooCommerce cart page:
Step 1: Add a cross-sell product
When editing a product, scroll down to the ‘Linked Products’ tab and add items to the ‘Cross-sells’ field.
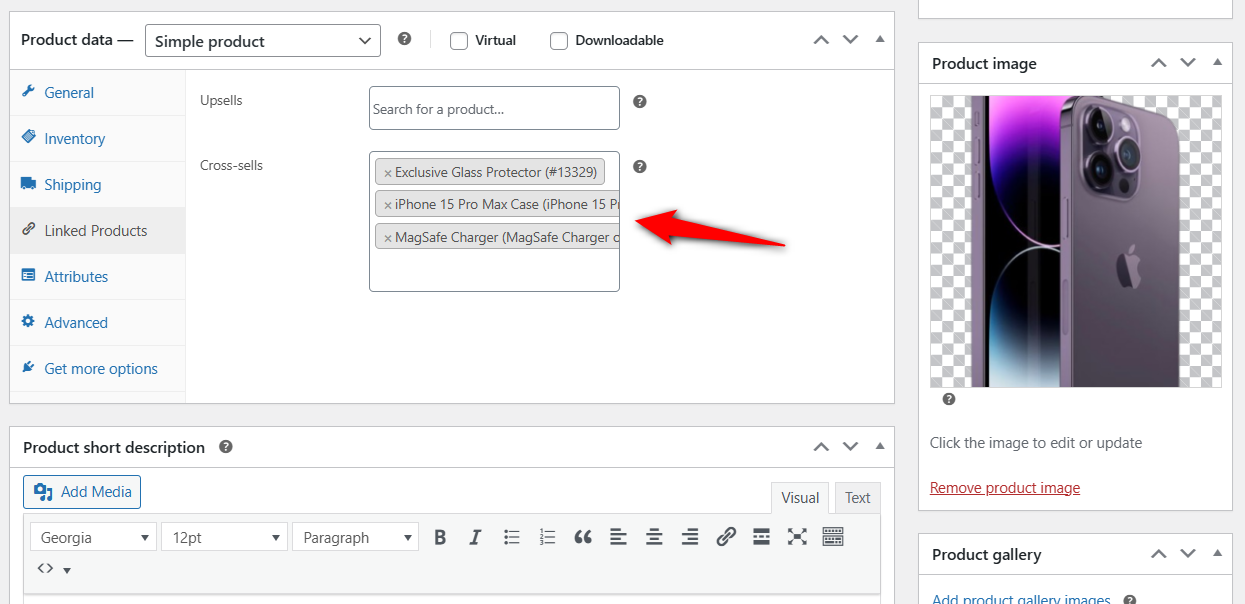
You can choose multiple cross-sell products here.
Click on the ‘Update’ button when done.
Step 2: Test and preview cross sells on the WooCommerce cart page
Go to the product page URL on the live site. Add an item to the cart and go to the cart page.
You’ll be able to find the cross sell products here:
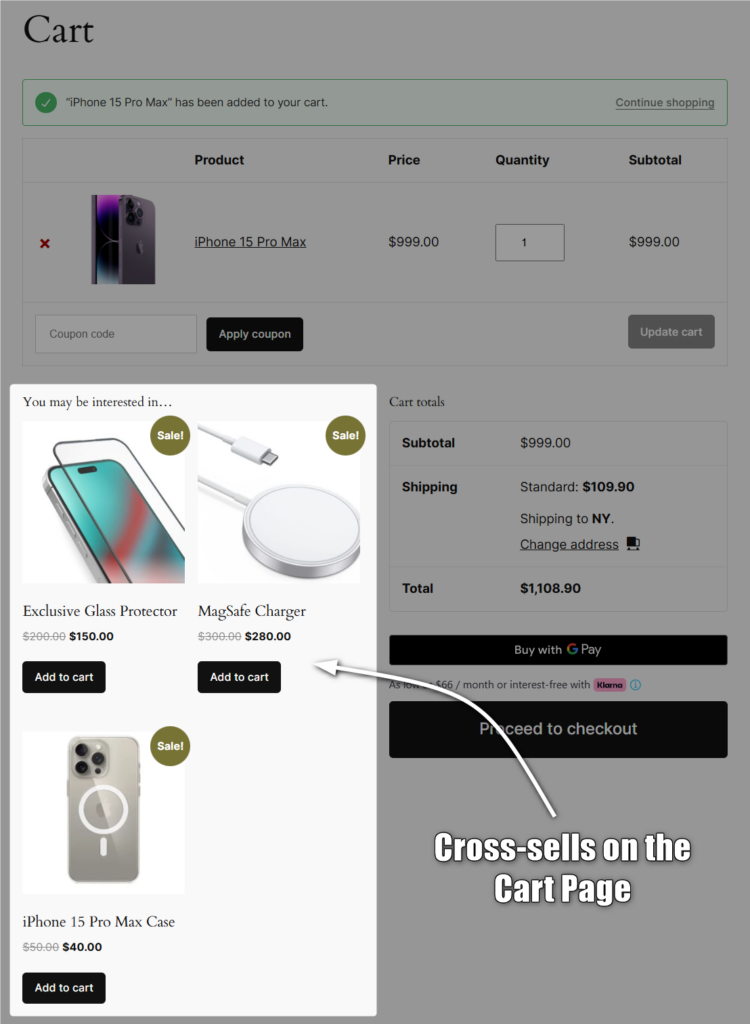
This is how you can show WooCommerce cross-sells on the default cart page.
👉 WooCommerce's default cross-sell options cover only 15-20% of the customer journey, leaving untapped potential for growth.
In the below section, we'll explore step-by-step cross-selling strategies to engage customers throughout the remaining 80% of their shopping experience, boosting sales and conversions.
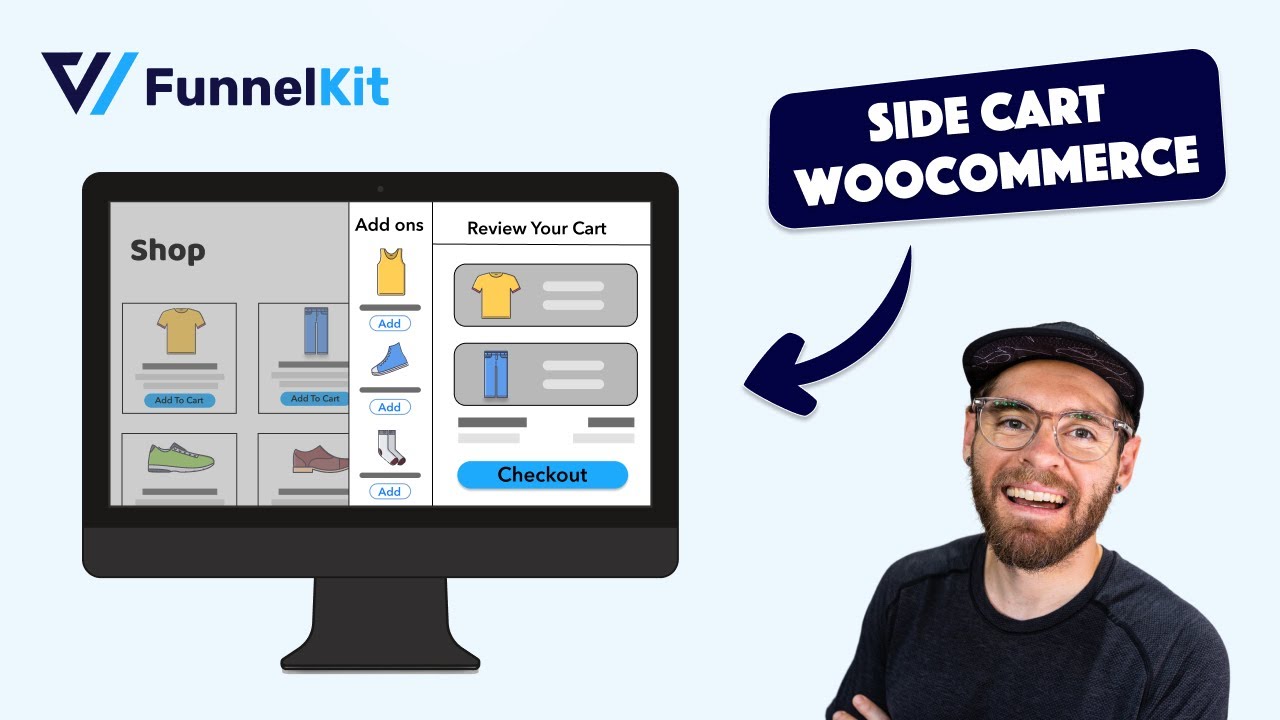
Method 3: Offering WooCommerce Cross-Sell inside the Shopping Cart (Cart Add-Ons)
We’ll use FunnelKit Cart to bring a dynamic, slide-in shopping cart to your WooCommerce store.
It allows you to add a side cart that offers upsell and cross-sell products directly inside your shopping cart.
With FunnelKit Cart, your shoppers can:
- Add relevant products to their cart with one click
- View, update, or remove quantities or items directly
- Skip the default cart page and proceed directly to checkout
- Get attractive rewards by reaching a certain cart value threshold
- Purchase directly from the cart with express checkout options
📝 Quick Note: You can use the basic version of this WooCommerce cross sell plugin for free. However, to access premium features like upsells/cross-sells or milestone-based rewards, upgrade to the FunnelKit Professional plan or above.
Follow these steps to offer WooCommerce cross-sell and upsell products in a sliding mini shopping cart:
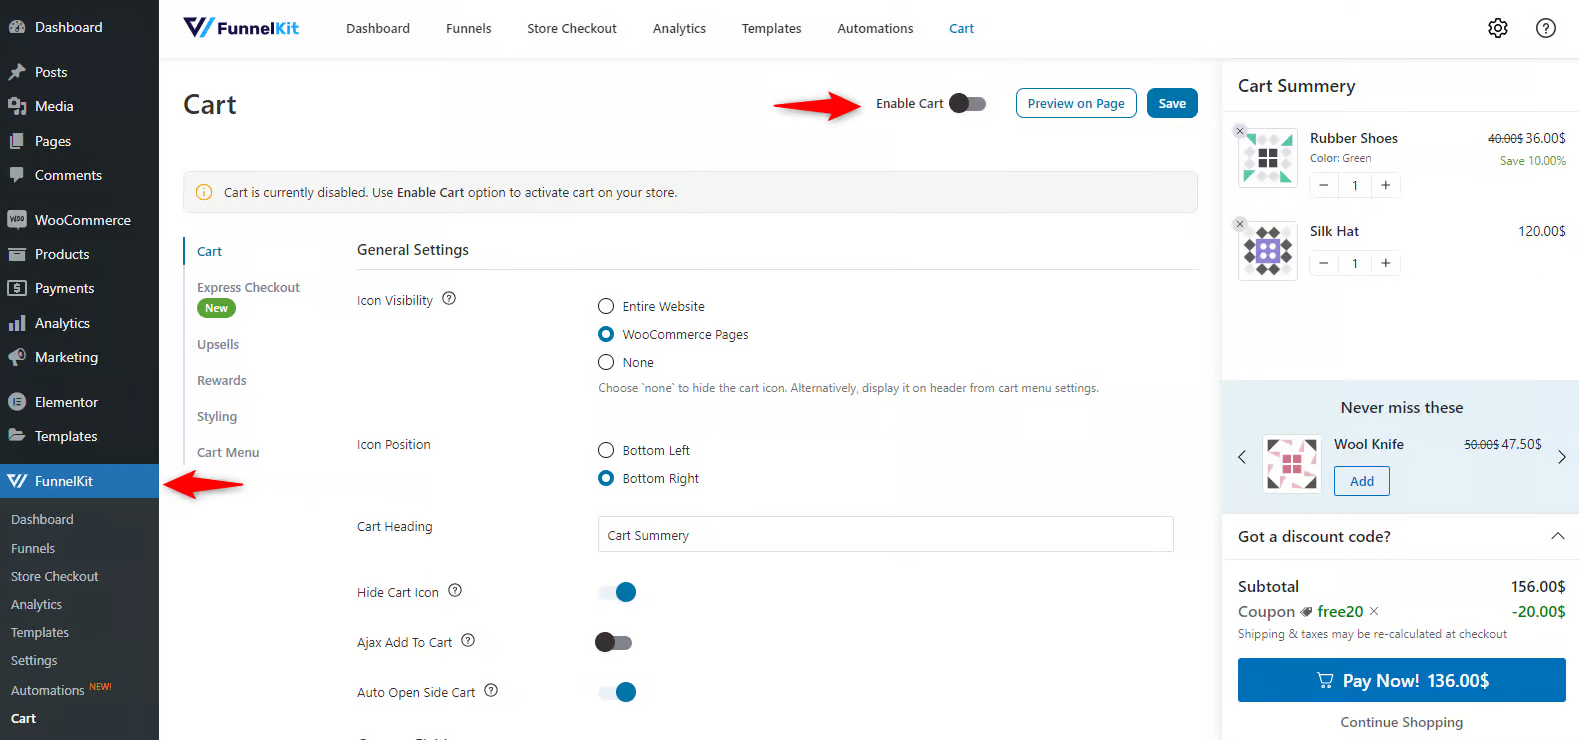
Step 1: Enable the WooCommerce cart plugin
After you install the plugin, you need to navigate to the FunnelKit > Cart.
Enable the side cart in your store from here:
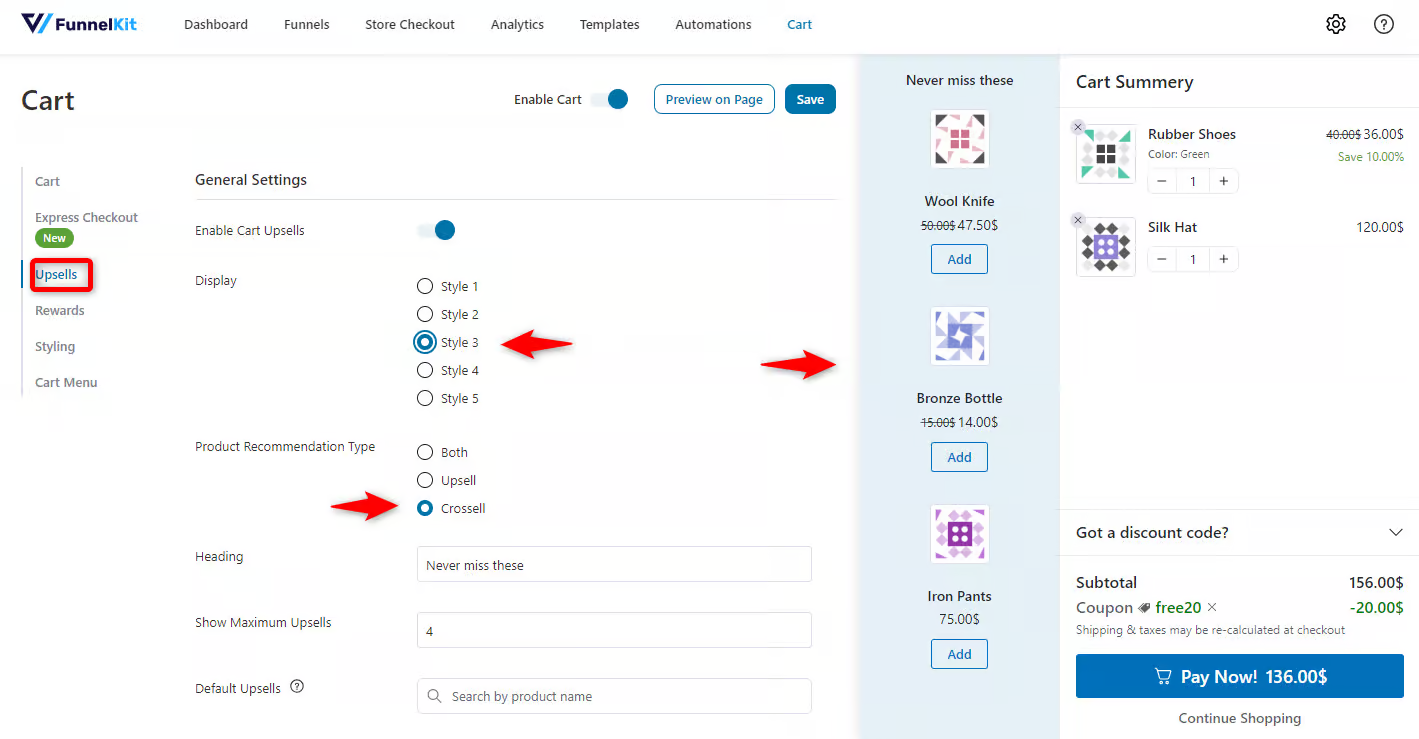
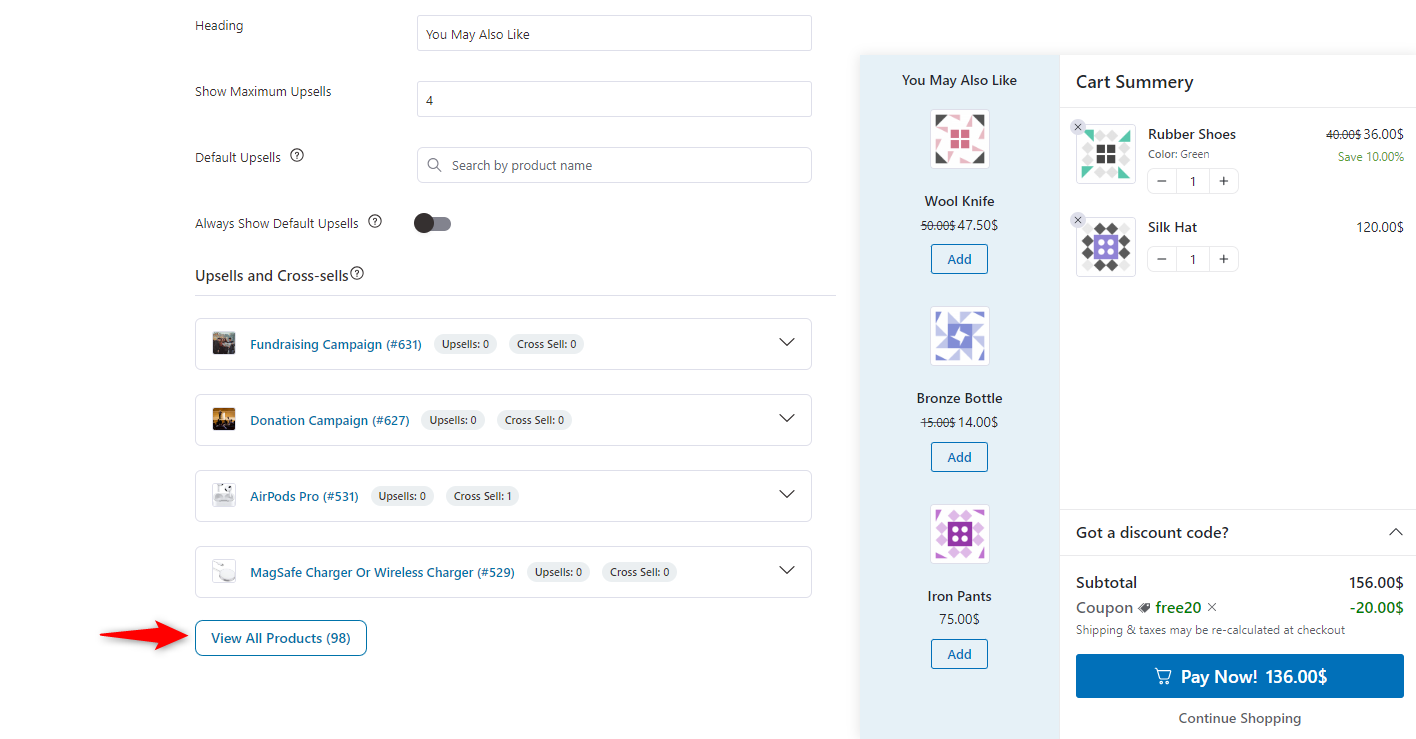
Step 2: Customize the cross-sell recommendation options
Next, click on the Upsells tab.
Here, you can choose the display pattern and product recommendation type.
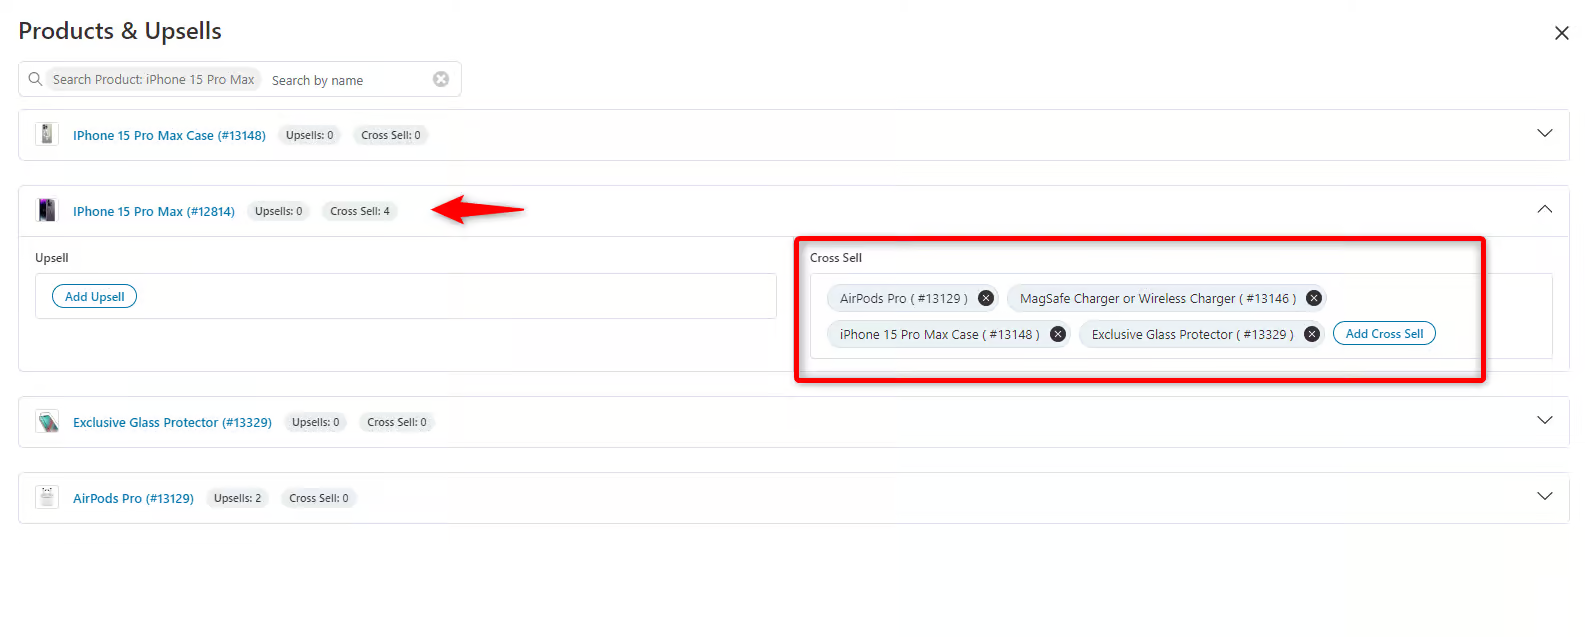
Step 3: Add cross-sell items to the main product
Click "View All Products" on the product page to add the cross-sell items to the primary product.
Then, search for the primary product you want to cross-sell, such as “iPhone 15 Pro Max”.
Under the product details, you’ll find the cross-sell option where you can add complementary products.
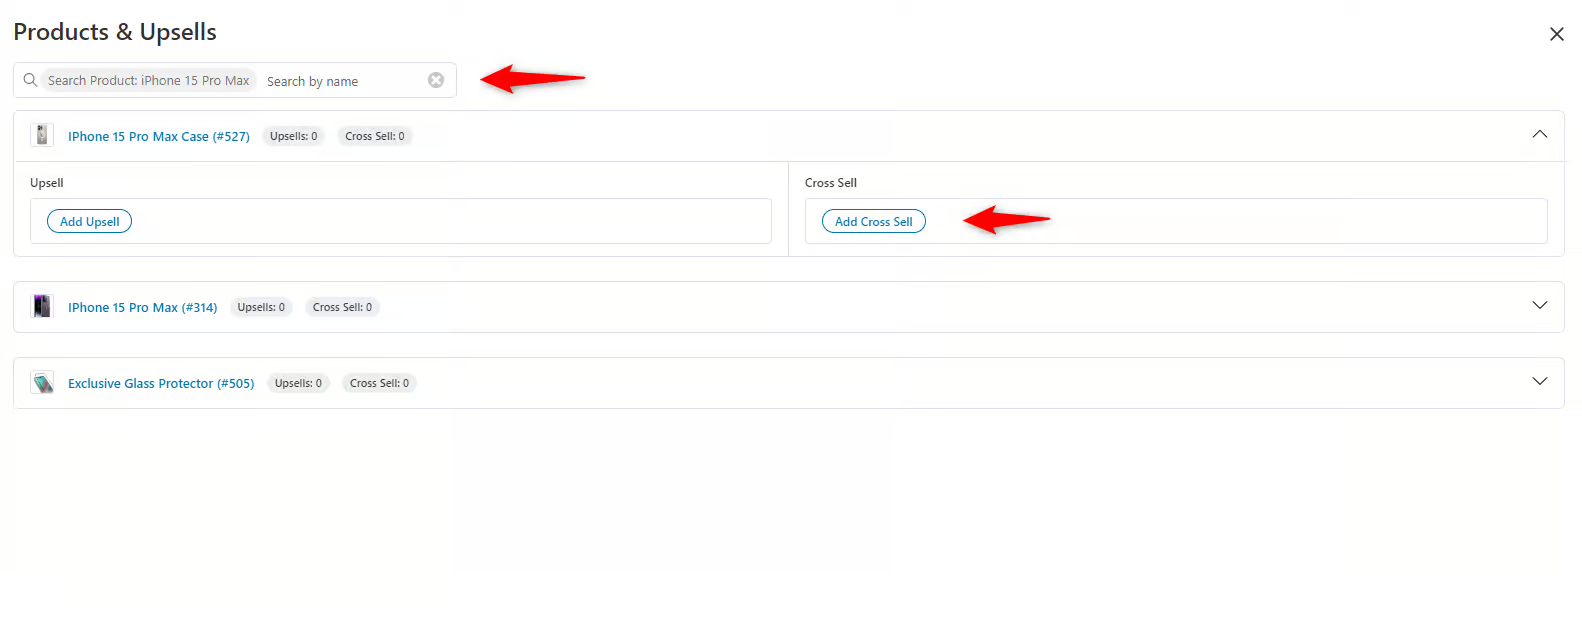
Add the recommended products to the main item as cross-sells and hit the “Add” button.
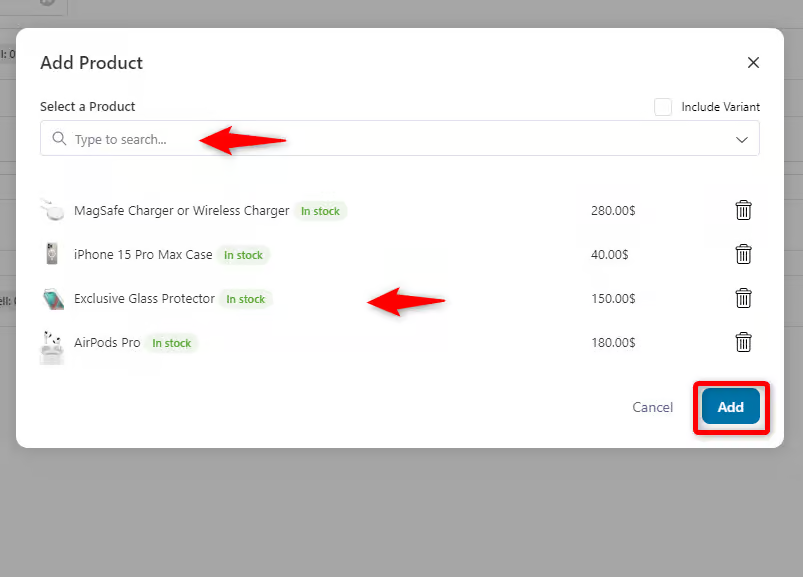
The products are added as cross-selling items.
Step 4: Preview of the cross-sell inside the shopping cart
So, when a user adds “iPhone 15 Pro Max” to the cart, the FunnelKit Cart shows the cross-sells inside the shopping cart.
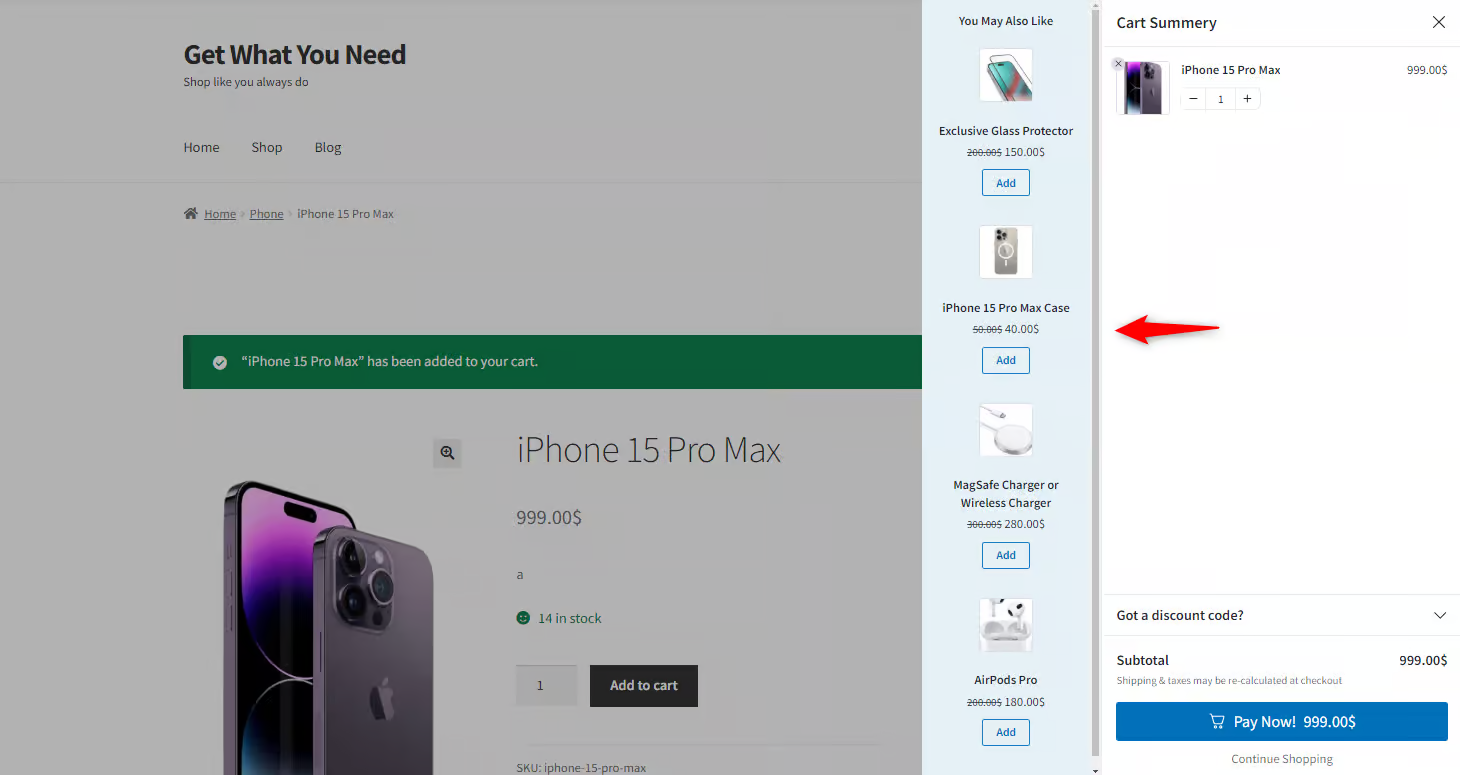
That’s it! This is how you can display WooCommerce cross-sells inside the dynamic shopping cart.
👉 Refer to our detailed guide on setting up cart upsells and cross-sells.
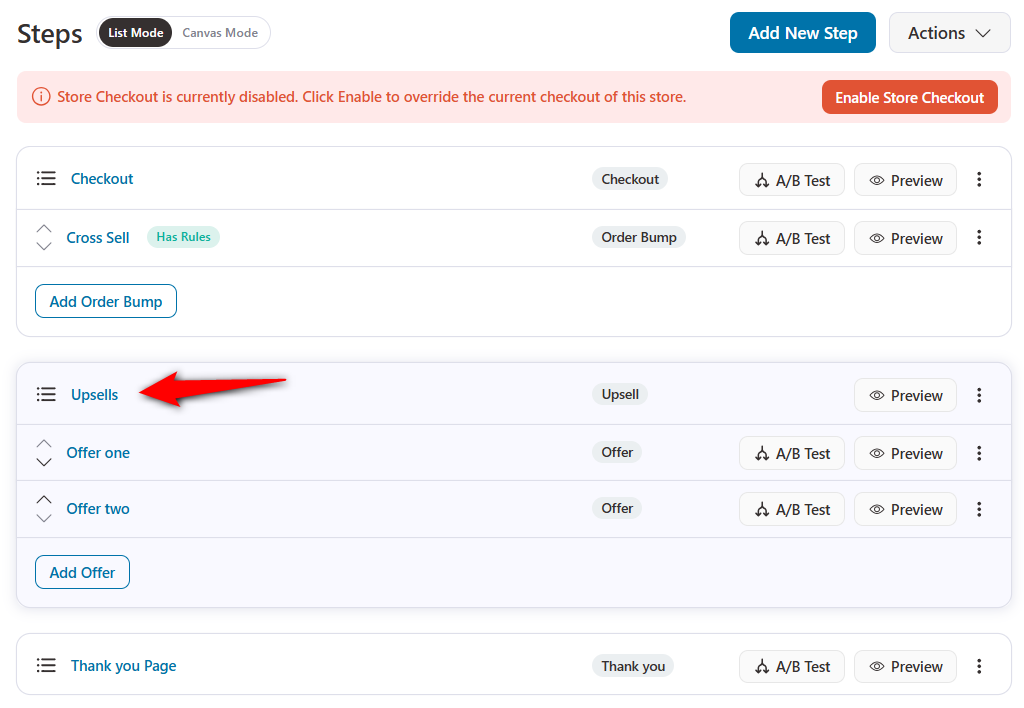
Method 4: Setting Up WooCommerce Cross-Sell Add-Ons on the Checkout Page
Product recommendations on the checkout page are known as order bumps.
FunnelKit Funnel Builder lets you replace the default checkout page with a custom, high-converting one.
You can also offer exciting, low-dollar order bumps that encourage impulse purchases that can be added to the cart with a single click before checkout.
Make sure you’ve installed the FunnelKit Funnel Builder plugin by getting the copy from the button below:
Once done, follow the steps below:
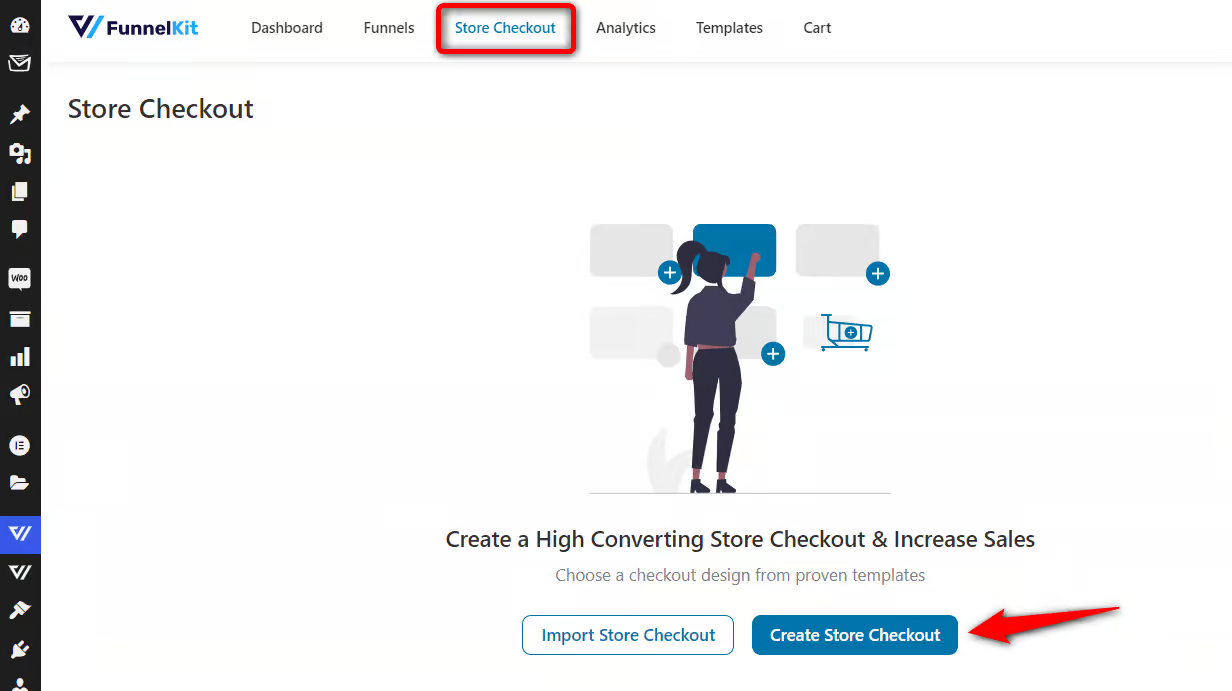
Step 1: Create a store checkout using a pre-built template
Navigate to FunnelKit ⇨ Store Checkout and click on ‘Create Store Checkout’.
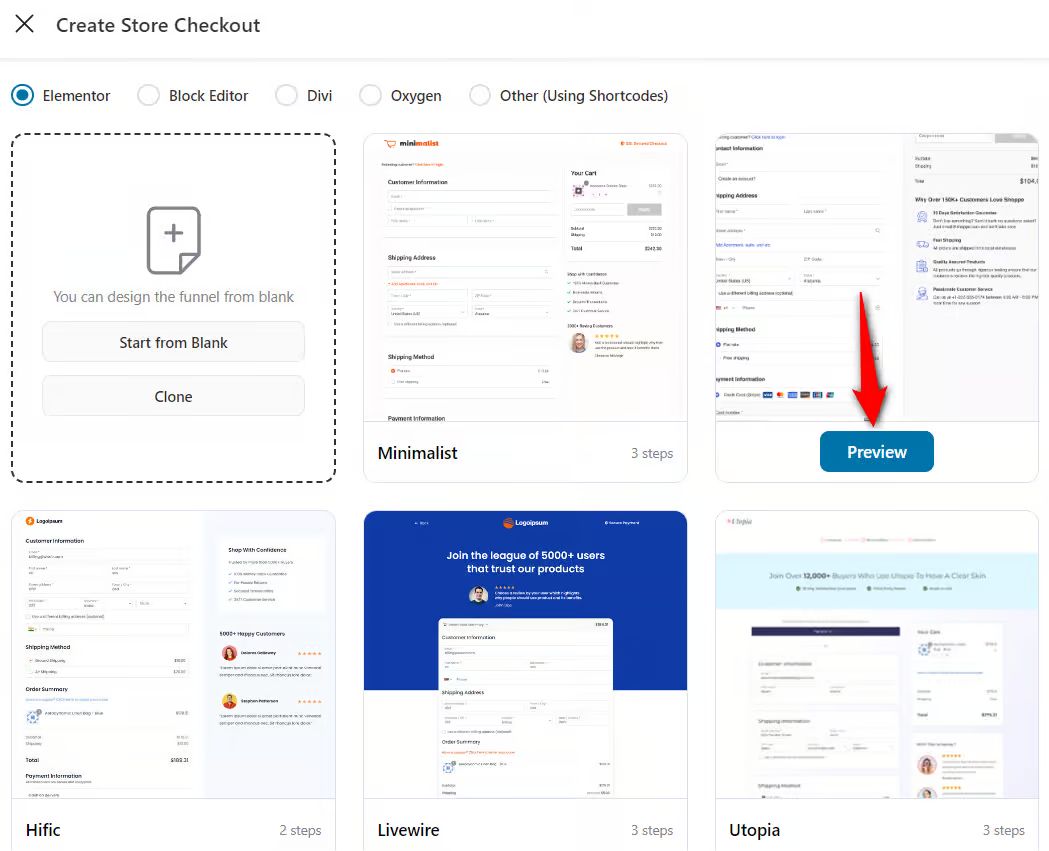
Choose the page builder of your choice among Elementor, Bricks, Divi, Oxygen, Block Editor, and Other (using shortcodes).
Next, hover on the template you like and click on ‘Preview’.
Let’s go with the Shoppe template and choose the number of steps you want on your checkout page.
Next, hit the ‘Import This Funnel’ button and name your store checkout.
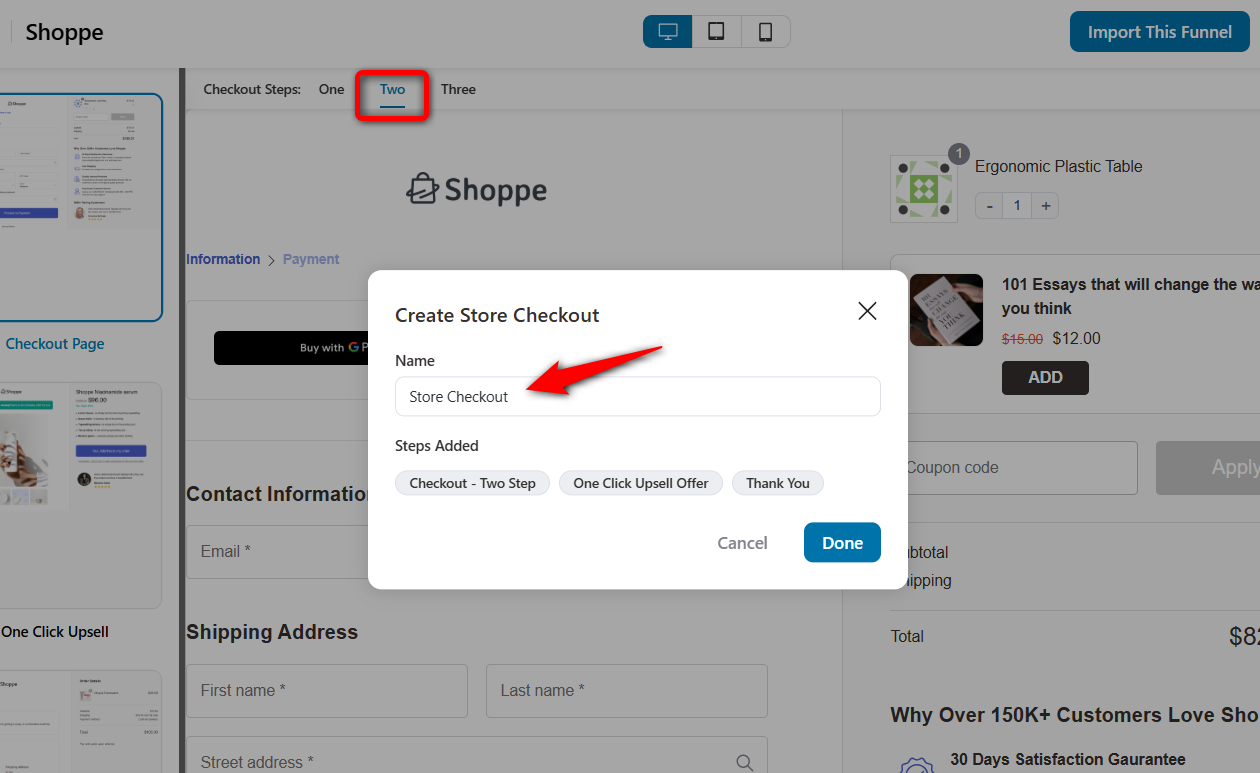
Finally, click on ‘Done’ to import your store checkout with a checkout page, one-click upsell, and thank you page steps.
Step 2: Customize your WooCommerce checkout page
You can customize your checkout page the way you like with your favorite page builder.
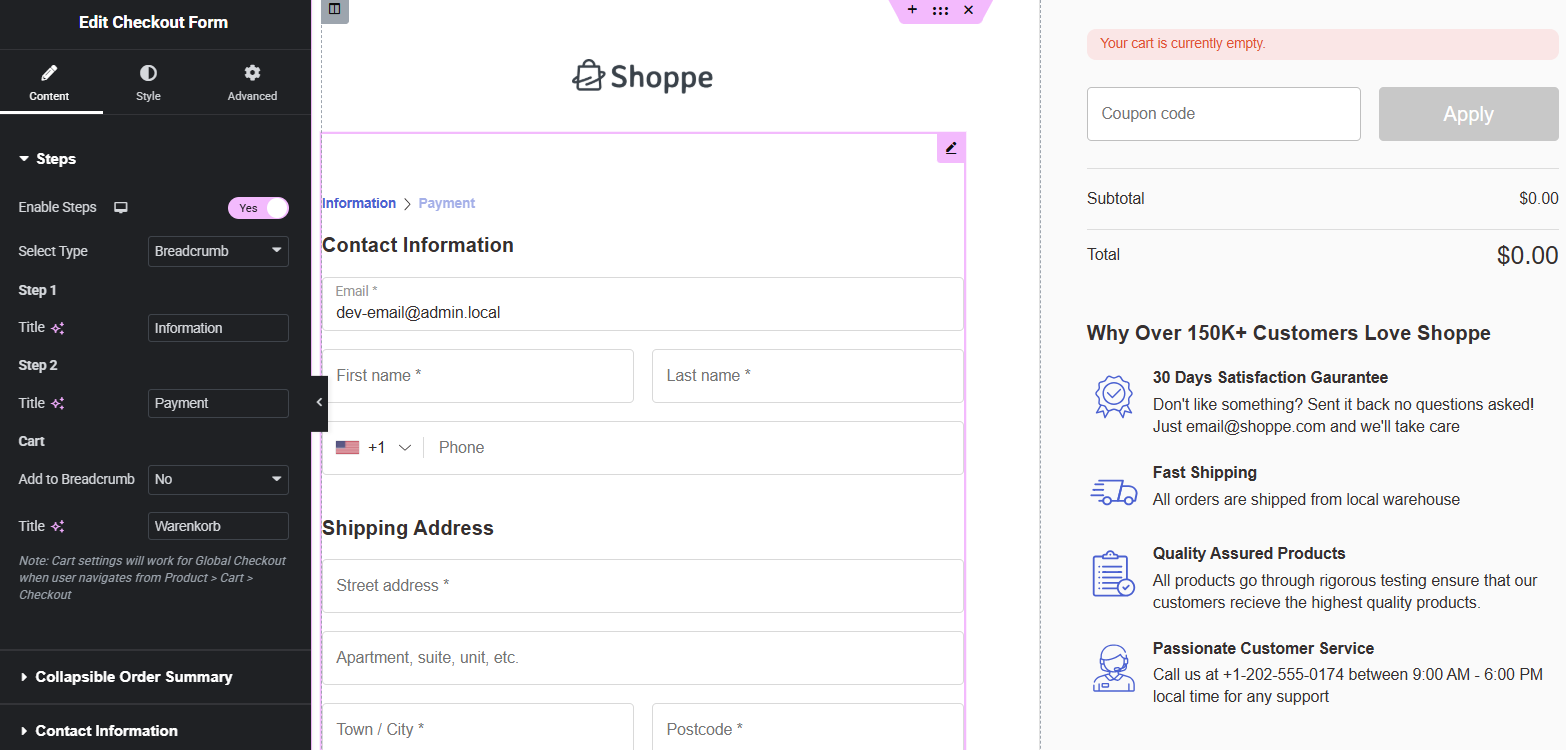
Just hit the ‘Edit Elementor Template’ button.
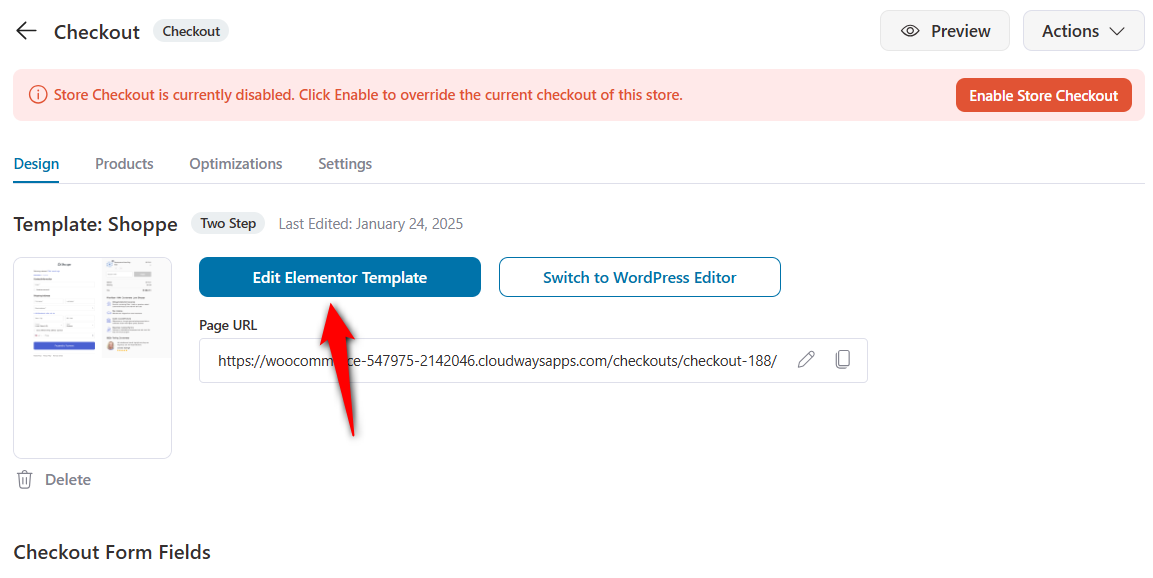
The page will load in Elementor. Here, you can customize your checkout page with Elementor widgets and several customization options.
Once done, hit ‘Publish’ to lock all your changes.
Next, you can customize the checkout form fields from the ‘Design’ tab.
Add a custom field, edit any field or section, rearrange them for the perfect order, or even delete unnecessary fields or sections.
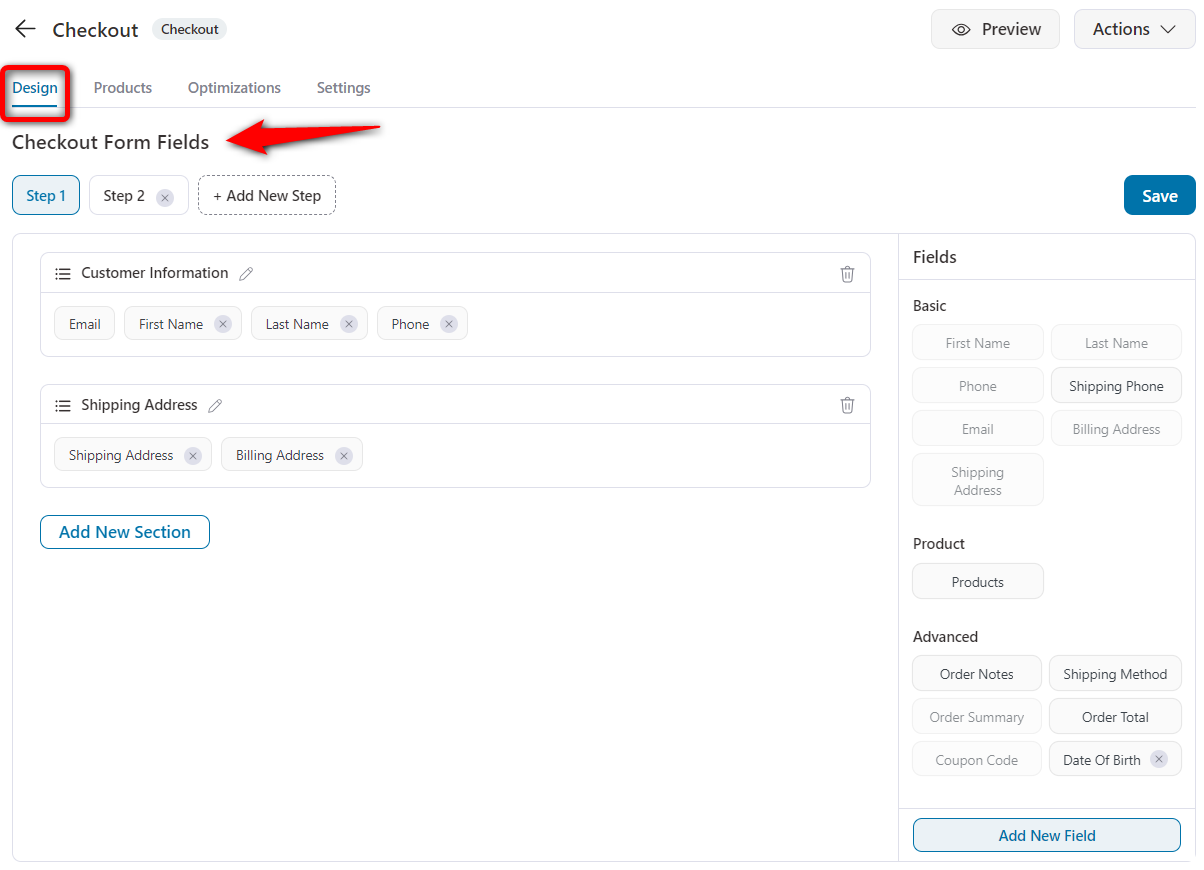
Save the changes when done.
👉 Check out our detailed post on optimizing your WooCommerce checkout page.
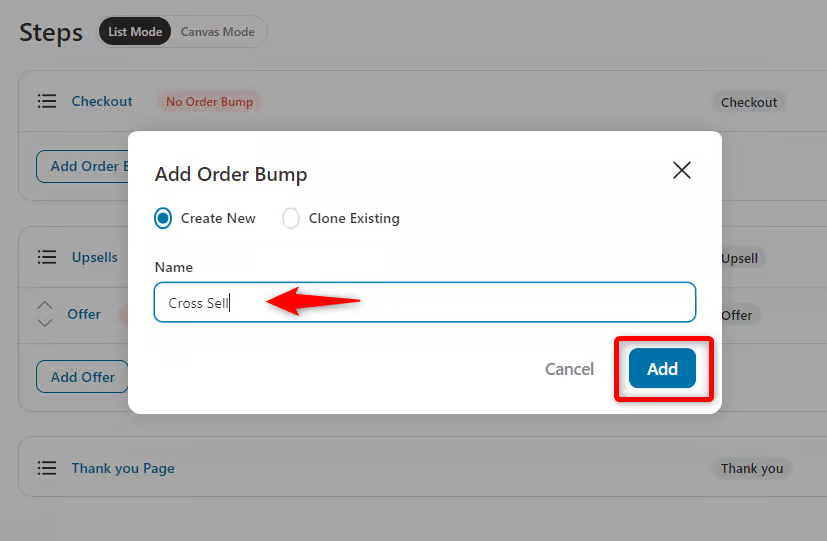
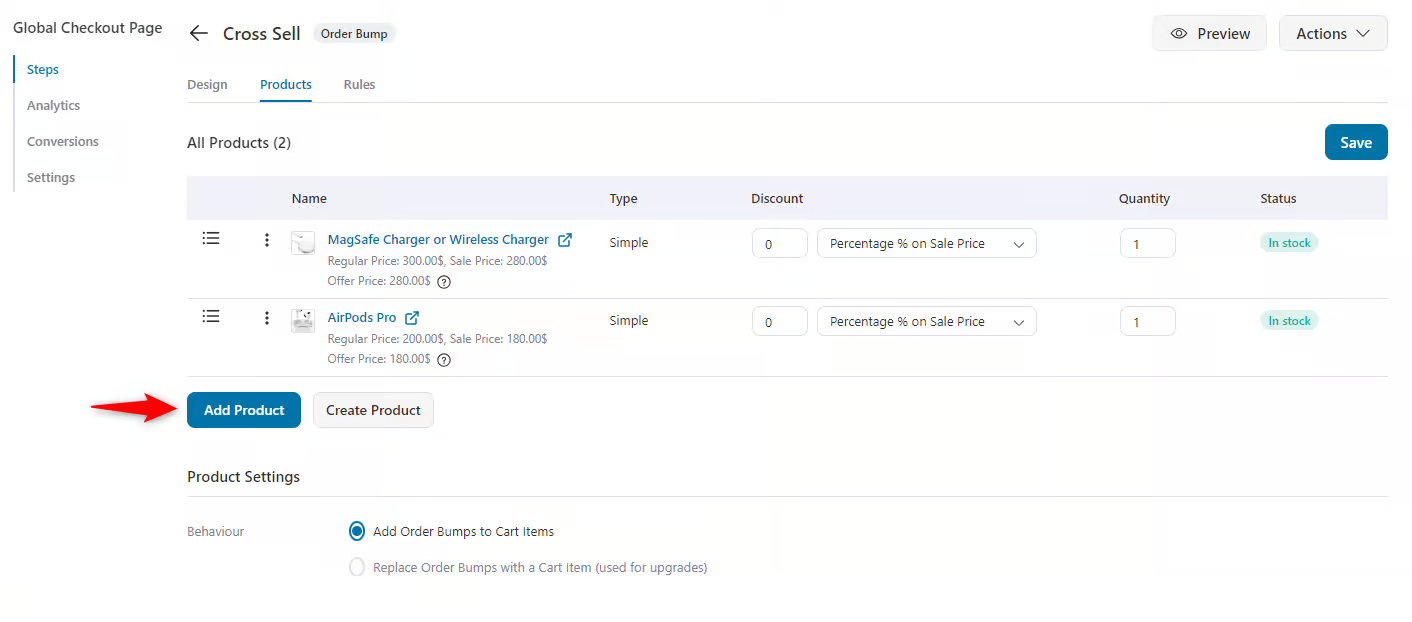
Step 3: Add WooCommerce cross sell products as an order bump
Click the “Add Order Bump” button.
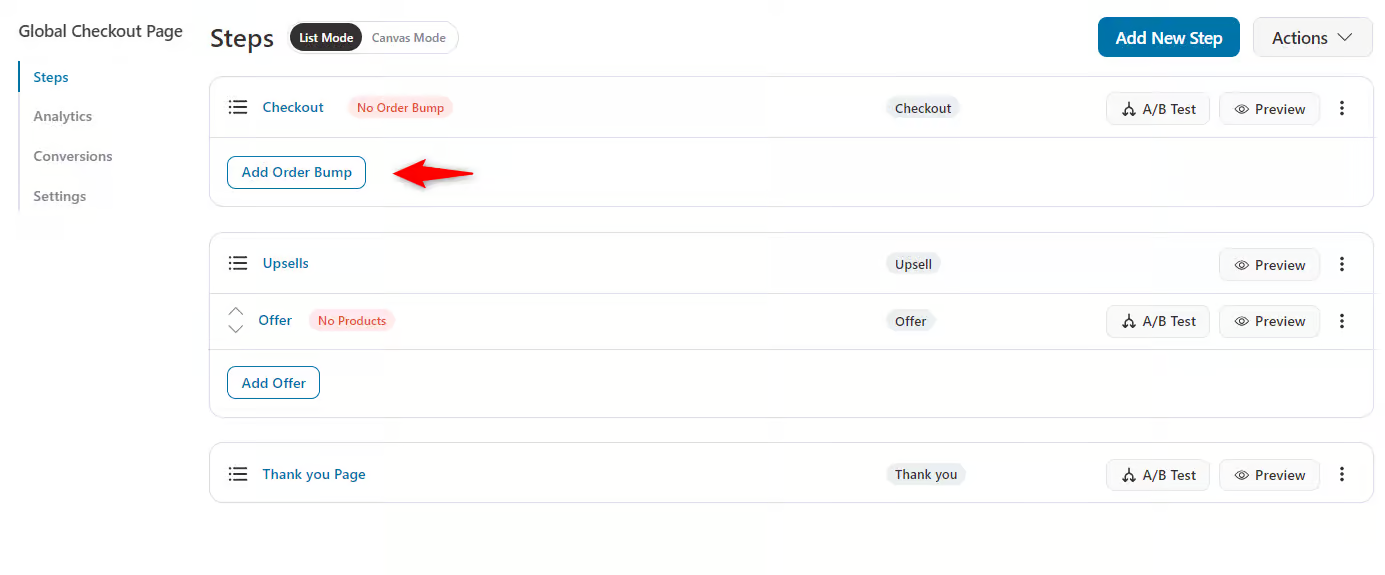
Next, provide the name of the order bump.
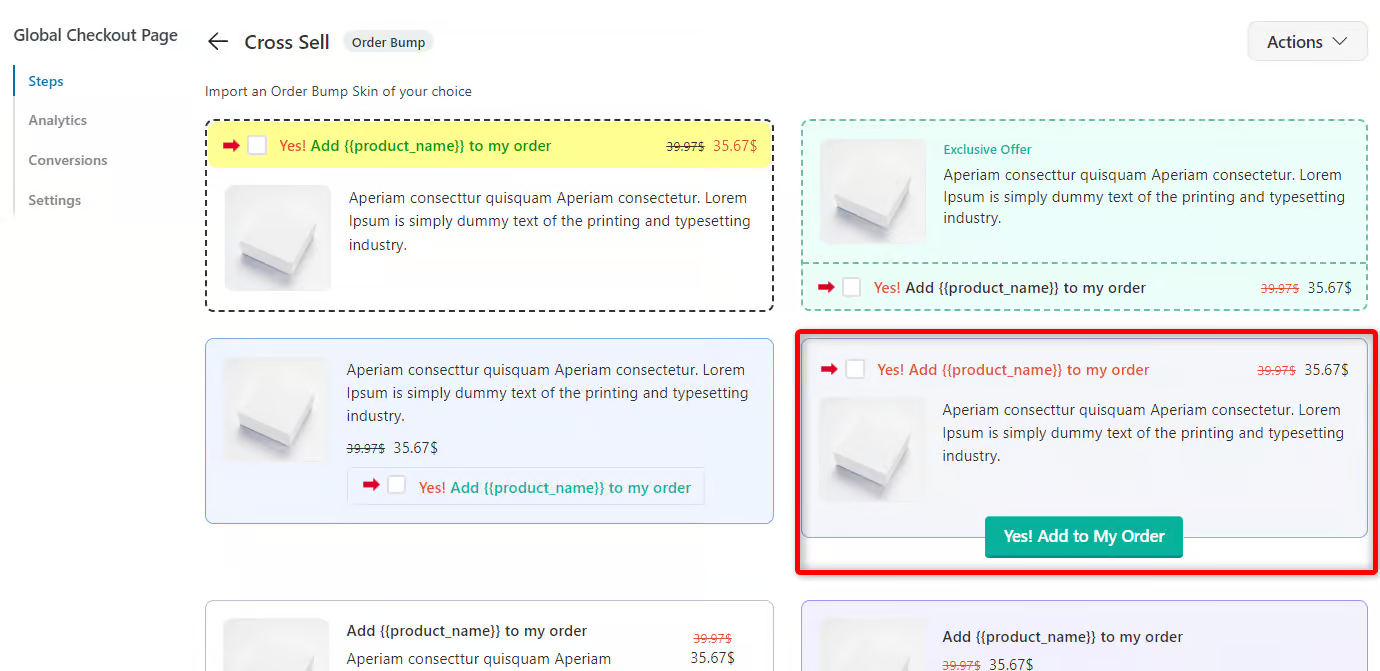
Step 4: Import an order bump template
Choose the template to display the order bump on your checkout page.
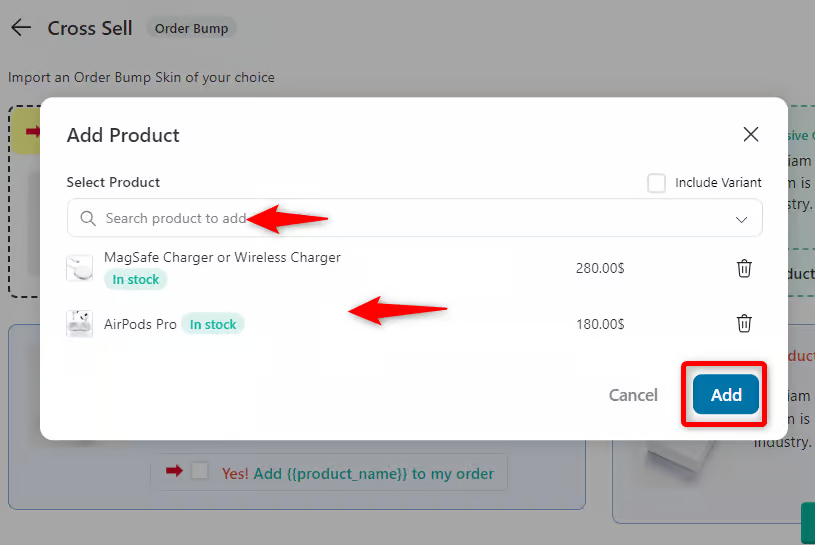
Next, search for the products here to add them as WooCommerce cross-sell recommendations.
Then, hit the “Add” button.
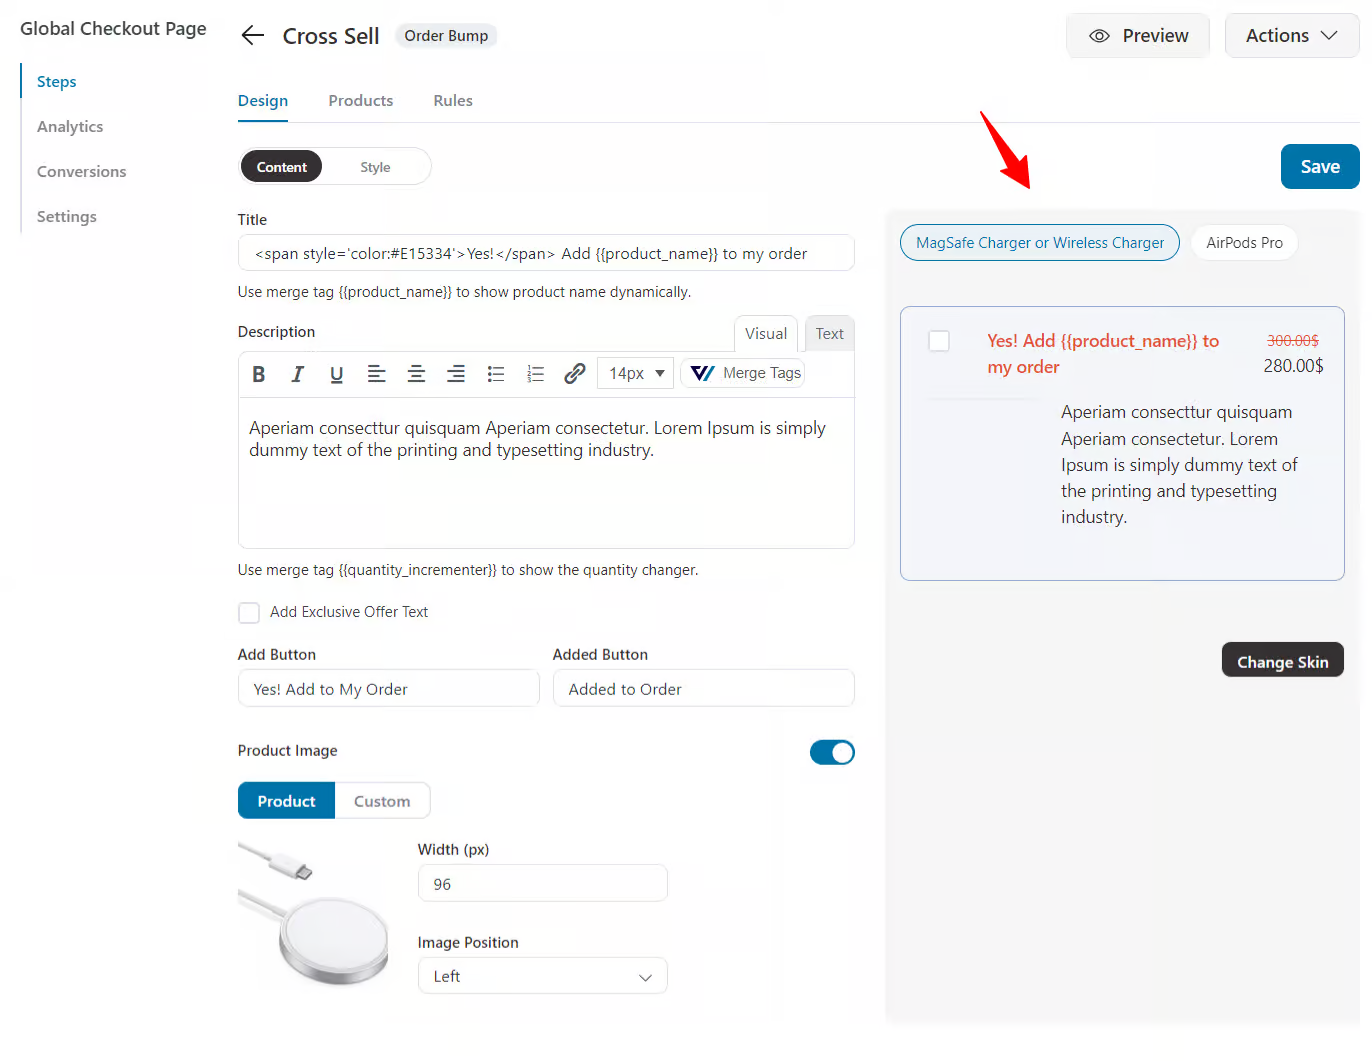
Step 5: Customize the order bump banner
To customize an order bump in WooCommerce:
- Navigate to the Content tab to customize the title, description, and buttons using dynamic tags like {{product_name}}.
- You can use the Style tab to adjust the appearance, such as button colors, fonts, and product image layout.
- Preview the order bump on the right panel to see real-time changes.
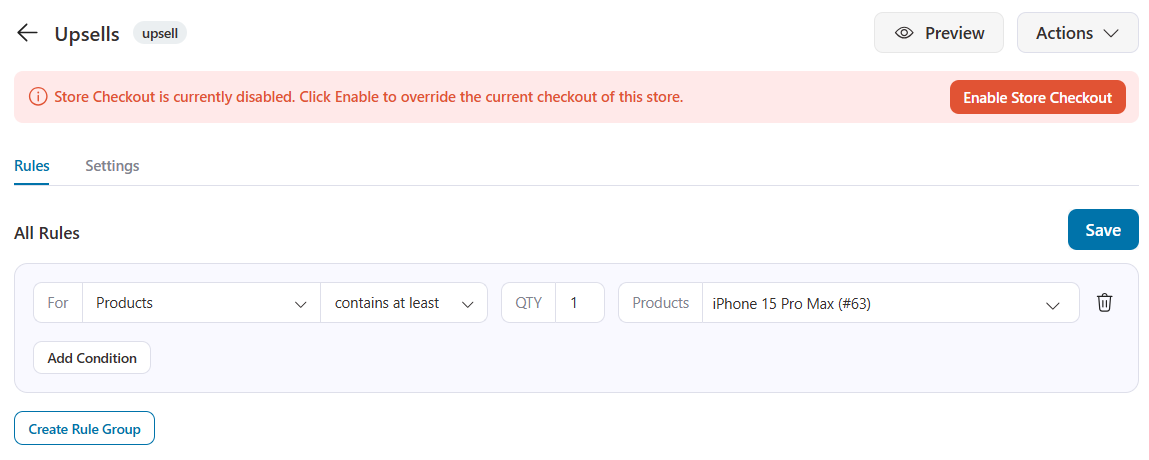
Step 6: Add the display condition for the order bump
Next, add a rule to show the order bump on the checkout page.
Here, the order bump will appear depending on the rules you set. We have selected the cart items, exact matches, quantity one, and the product name. Hit save when you’re done.
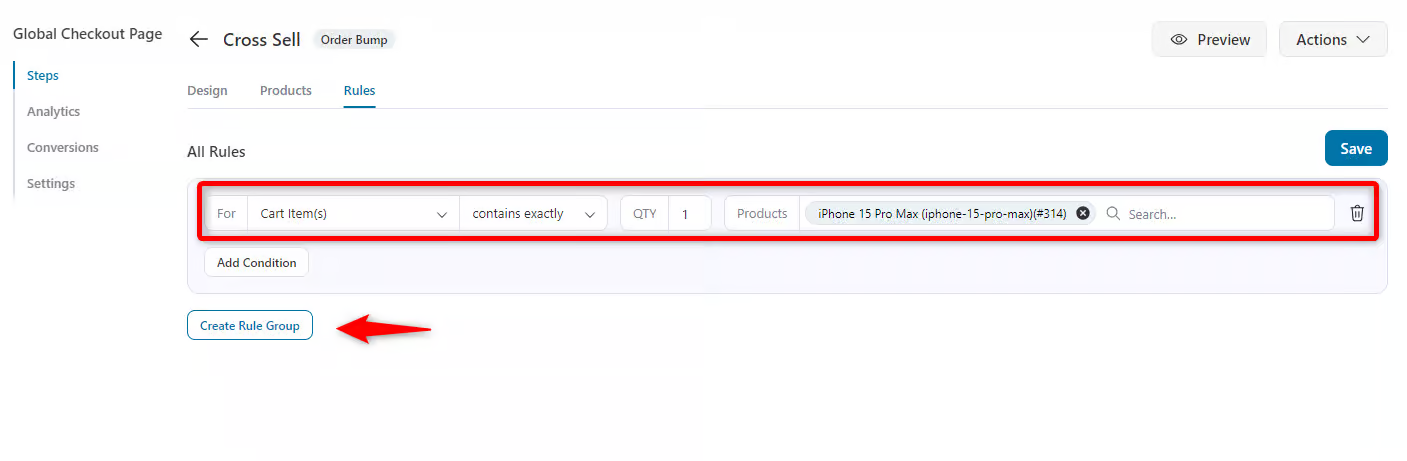
You can also add more products if you want.
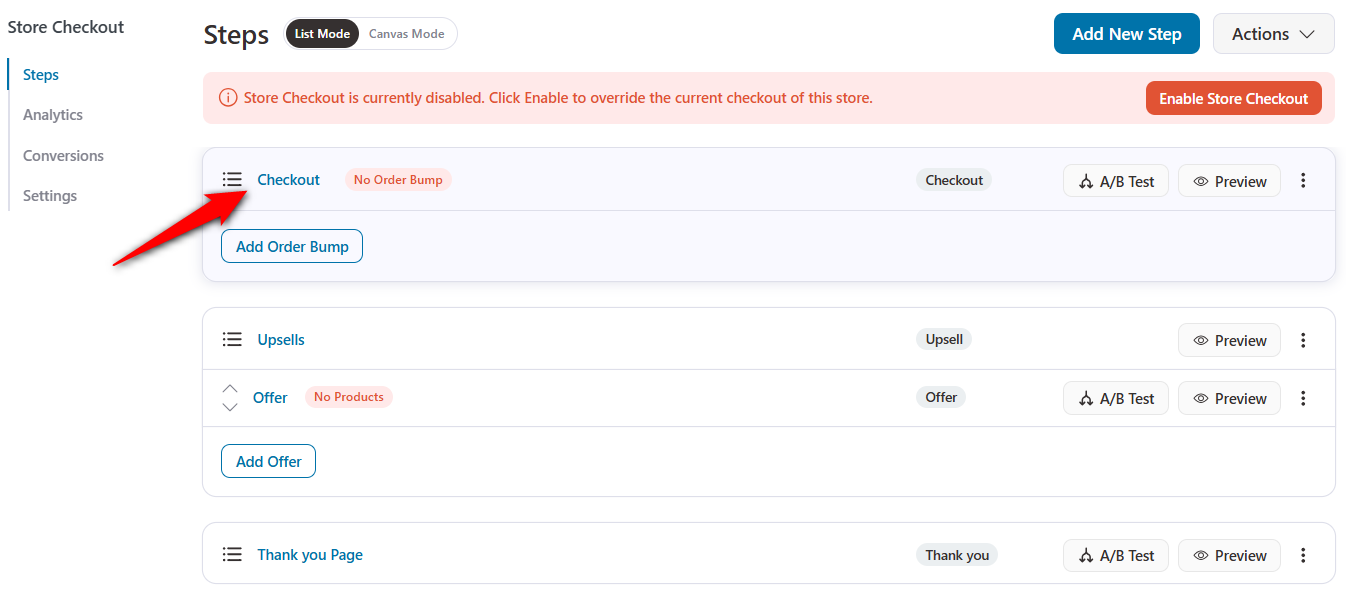
Step 7: Enable store checkout
Before checking whether the order bump is working or not, you have to enable the checkout page. To do so, click on the "Enable Store Checkout" button to activate the checkout page.
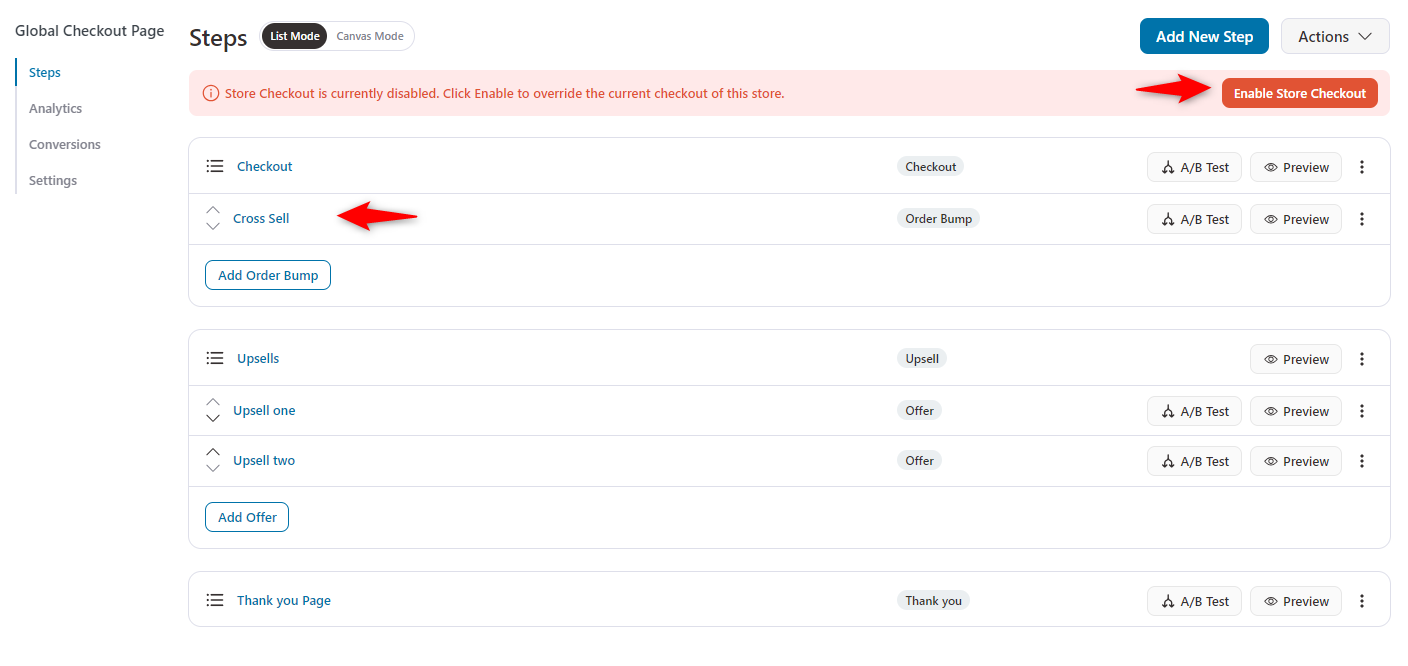
Now, it’s time to check if the order bump is working properly.
To do so, add “iPhone 15 pro-Max” to the cart, and the recommended products appear as cross-sells on the checkout page.
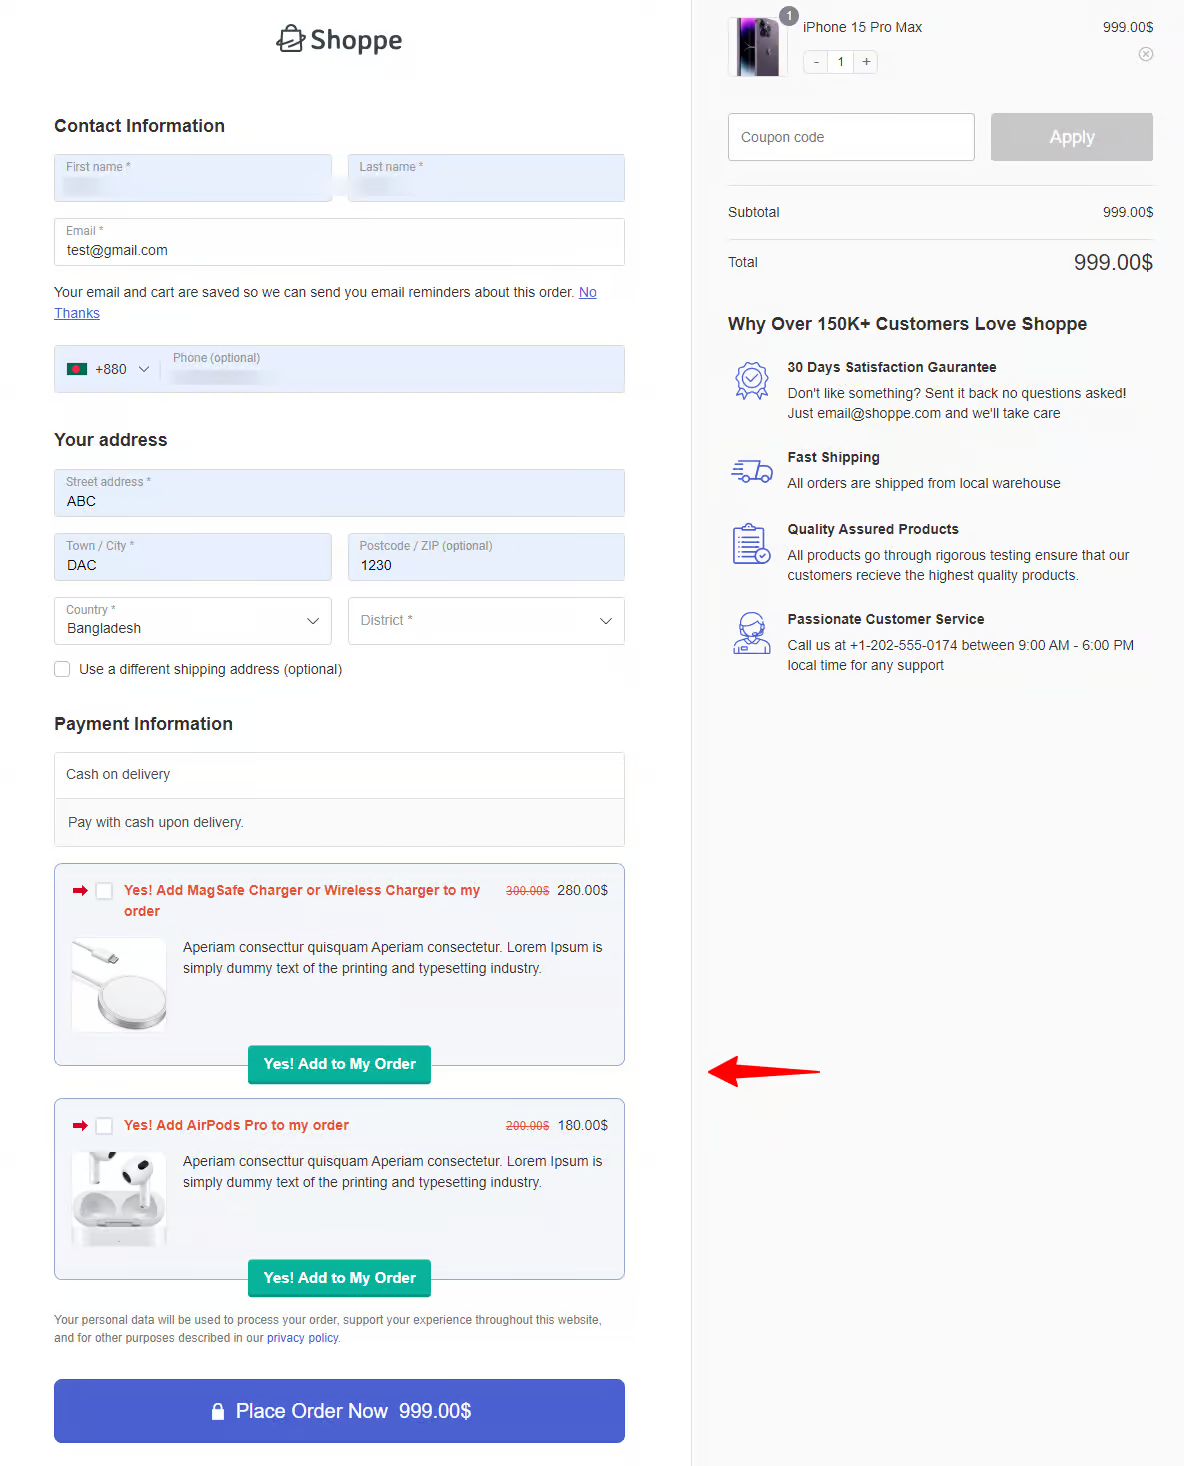
This is how you can showcase cross-selling products on the checkout page using the FunnelKit order bump feature.
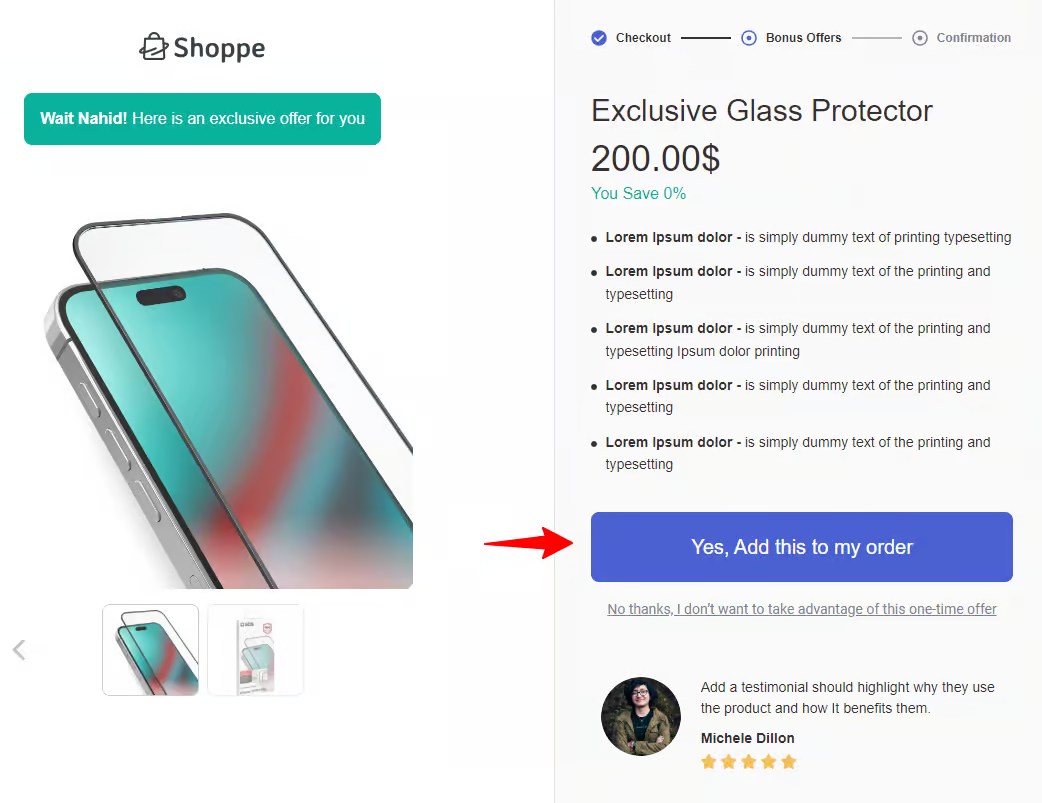
Method 5: Adding WooCommerce Cross-Sell One-Click Upsell Popup Offer
You can create one-click upsells as part of your cross-selling offer. One-click upsells appear after the checkout page and before the order confirmation page.
These offers are accepted with a single click, requiring no additional input since the payment method is already tokenized.
Now, let’s see how to implement a cross-sell popup one-click upsell offer in your WooCommerce store.
Step 1: Add the cross-sell product offer
The upsell section is on the store checkout page. To access it, click on the offer name.
Now, click the “Add Product” button to add a product to the upsell offer.
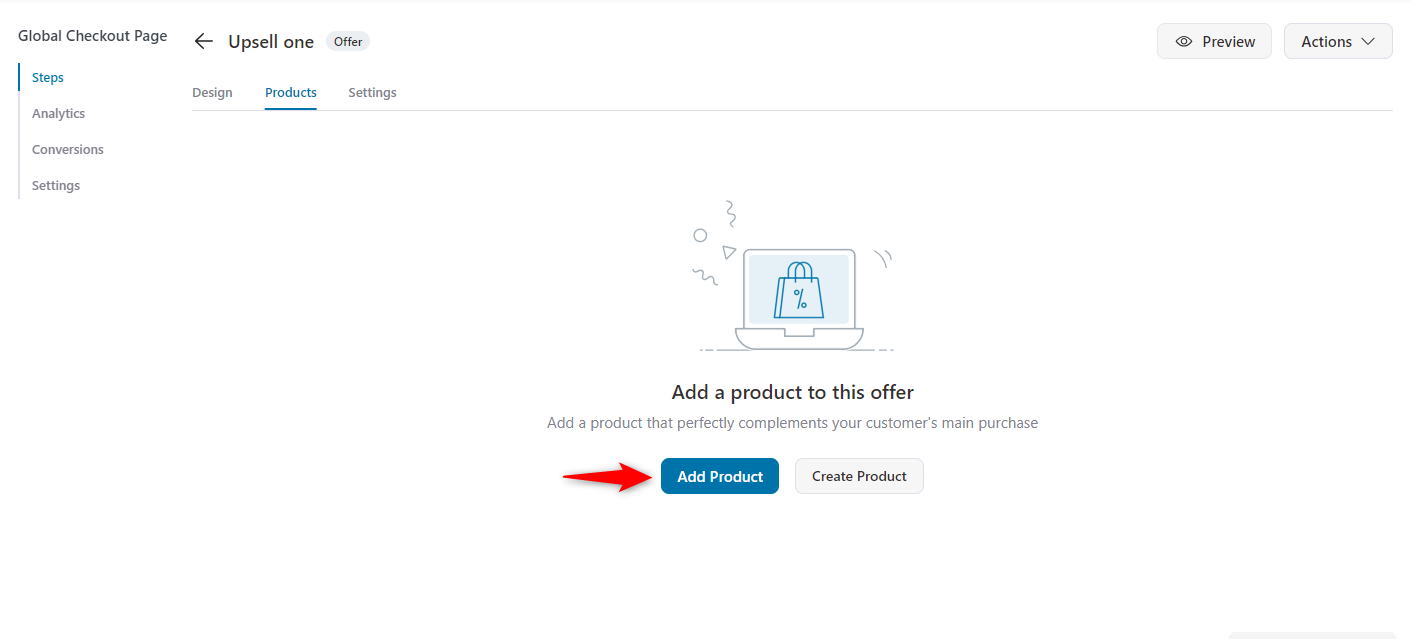
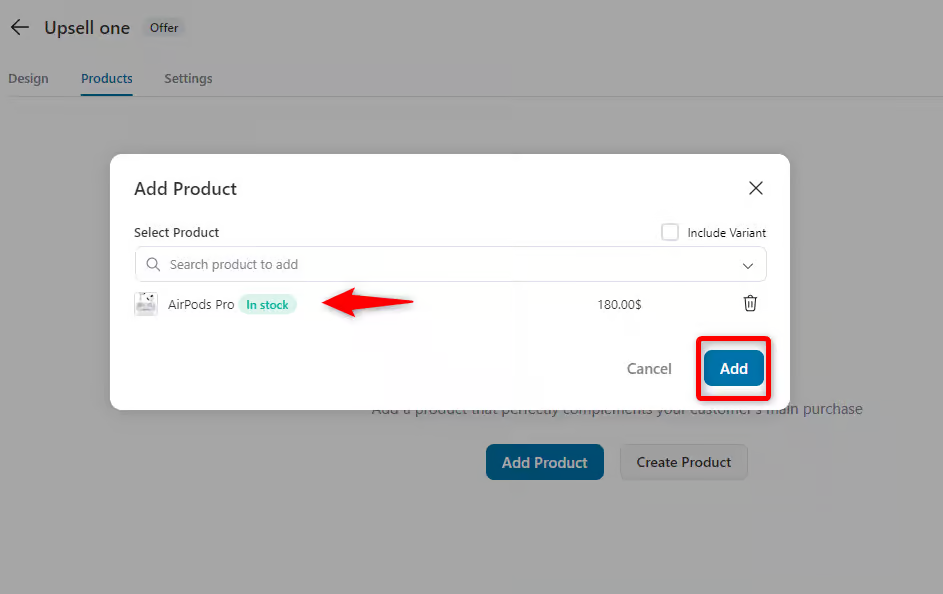
Search for the product and add it. And then click on the “Add” button.
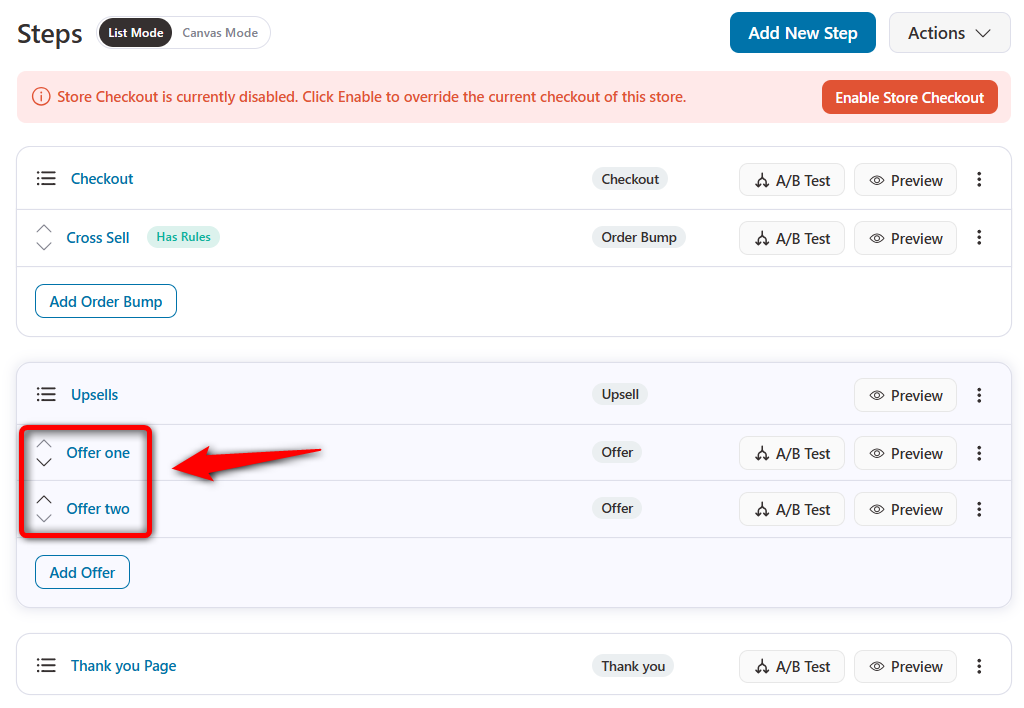
Following the same process, add another upsell offer. In our case, we created the "Upsell Two".
Step 2: Configure the upsell setting
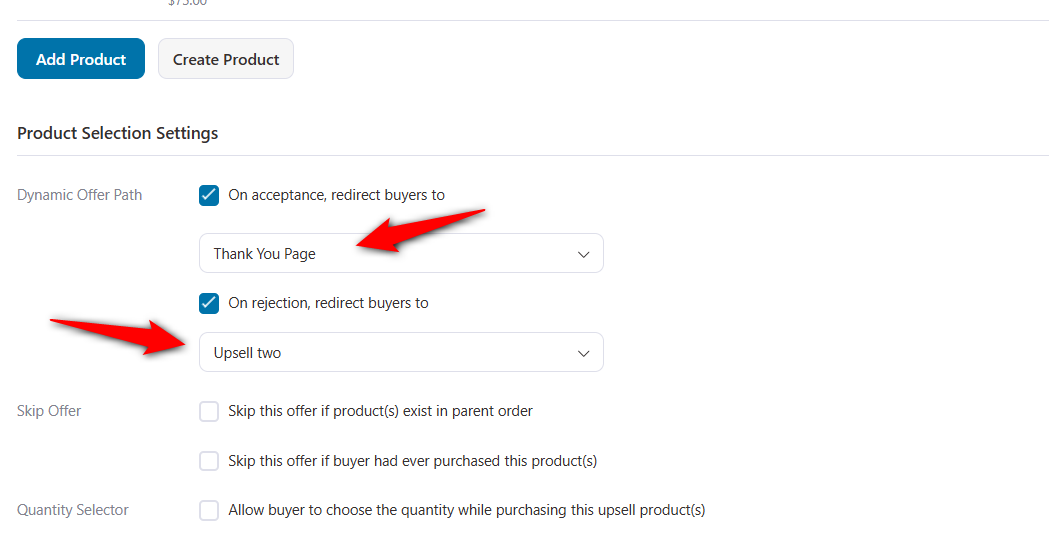
Click on the first upsell and navigate to the product tab.
Here, you can configure some settings. You can set dynamic offer path conditions depending on your offers.
If anyone accepts the upsell offer, you can redirect your users to the thank you page.
Or if anyone rejects the upsell, you can redirect your users to the second upsell or downsell offer.
Step 3: Add rules to your one-click cross-sell offers
Click on the main upsell page.
Under the Rules tab, set up a display condition for your cross-sell offer.
Here, we’ll select the Product purchased rule.
You can add more rules to show the right offers to the right customers.
Step 4: Preview the WooCommerce cross-sell offer after checkout
Here is the preview of the first cross-sell offer appearing after the checkout page:
On rejection, the 2nd upsell offer appears.
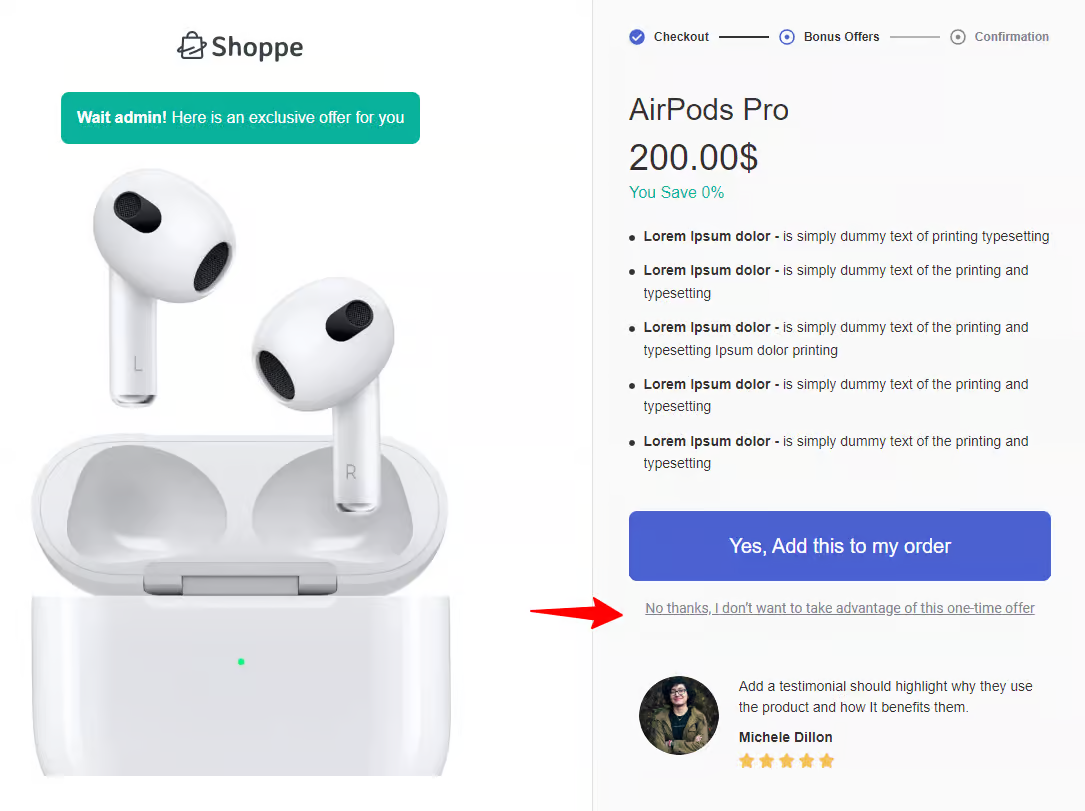
Your customers will land on the thank you page based on your acceptance or rejection of the offer.
This is how you can set cross-selling offers in your WooCommerce store using FunnelKit Funnel Builder's one-click upsell feature.
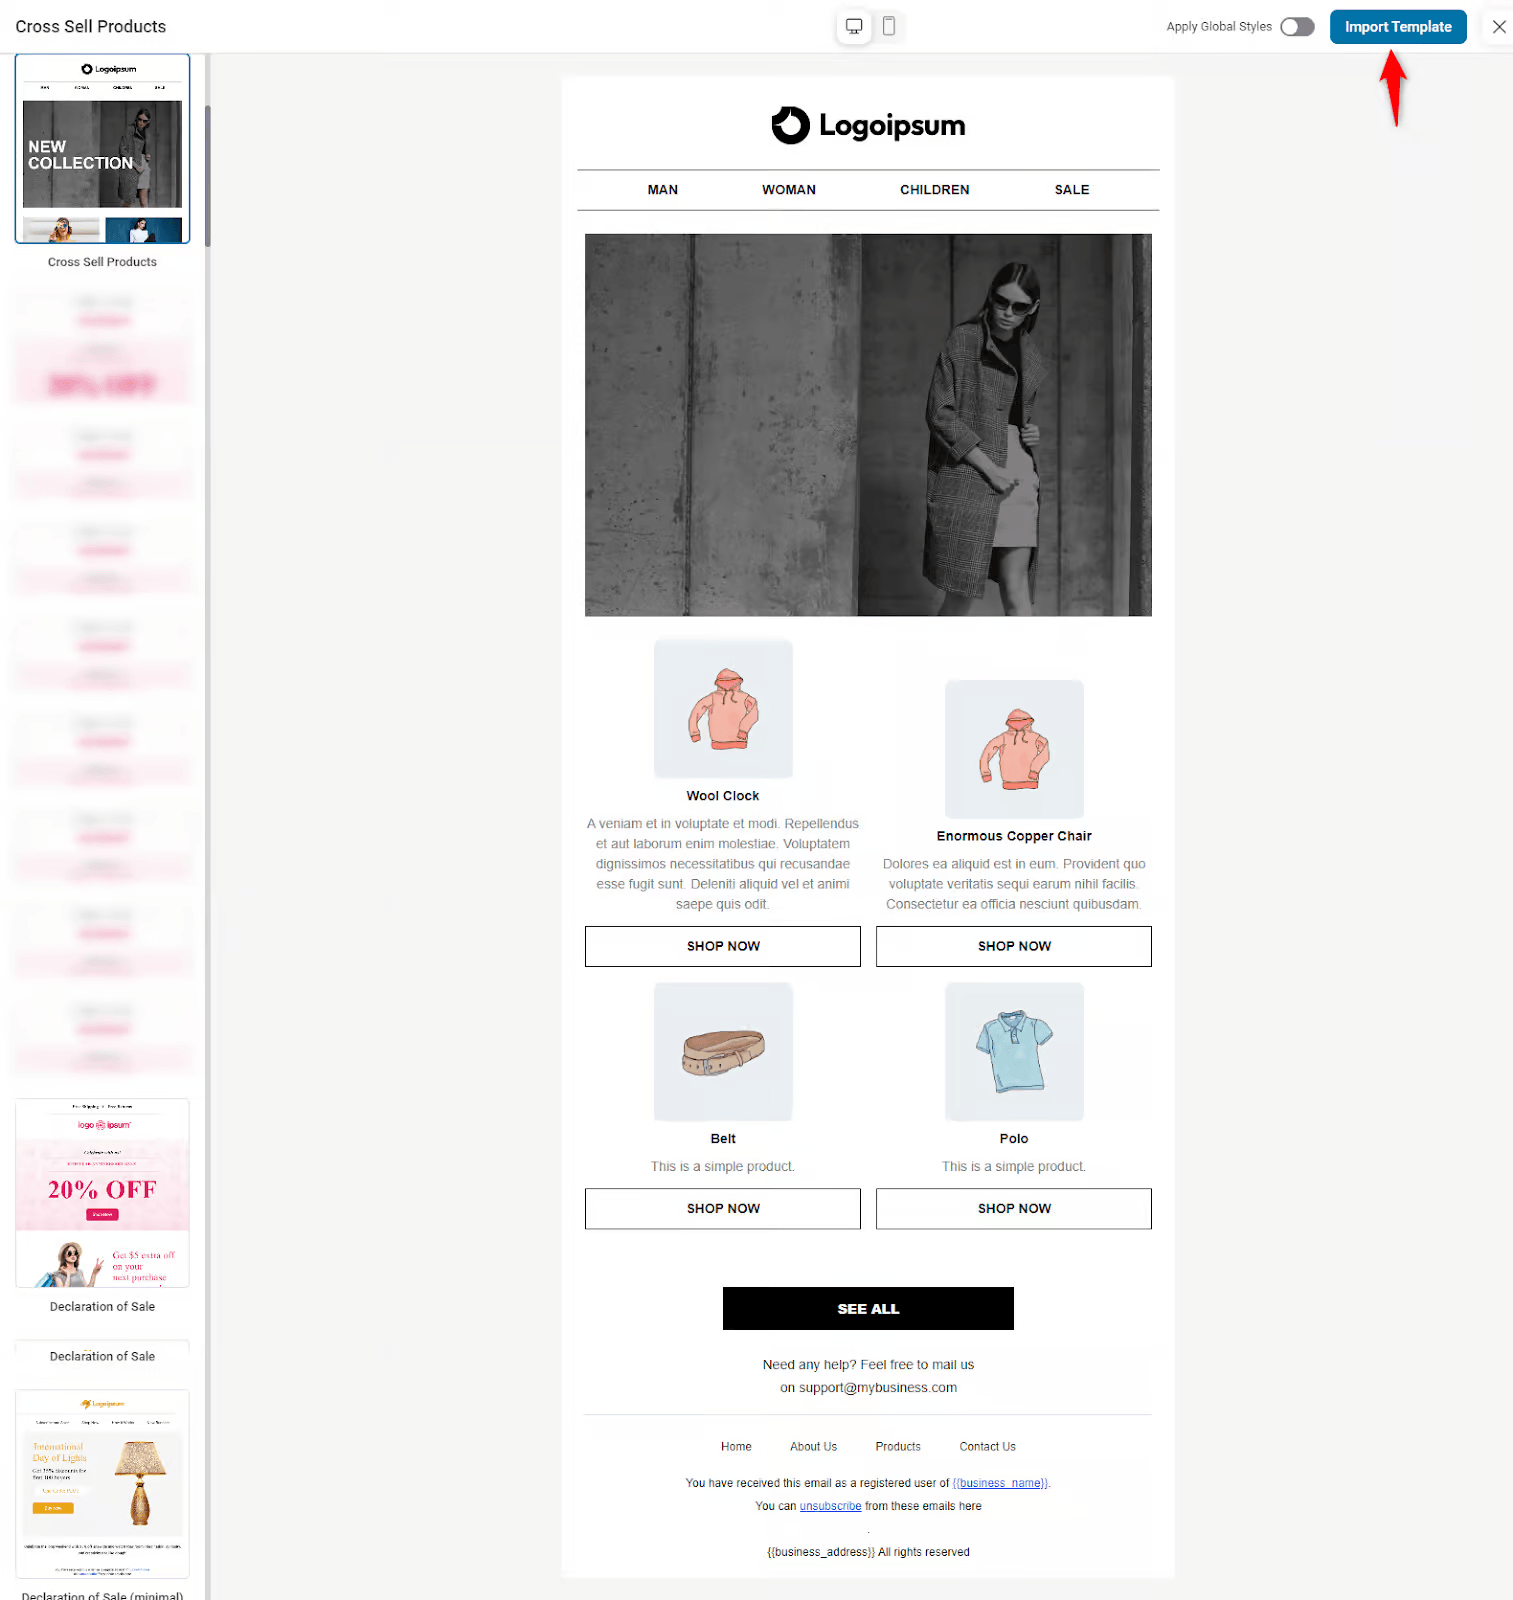
Method 6: Offering WooCommerce Cross-Sell in Post-Purchase Emails
Cross-selling doesn’t end when customers leave your website. With automated workflows, you can continue suggesting related products via email to drive sales.
For example, after a customer buys a mobile phone, send a post-purchase email recommending a charger or phone case.
For that, we’ll use FunnelKit Automations, the best marketing automations and broadcast CRM for WordPress and WooCommerce.
Make sure to install and activate FunnelKit Automations on your website.
Let’s get started:
Step 1: Create an automation
First, you need to create an automation. Navigate to the Automations section and click the “Create Automation” button.

Next, you must choose a recipe to run the automation. In this case, we’re using Scratch.
After choosing, provide the name for it.
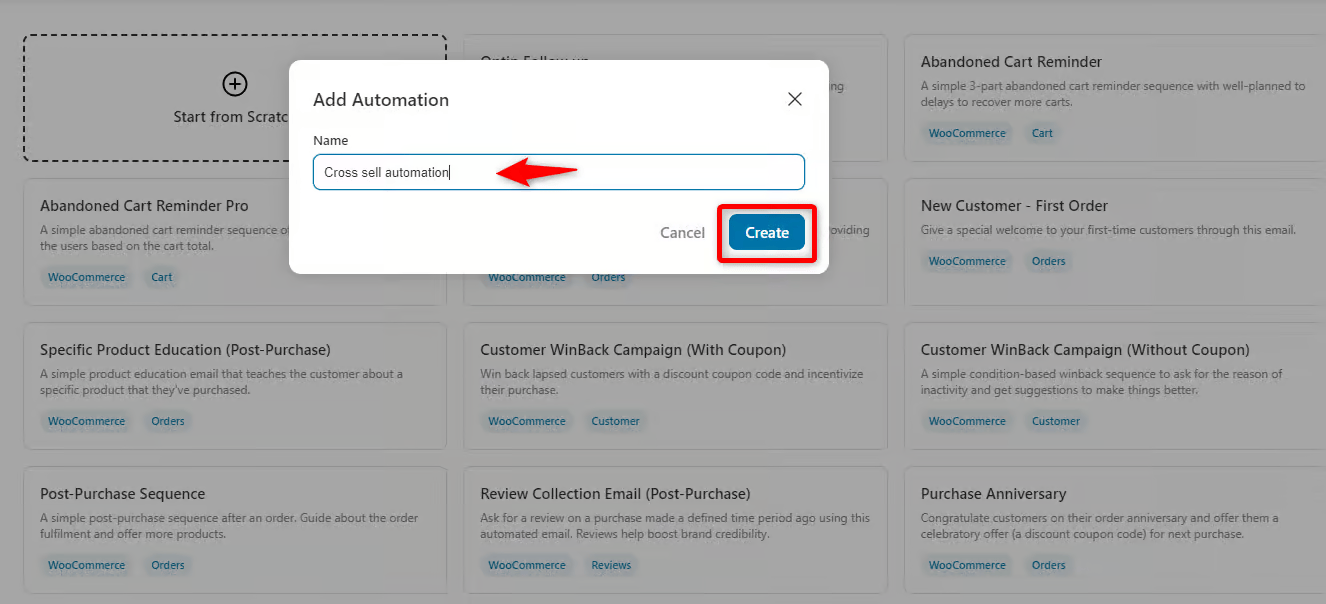
It’ll create a fresh workflow.
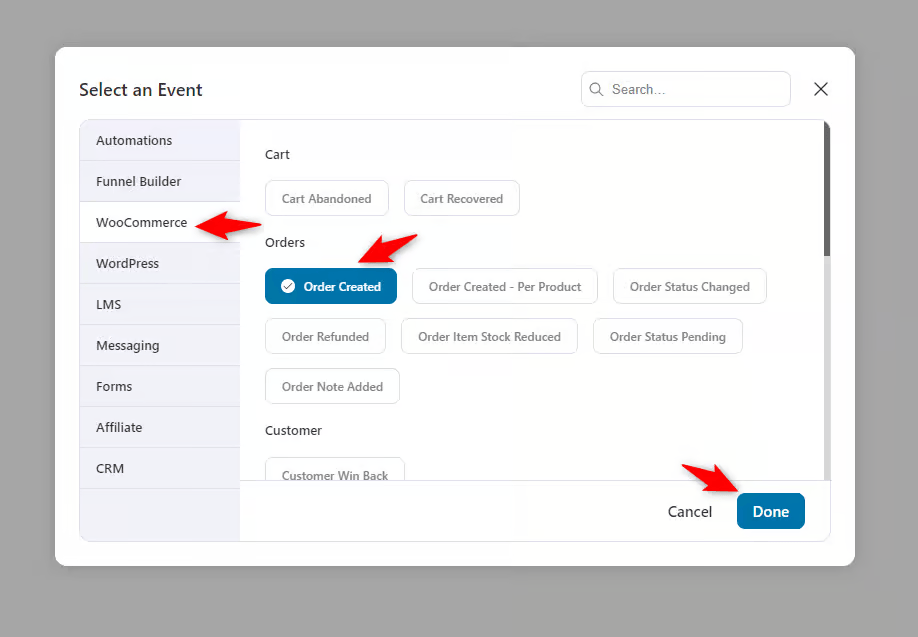
Step 2: Select the WooCommerce order created event
Next, you need to select the event to trigger this automation.
Click on it and choose the ‘Order Created’ trigger under the WooCommerce section. Then hit ‘Done’.
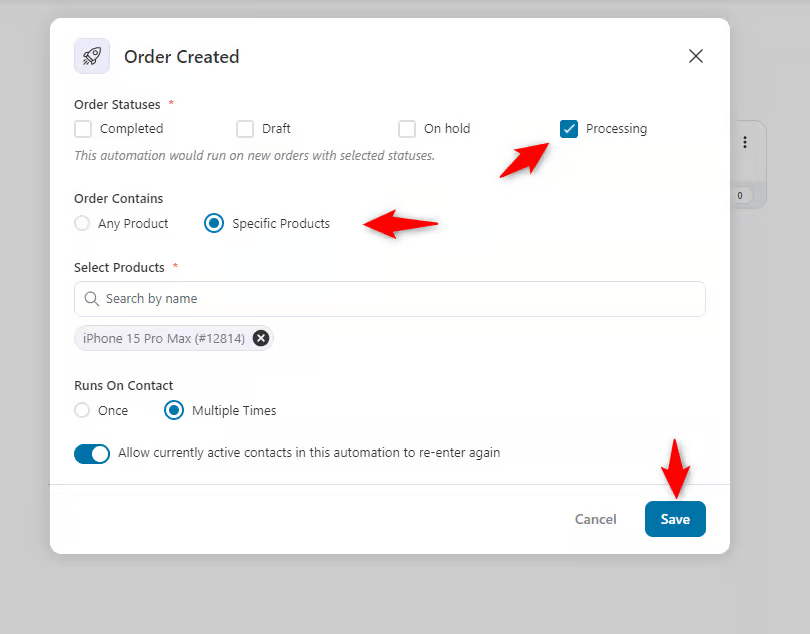
Next, check these options as they are. Just in the order contain section, choose specific products.
Suppose we send an email with a cross-selling offer. For that, we selected the “iPhone 15 Pro Max”.
So whenever the users purchase the iPhone 15 Pro Max, they will get the email, but not for all products they purchase. Hit save when you’re done.
Step 3: Create an automated email action
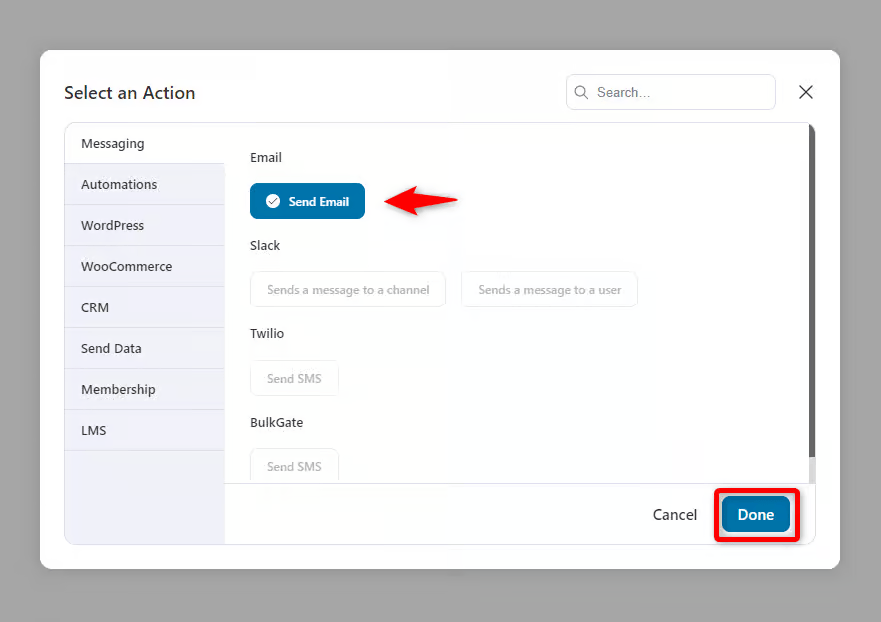
Next, create an event. Click on the plus icon and then action.
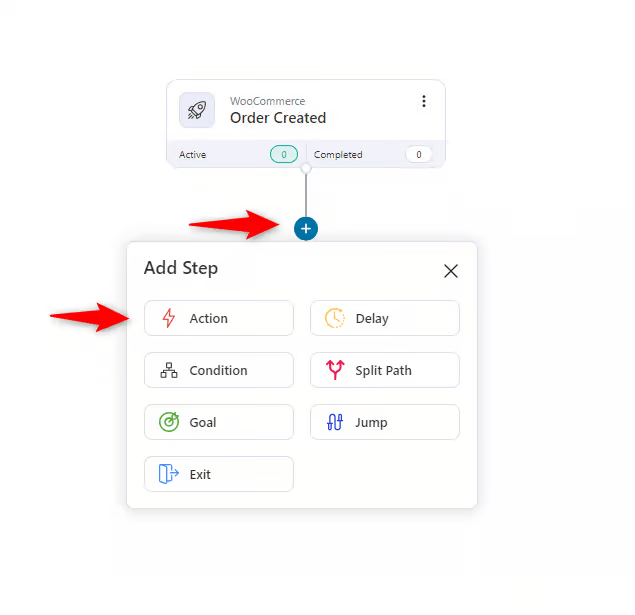
Select “Send Email” under the messaging section. And then hit done.
Step 4: Configure the email settings
Next, you need to configure the email settings. For example, provide a subject line and preview text.
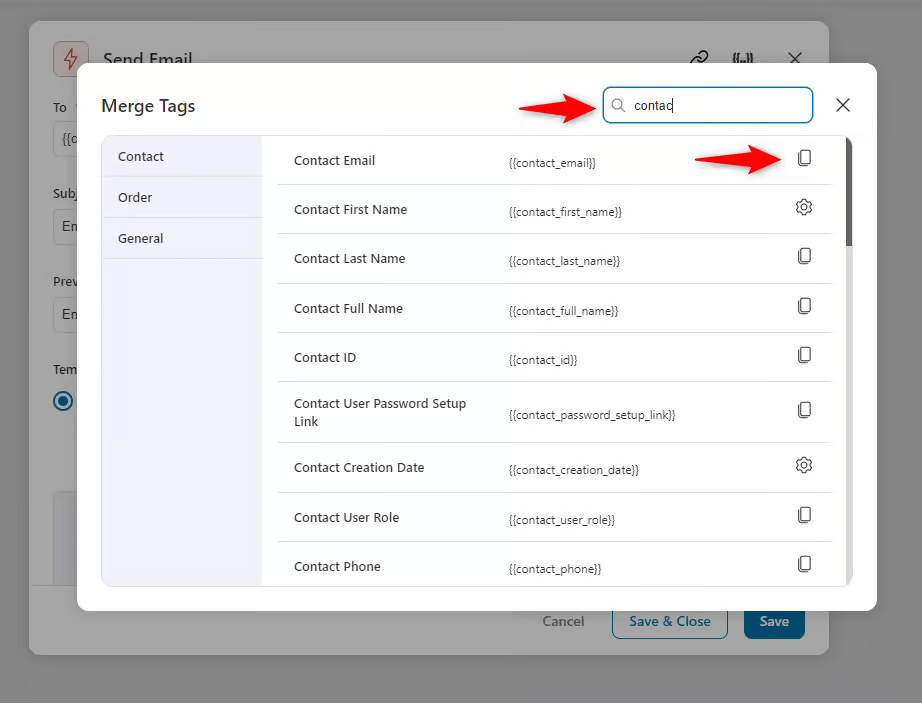
Also, using the merge tag {{..}} icon, you can directly trigger your preferred thing on the email.
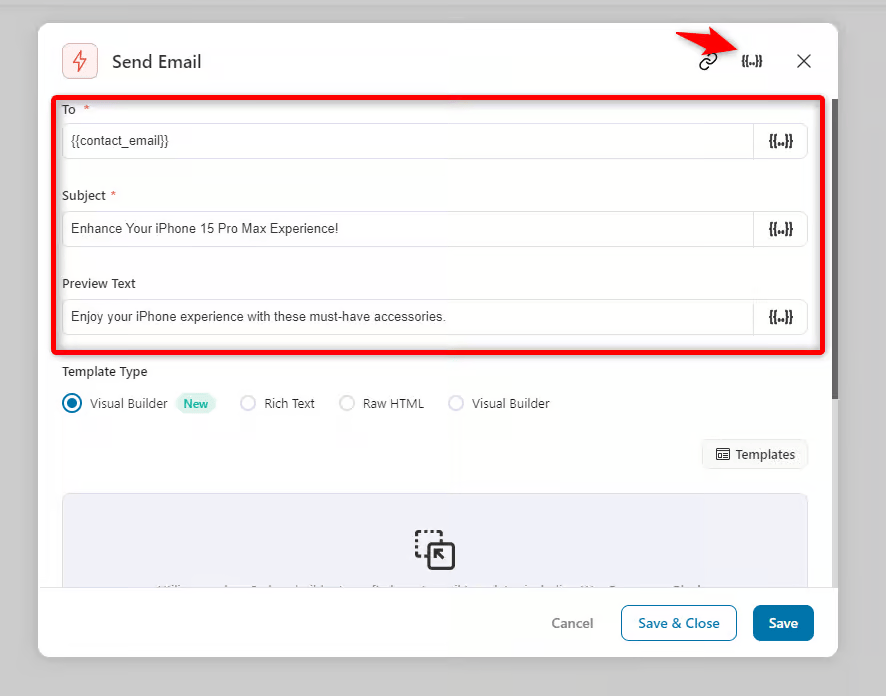
Suppose you want to trigger the contact email. To do so, click the merge tag icon and find the available tags here.
Simply copy the code and paste it to the preferred place.
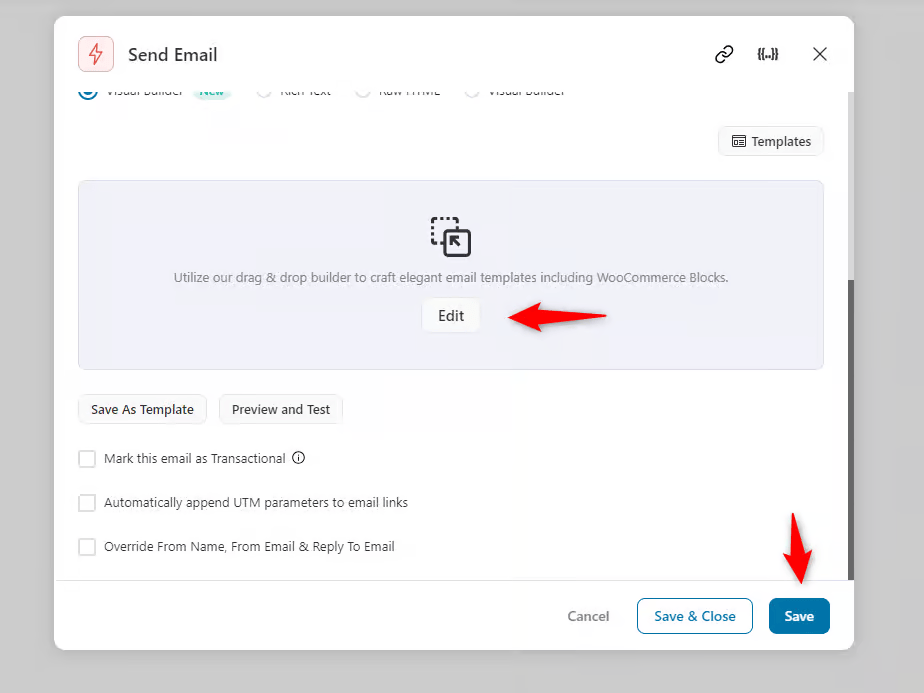
Step 5: Edit email with the visual builder
Once you’re done with the configuration, it’s time to customize the email template.
For instance, you need to use the visual builder of FunnelKit Automations. Click on the “Edit” button.
Under the eCommerce section, choose the “Cross-sells Products” template.
Preview the template and import it.
Step 6: Customize the email template
Customize the email content as per your business needs.
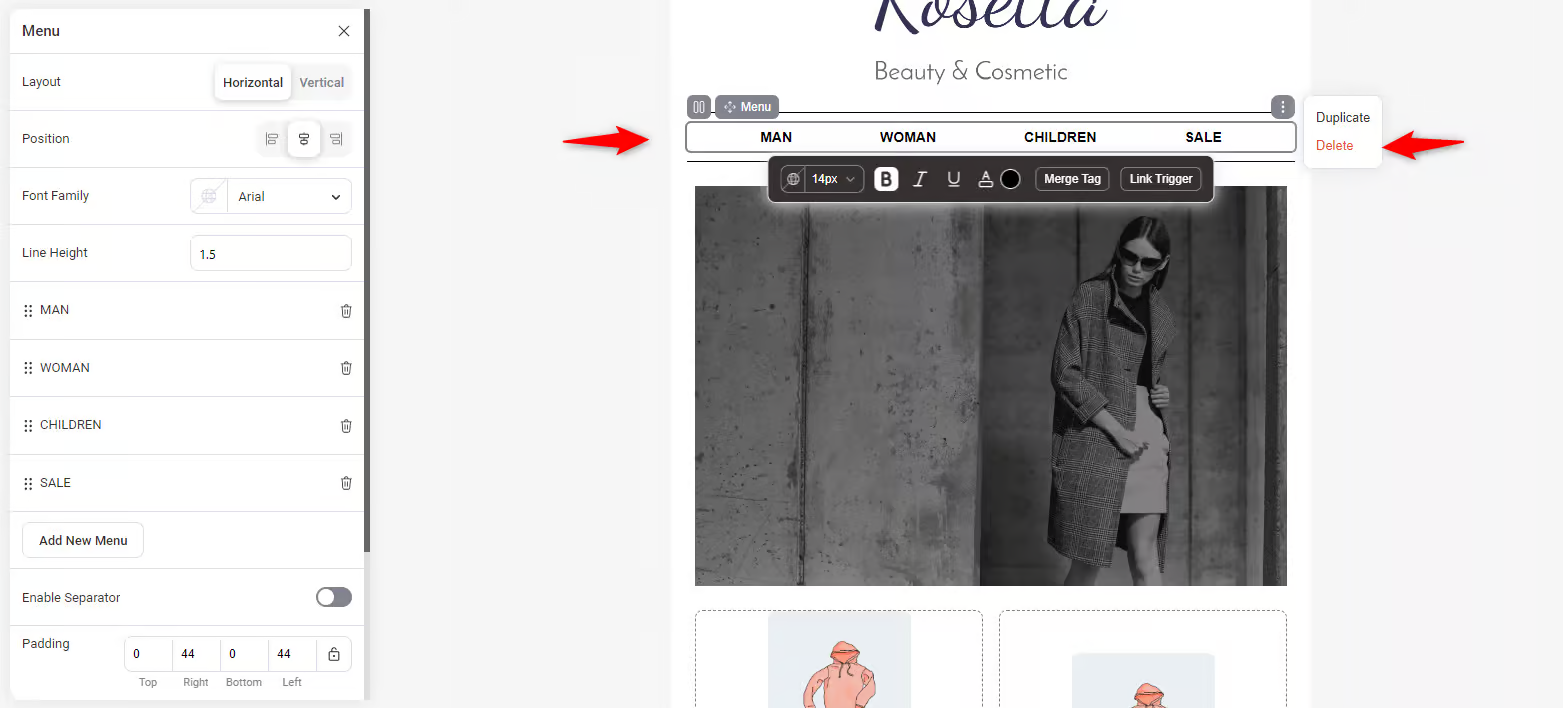
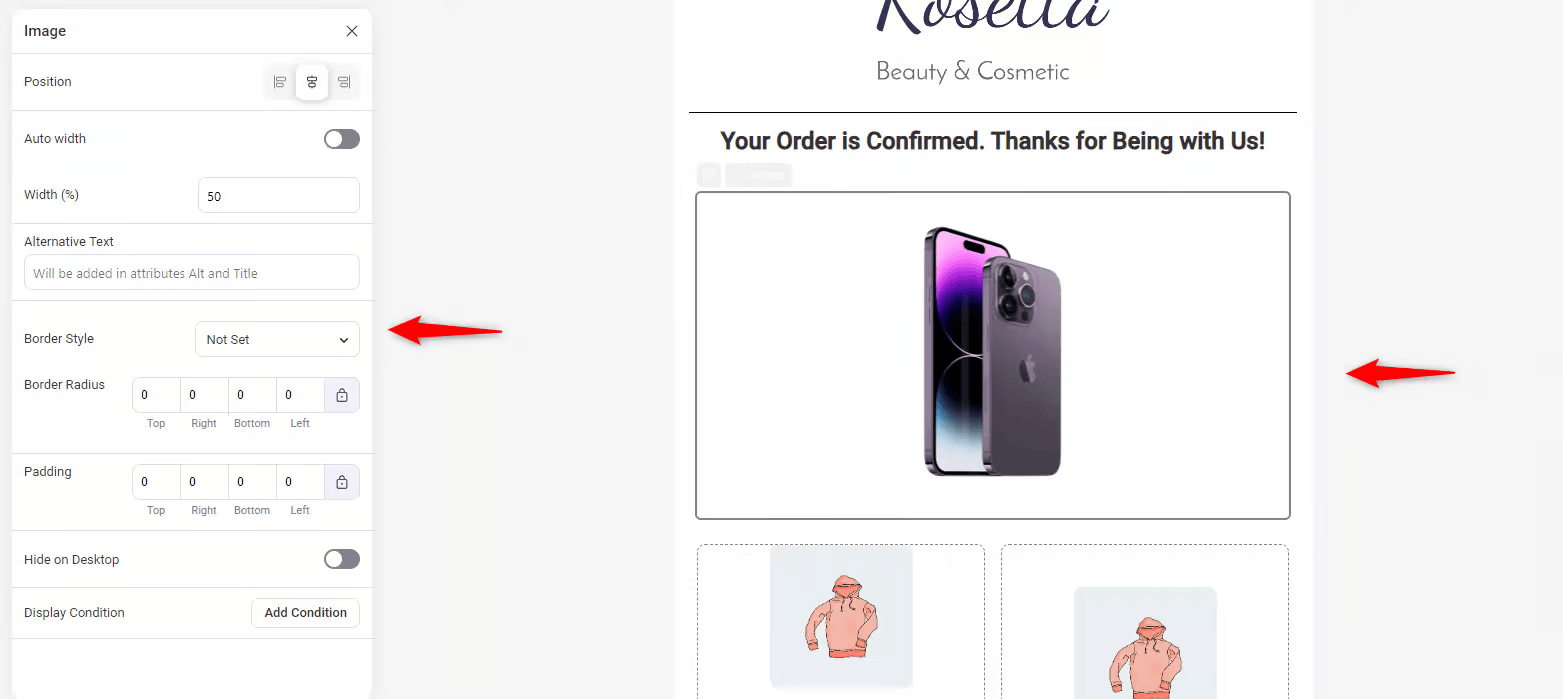
Customize the logo
Click on the logo and upload a logo of your company or brand.
Once done, customize the logo image settings on the left side of the screen.
Adjust the position, auto-width, alt-tags, border, paddings, etc.
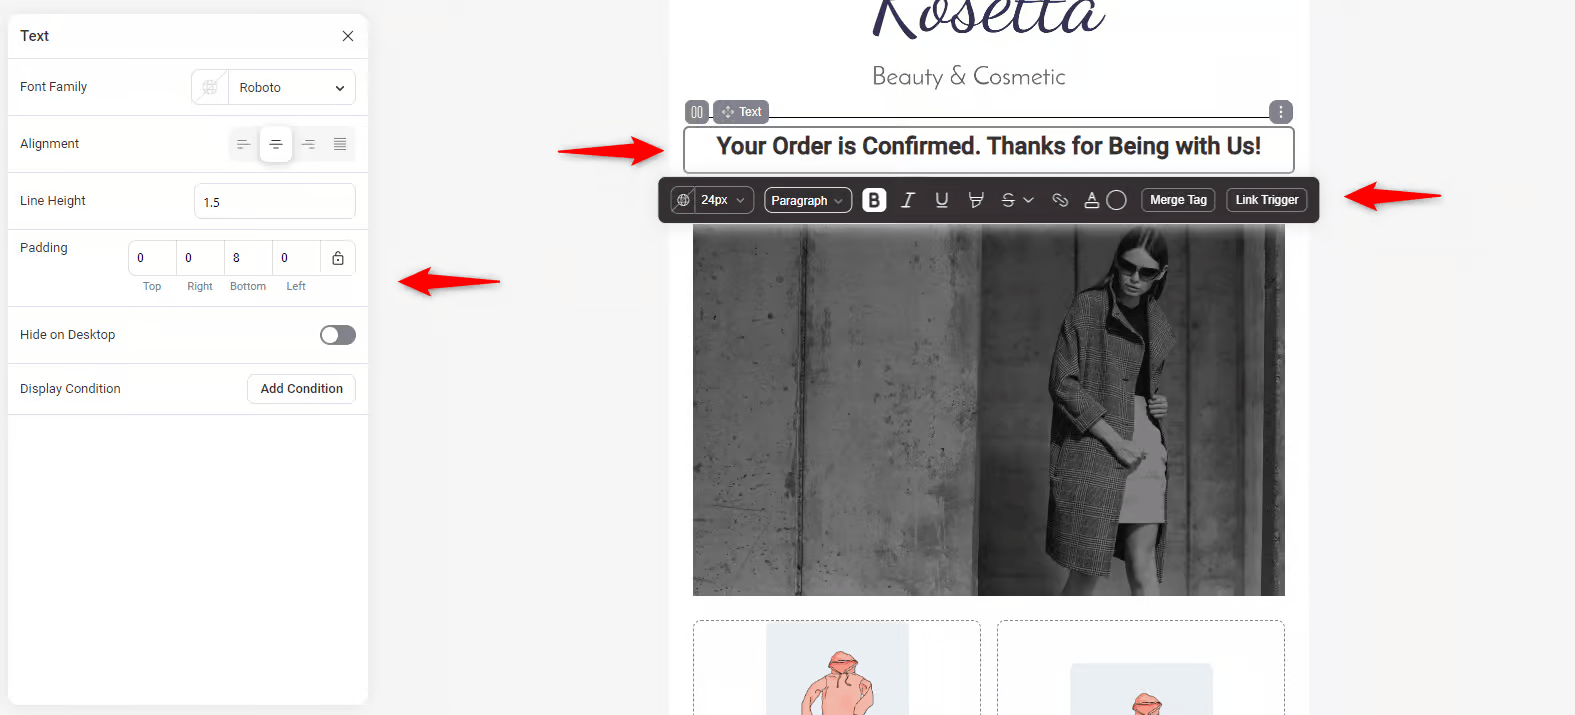
Customize the heading
The current heading may not be suitable for your brand. We’re changing it. Click on it and remove it.
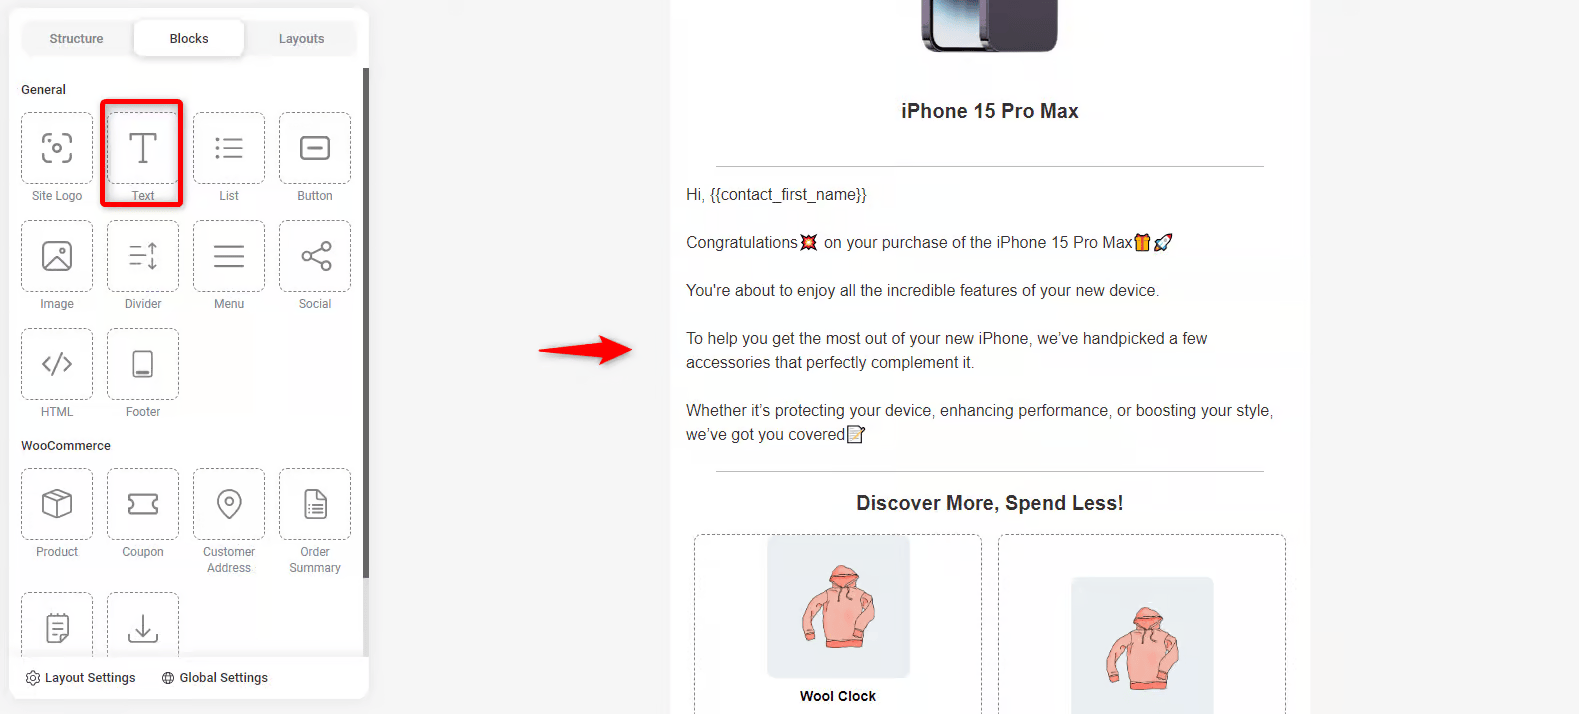
Then, add a text widget by dragging left to right side.
Write your text here or any tagline that you want to use. Then, adjust the settings on the left side.
Customize the header image
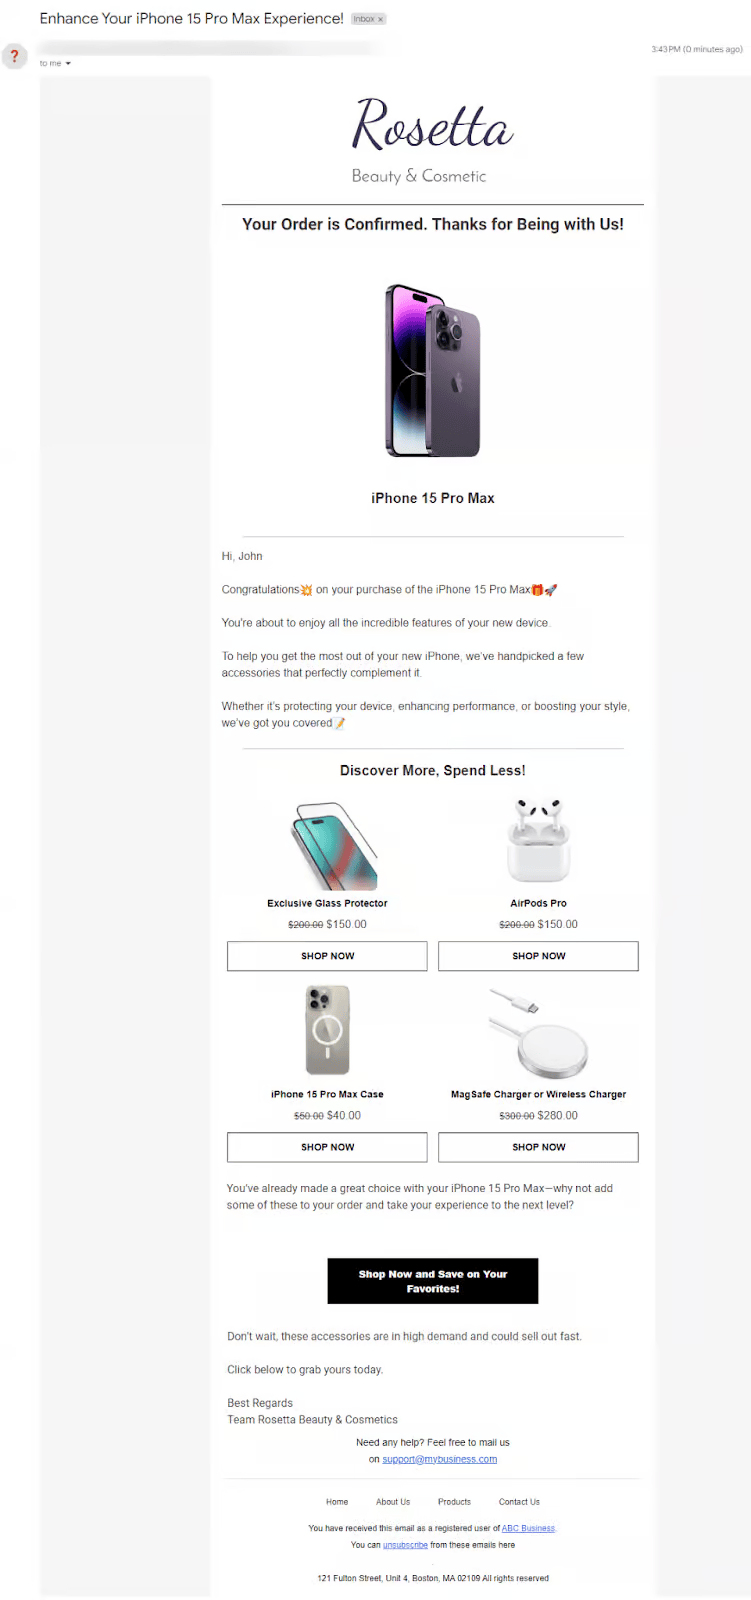
We're removing the current image since we’re crafting the cross-selling email for the iPhone 15 Pro Max.
Upload your product’s image and adjust its settings from the left side.
Customize the email body
In the same way, add another text widget and your email content.
Customize the product widget
Then, add the product widget to show cross-sell products.
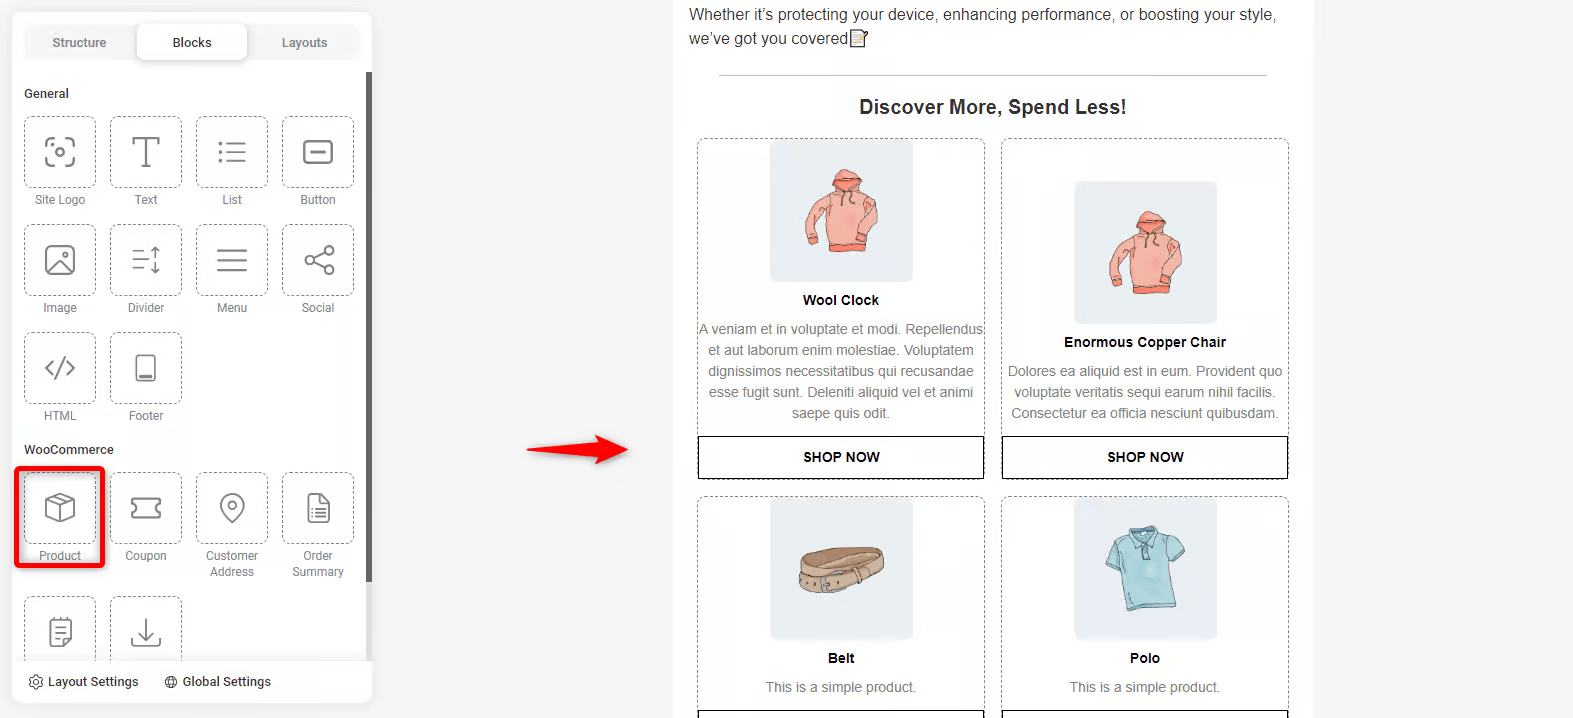
On the left side, choose the product feed. This will help you configure the product feed to display woocommerce cross sell recommendations dynamically.
You can even add the products individually.

Customize the CTA button
Next, customize the button and its text.
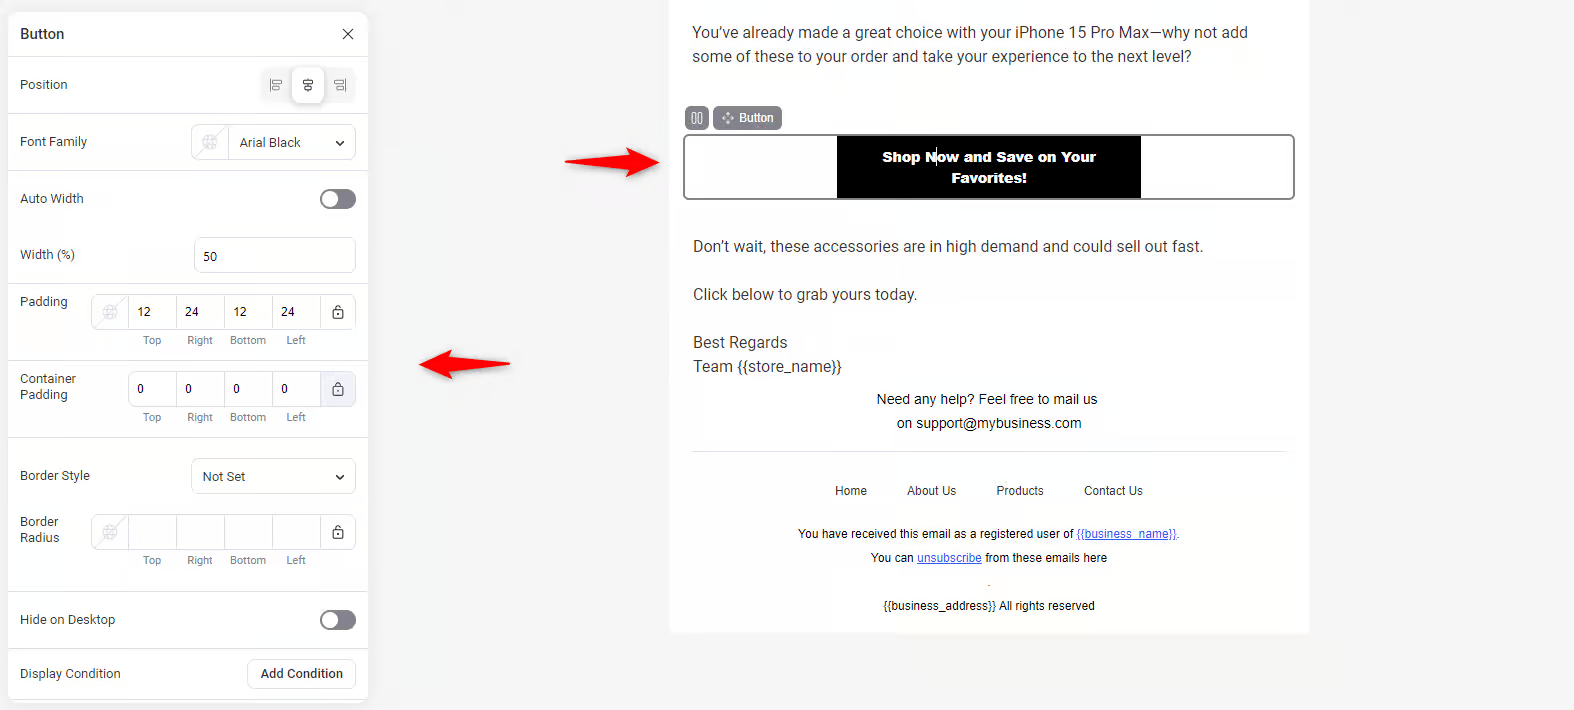
Save it when you’re done editing your WooCommerce cross-sell email.
Step 7: Activate the automation and regulate it
Before running the campaign, be sure to activate the automation.
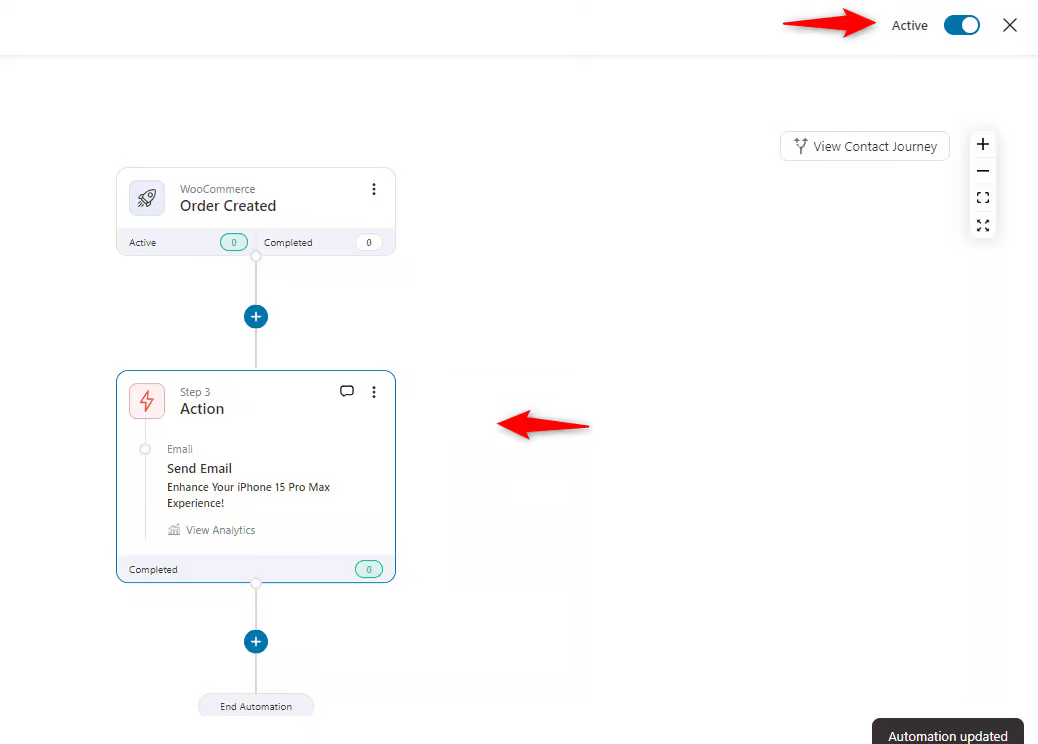
So, users will receive this cross-selling email whenever they add the “iPhone 15 Pro Max” to their cart.
Well done! This is how you show cross-sells to your customers in an email.
9 Tips for Effective WooCommerce Cross-Selling to Your Customers
Cross-selling boosts sales and improves customer satisfaction. In fact, 72% of salespeople reported revenue growth from upselling and cross-selling strategies.
To succeed with effective cross-selling, consider these nine tips:
1. Offer relevant products and services
Recommend products and services that naturally complement each other.
For instance, if a customer buys a laptop, recommend accessories like a mouse or extended warranties.
2. Timing is key
Present cross-sells at the right moment—when items are added to the cart, at checkout, or after the purchase. Don’t overwhelm them too early in the shopping process.
Suggest socks or shoe polish as customers are about to purchase a pair of shoes.
3. Use personalization
Tailor the cross-sell recommendations based on the customer’s purchase history or preferences.
For instance, suggest a water bottle, resistance bands, or gym bag if a customer buys workout gear frequently.
4. Don’t overdo cross-sells
Don’t overwhelm customers with too many options. Focus on 2-3 products that naturally complement their purchase.
Too many choices can lead to decision fatigue and cart abandonment.
5. Pitch smart offers
Make cross-sells more attractive by offering discounts or bundling items. Here’s a cross-sell example from brands like Adidas that use this strategy with the “Complete the Look” and “You May Also Like” sections.
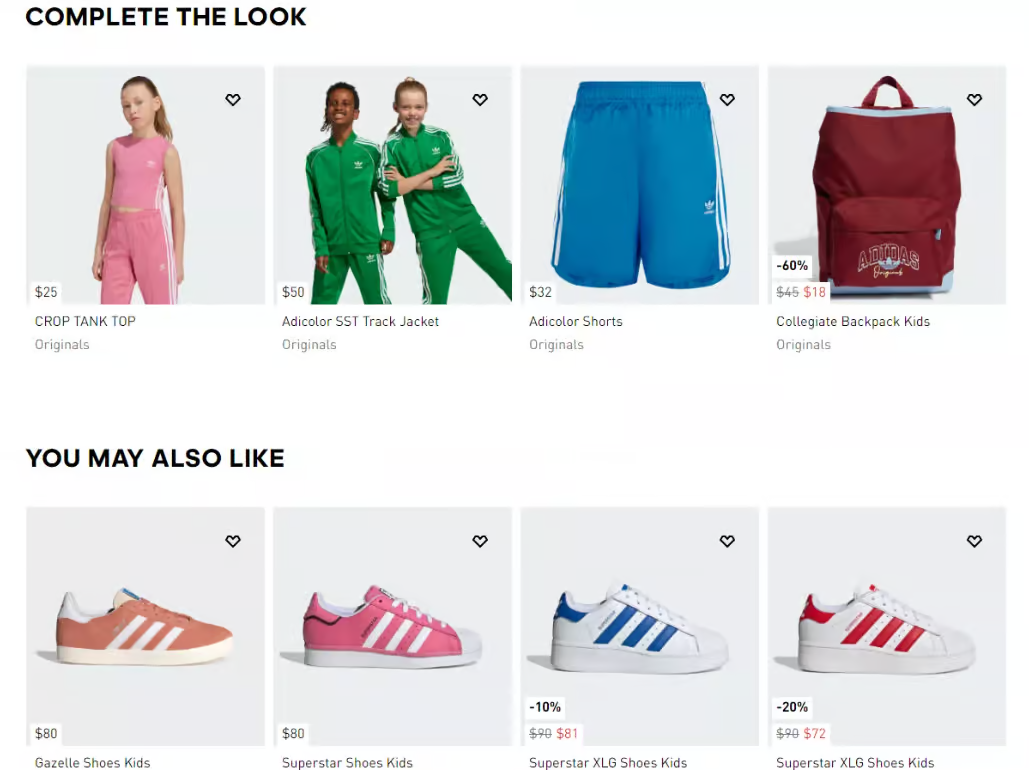
However, be sure to offer small incentives such as 5% or 10% on low-cost cross-sell items with high-profit margins.
You can also entice customers to add complementary products to qualify for free shipping or get free samples and gifts, increasing the overall order value.
6. Test and measure performance
A/B experiment with your cross-sells with products, discounts, and placements to find the most effective strategy.
FunnelKit Funnel Builder lets you run A/B tests and analyze performance to identify the best-performing variant.
7. Showcase product reviews
Highlight excellent reviews and 5-star ratings of related products to build trust and encourage additional purchases.
8. Limited-time offers
Add urgency with countdown timers to push shoppers to act quickly on your WooCommerce cross-sell offers.
9. Email marketing
Retarget existing customers with tailored emails by showcasing compelling cross-sell offers.
You can send dynamic, personalized coupon codes with your recommendations using FunnelKit Automations.
Join our Facebook group and subscribe to our YouTube channel to get effective tips and strategies for growing your online business.
Frequently Asked Questions (FAQs)
1. What's the difference between upsell and cross-sell?
While upselling and cross-selling are popular strategies to boost sales, they have distinct goals and approaches.
Upselling encourages customers to spend more on an upgraded or premium version of the product they’re already buying.
For example, suggesting a luxury leather sofa instead of a fabric one.
Cross-selling focuses on complementary items, like suggesting a pillow set when a customer buys a mattress.
2. What is the 25% rule of thumb for cross-selling?
The 25% thumb rule for cross-selling suggests that the price of the cross-sell product should be not more than 25% of the cost of the original product.
Let’s suppose, a customer buys a table lamp for $100, then the cross-sell products should ideally be priced at $25 or less.
3. Is cross-selling profitable?
Yes, cross-selling can be highly profitable if done effectively. It helps increase the average order value and revenue of all eCommerce businesses.
McKinsey found that cross-selling has increased their revenue by 20% and profitability by 30%.
4. What is a good example of cross-selling?
Some good examples of cross-selling include chargers, screen guards, phone covers, headphones, etc., when buying a mobile phone.
When buying a yoga mat, cross-sell suggestions like resistance bands, gym bags, or water bottles.
Another can be a sleeping bag, portable stove, flashlight, or waterproof backpack when buying a camping tent.
Ready to Unlock Your Store’s Potential with WooCommerce Cross-Sell Strategy
Cross-selling is a proven strategy to increase average order value and revenue while enhancing the customer experience with relevant product recommendations.
The default WooCommerce cross-sell setup falls short, but tools like FunnelKit Funnel Builder, FunnelKit Cart, and Automations take it to the next level.
They help you automate, optimize, and personalize your cross-selling marketing strategy effectively.
Start leveraging cross-selling today and turn your store into a revenue-boosting machine.
So, are you ready to unlock your store’s potential? Try FunnelKit Funnel Builder now!
The post How to Set Up Cross Sell Products in WooCommerce: Step-by-Step Guide appeared first on FunnelKit.