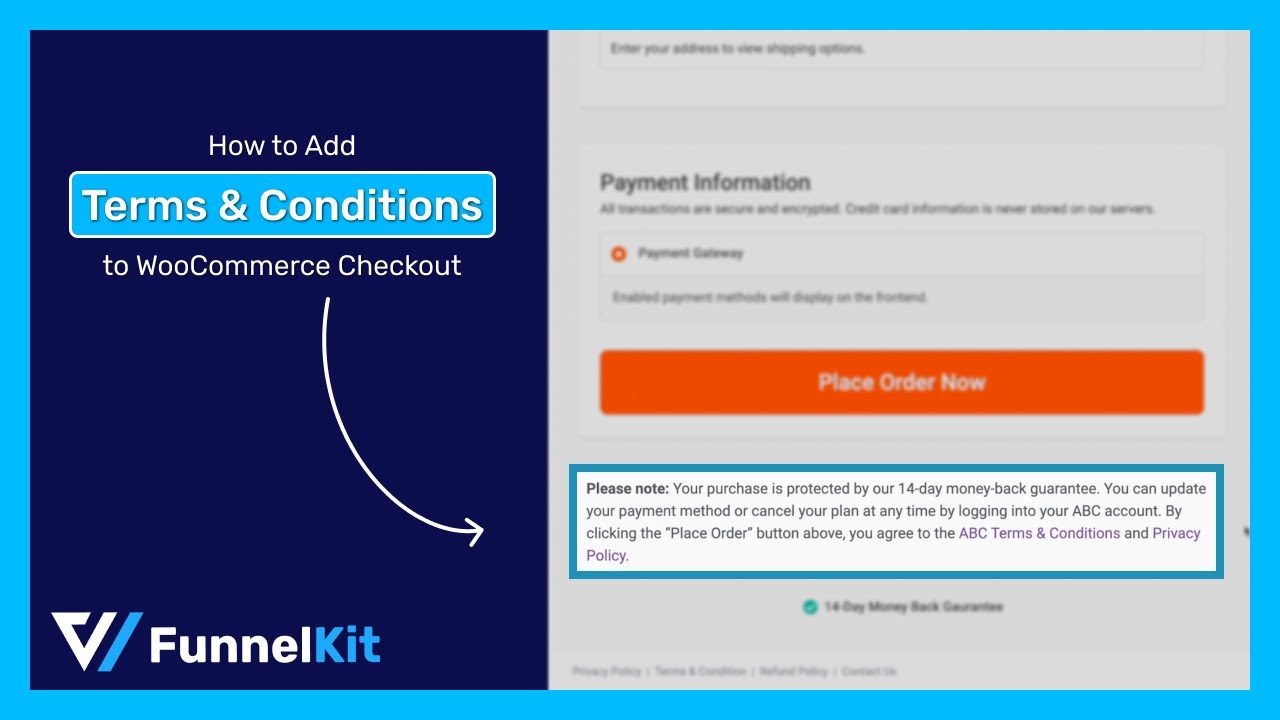
Nobody likes to read terms and conditions. But not having them on your website? That's even worse.
In WooCommerce, many store owners focus on flashy designs and shiny features but forget the legal backbone: visible, agreed-upon terms at checkout. Skipping this is like leaving the front door of your house wide open.
One of our clients had to issue full refunds on dozens of their orders simply because they couldn’t prove buyers had agreed to the terms.
But after they added a required terms and conditions checkbox and a visible link to their policy, refund requests dropped by over 10%.
By clearly outlining your policies, you create transparency, reduce misunderstandings, and build trust with customers. This simple step can also minimize chargebacks and customer complaints.
In this article, we’ll walk you through how to seamlessly integrate a terms and conditions checkbox into your WooCommerce checkout process.
We’ll also explore alternative ways to display your terms and conditions without a checkbox or even removing them from your WooCommerce checkout page, giving you the flexibility for your store.
Short on time? Watch the complete tutorial here 👇
Clik here to view.
What are WooCommerce Terms and Conditions?
WooCommerce terms and conditions are a set of rules outlining the terms of use, sale, and responsibilities for both the seller and the buyer of a WooCommerce online store.
A terms and conditions checkbox on the checkout page serves as a mechanism for obtaining explicit consent from shoppers, acknowledging that they have read and agreed to abide by the mentioned agreement.
It includes the following agreement guidelines:
- Shipping policies
- Returns policy
- Warranties
- Consequences of engaging in abusive activities
- Disclaimers or legal requirements specific to your business or location
Adding terms and conditions to the WooCommerce checkout is always a good practice.
Why Add Terms and Conditions to Your WooCommerce Checkout Page?
By default, WooCommerce does not include a terms and conditions page or a terms and conditions checkbox on the checkout page.
However, on the checkout page, you will see some text referencing the privacy policy and a direct link to the detailed privacy policy page.
Let’s look at our default WooCommerce checkout page:
Clik here to view.

Adding a terms and conditions page to your checkout page can benefit you in many ways.
Let’s look at the perks of having terms and conditions on your WooCommerce store:
- Legal protection: Adding Terms and Conditions provides legal protection for the WooCommerce store owner. It does so by serving as a legally binding agreement between the store owner and the customers about the rules, responsibilities, and expectations of both parties.
- Limiting liability: A well-drafted agreement limits legal liability, offering protection from breaches and product failures.
- Guidelines for users: Terms and Conditions offer clear guidelines for acceptable behavior, helping to prevent website misuse. You can inform users that failure to comply with terms may result in account closure, manage expectations, and prevent disputes.
- Intellectual property protection: Clearly define and protect intellectual property (brands, trademarks, patents) owned by the WooCommerce store. You can also outline potential consequences if a user misuses intellectual property, fostering awareness and deterrence.
- Payment and shipping terms: Specify crucial details such as accepted payment methods, payment processing procedures, shipping terms, delivery duration, and protocols for lost or damaged orders.
- Dispute prevention: Setting clear rules and guidelines helps manage user expectations and prevents disputes, making both parties' rights and responsibilities evident.
Method 1: How to Add the Terms and Conditions Checkbox to WooCommerce Checkout?
Follow these steps to add the terms and conditions checkbox to the WooCommerce checkout page:
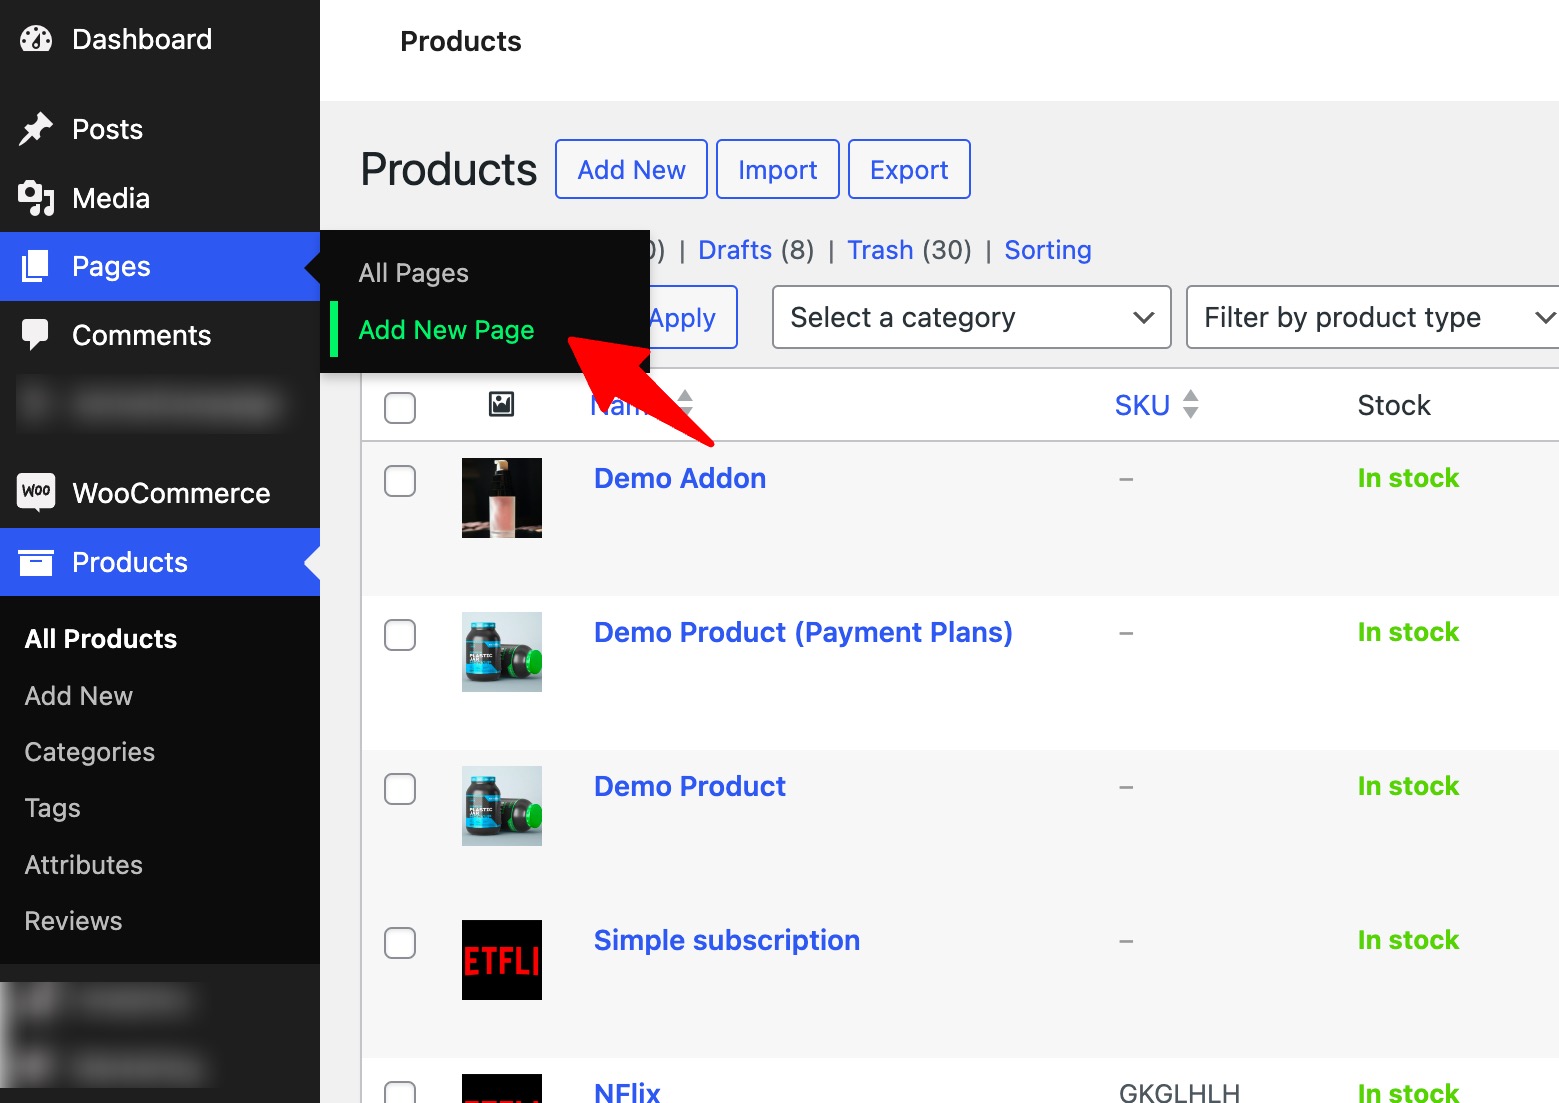
Step 1: Create a terms and conditions page
First, you need to create a terms and conditions page. From the WordPress dashboard, go to Pages ⇒ Add New Page.
Clik here to view.
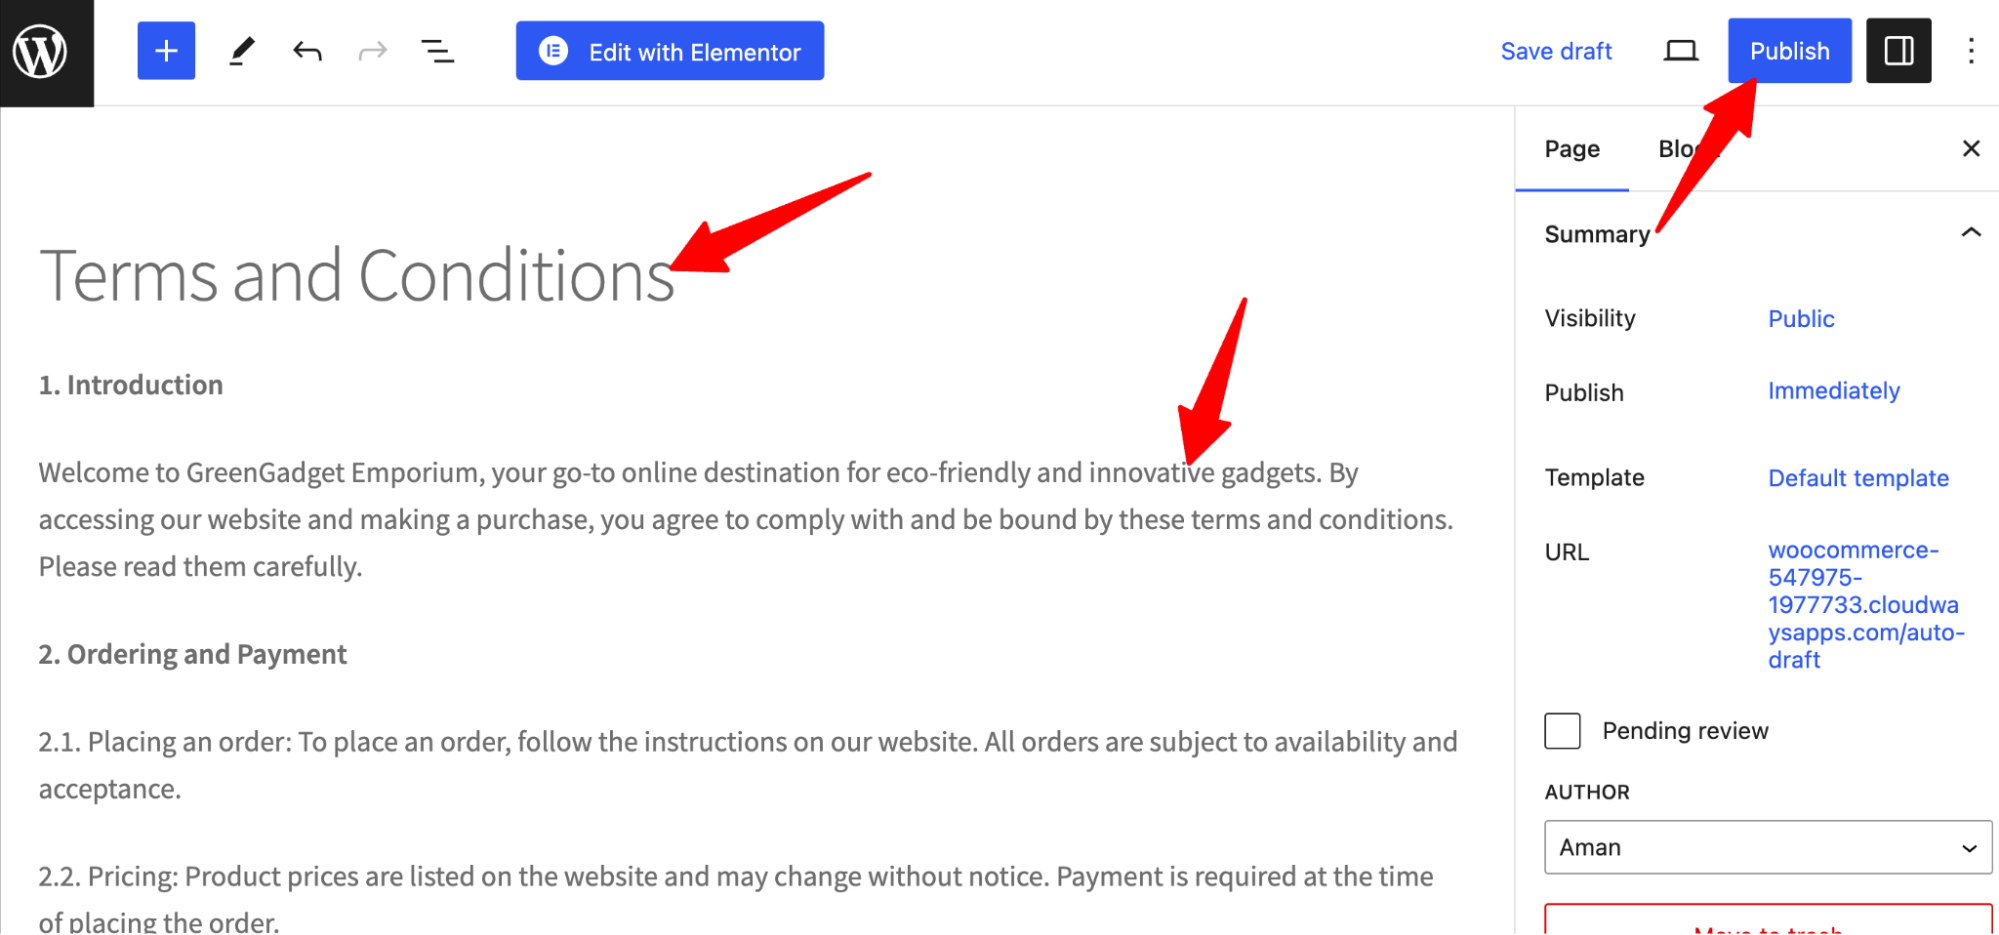
Now, provide a page title, then add the terms and conditions of your WooCommerce business.
Include your business policies, legal obligations, and user responsibilities.
After that, click on the ‘Publish’ button.
Clik here to view.
This will publish the terms and conditions page on your website.
Step 2: Add WooCommerce terms and conditions checkbox to the checkout page
You can add terms and conditions to the checkout in two ways:
Option 1: Using WooCommerce advanced settings
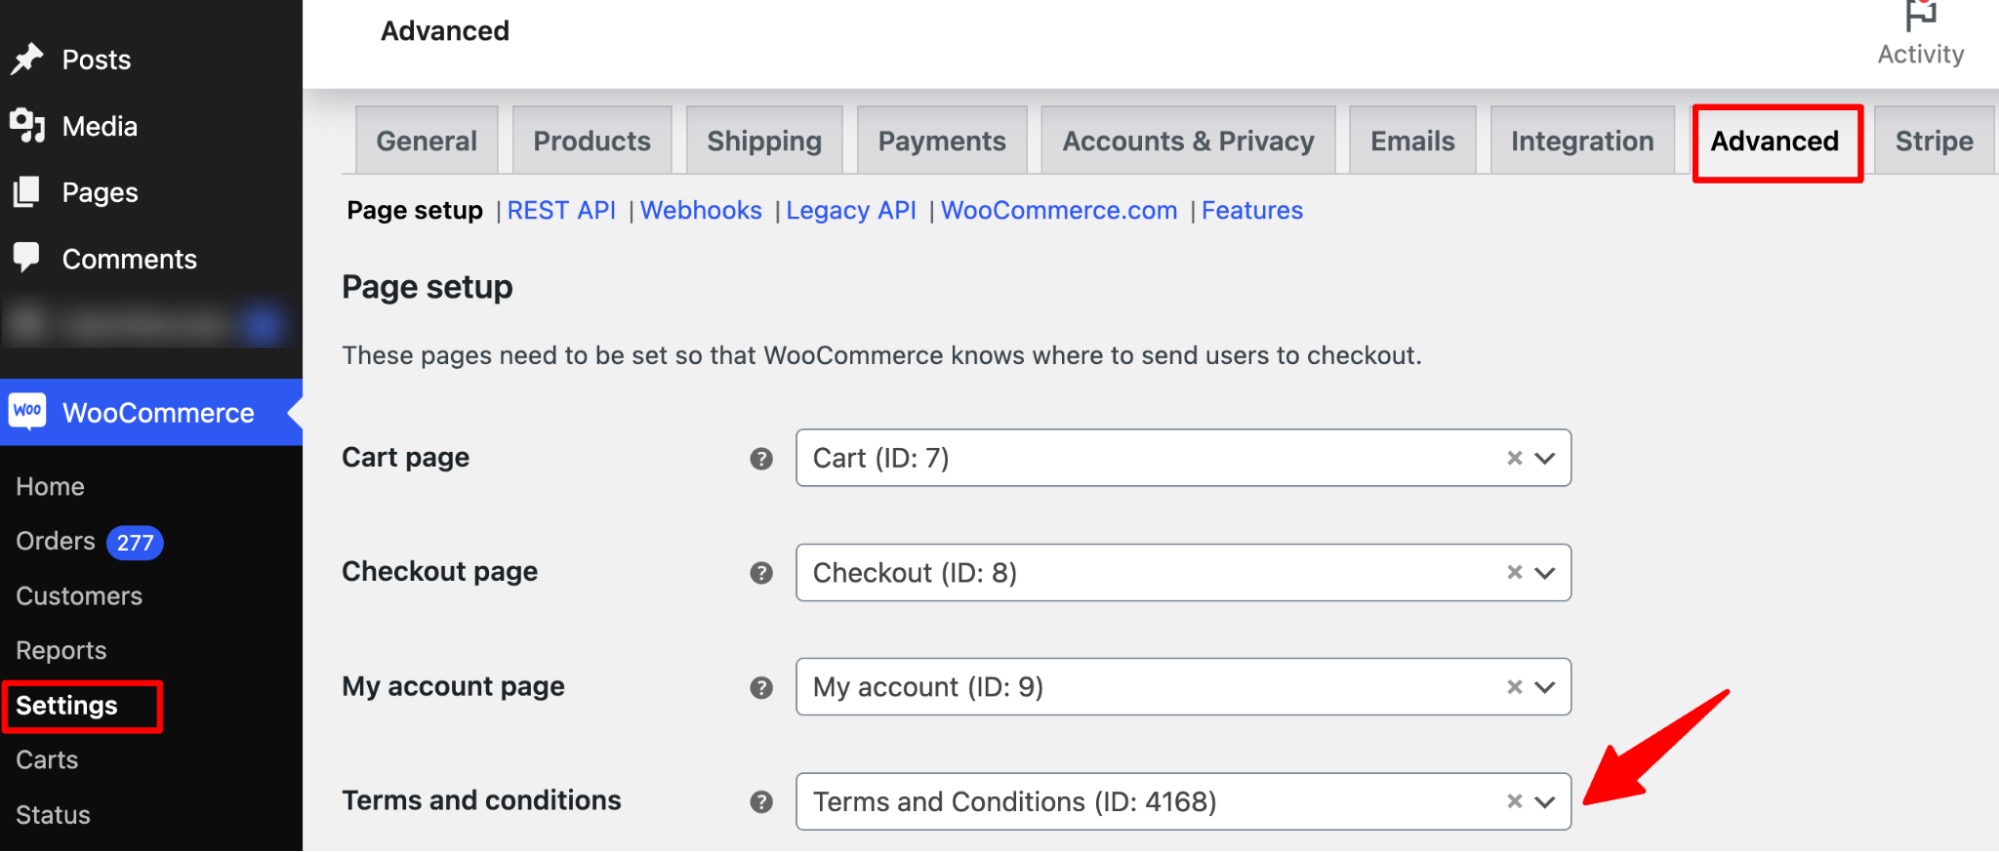
Navigate to WooCommerce ⇒ Settings, then move to the Advanced tab.
Here, for the Terms and Conditions option under Page setup, choose the page you just created.
Clik here to view.
After that, click on ‘Save Changes’ to update.
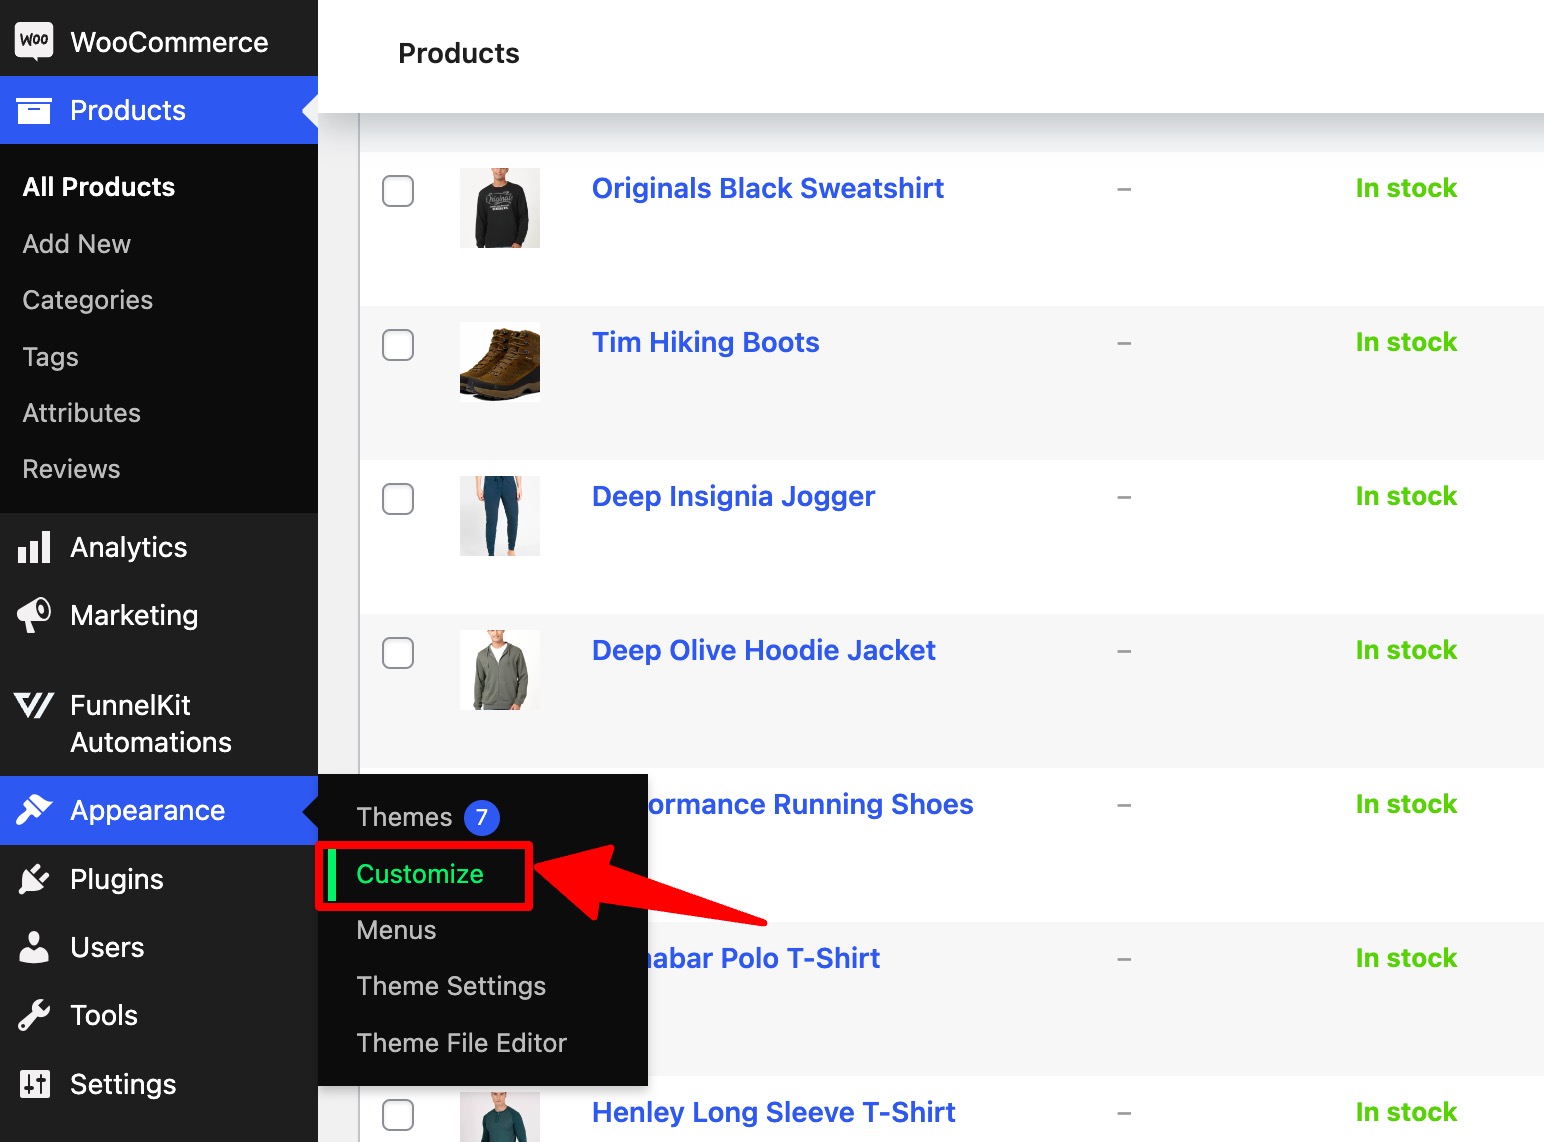
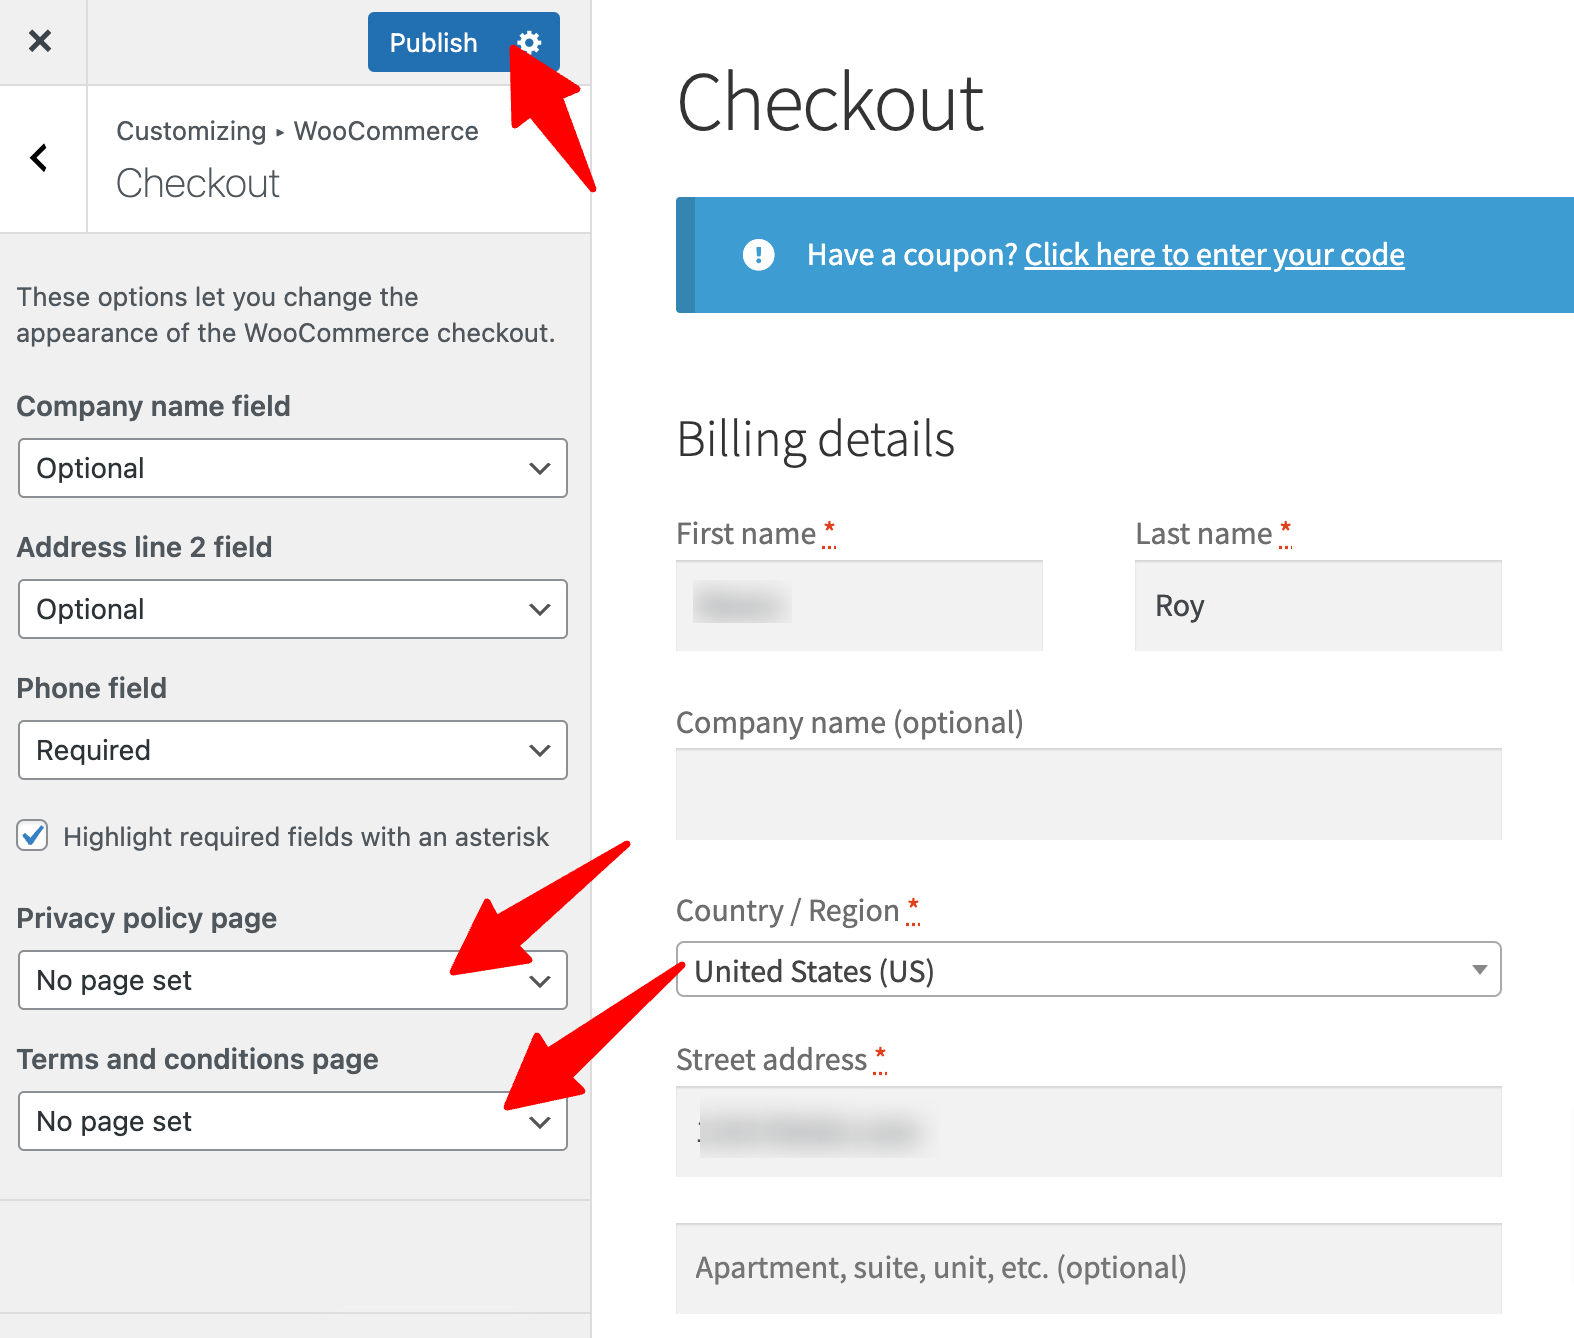
Option 2: From WordPress customization options
To use this option, go to Appearance ⇒ Customize from the WordPress menu.
Clik here to view.
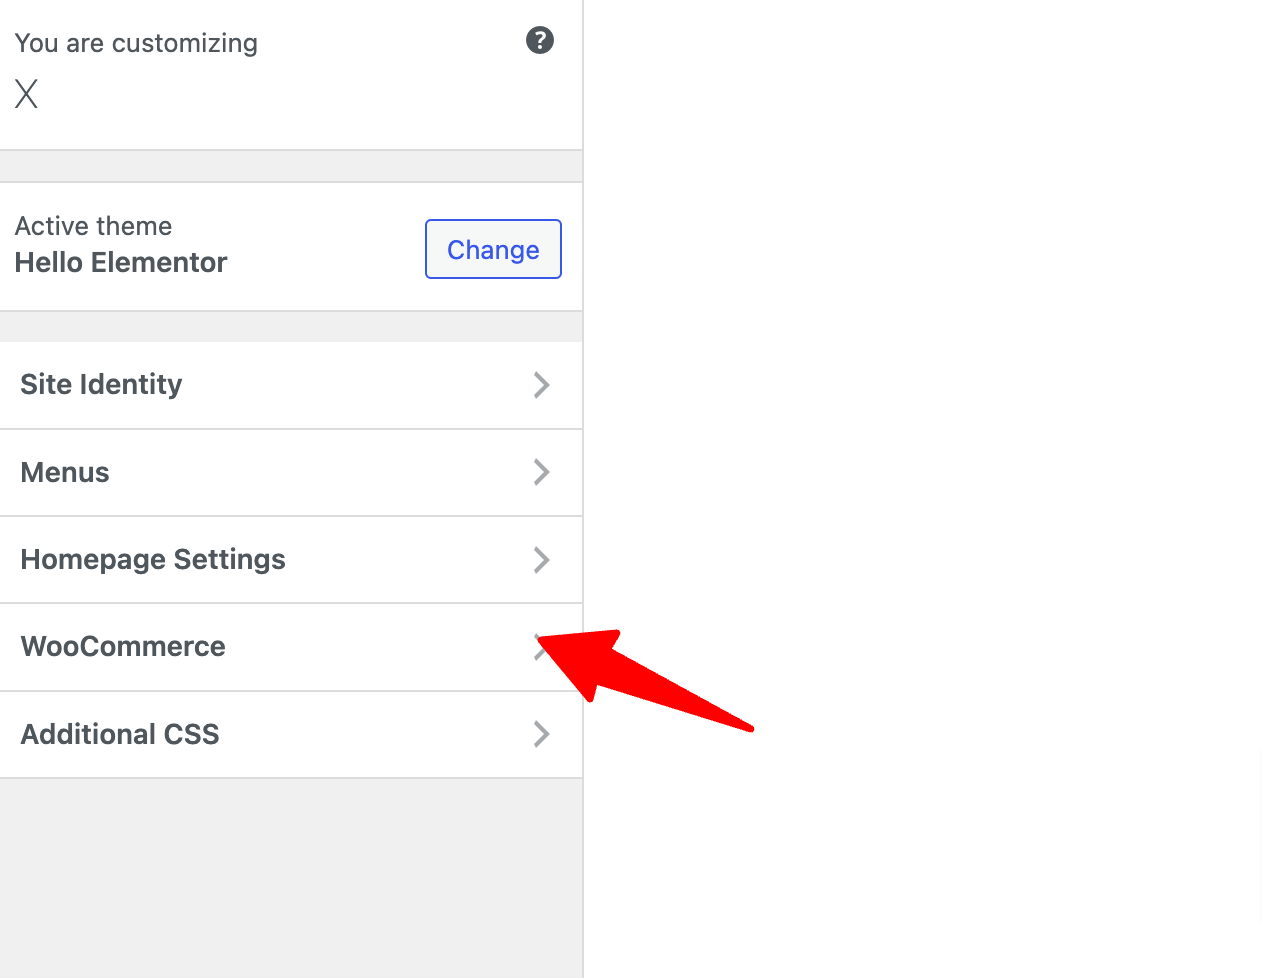
Then, click on WooCommerce to expand and see all the options.
Clik here to view.
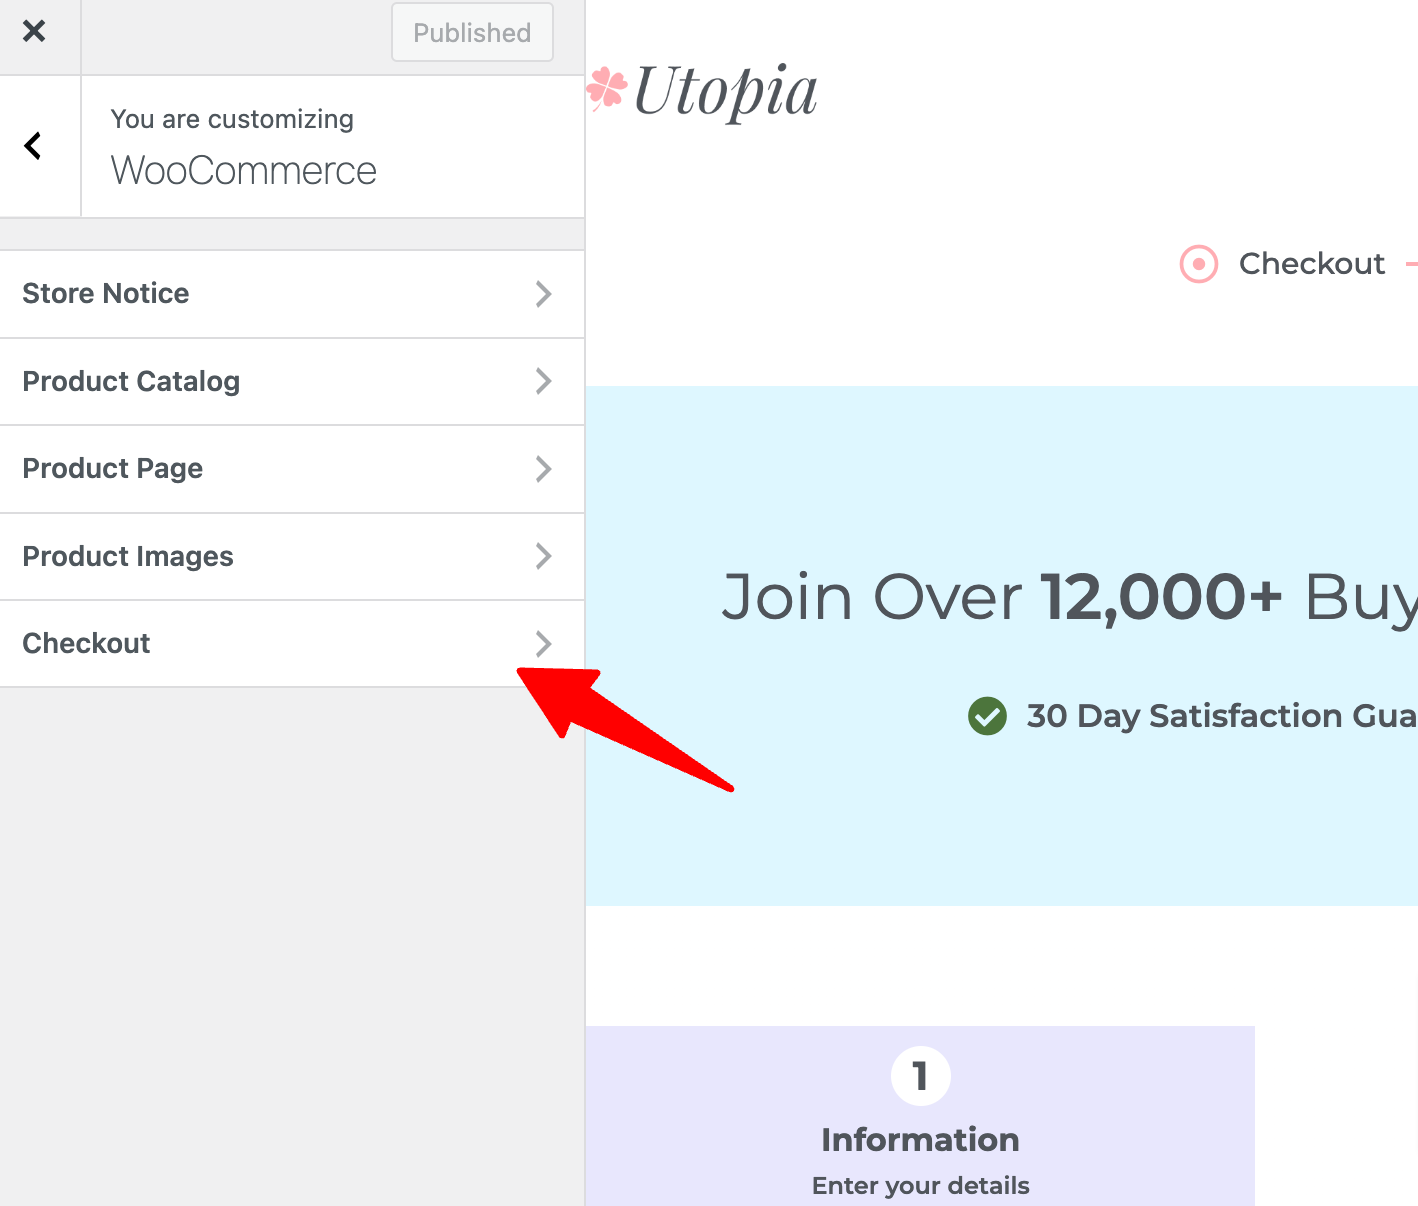
Now click on the “Checkout” option to access the related settings.
Clik here to view.
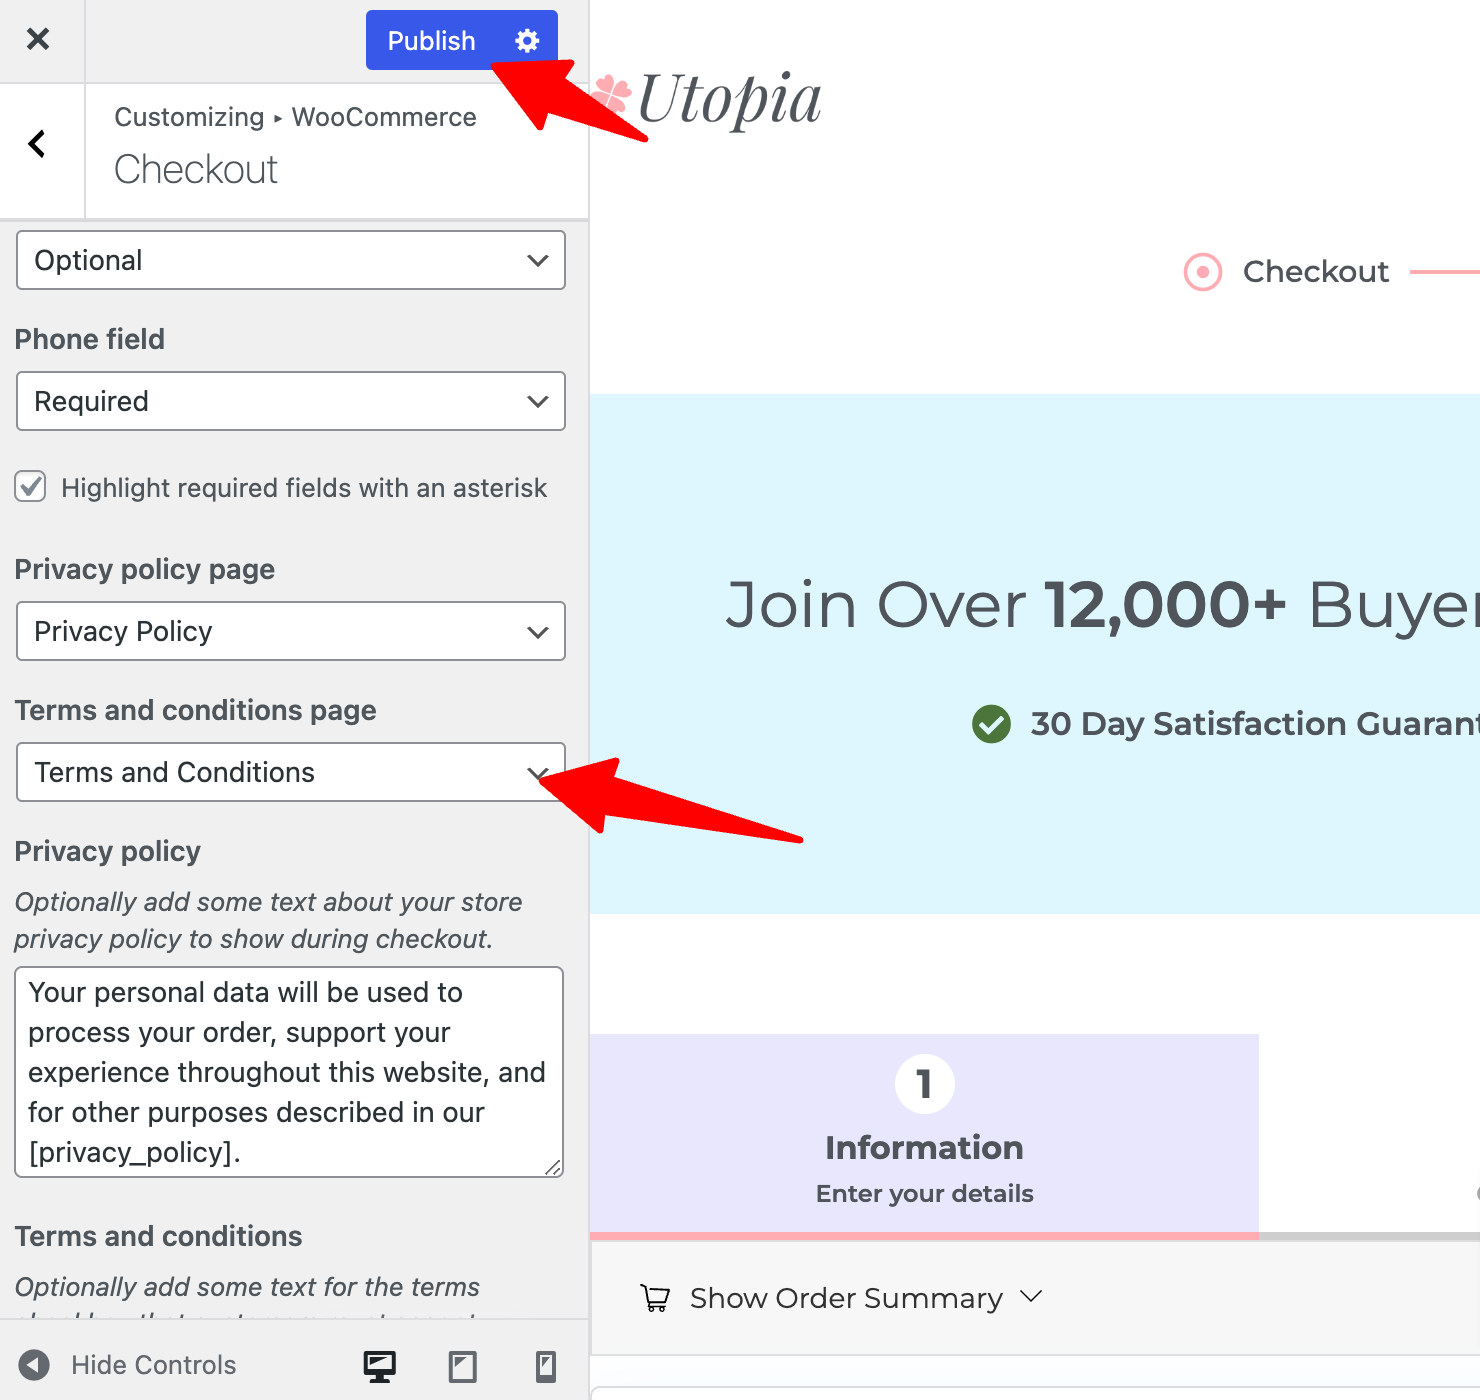
For the Terms and Conditions page option, choose the page you created and click on Publish to update the changes.
Clik here to view.
Step 3: Test terms and conditions on WooCommerce checkout
Now, if you go to the checkout page, you should see a checkbox asking users to confirm that they have read the terms and conditions of the WooCommerce store.
Clik here to view.
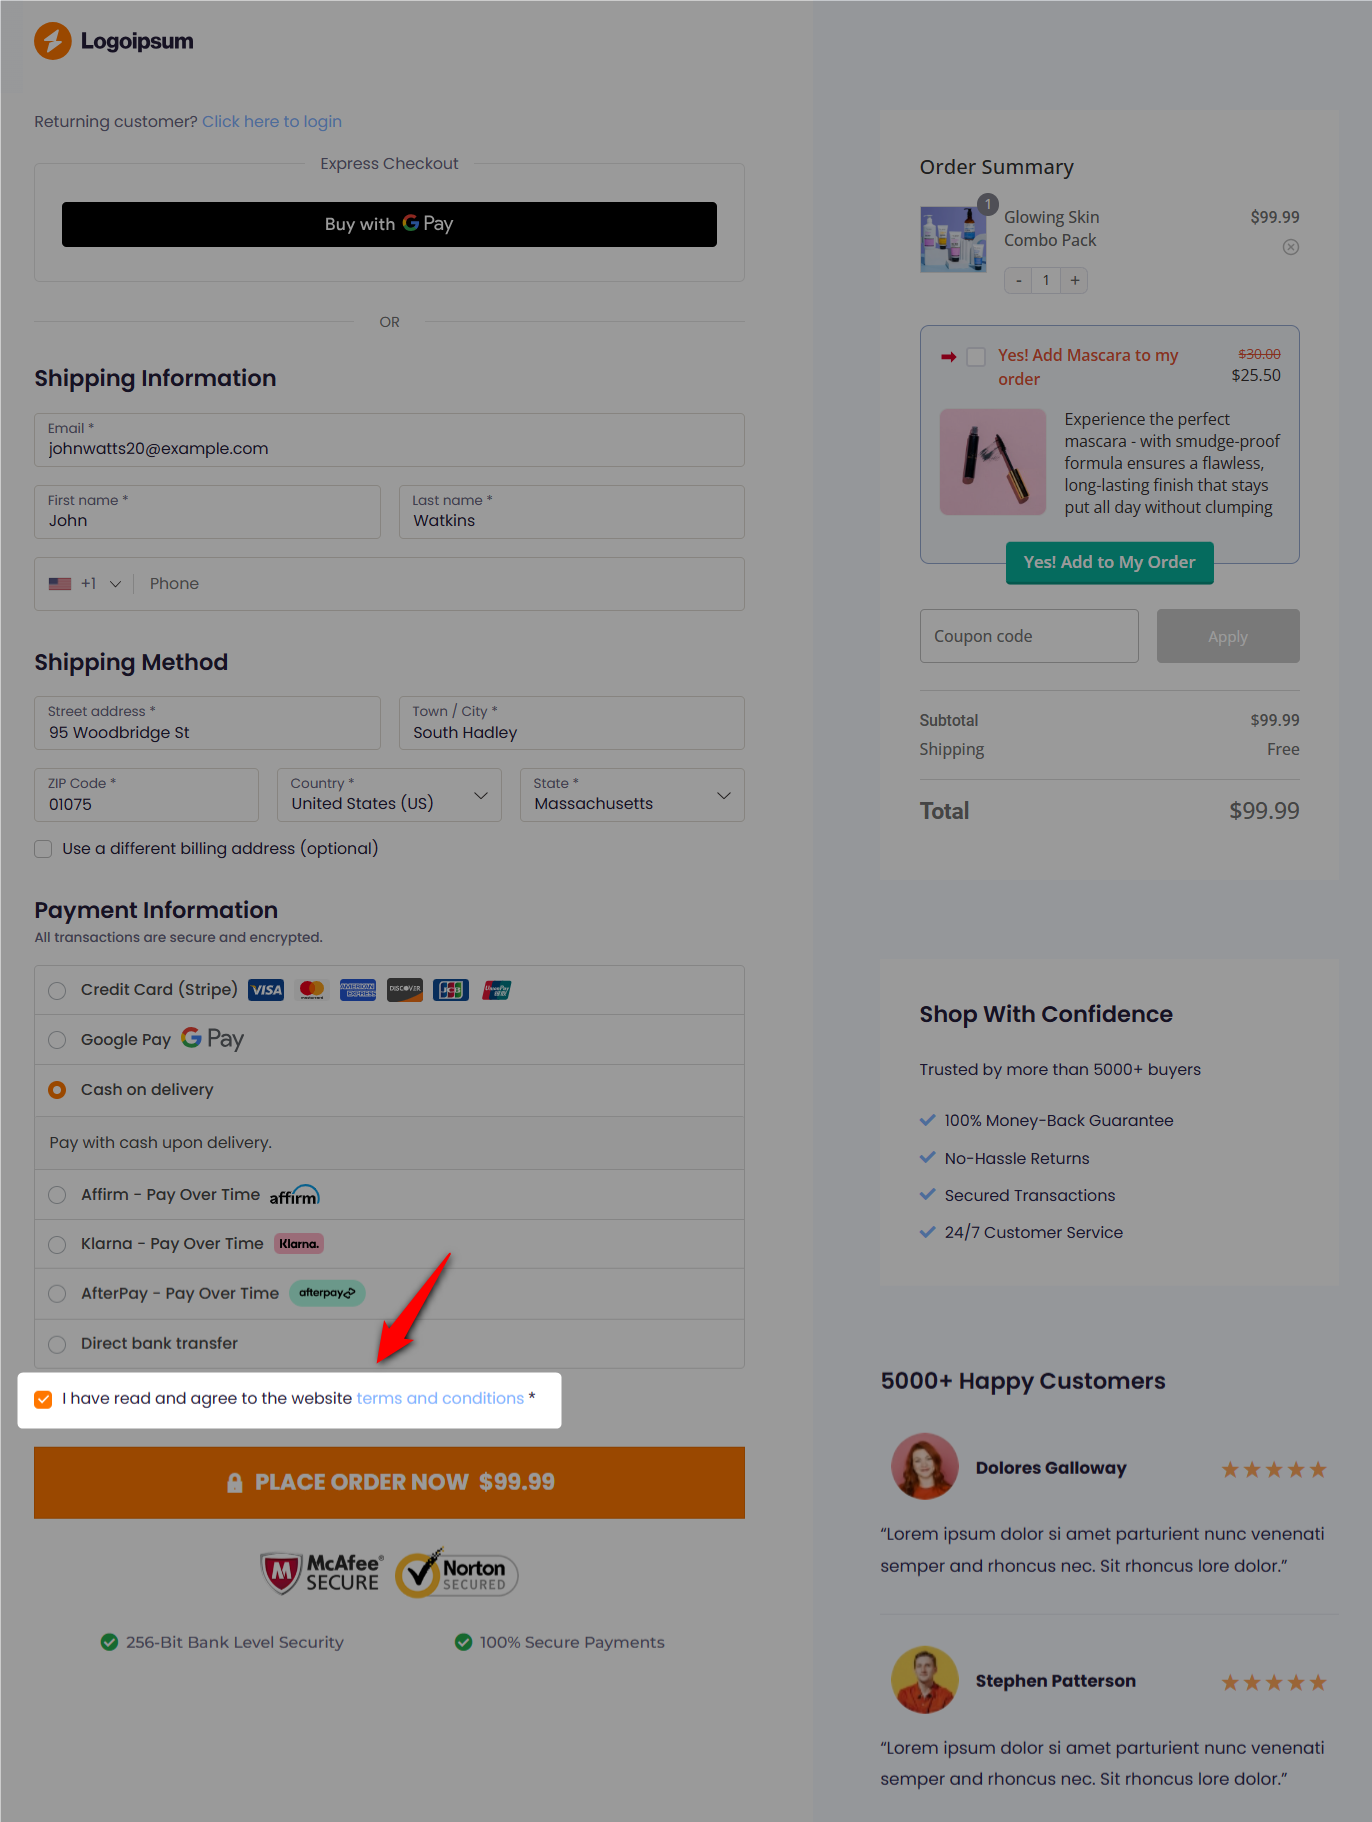
Well done! This is how you can add the terms and conditions checkbox to the WooCommerce checkout page.
Method 2: How to Add the Terms and Conditions to WooCommerce Checkout Without a Checkbox?
Adding a checkbox on the checkout page requires users to check it first and then go to the checkout page, increasing the number of fields they need to fill in to place an order.
What if we told you that you can include terms and conditions on the checkout page without requiring customers to check an additional field?
That’s exactly what we will share here in this section.
To follow along, you need to install and activate the FunnelKit Funnel Builder plugin.
Step 1: Remove the default terms and conditions and privacy policy content from the checkout
First, we will remove the terms and conditions default page from settings. We will also remove the privacy policy page because, by default, the checkout page will show the privacy policy text if the terms and conditions page is removed.
We’ll add a custom text field that will link to both the terms and conditions page and the privacy policy page.
To do so, go to Appearance ⇒ Customize. Then, click on WooCommerce and Checkout to expand the relevant options.
On the option Terms and Conditions page, select the option “No page set” from the drop-down menu. Do the same for the Privacy Policy page. After that, hit Publish and save the changes.
Clik here to view.
This will remove the default privacy policy statement from the checkout page.
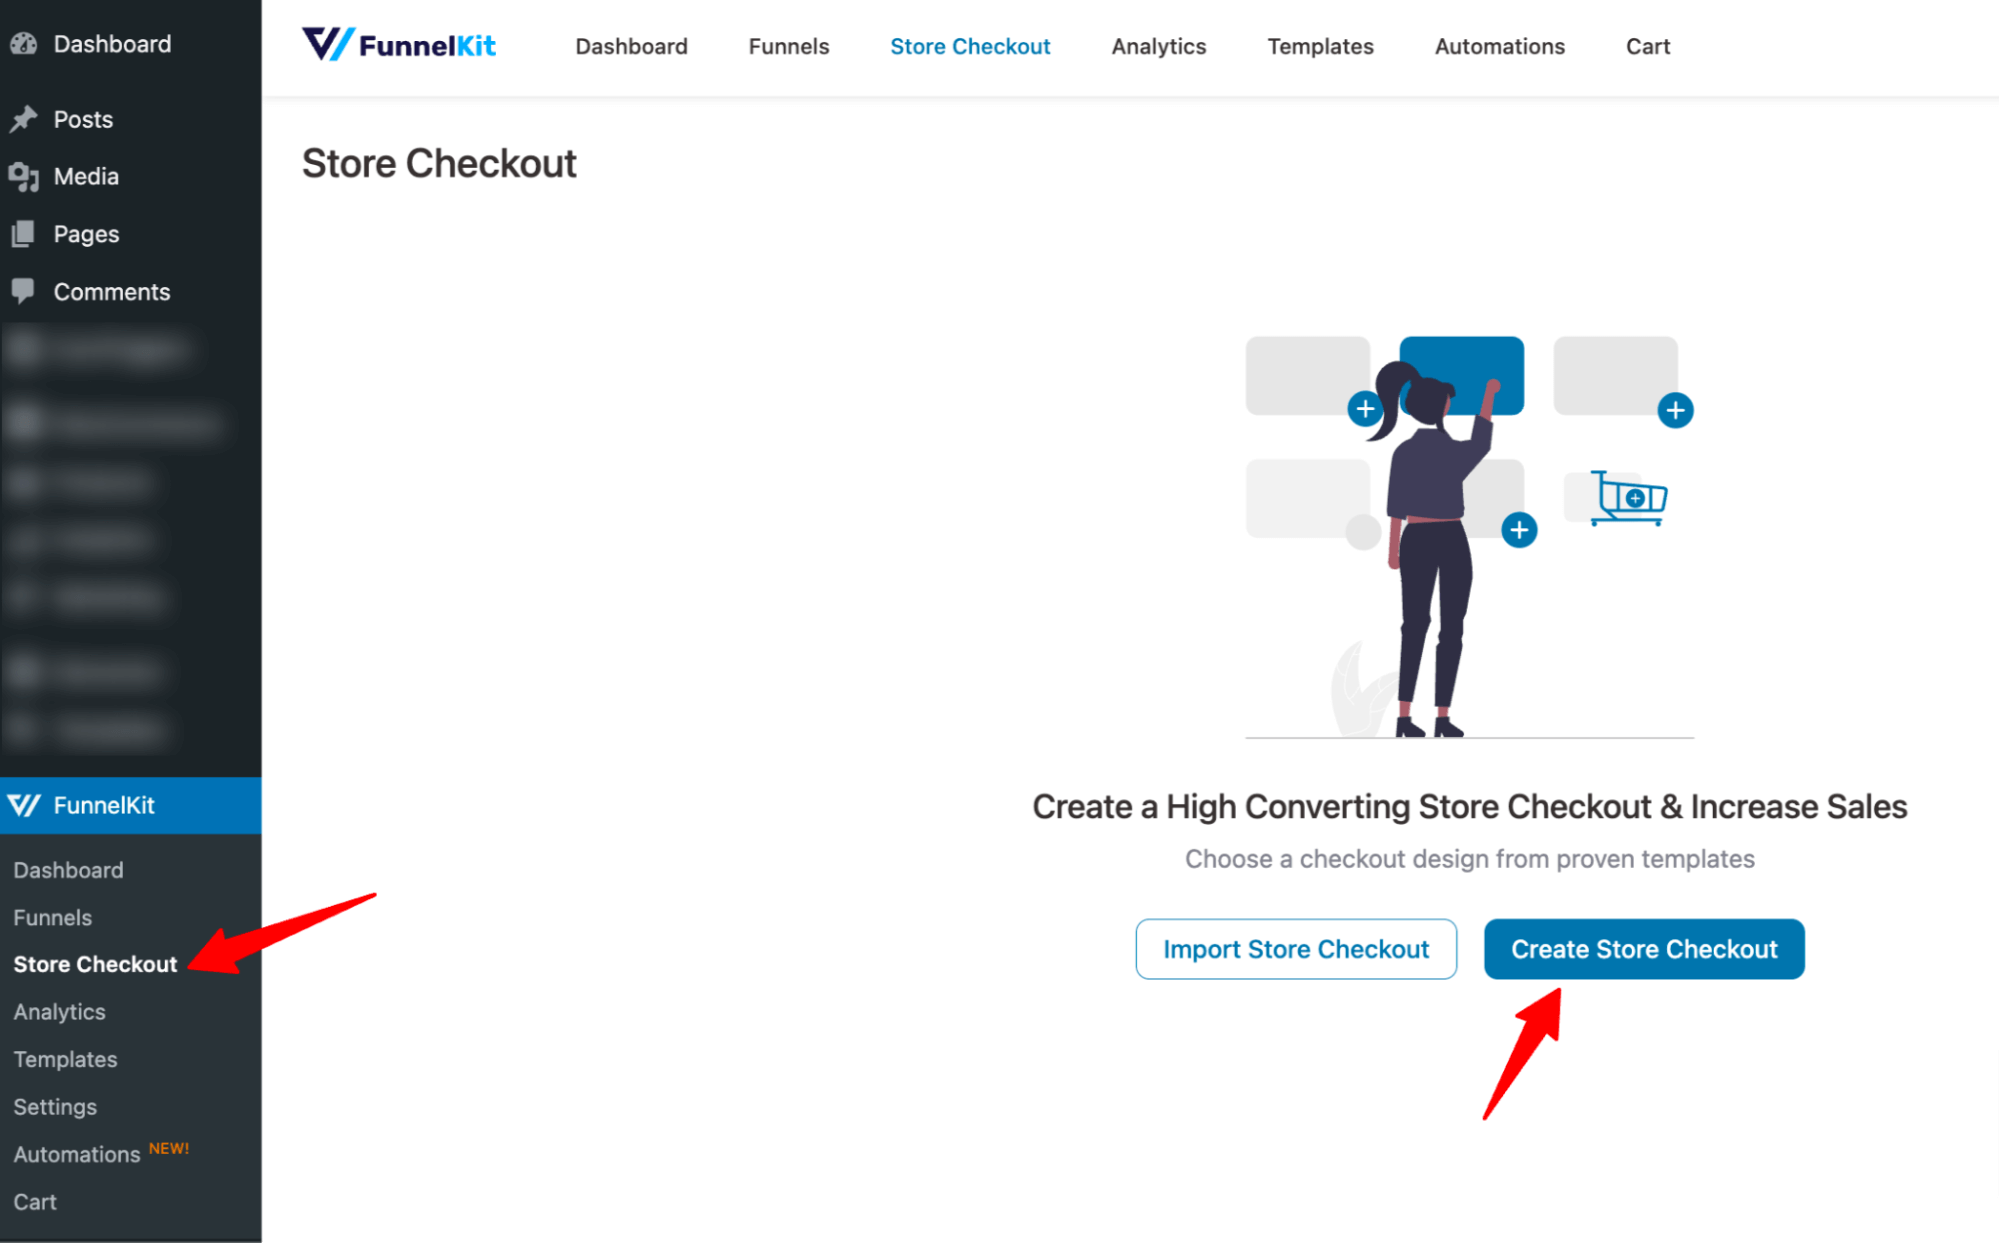
Step 2: Create a store checkout
Now, we need to create a store checkout that will replace the default WooCommerce checkout page.
For that, navigate to FunnelKit ⇒ Store Checkout and click on the ‘Create Store Checkout’ button.
Clik here to view.
After that, select your favourite page builder and choose a template from the list of prebuilt checkout templates that FunnelKit provides.
Feel free to choose your favorite page builder, like Elementor, Bricks, Divi, Gutenberg, Oxygen, etc., or use shortcodes with any other page builder you want.
To select one, hover on the template you like and click on Preview. Here, we are choosing the Elementor page builder and going with the Hific template.
Clik here to view.
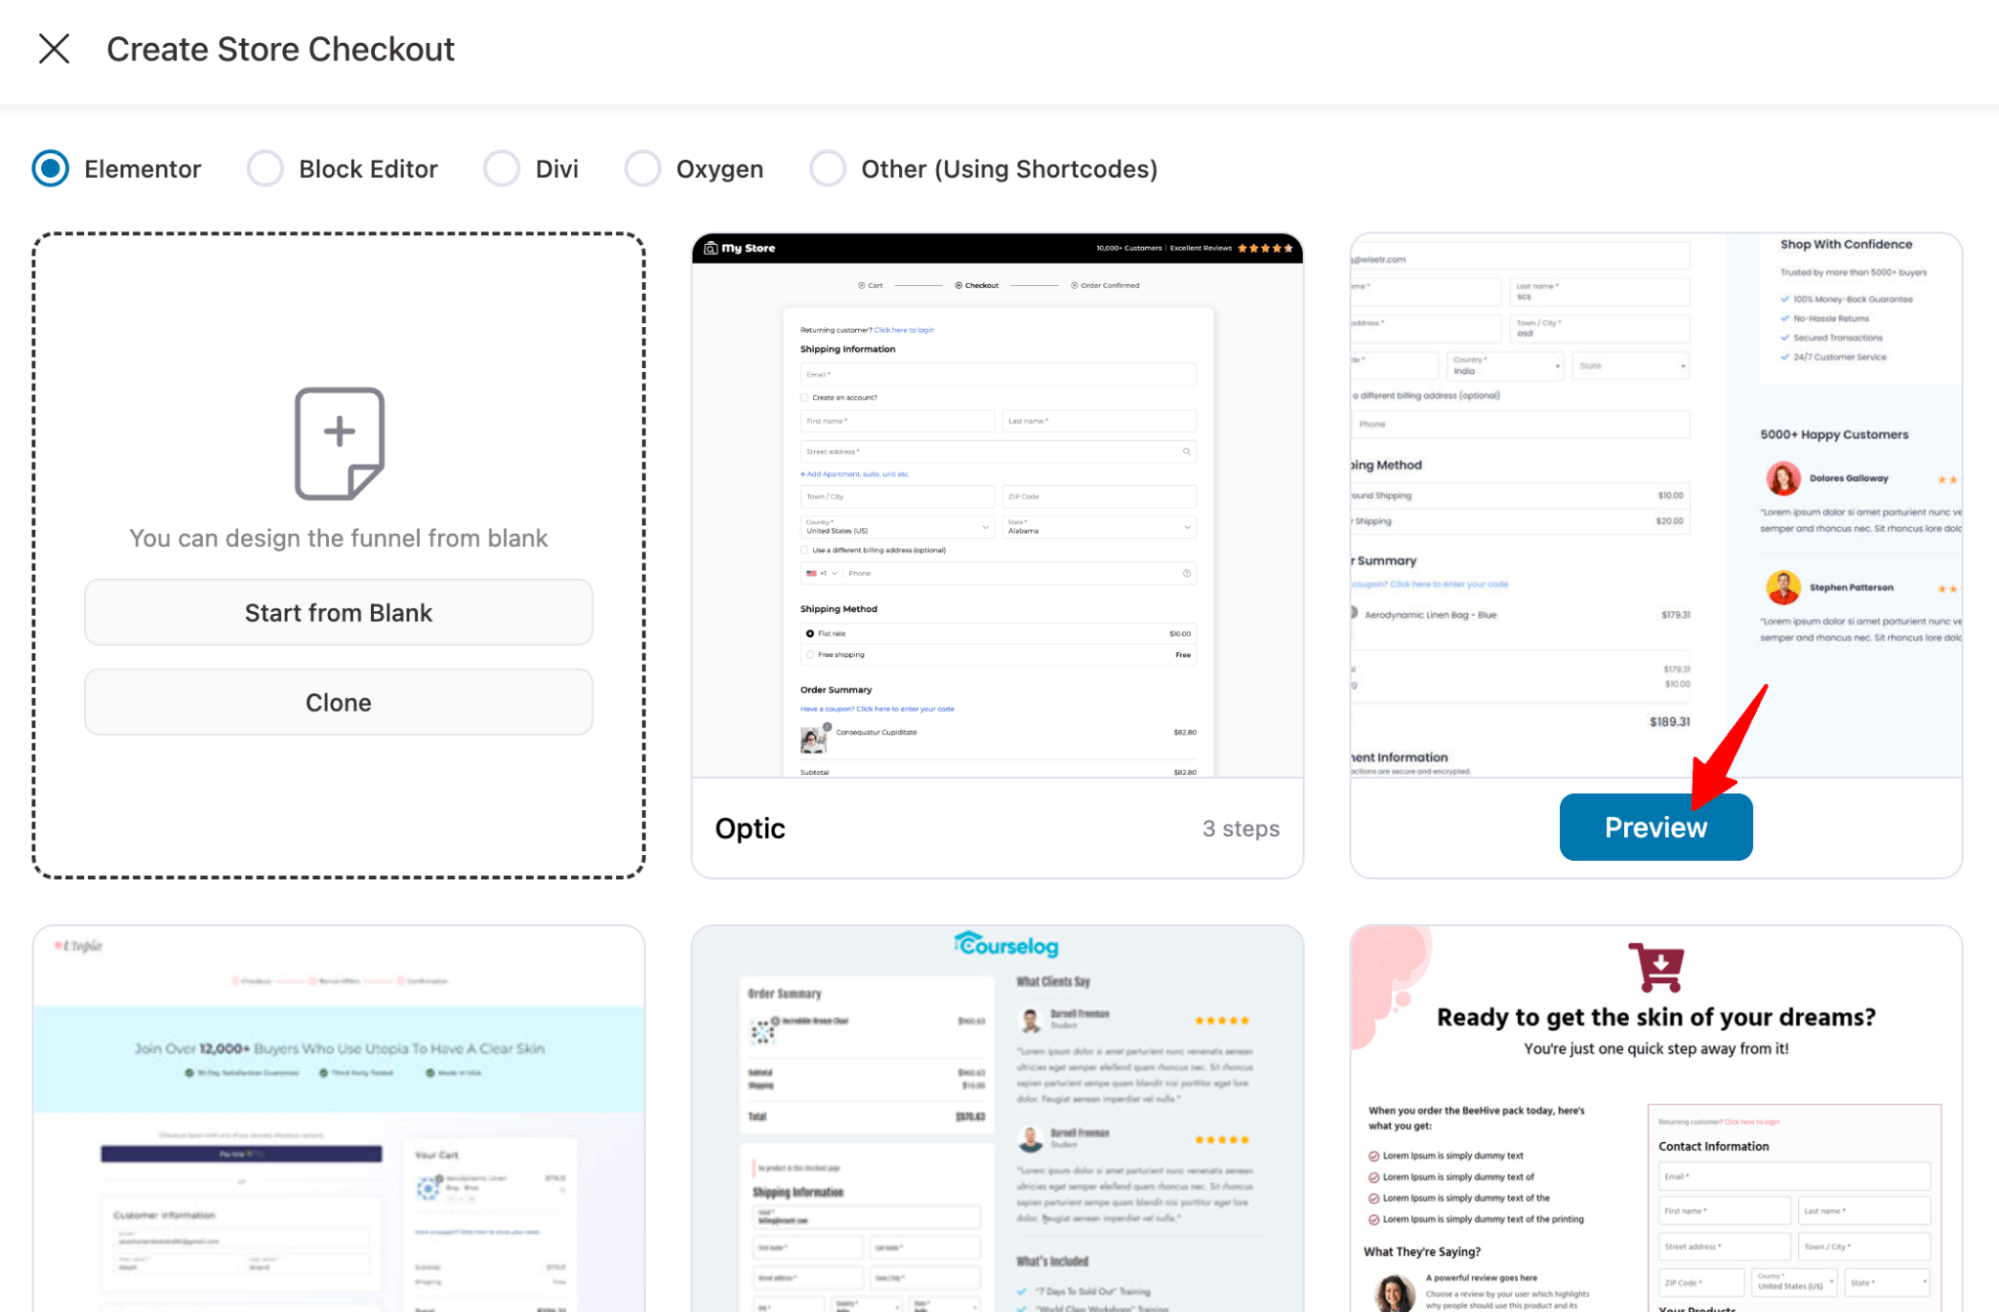
We are going with a one-page checkout. Please note that the multi-page checkout option is only available for the pro version.
After that, click on “Import This Funnel”, provide a name, and hit the Add button to import your store checkout funnel.
Clik here to view.

Step 3: Add the terms and conditions section
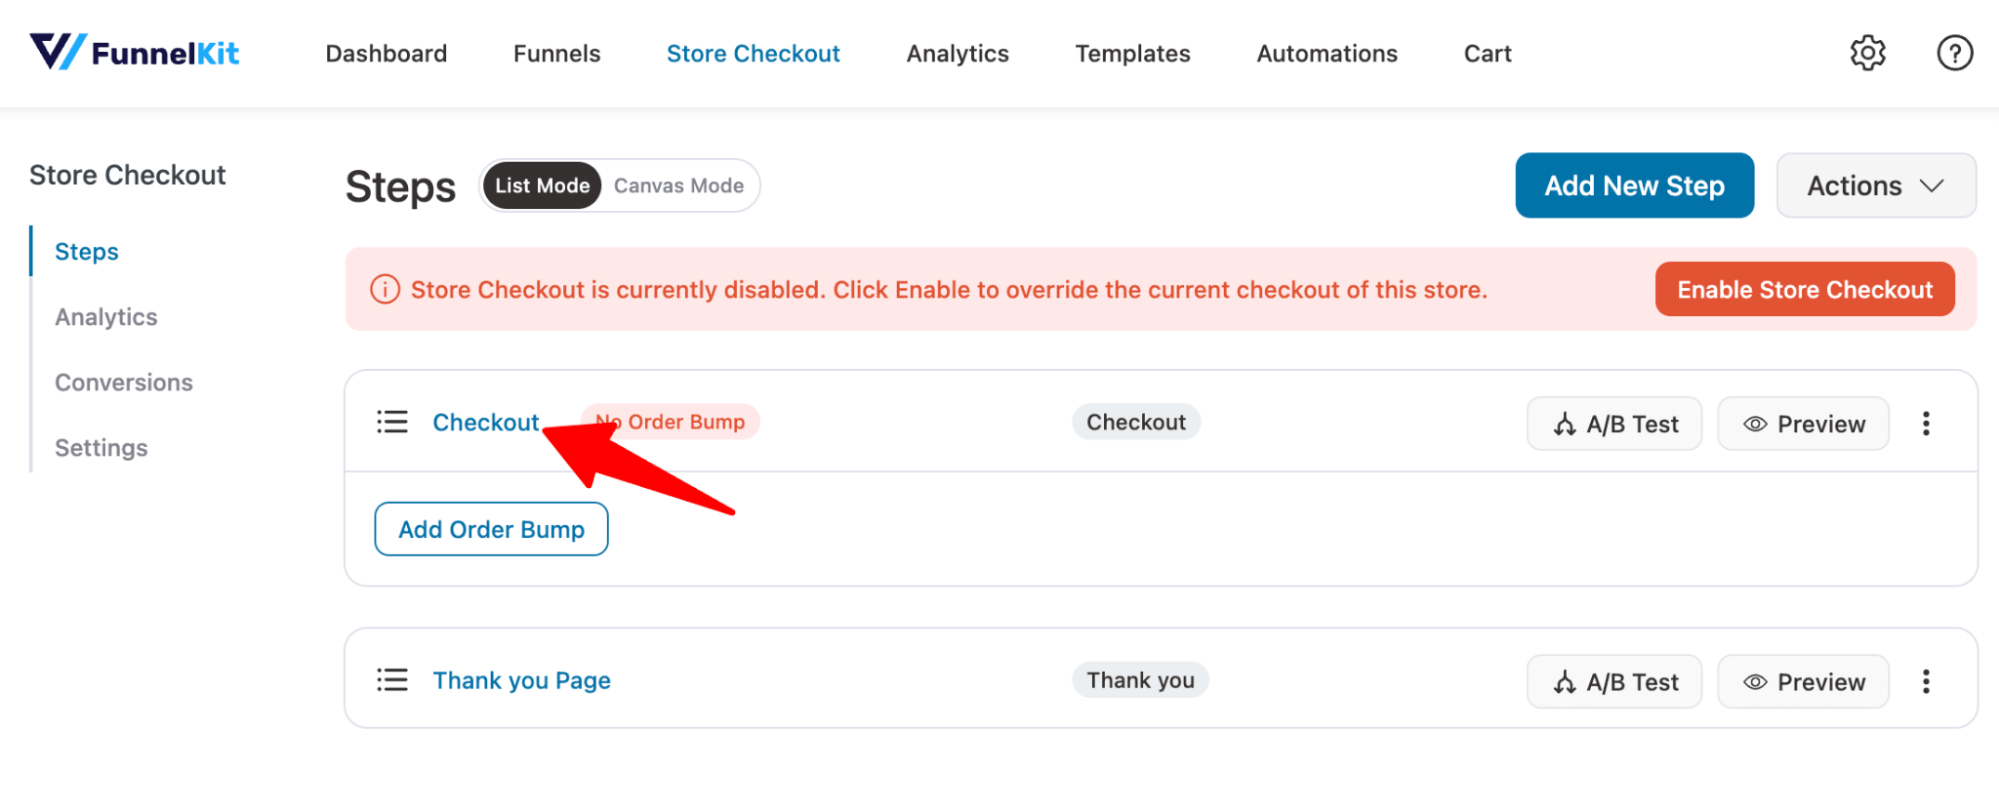
To customize the checkout page template, click on the checkout step.
Clik here to view.
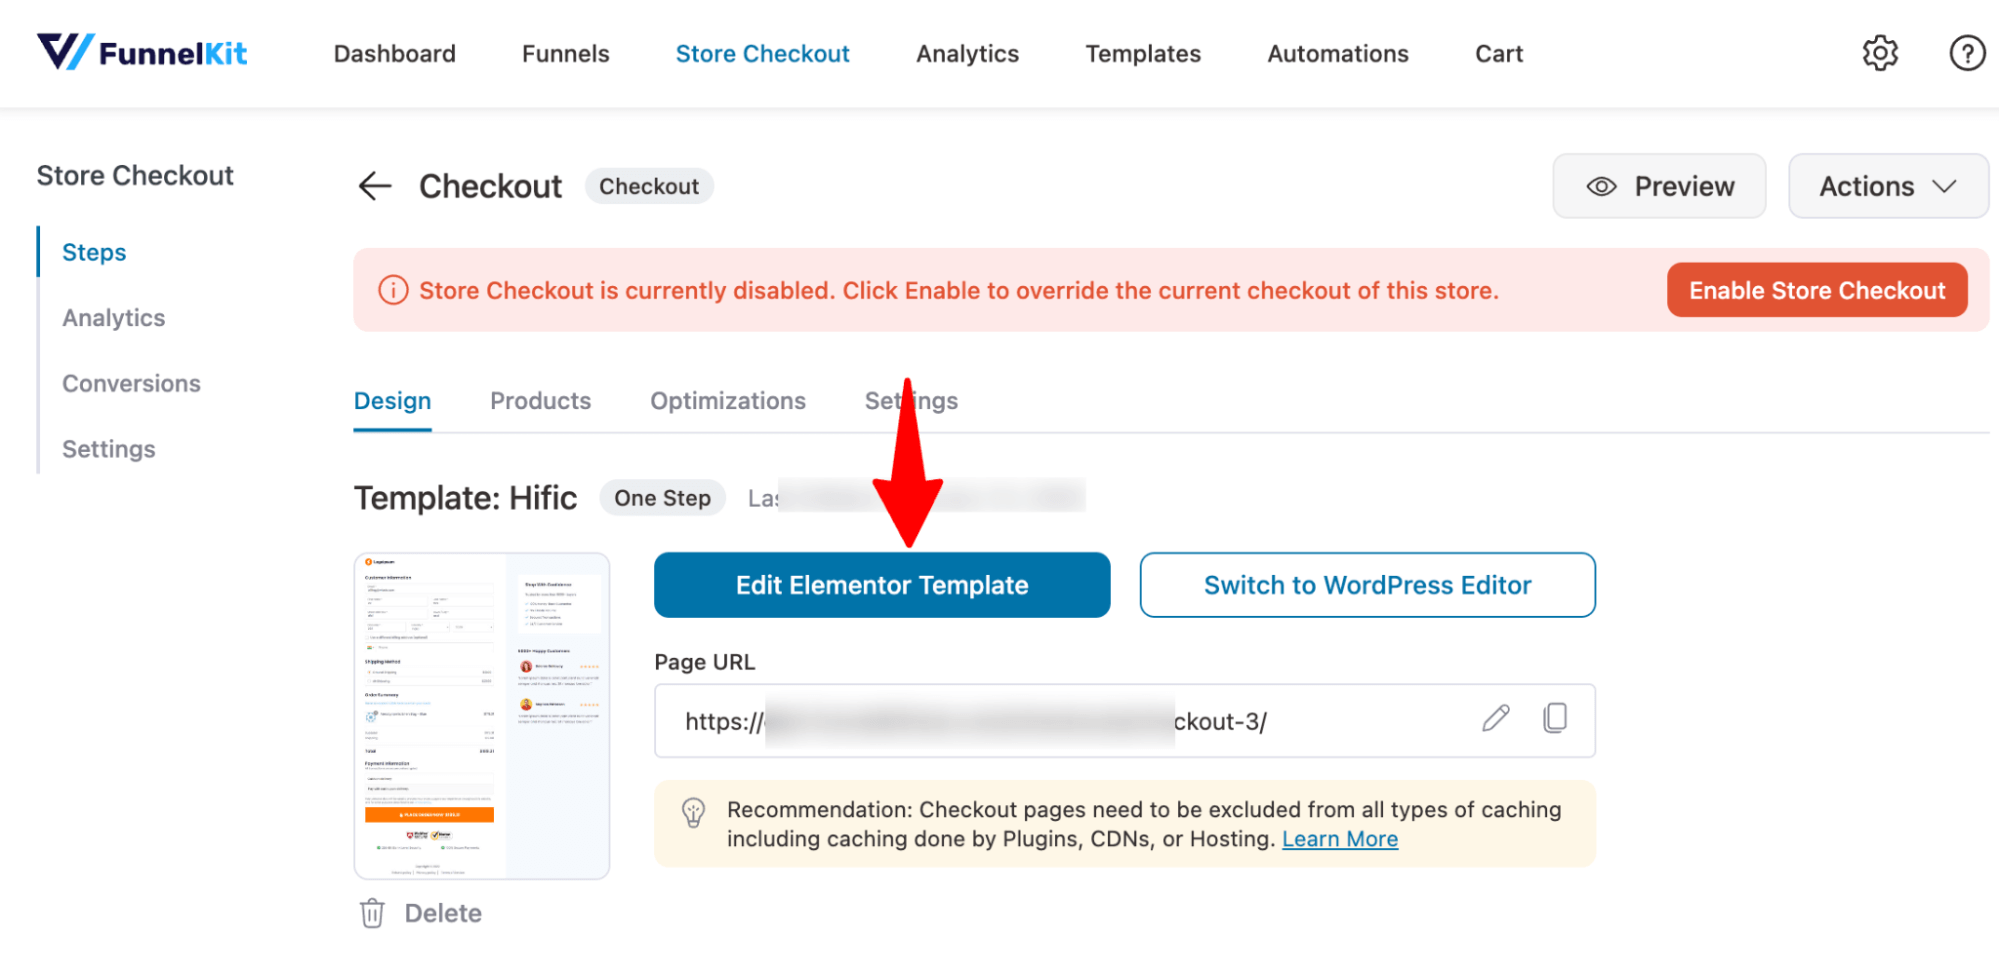
Here, you can customize the design and content of the checkout page with the selected page builder and add a new section.
For that, click on the “Edit Template” option.
Clik here to view.
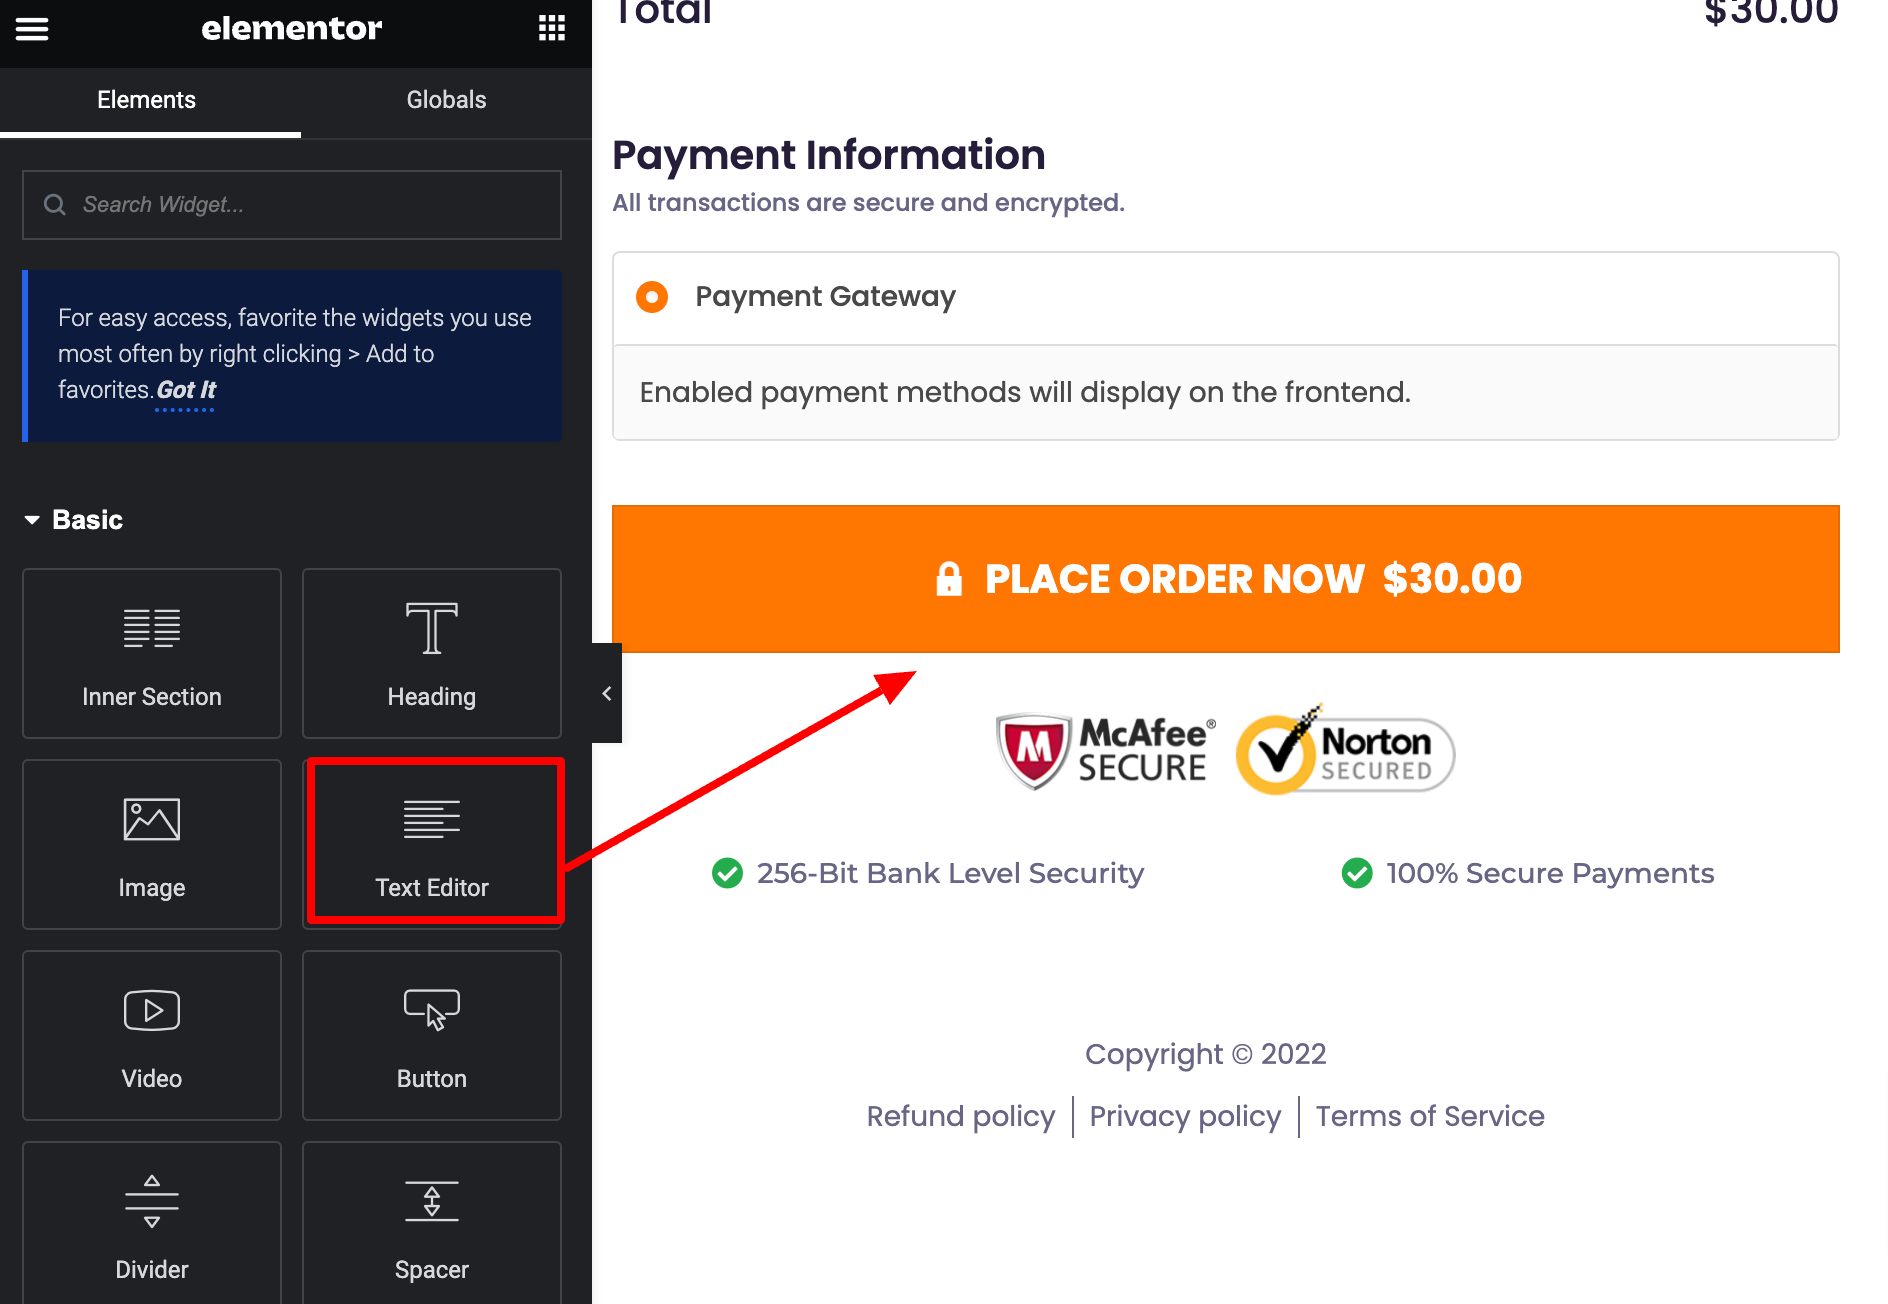
You can drag and drop the Text Editor widget from the left panel to the checkout page, right below the “Place Order” button.
Clik here to view.
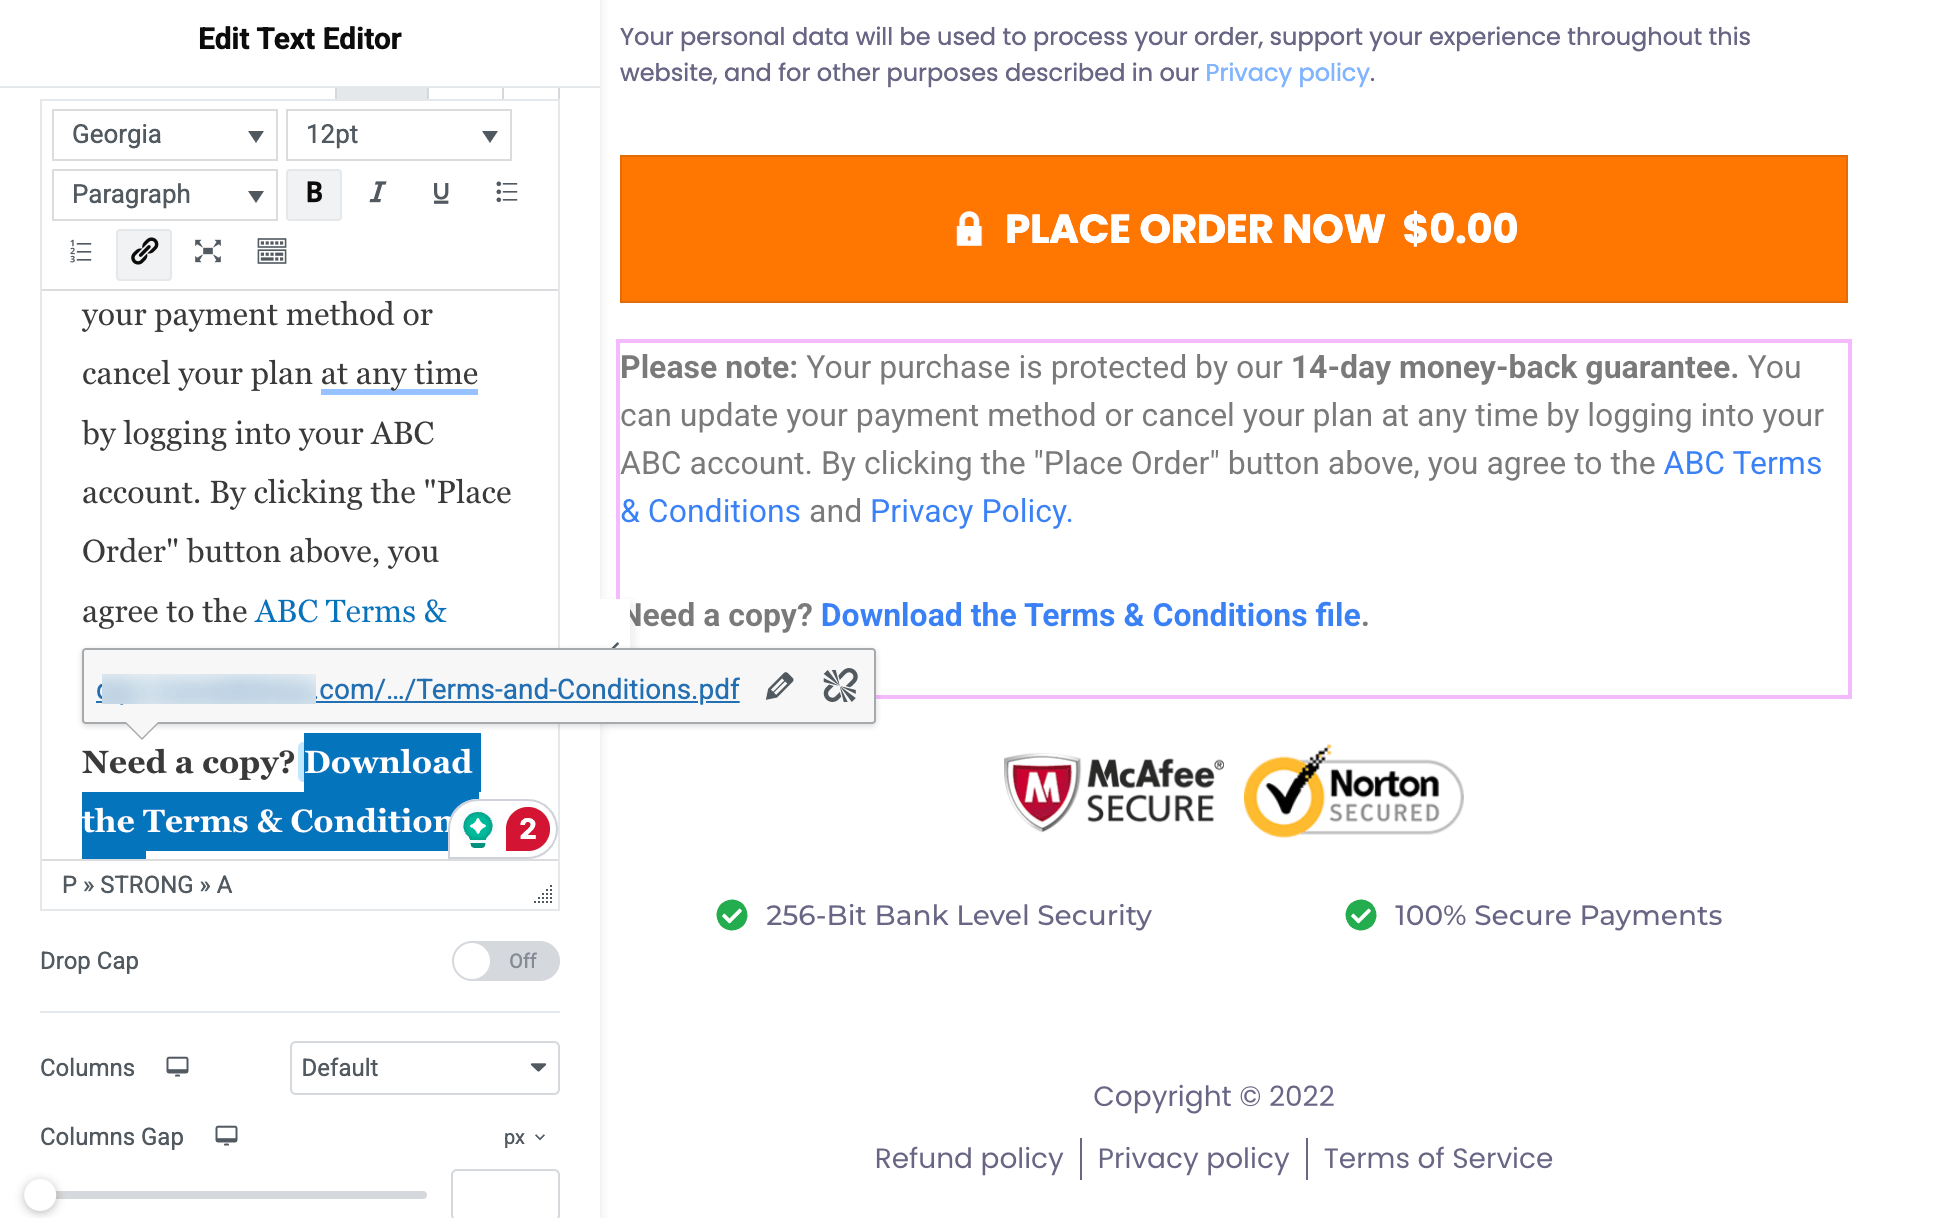
Now, add the content you want to show your customers. Make sure to link the terms and conditions page here. After adding the custom text, click on Update.
Clik here to view.
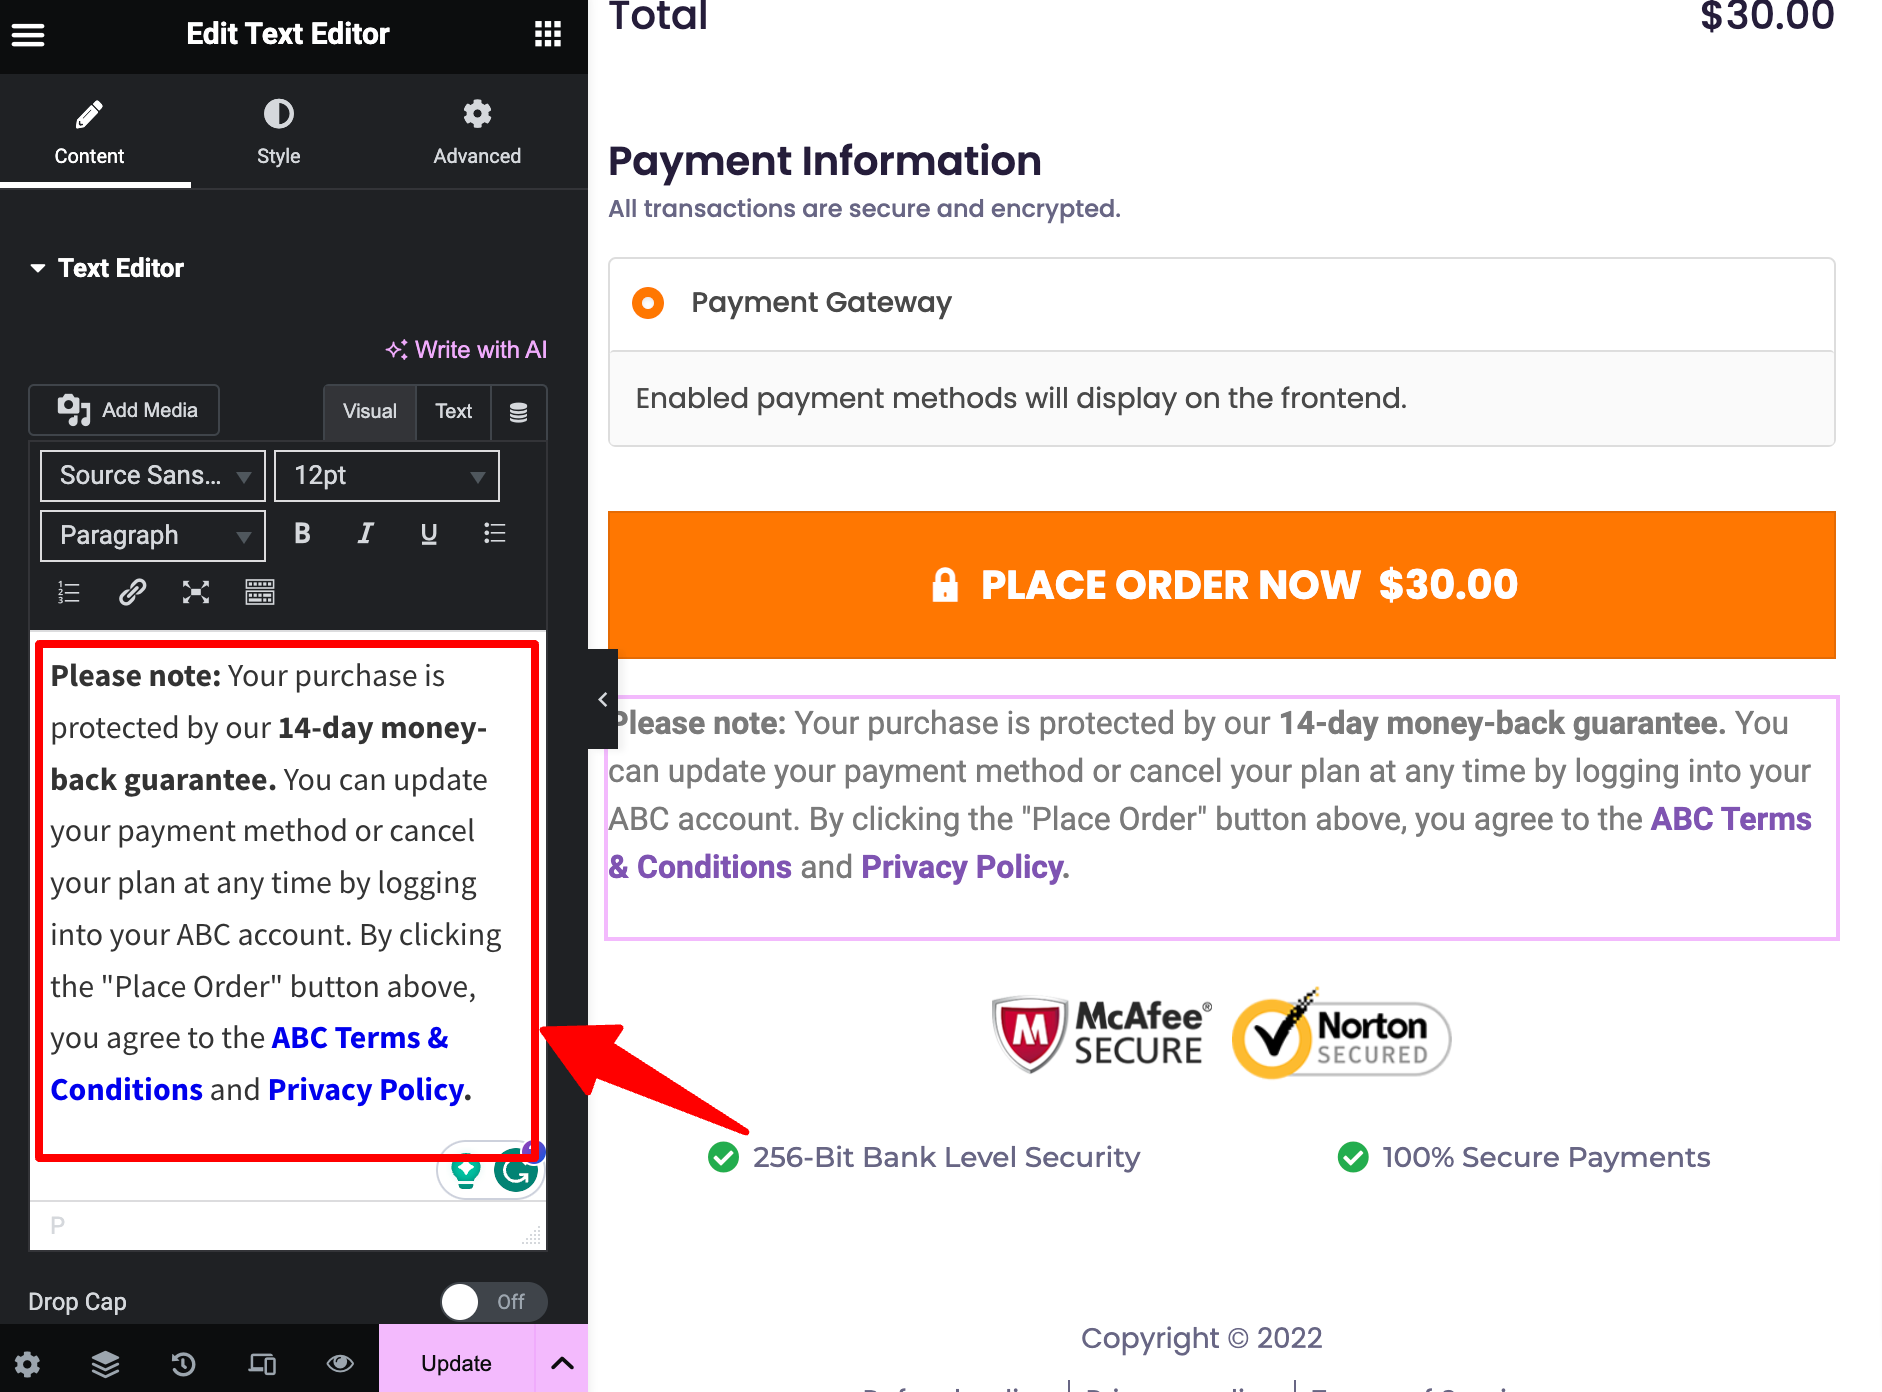
This way, customers can check the terms and conditions page without being required to check the terms and conditions checkbox.
Not only that, you can customize the thank you page further as well.
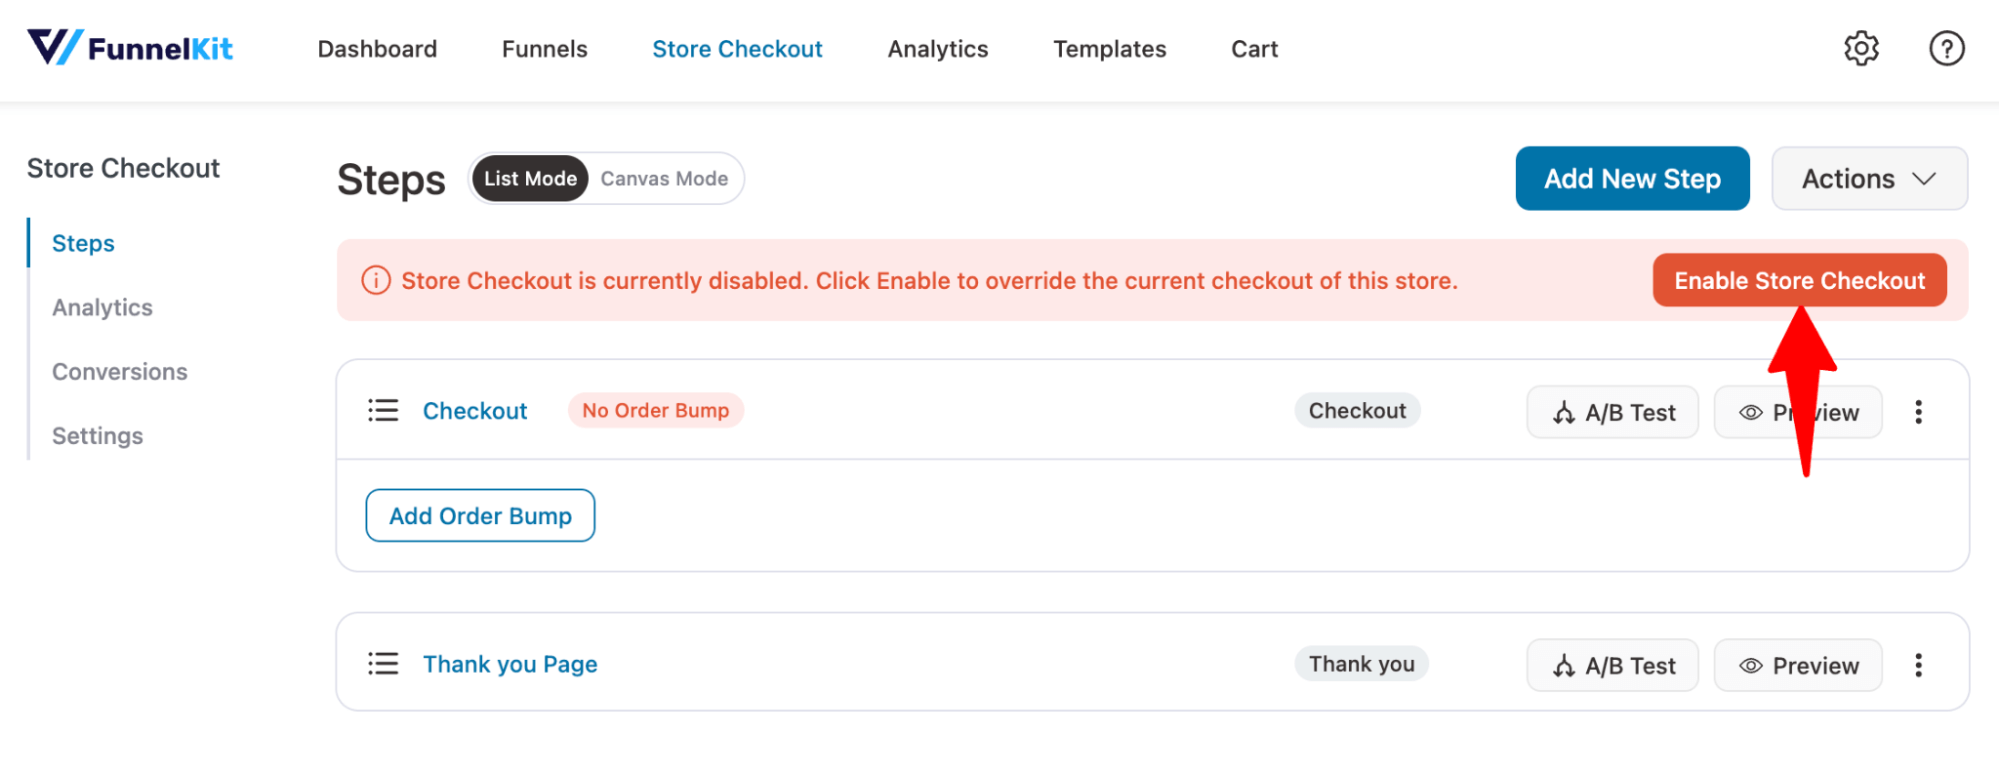
Step 4: Activate the store checkout
The final step is to activate the store checkout. For that, enable the “Enable Store Checkout” option.
Clik here to view.
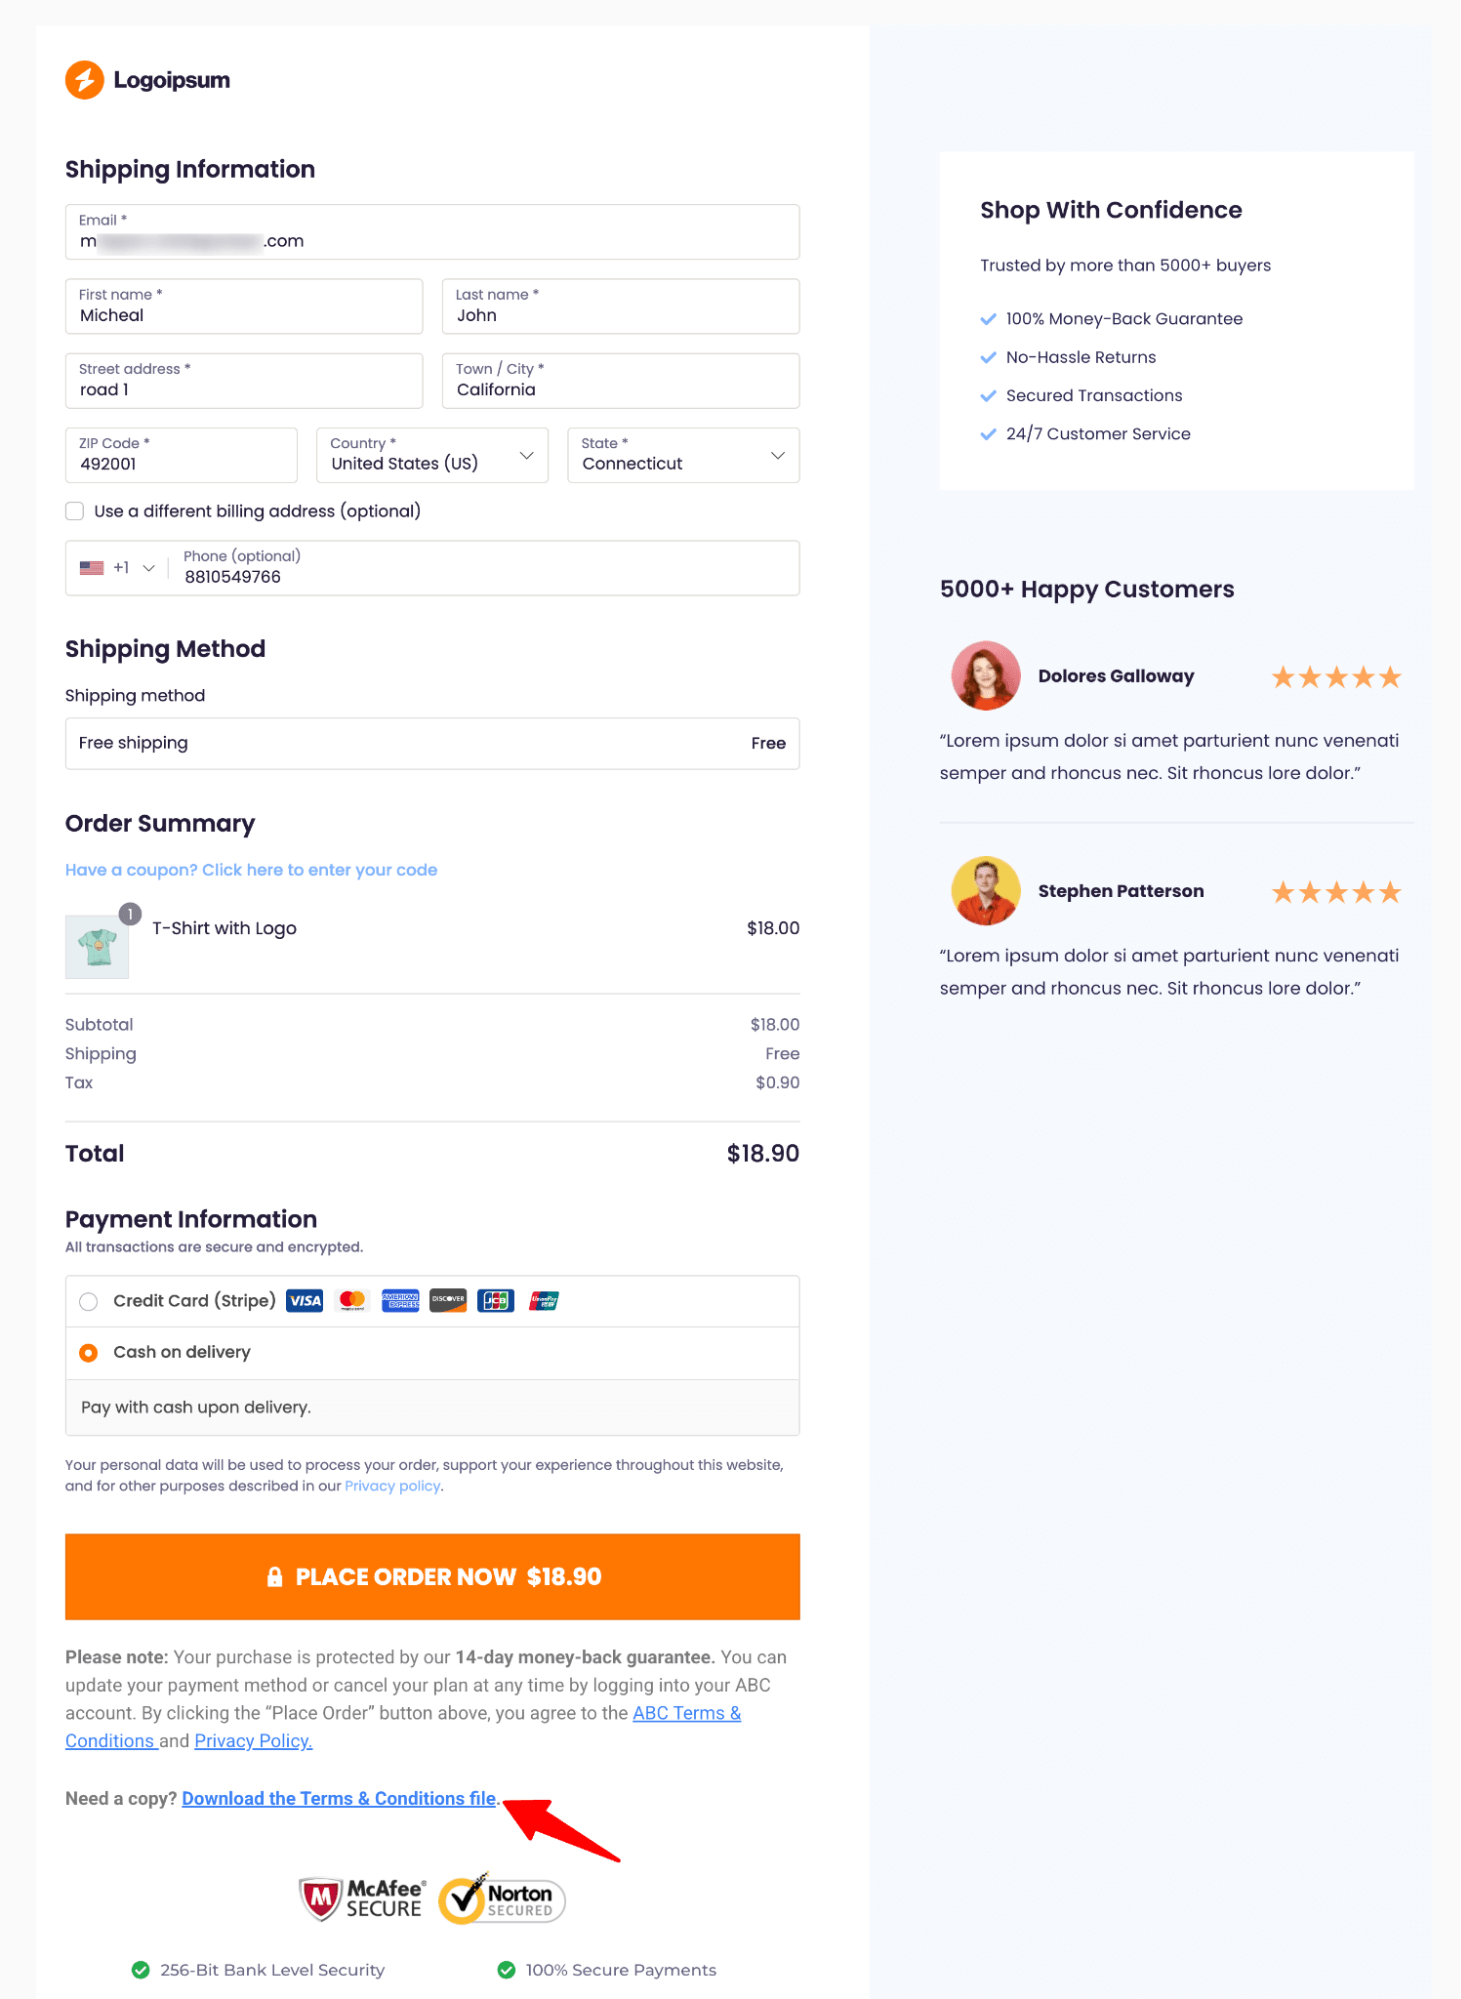
Here is what the WooCommerce checkout page with new terms and conditions text looks like:
Clik here to view.
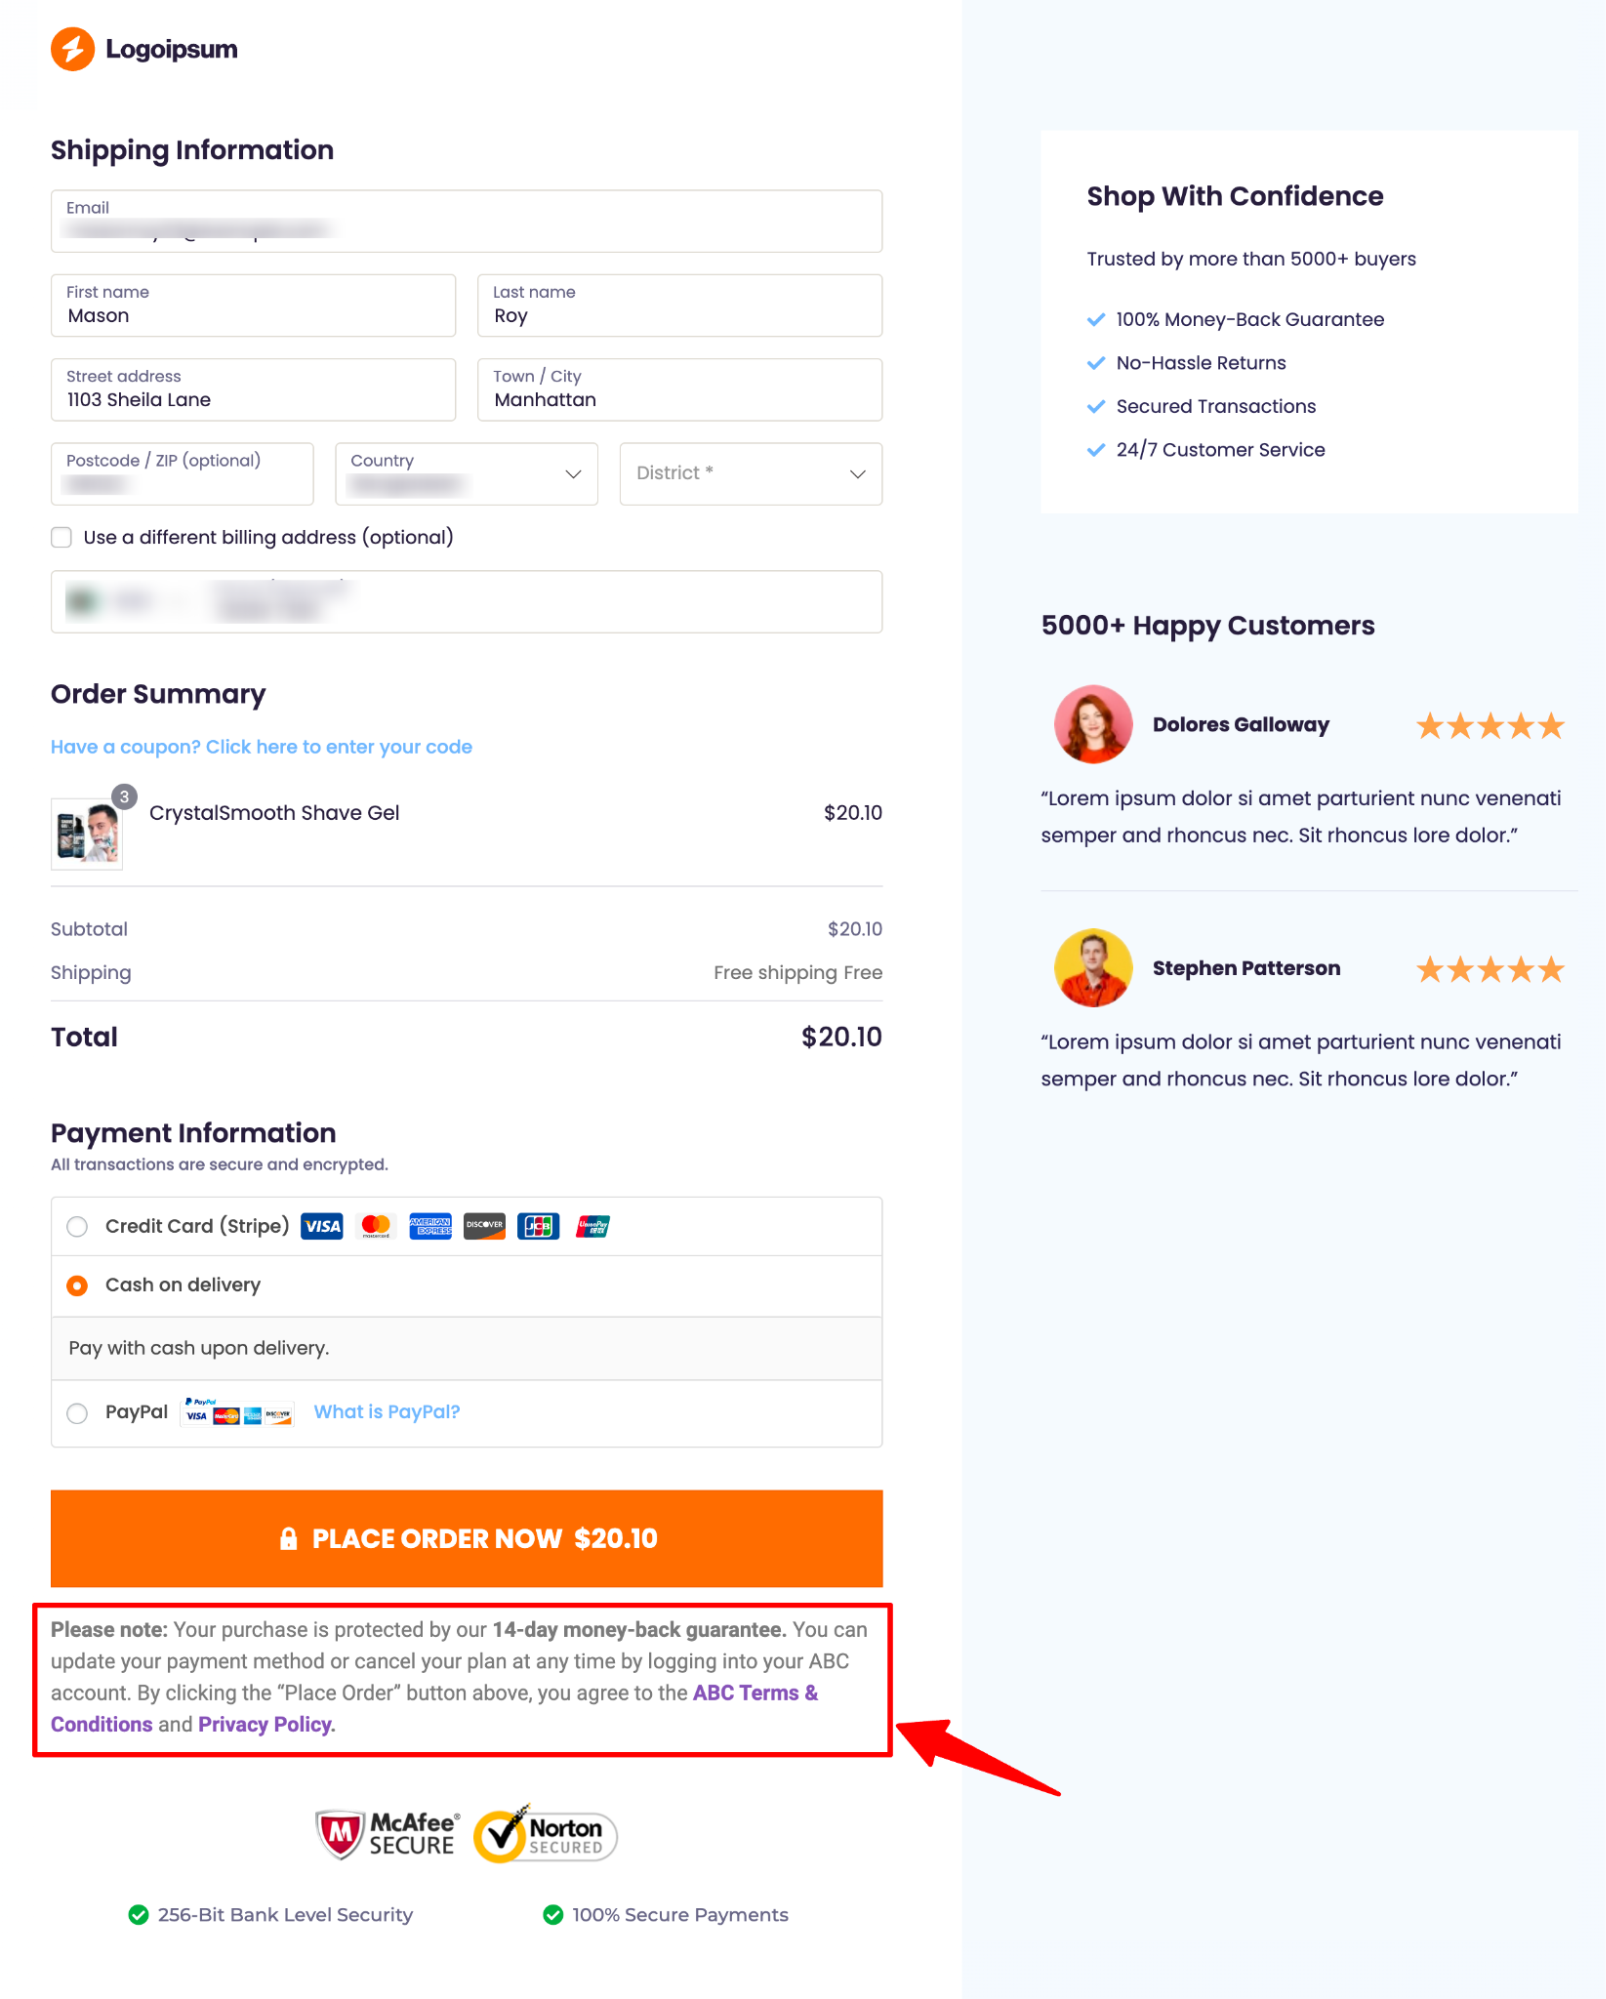
These terms and conditions don’t have a checkbox at the WooCommerce checkout. It allows users to go to the checkout page and purchase without adding an extra checkbox to click.
This is how you can add the terms and conditions to WooCommerce checkout pages.
Method 3: How to Add a Terms and Conditions PDF to the WooCommerce Checkout Page?
Along with linking to the Terms and Conditions page, you can add a PDF that customers can download and save. This makes it easy for them to refer back to it later and ensures they have a fixed version, even if your policies change.
To do this, first, add a Terms and Conditions section using FunnelKit Funnel Builder, as explained in the section above.
Next, follow these steps:
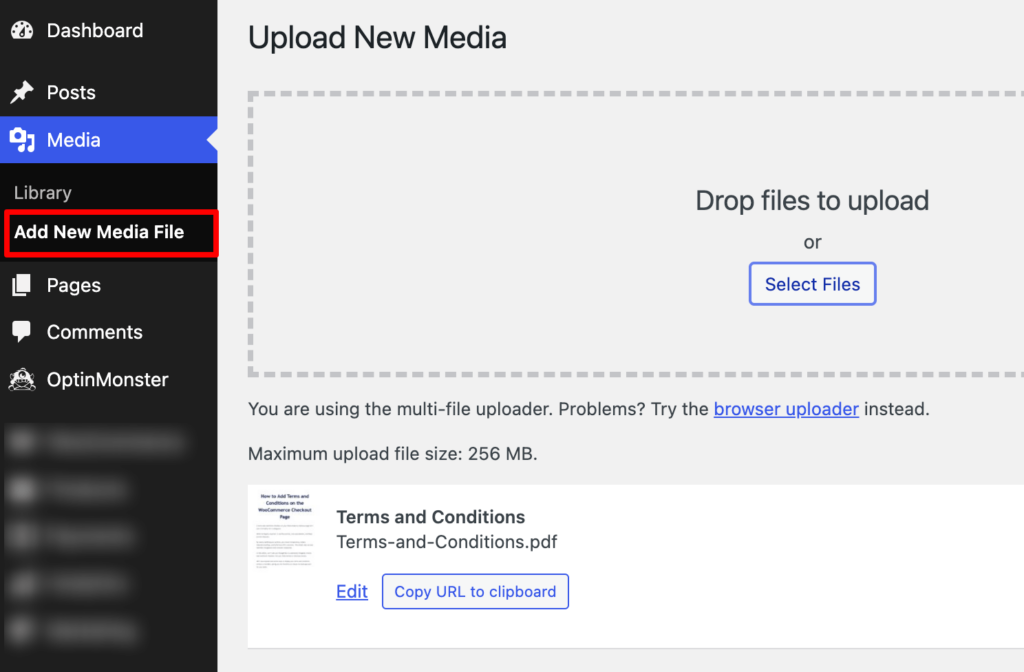
Step 1: Upload the Terms and Conditions PDF to your WooCommerce store.
Go to Media ⇒ Add New, then either select or drag and drop the file.
Clik here to view.
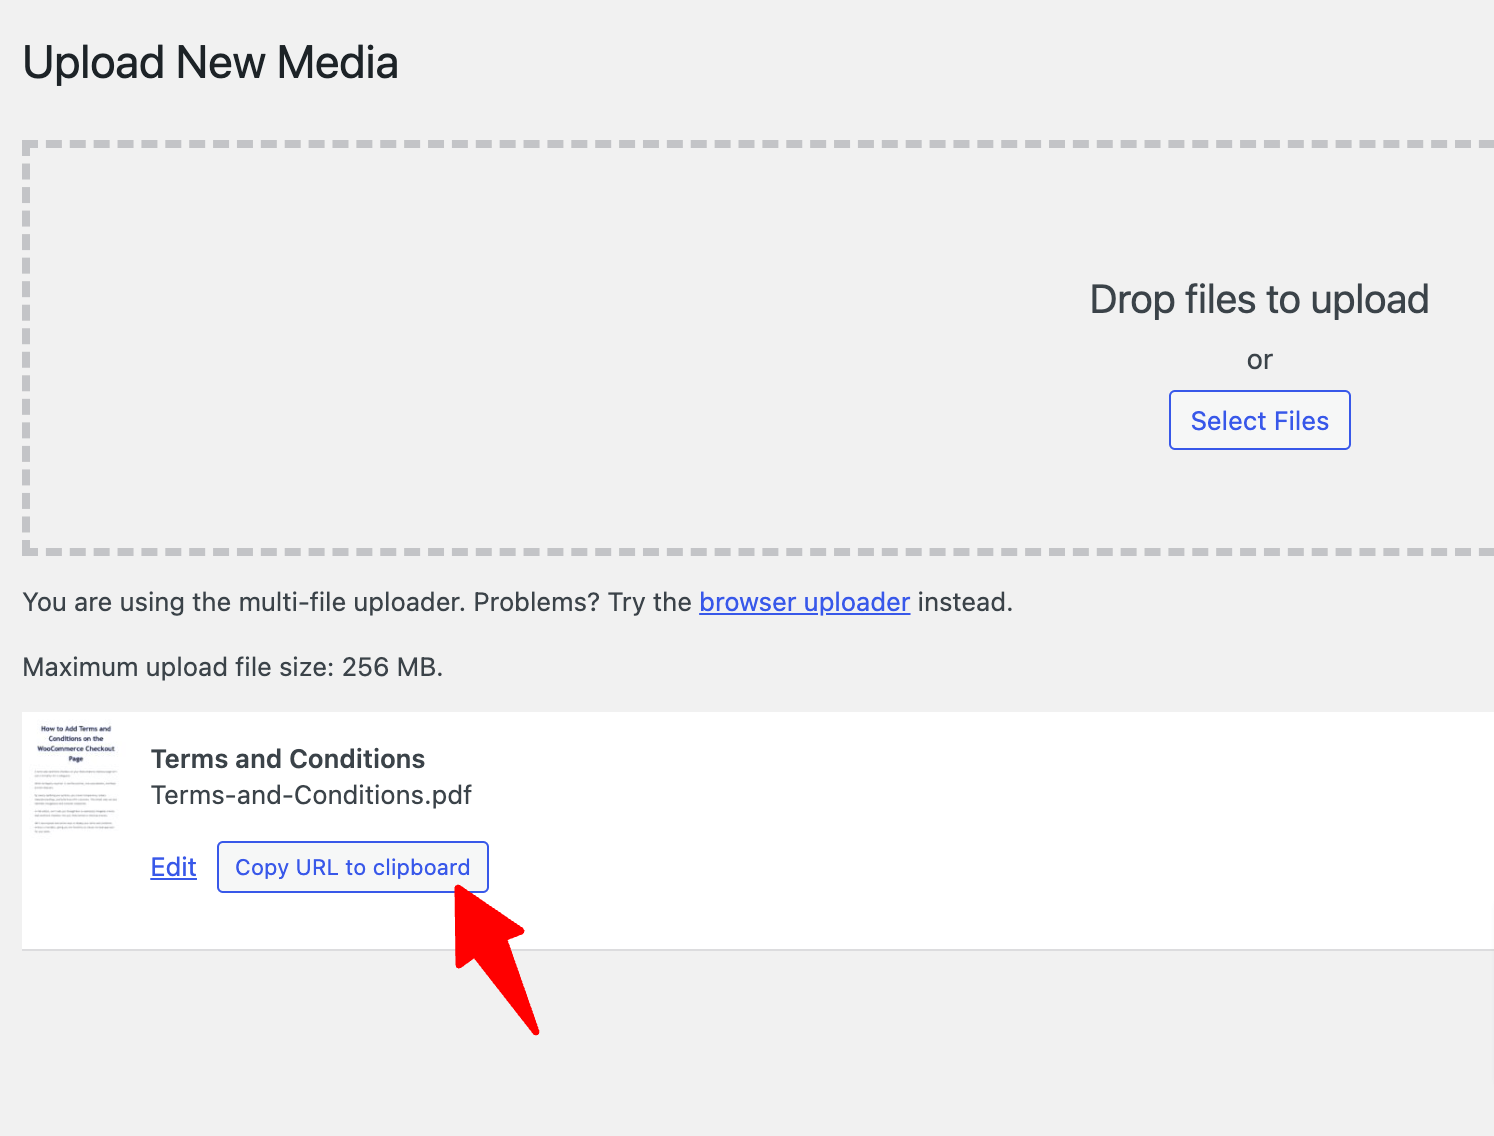
Step 2: Copy the terms and conditions PDF URL
Now, hit the “Copy URL to clipboard” button to copy the path.
Clik here to view.
Step 3: Link the PDF on the checkout page
Add the download link for the PDF in the Terms and Conditions section. Make sure the link opens in a new tab so customers can easily access it without leaving the checkout page.
Clik here to view.
Now, on the checkout page, users can just click the link to download the terms and conditions file.
Clik here to view.
This is how you can add a terms and conditions PDF to the WooCommerce Checkout Page?
Don't Want the WooCommerce Terms and Conditions? Here's How to Remove It from Checkout
The terms and conditions checkbox on the WooCommerce checkout page is great for compliance, but sometimes, you don't need it at all.
Maybe you run a simple store that doesn’t deal with returns. Maybe your policies are already included elsewhere. Or maybe you’re looking for a cleaner, faster checkout experience to boost conversions.
Here's how you can remove the terms and conditions from your WooCommerce checkout page.
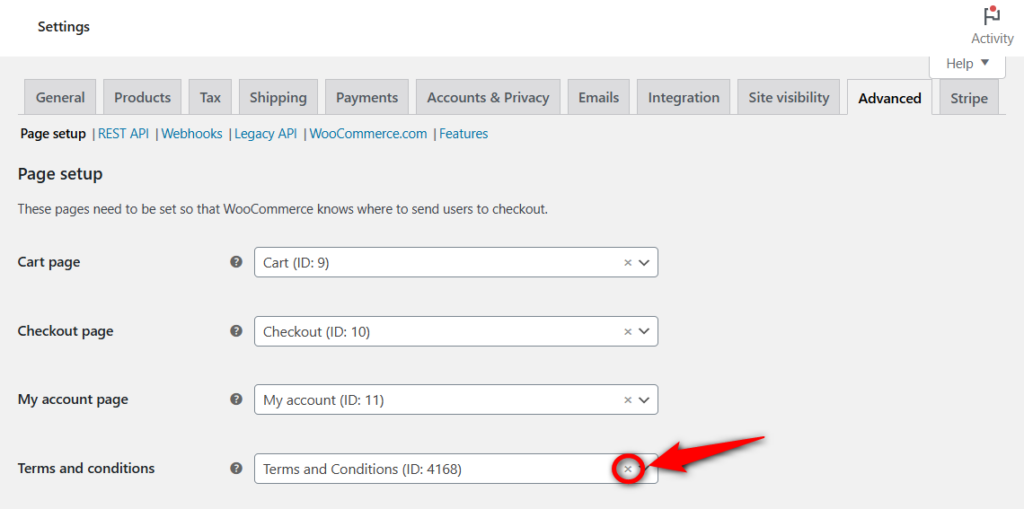
Navigate to WooCommerce ⇒ Settings ⇒ Advanced ⇒ Page Setup.
Find the setting labeled “Terms and conditions page”.
Simply deselect or remove the terms and conditions page from there.
Clik here to view.
Click on 'Save changes' when done.
This is how you can remove the WooCommerce terms and conditions from the checkout page.
WooCommerce Checkout Page Terms and Conditions: Frequently Asked Questions (FAQs)
In this section, our experts have answered some of the most frequently asked questions regarding WooCommerce checkout page terms and conditions checkbox:
1. How do I add terms and conditions to the WooCommerce checkout?
You can add terms and conditions to the WooCommerce checkout using two methods.
First, create a new terms and conditions page and specify it in the advanced WooCommerce page setup settings. Customize the checkout template in WordPress and assign the terms and conditions page there.
Second, create a store checkout with FunnelKit Funnel Builder and customize your checkout page with any page builder. Add the text editor widget and enter your terms and conditions under the place order button.
2. How do I customize my WooCommerce checkout page?
You can customize your WooCommerce checkout page using FunnelKit Funnel Builder.
It lets you add various elements like text, buttons, images, etc., and customize the button width, alignment, typography, icon color, font size, background color, etc., of your checkout page.
You can even customize the checkout form, mini cart, customer testimonials, benefits section, and more to make it high-converting.
3. How do I change the WooCommerce terms and conditions text?
You can change the WooCommerce terms and conditions text by navigating to Appearance > Customize > WooCommerce > Checkout. Edit the terms and conditions text there. You can also hyperlink your terms and conditions page there.
Hit the Save Changes button when done.
4. How do I remove terms and conditions from the WooCommerce checkbox?
You can remove terms and conditions by not specifying any page under the terms and conditions checkbox option in WooCommerce's advanced settings.
Alternatively, you can remove or make your terms and conditions page private under the Pages section.
5. How do I specify a terms and conditions page in WooCommerce settings?
You can specify a terms page by navigating to WooCommerce settings > Advanced. Under the Page Setup tab, click on the drop-down menu next to Terms and Conditions and select your terms page there.
Click on save when done.
Add WooCommerce Checkout Terms and Conditions with Ease!
In an online store, WooCommerce checkout terms and conditions are crucial to establishing a secure and transparent online shopping experience for you and your customers.
By clearly outlining the terms of service, privacy policies, and other important information, you can build trust with your audience.
We hope that after reading this post, you can now add terms and conditions to the WooCommerce checkout without any trouble. The best part is that you can now add terms and conditions without requiring customers to fill in extra fields.
So, why wait? Add terms and conditions to your WooCommerce checkout page today!
The post How to Add Terms and Conditions to the WooCommerce Checkout Page appeared first on FunnelKit.