Do you want to track conversions from Google Ads to your WooCommerce store?
Setting up WooCommerce Google Ads conversion tracking is crucial if you want to analyze the ROI from your advertising campaigns.
It helps you keep a close eye on new subscribers, abandoned carts, purchases made, and so much more.
Enabling conversion tracking helps you optimize your ad campaigns to further set up retargeted ads to custom audience segments.
It’s a wonderful way to analyze what is working and what needs to improve in your store.
In this post, you’ll learn how to add a Google Ads conversion ID and enable event-based tracking in your WooCommerce Store.
Why Should You Set Up Google Ads Conversion Tracking in WooCommerce?
Setting up Google Ads conversion tracking on your WooCommerce store lets you know the total revenue you’re making from the people who click on your Google ads.
Not just this, you can even track your ROI with the help of event-based tracking.
This means that you can track down the activities of users on your website right from the point they click on your ad and land on your website.
With Google ads, you can track all types of conversions, such as:
- Product purchases
- Lead magnet downloads
- Email subscriptions
- Form submissions, and more
It’s a great performance indicator that lets you know about product performance and the shopping behavior of the visitors in your store.
This way, you can not only optimize the pages on your store but set up retargeted ads based on how users interact on your website.
Events You Can Track with WooCommerce Google Ads Conversion Tracking
To set up Google ads conversion tracking in WooCommerce, we'll be using FunnelKit - the most powerful sales funnel builder solution available for WordPress.
You can design your opt-in pages, checkouts, upsell offers, thank you pages, and more using pre-built templates or from scratch with any page builder of your choice.
Not just this, FunnelKit has deep integration with Google Ads that lets you keep track of conversions happening on your website.
The following events can be easily measured with FunnelKit once you set up Google Ads conversion tracking in WooCommerce:
Common Google Ads events
- Page View - A visitor lands on a page in your store
- View Item - A user views a product on your store’s shop page
- Lead - A user successfully submits a form to your store
- Add to Cart - A user adds an item to their cart
- Purchase - A user makes a purchase by going from the checkout page to the thank you page
Funnel-specific events
- Order Bump Conversion - A user accepts the order bump on the checkout page
- Track funnel steps - A user lands on any page in the funnel such as Optin, Optin confirmation, Sales page, Checkout, Upsell, Downsell, and Thank You page created with FunnelKit.
As your visitors navigate and take action on your website, these events will get fired and captured.
How to Add Google Ads Conversion ID to WooCommerce & Track Events?
Follow the steps below to set up WooCommerce Google Ads conversion tracking in your online store.
Step 1: Install FunnelKit
First and foremost, you need to install FunnelKit.
FunnelKit is a perfect WooCommerce conversion tracking plugin for different platforms such as Google Ads, Facebook Ads, TikTok Ads, etc.
It also perfectly integrates with Google Analytics to help you track your store's transactions.
With FunnelKit, you can do all this with the help of its free version.
👉 Download FunnelKit’s Funnel Builder for free and install it on your website.
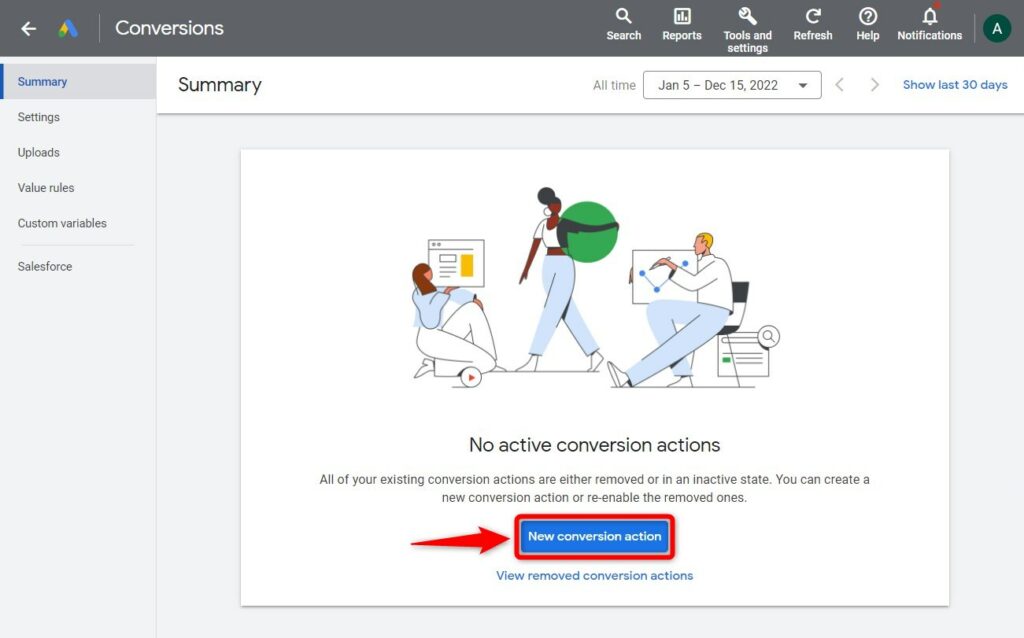
Step 2: Go to Google Ads conversions
Go to Google Ads and sign in to your account.
After the successful login, you’ll be redirected to your campaign dashboard page.
From there, go to Goals ⇨ Conversions and click on the 'Summary' option.
You'll reach the conversion summary section.
Step 3: Create the conversion action
Click on the 'New conversion action' button.
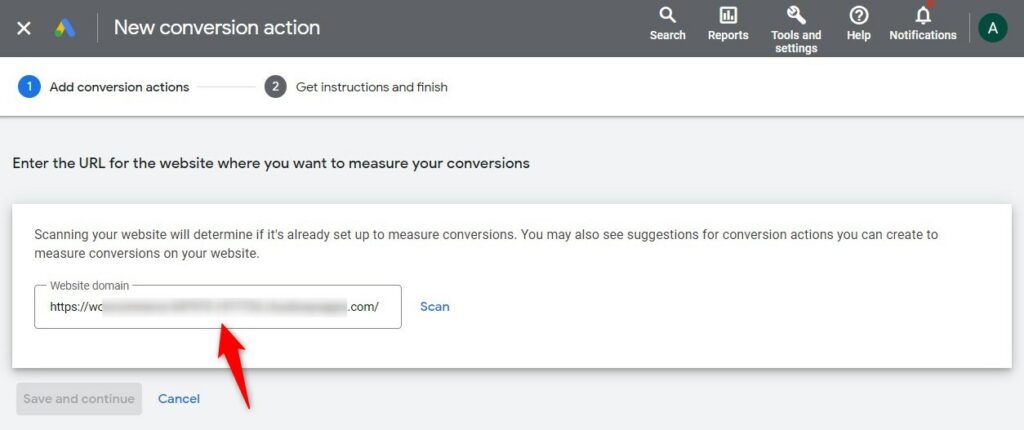
Next, click on Website and enter the domain URL of your website.
Once done, click on 'Scan'.
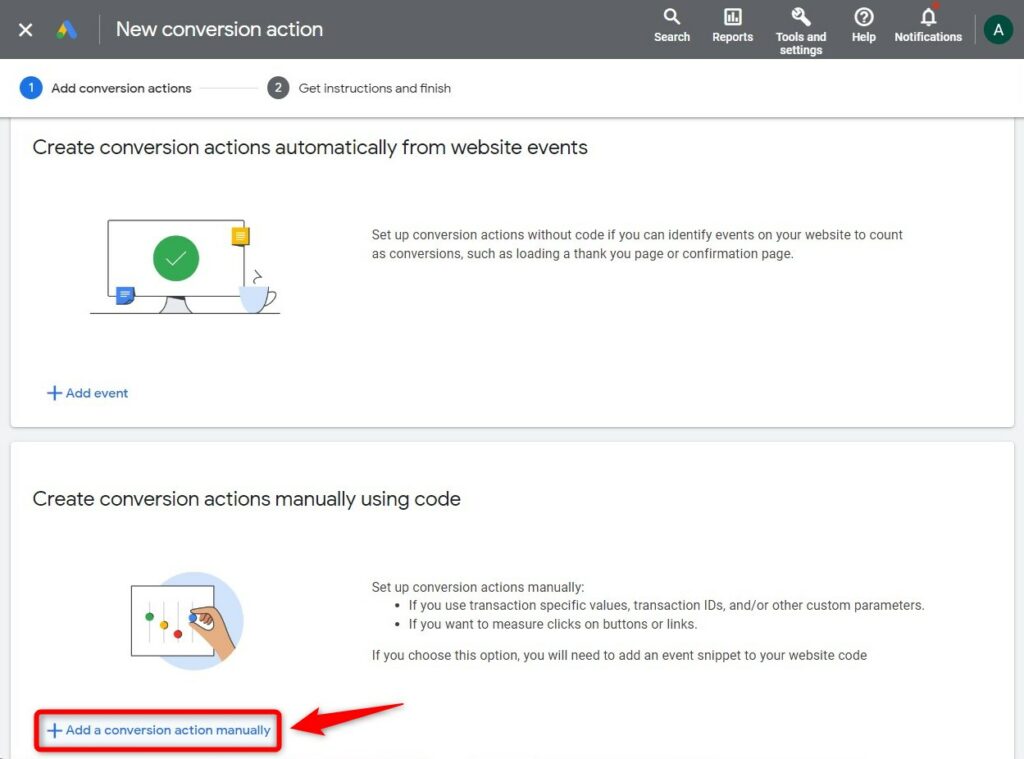
Now, choose the conversion actions you want to set up.
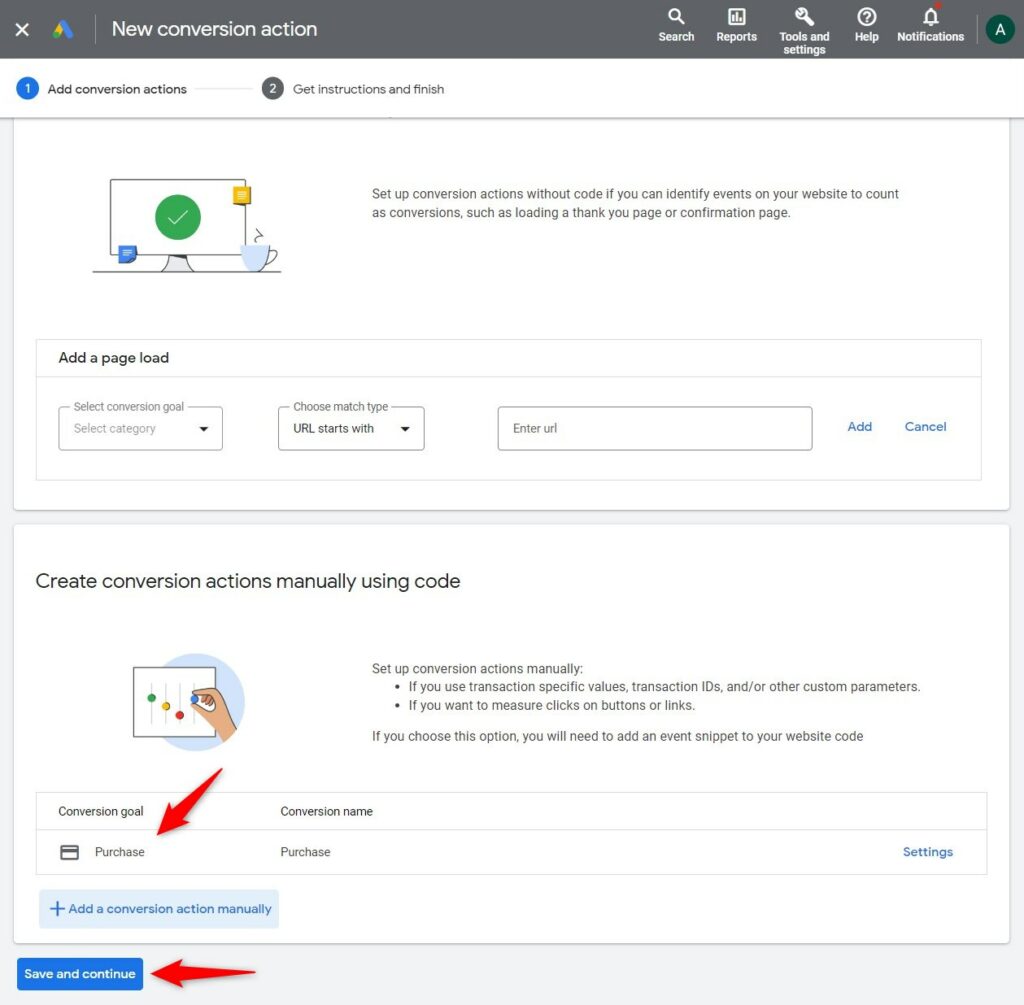
From here, choose 'Add a conversion action manually'.
Then, select a new goal and related information for your Google Ads conversion tracking.
Select a conversion type and name it. You can also set the conversion value and count there.
For example, here we have set up one conversion 'Purchase' action and selected the following information as shown below:

Make sure you've enabled enhanced conversions for this conversion action.
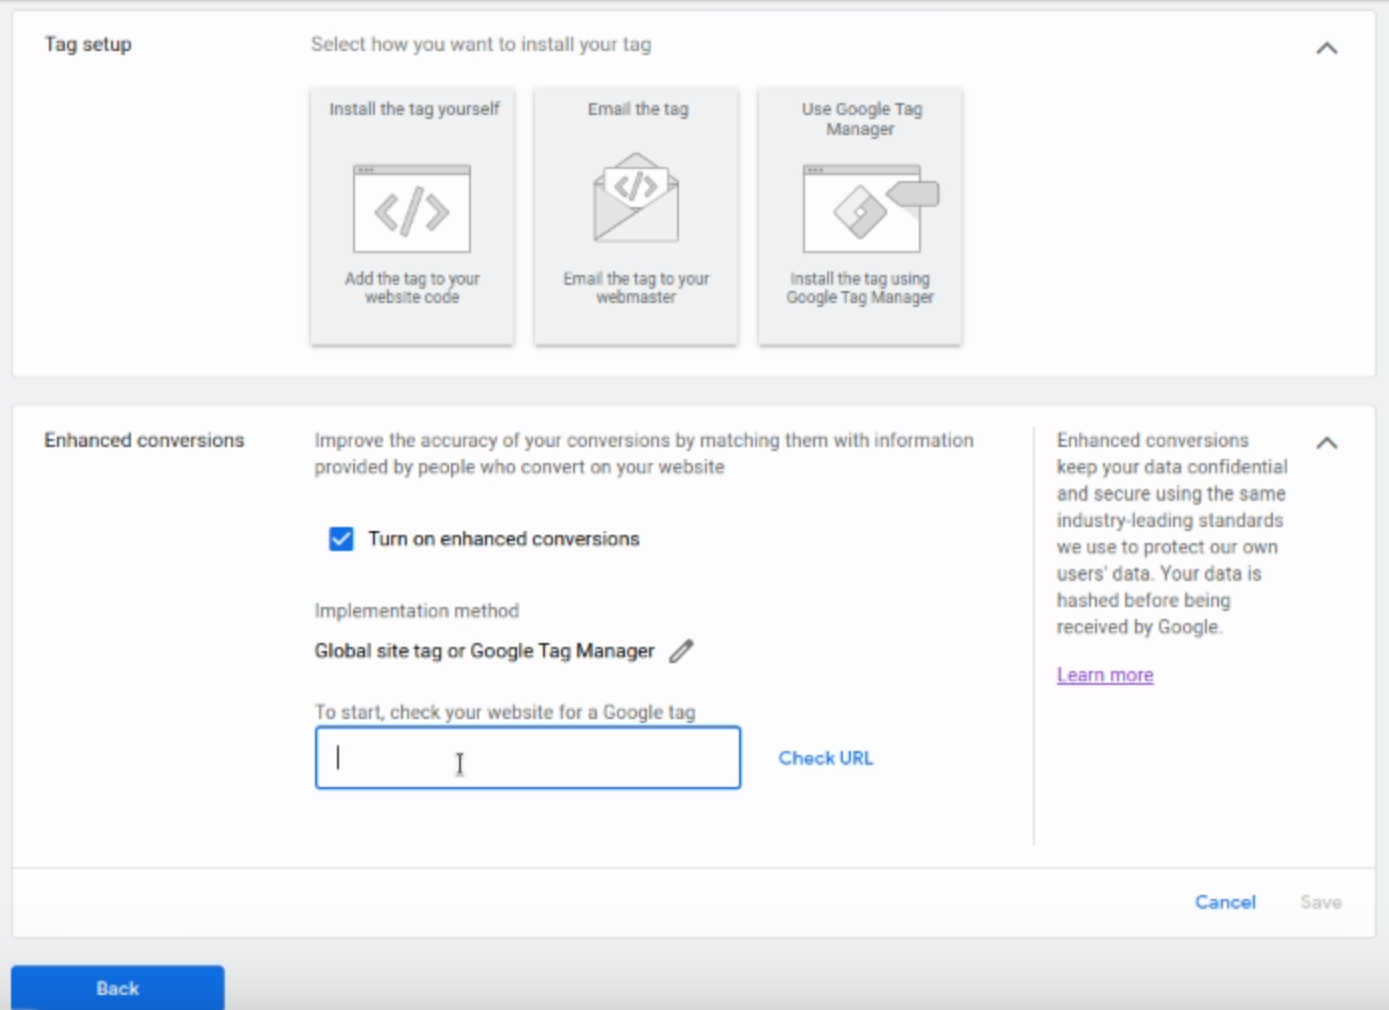
Click on 'Done' to save the changes.
Now that we have added our conversion goals, make sure to click on the 'Save and continue' button.
Next, you’ll reach Step 2, click on 'See event snippet' here.
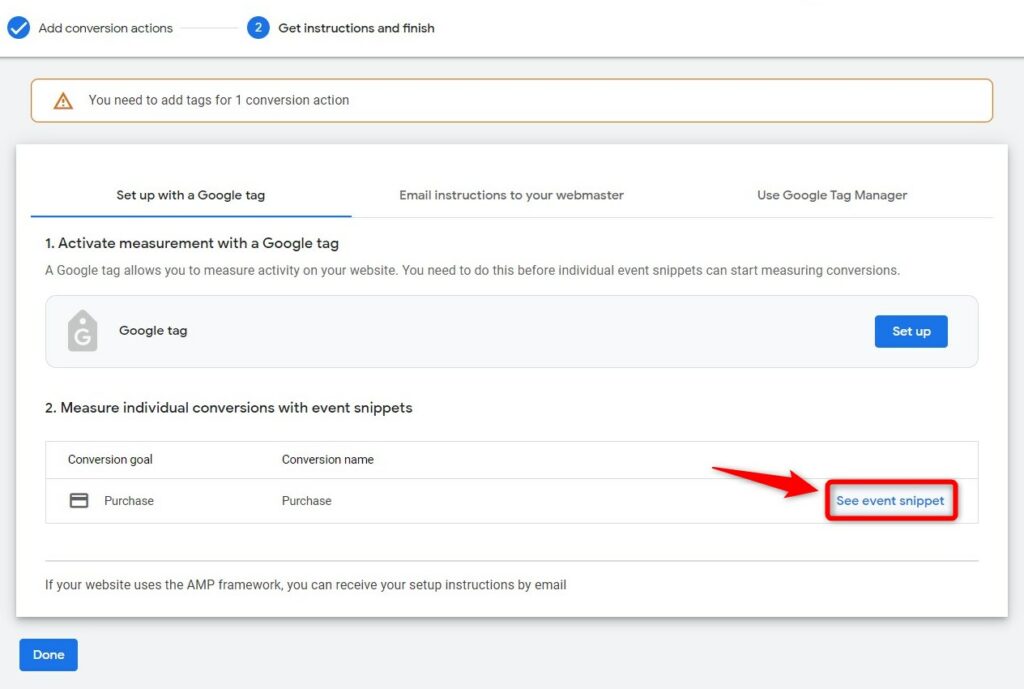
Well done! This is how you can create a conversion action in Google Ads for tracking.
Step 4: Copy the conversion ID and label
Clicking on the 'See event snippet' button will help you locate your Conversion ID and Conversion Label.
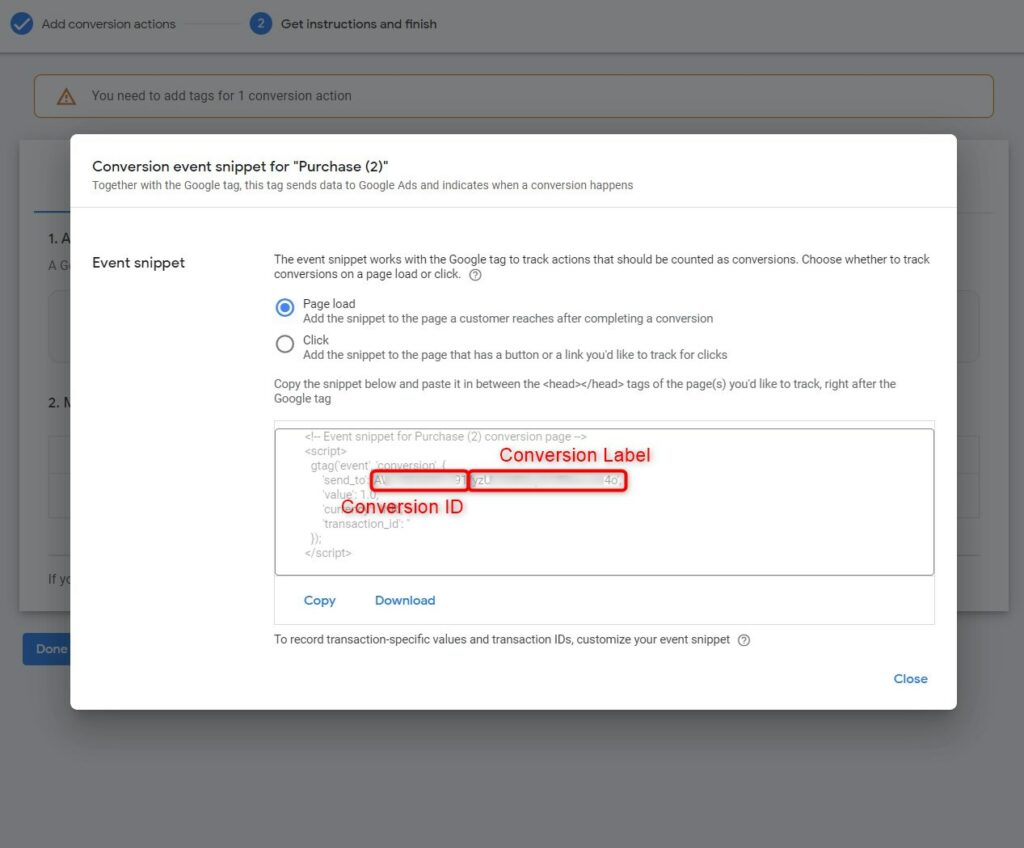
Copy the Google Ads conversion ID and label from here.
Step 5: Add the Google Ads conversion ID and label to WooCommerce
Go to FunnelKit’s settings section.
Under the Google Ads tab inside the Pixel Tracking section, paste the conversion ID and conversion label there.
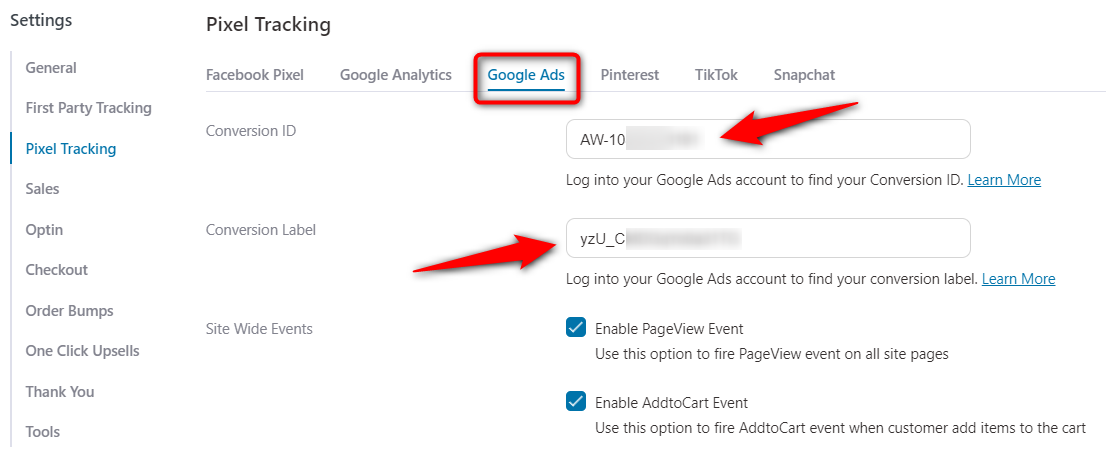
This is how you can add Google Ads conversion ID to WooCommerce.
Step 6: Enable the events you want to track
Scroll down and enable all the events you want to track on your website.
Site Wide Events
- Page View
- Add to Cart
- View Item
Sales Page Event
- Page View
Optin Page Events
- Page View
- Lead
Checkout Events
- Page View
- Add to Cart
Order Bump Events
- Add to Cart
- Order Bump Conversion
Purchase Events
- Page View
- Conversion
Track Steps (Custom Funnel Step events)
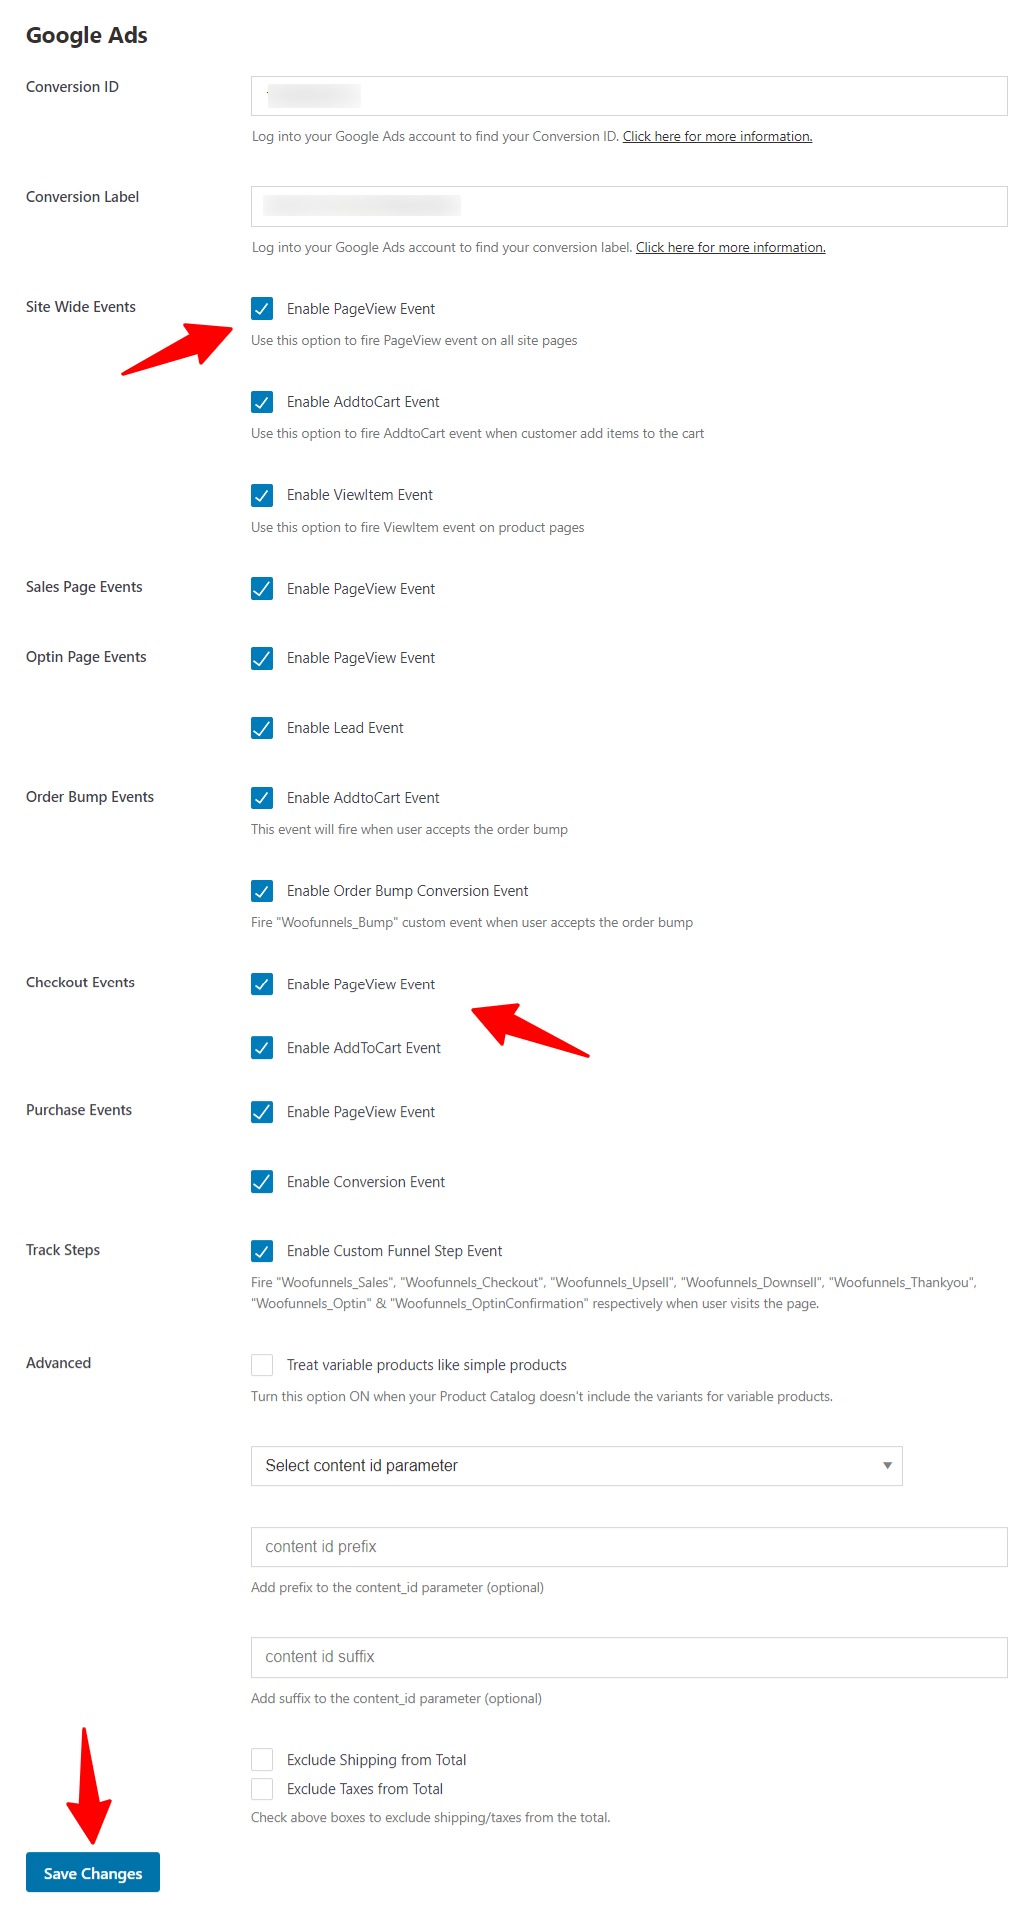
Click on 'Save Changes' once done.
This way you can successfully enable WooCommerce Google Ads conversion tracking on your store.
How to Test Google Ads Conversion Tracking in WooCommerce?
To test the Google Ads conversion implementation on your website, use Google Tag Assistant.
Here’s how you can do it:
Step 1: Add the domain to Google Tag Assistant
Go to Google Tag Assistant and click on the 'Add domain' button.
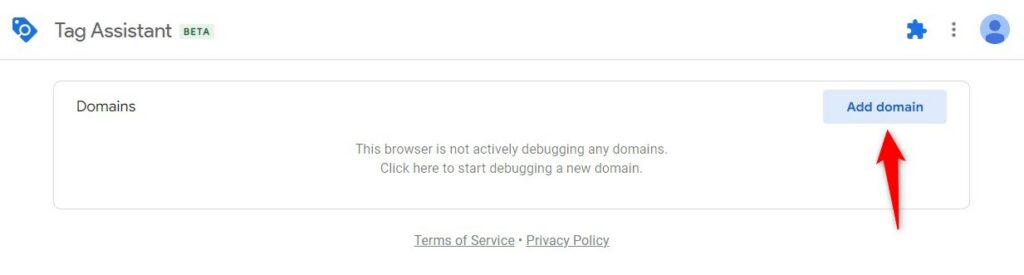
Enter your website’s URL and hit 'Connect'.
It’ll successfully connect and open up the website on another tab in your browser.
Click on 'Continue'.
From there, you can interact with your website and see all the events being fired on the Tag Assistant.
Step 2: Interact with your website and see fired events in Tag Assistant
Now, interact with your website - go to your product’s catalog and view any item or add it to your cart.
Viewing an item and adding it to the cart
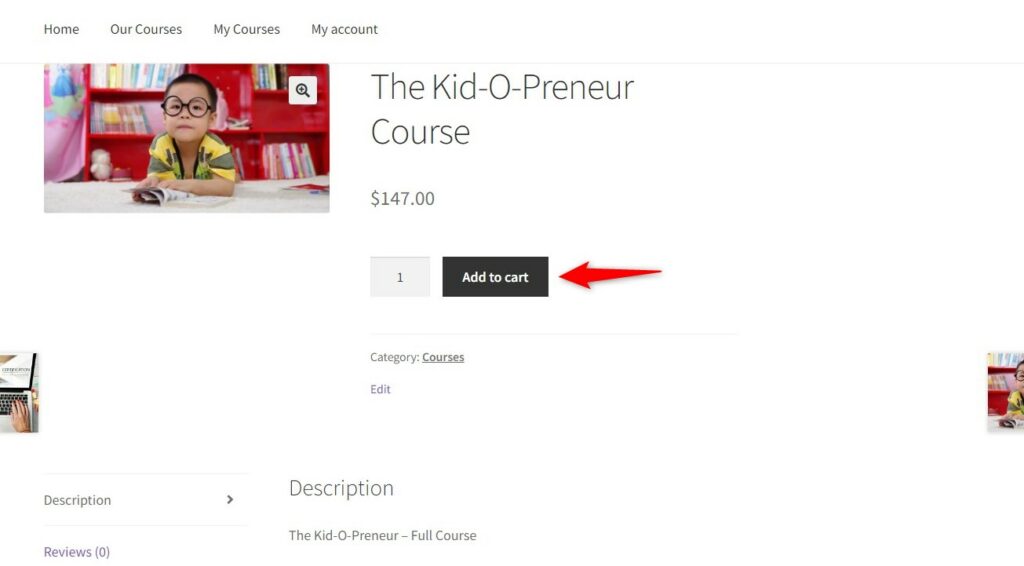
These are the events that get captured:
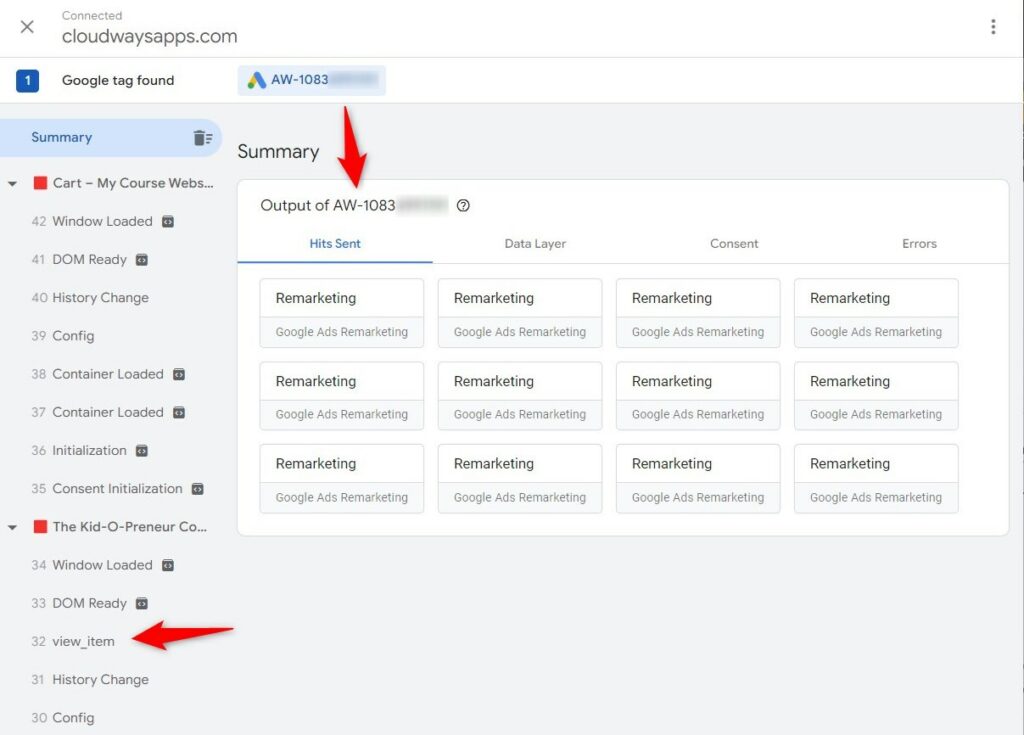
As you can see, it shows various events related to the product you view as well as adding it to the cart.
To see more details about any event, click on the block and a sliding window will appear with all the details:
As you can see the product details, page URL, platform, system details, etc. for this page view event.
Initiating the checkout and making a purchase
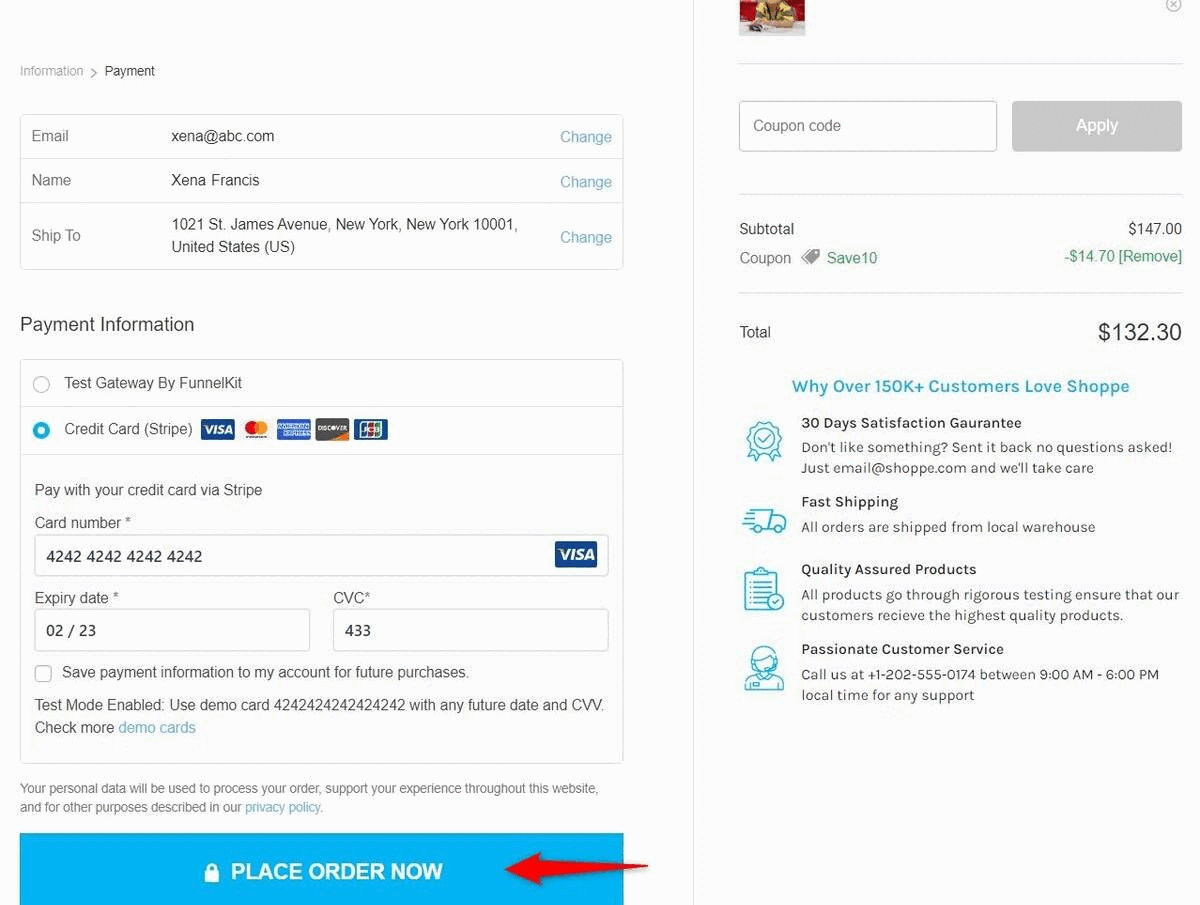
Now, proceed to the checkout and make a test purchase by filling in all the details on the checkout form.
Once done, you’ll reach the order confirmation page and see these events in the previous tab.
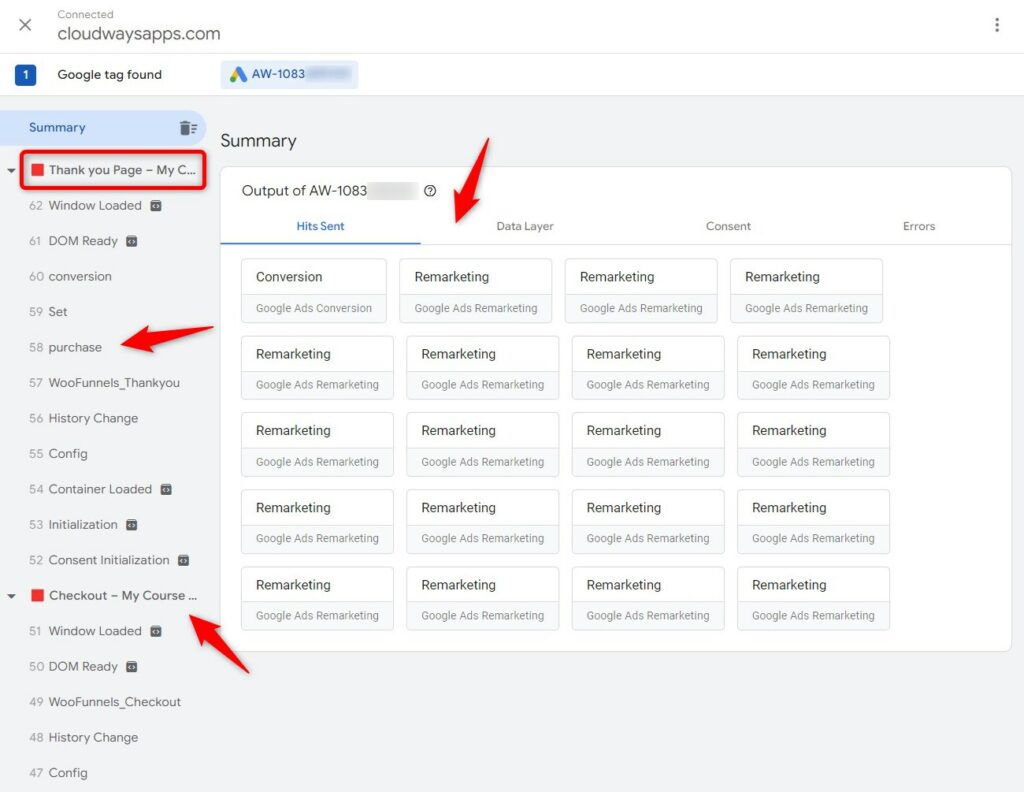
As you can see, events such as Checkout, Page View, Purchase, Thank You page has been fired.
Since all the events successfully fired, it means that Google Ads is effectively tracking conversions in the WooCommerce store.
This is how you can test your Google Ads conversion implementation on your WooCommerce website.
Frequently Asked Questions Related to WooCommerce Google Ads Conversion Tracking
Here are some common questions users asked about tracking conversions from Google Ads to WooCommerce:
1. How do I manage conversions in Google Ads?
You can manage your conversion actions and values by going to the 'Conversions' section under the 'Tools and settings' menu from the Google Ads dashboard. You can edit settings or add new action values based on your requirements.
2. How do I track Google Ads conversion in WooCommerce?
You can track Google ads conversions in WooCommerce using FunnelKit. All you have to do is enter your conversion ID, label and turn on the events to track. Check out this post for detailed instructions.
3. How do I add Google Ad conversion tracking code to my website?
FunnelKit deeply integrates with Google Ads. This means you don’t have to add any code - just create a conversion action in Google Ads and paste the conversion ID as well as the label here.
4. Why am I getting no conversions in Google Ads?
If you’re not getting any Google Ads conversions, there is a chance that you have not correctly embedded the code into your website. That’s why we recommend FunnelKit as the most effective WooCommerce conversion tracking plugin that integrates perfectly with Google Ads.
FunnelKit Makes WooCommerce Google Ads Conversion Tracking Easy!
There’s no doubt that Google Ads bring relevant traffic to your website.
However, if you want to measure the ROI of your campaigns, you need to enable Google Ads conversion tracking on your website.
This way you’ll be able to track new purchases, cart abandonments, lead signups, and optimize your ad campaigns further.
To add Google Ads conversion tracking to your WooCommerce store, you can’t get a better tool than FunnelKit.
FunnelKit is the most powerful sales funnel builder for WordPress that also has deep integration with Google Ads.
It allows you to not only create high-converting sales funnels but track conversions from Google Ads to your WooCommerce website.
Furthermore, FunnelKit’s site-wide event-tracking ability lets you track users’ activities right from they land on your website.
So don’t wait out for too long!
You can further subscribe to our YouTube channel or join our Facebook Group to get amazing tips and strategies to implement in your store.
The post How To Set Up Google Ads Conversion Tracking In WooCommerce [2024] appeared first on FunnelKit.