Do you want to add a custom field to WooCommerce email?
Any custom information you collect on your checkout page via a custom field becomes an important part of the order. Therefore, it's crucial to include that custom information in the WooCommerce emails.
WooCommerce, by default, doesn’t provide any option to collect any custom information or add any field to default emails. However, for effective communication, you must include different custom fields in your WooCommerce emails.
In this blog, we’ll walk you through a step-by-step guide on how you can add custom fields to WooCommerce emails.
Let’s start.
What Are Custom Fields in WooCommerce Emails?
Custom fields in WooCommerce emails allow you to include additional information alongside the default email content.
The default WooCommerce order emails typically provide basic details about order statuses. However, there are situations where you might want to add custom fields, such as:
- Custom information: Any custom values or unique details collected from customers on the checkout page.
- Discount code: Share discount coupons for customers to use on their next purchase.
- Shipping Policy: Include your shipping policy for better transparency.
- Shipment tracking information: Provide shipment tracking information for customer convenience.
- Product recommendations: Suggest products to encourage future sales.
- Social media links: Share social media links so customers can follow your brand on social platforms.
- Third-party data: Include customer data from third-party plugins you use with WooCommerce.
- Note from store owner: Add a special note for the customer from the store owner.
These are just a few types of custom fields you can add to your WooCommerce emails. The type of custom field you include will depend on the specific WooCommerce email you’re sending.
👉 Must Read: Default WooCommerce Order Notification Emails
Why You Should Add Custom Fields to WooCommerce Emails?
Have a look at some of the reasons why you should add custom fields to WooCommerce emails:
- Provide additional order details
Custom fields enable you to include extra information that defaults WooCommerce emails may not cover. This could be special instructions, customizations, or additional product attributes important to the customer. This ensures you share every important information with customers in the emails.
- Enhance personalization
Adding custom fields allows you to tailor emails with specific details related to each customer’s order or preferences. You can also include personalized notes from the store owner for a more customized experience.
- Improve customer service
By integrating custom fields into emails, you can communicate essential information such as product usage instructions or delivery preferences. This helps improve customer satisfaction and reduce the need for follow-up queries.
- Streamline internal operations
Custom fields can include internal notes or handling instructions that help your team process and fulfill orders more efficiently. This ensures all relevant information is communicated and acted upon.
- Enhance tracking and reporting
Adding shipment tracking information to your WooCommerce order emails improves order tracking for customers, streamlining reporting and reducing confusion.
- Boost sales
Personalized product recommendations, combined with a time-limited discount coupon, can encourage repeat purchases and boost sales.
How to Collect Custom Information at Checkout and Add Those to WooCommerce Email?
In this section, we will share how to collect additional information on the checkout page with a custom field and then add the custom field to WooCommerce emails.
To add an extra custom checkout field to the WooCommerce checkout page, we will use FunnelKit Funnel Builder. This highly popular plugin powers over 20,000 WooCommerce websites worldwide.
We chose this plugin because it allows you to add custom fields to your WooCommerce checkout form using a simple drag-and-drop interface without coding. Additionally, you can easily control the order of your checkout form fields.
FunnelKit Funnel Builder is not just a WooCommerce checkout field editor; it's a complete WooCommerce checkout manager plugin that helps you create a multi-step checkout page and optimize it for a frictionless checkout process.
To follow along with the process, you need to install and activate both:
- FunnelKit Funnel Builder (free)
- FunnelKit Funnel Builder Pro
After activating the plugins, follow these steps:
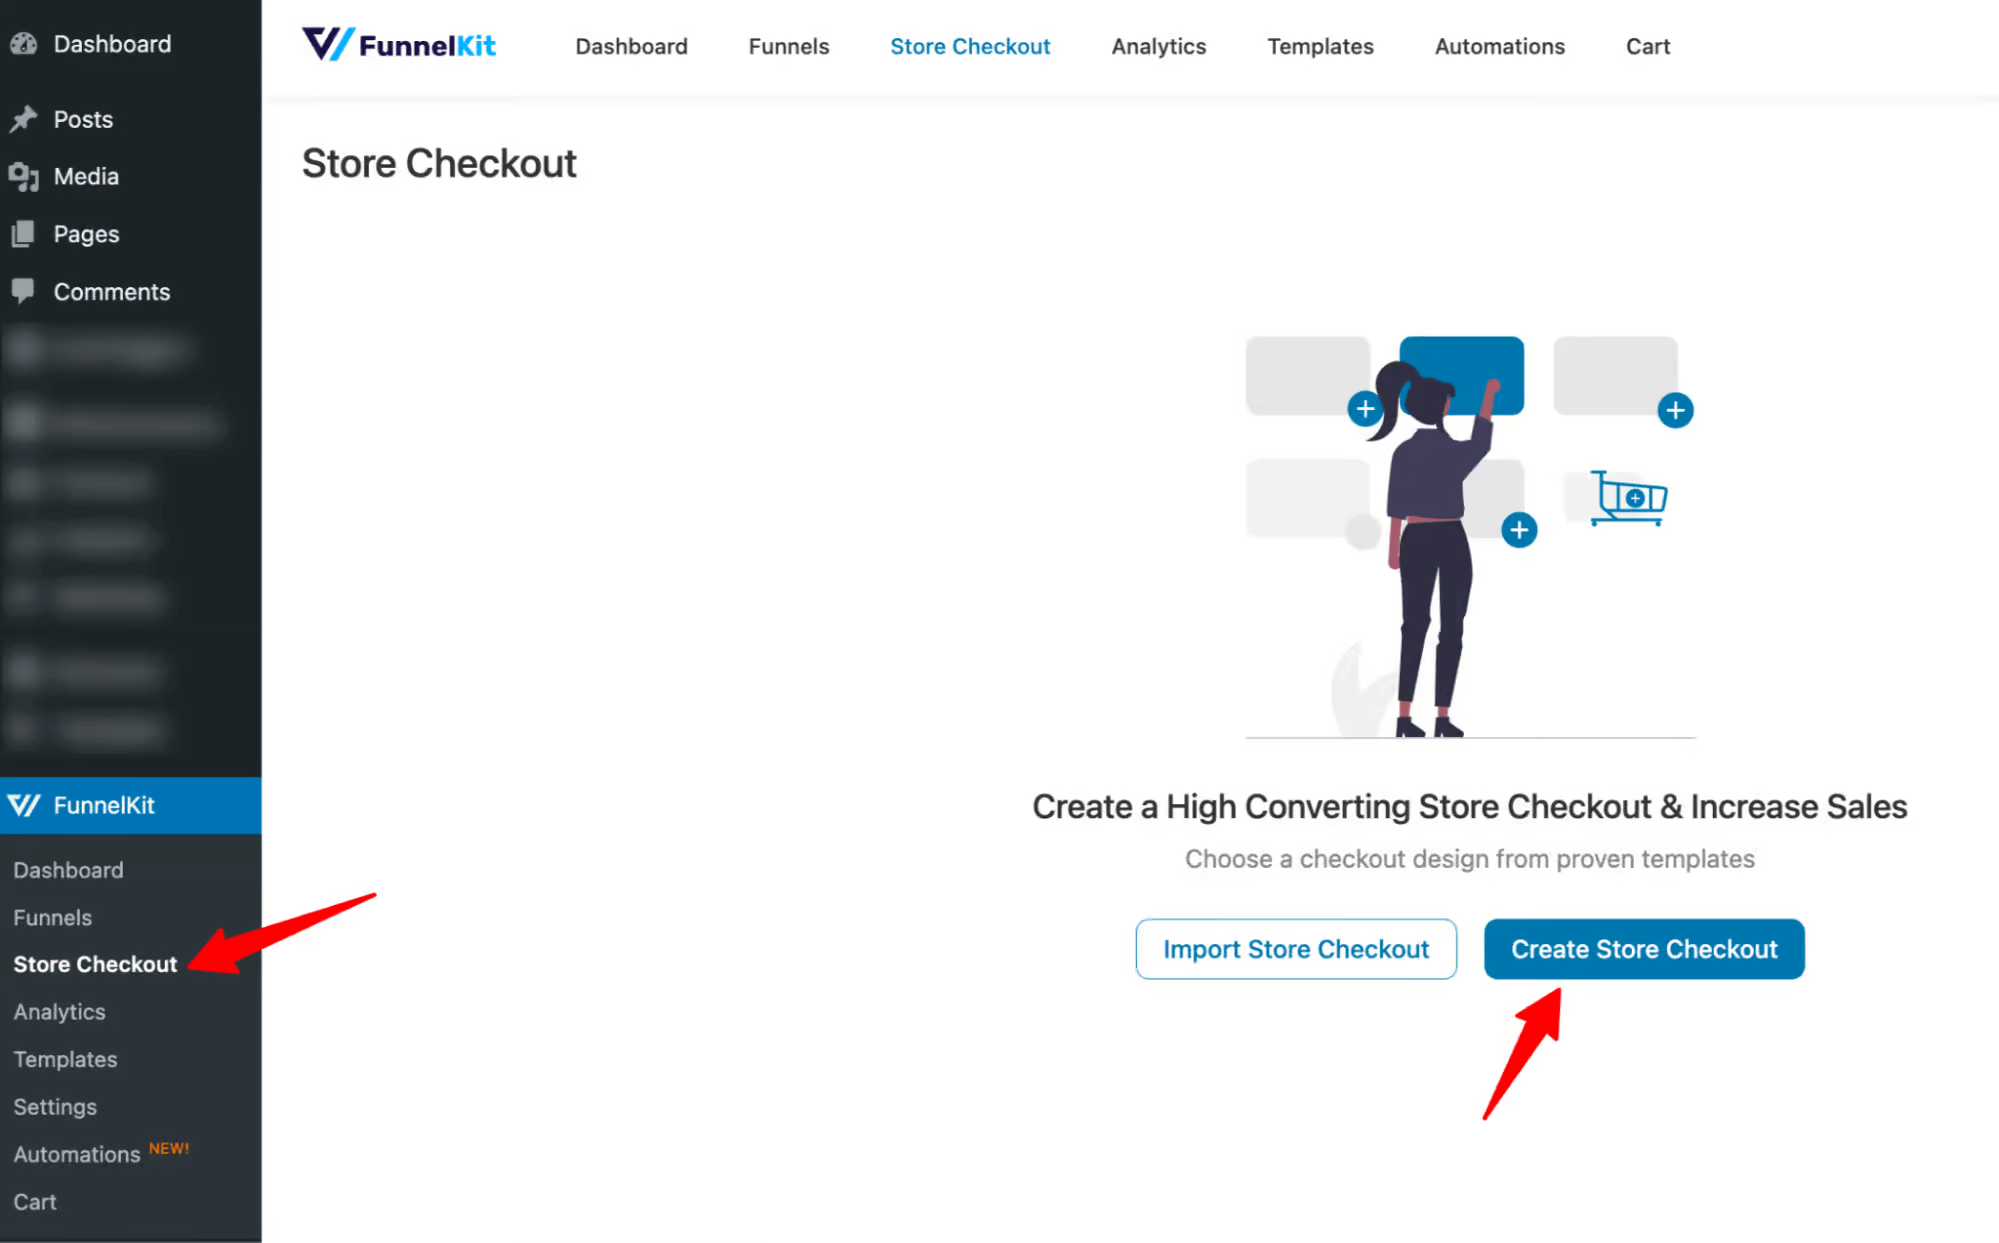
Step 1: Create a store checkout
Firstly, we need to create a store checkout that will replace the default WooCommerce checkout page.
To do so, navigate to FunnelKit ⇒ Store Checkout and click on the ‘Create Store Checkout’ button.
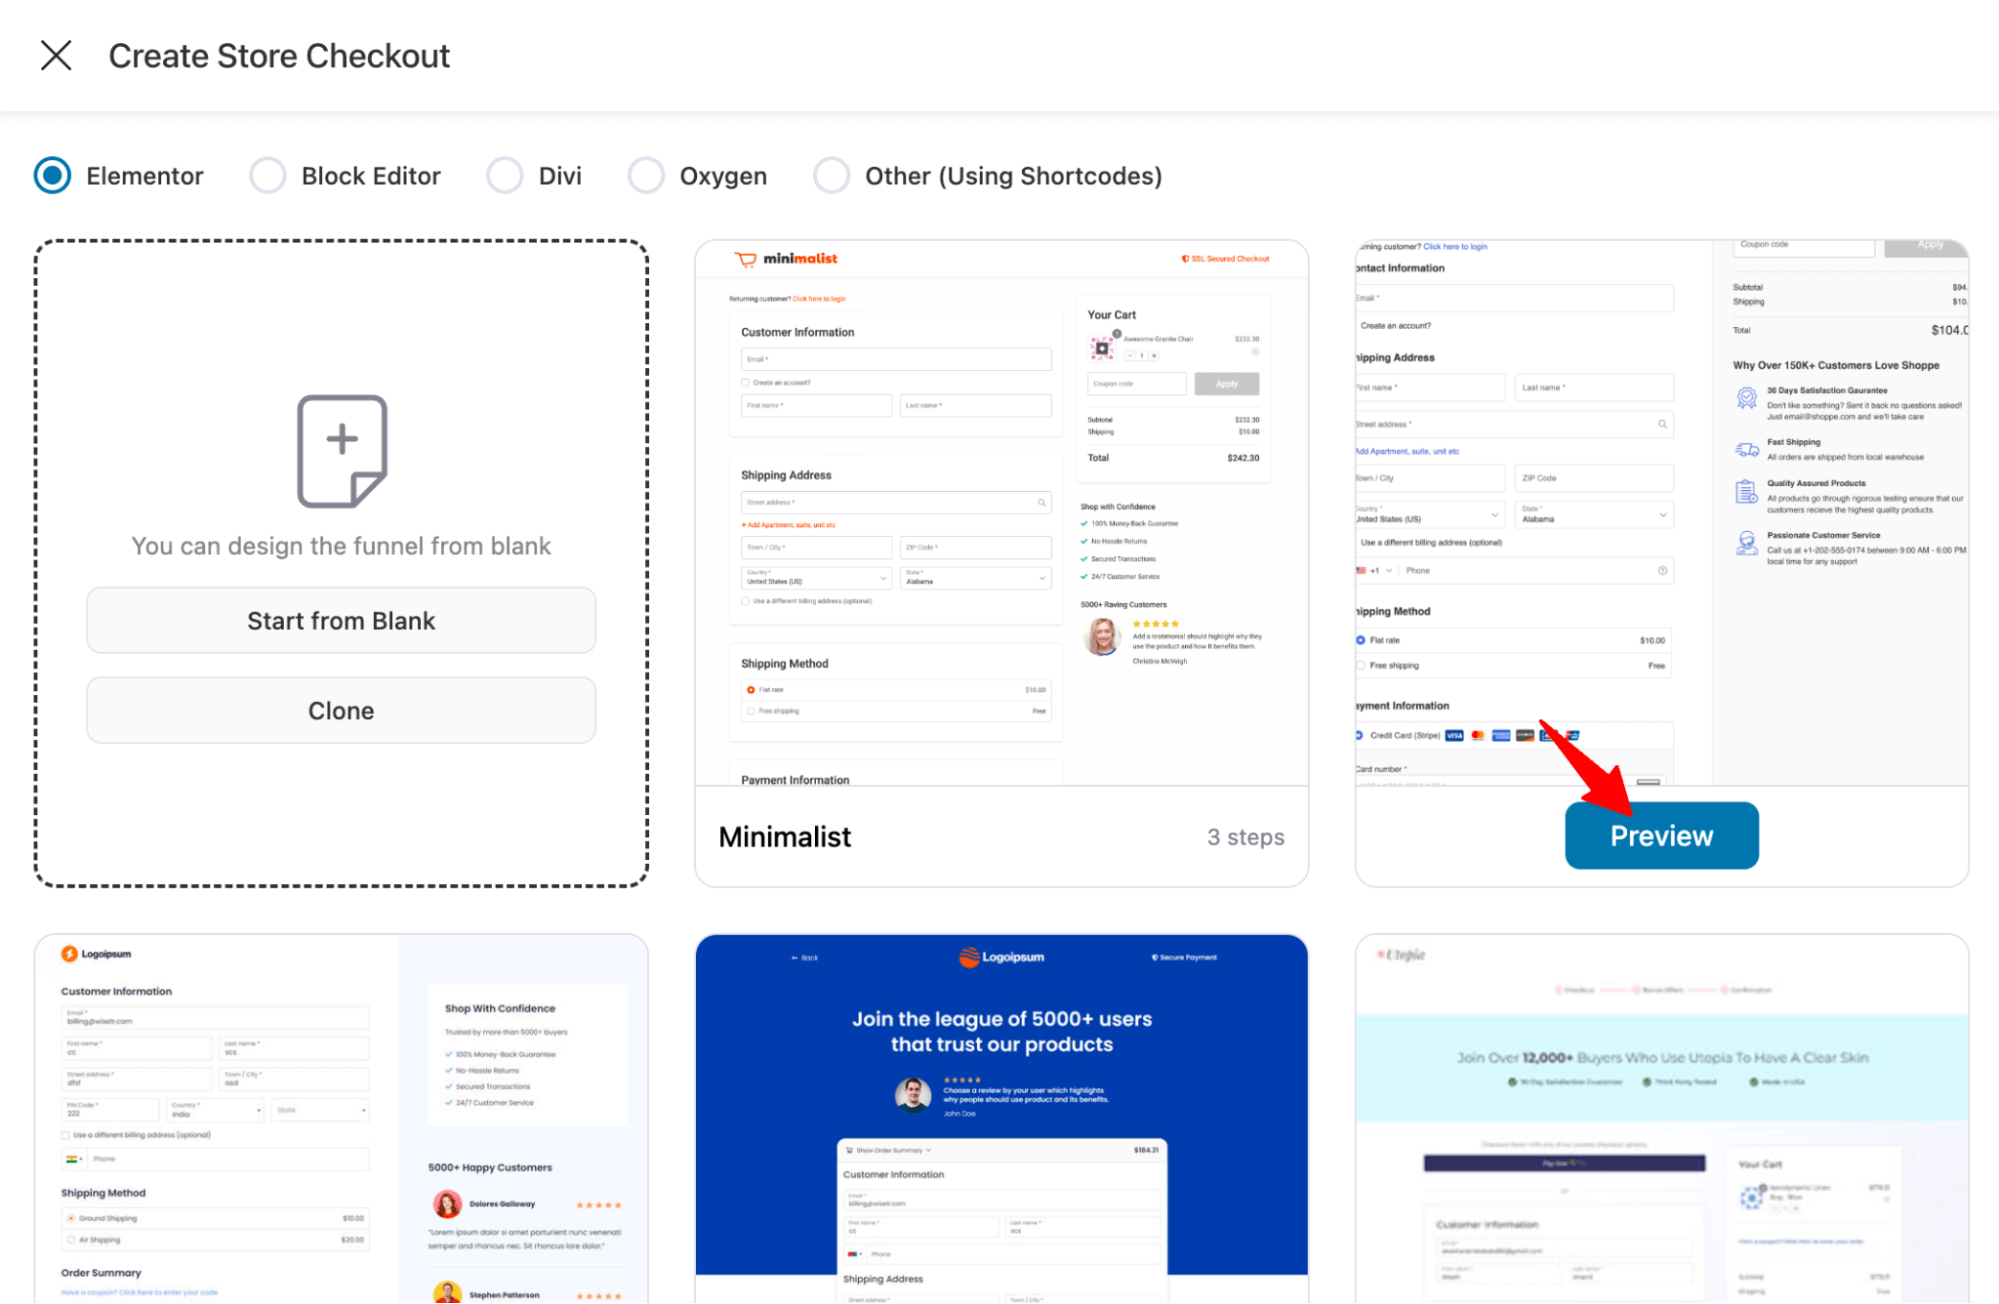
FunnelKit offers many pre-built templates for sales funnels and checkout pages.
Choose your favorite page builder. After that, hover over the template you want for your Global checkout and click on Preview. We are going with the Shoppe template here.
Now, choose whether you want a single-page checkout or a multi-page checkout. After that, click on “Import This Funnel,” provide a name, and click ‘Add’ to import this funnel as your default store checkout.
We are choosing a two-step checkout here.
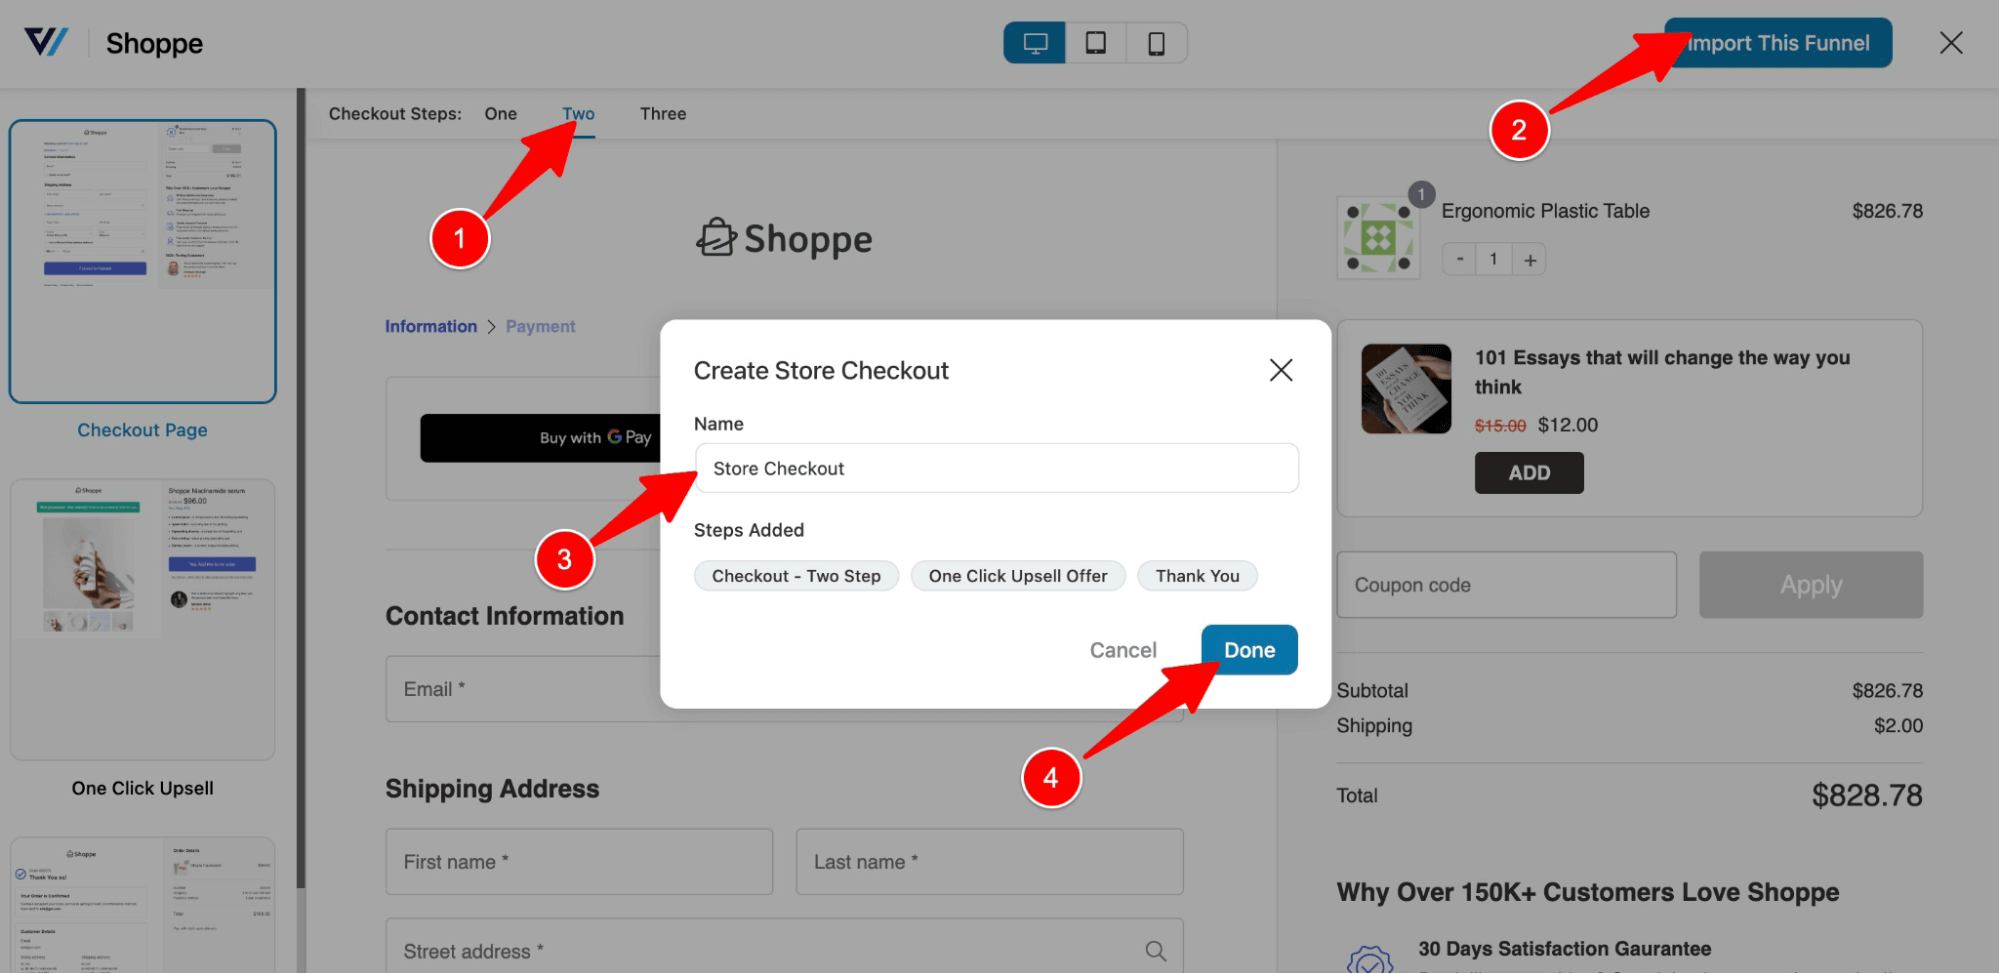
This will import a store checkout with two steps: Checkout, Upsell, and Thank you page.
Step 2: Create a custom checkout field
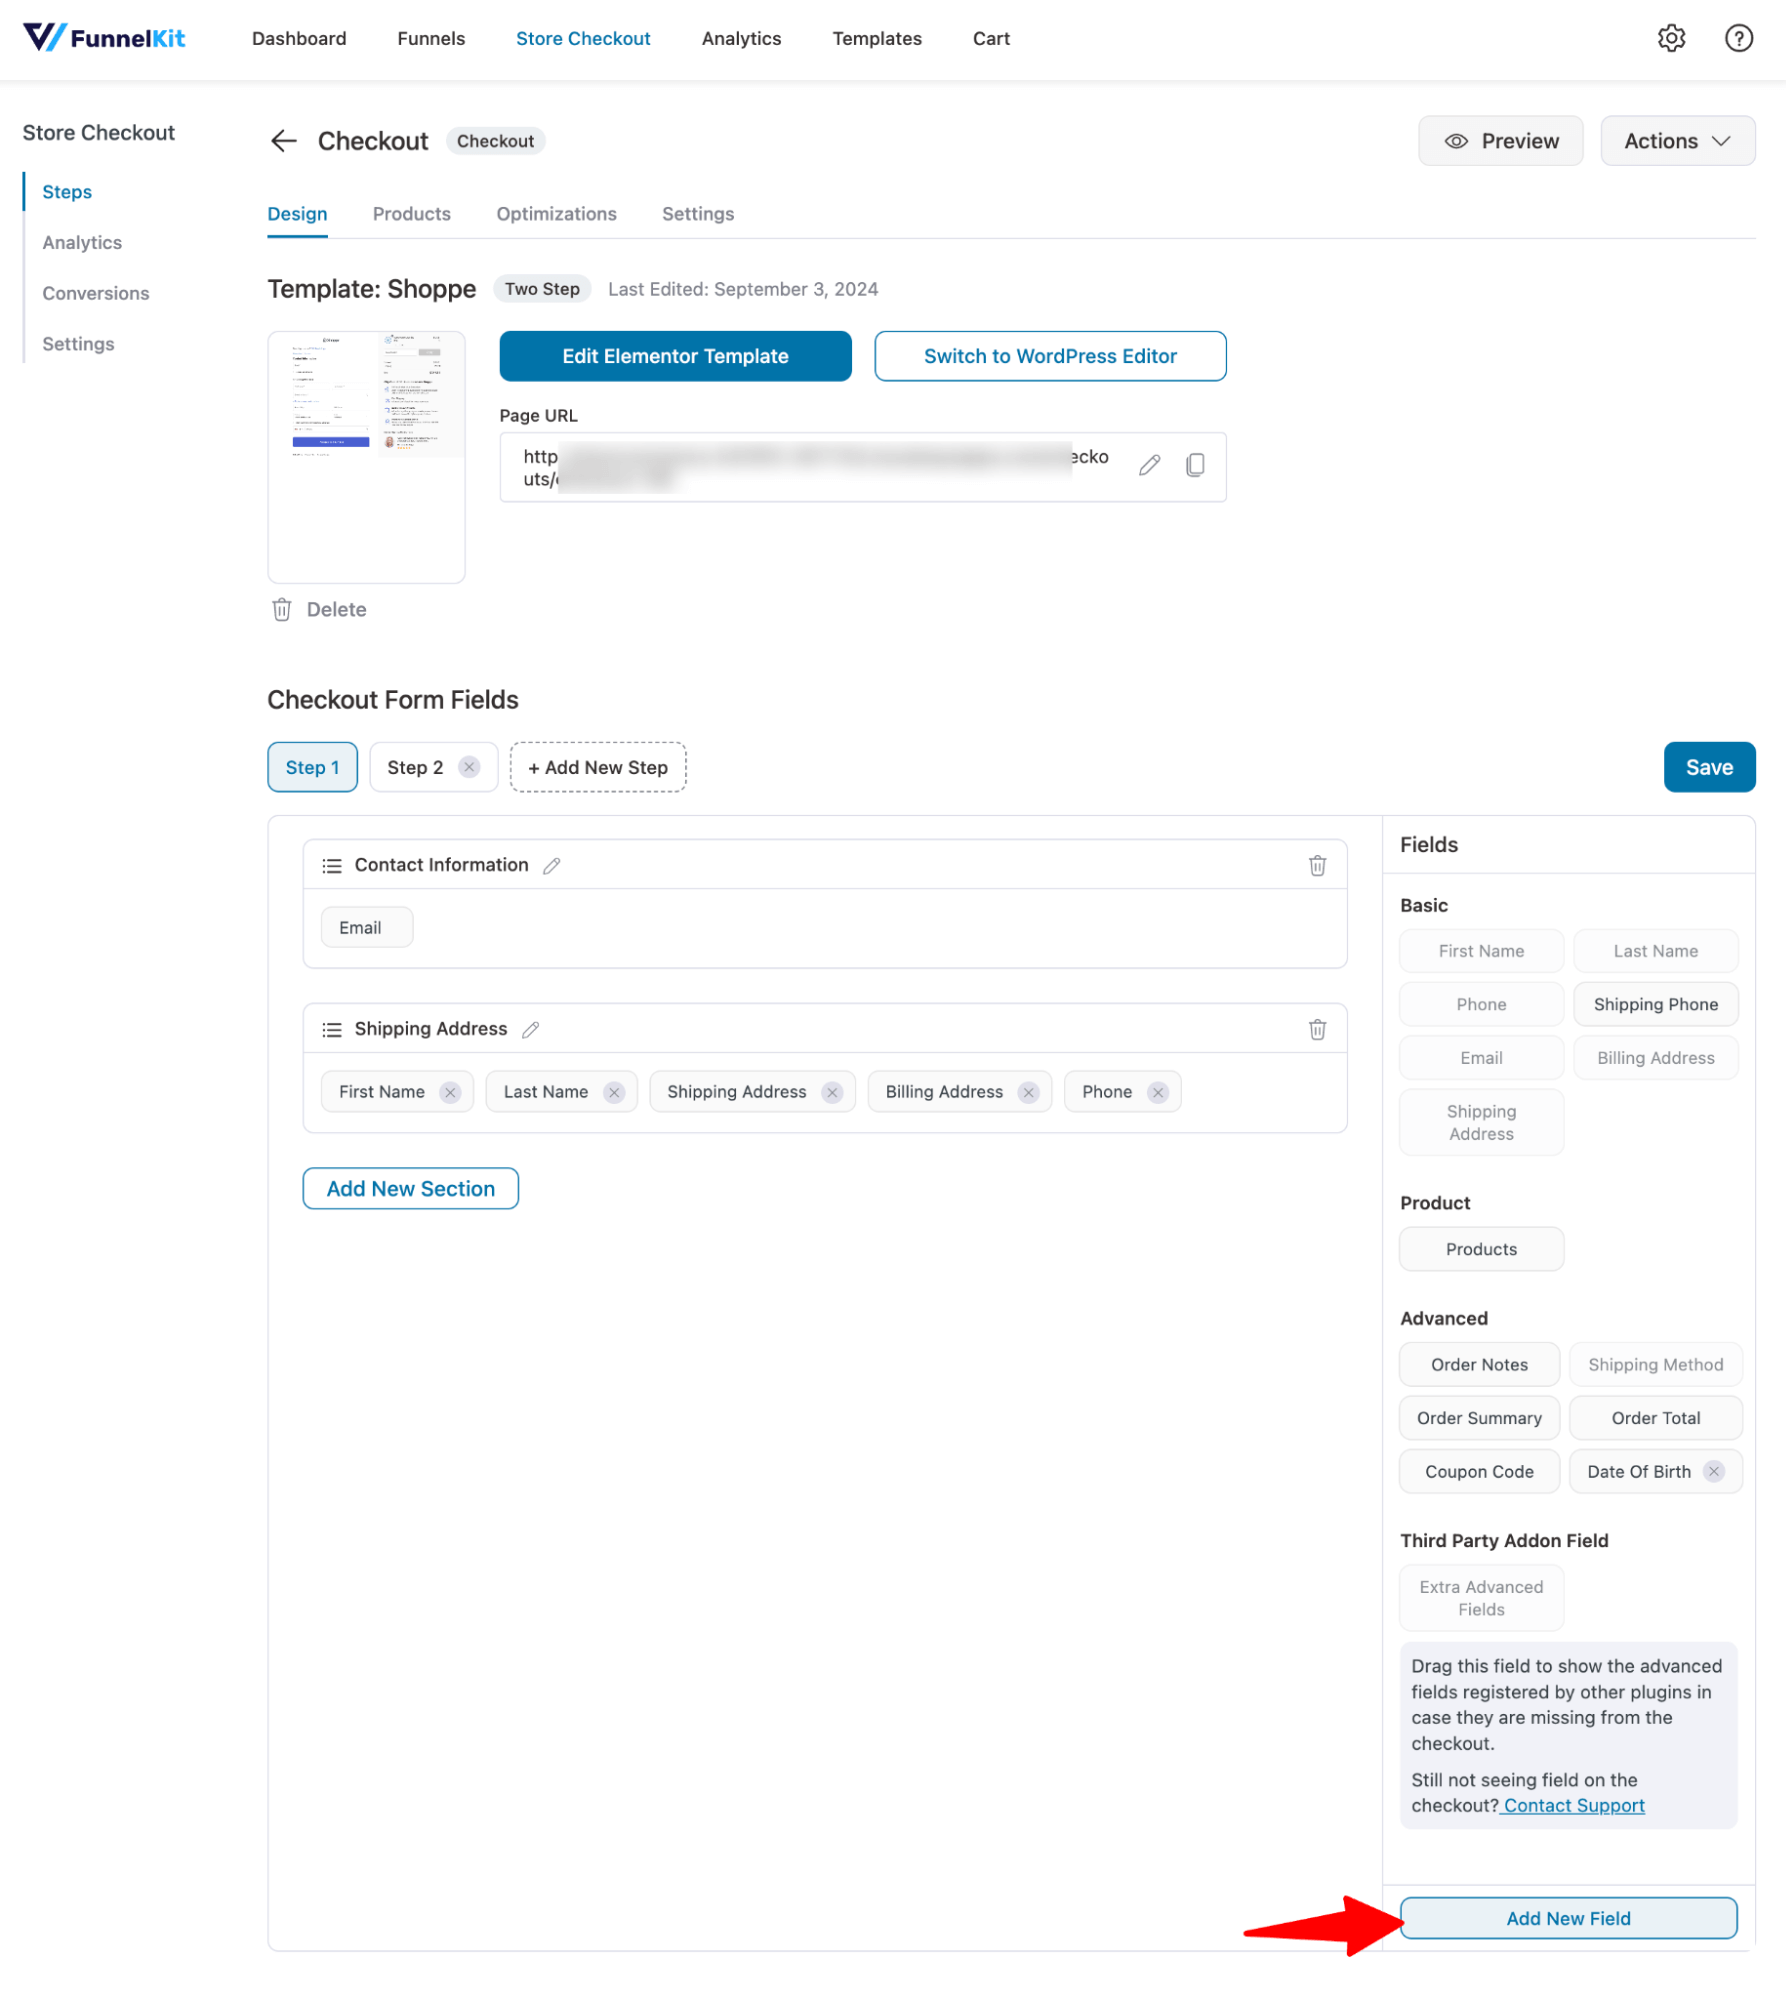
Now, to edit the WooCommerce checkout page and add a field, click on the “Checkout” step.
On the design tab, you can customize the design and content of the checkout page.
After customizing, scroll down to the “Checkout Form Fields” to create an extra field. You will find the default form fields have already been added to the checkout form.
To add a custom field, click on “Add New Field” under the Advanced section.
Here, you can create an extra custom checkout field. You can create different types of WooCommerce custom fields, such as:
- Single line text
- Checkbox
- Radio
- HTML
- Dropdown
- Select2
- Multi-select
- Paragraph text
- Number
- Telephone
- Hidden
- Password
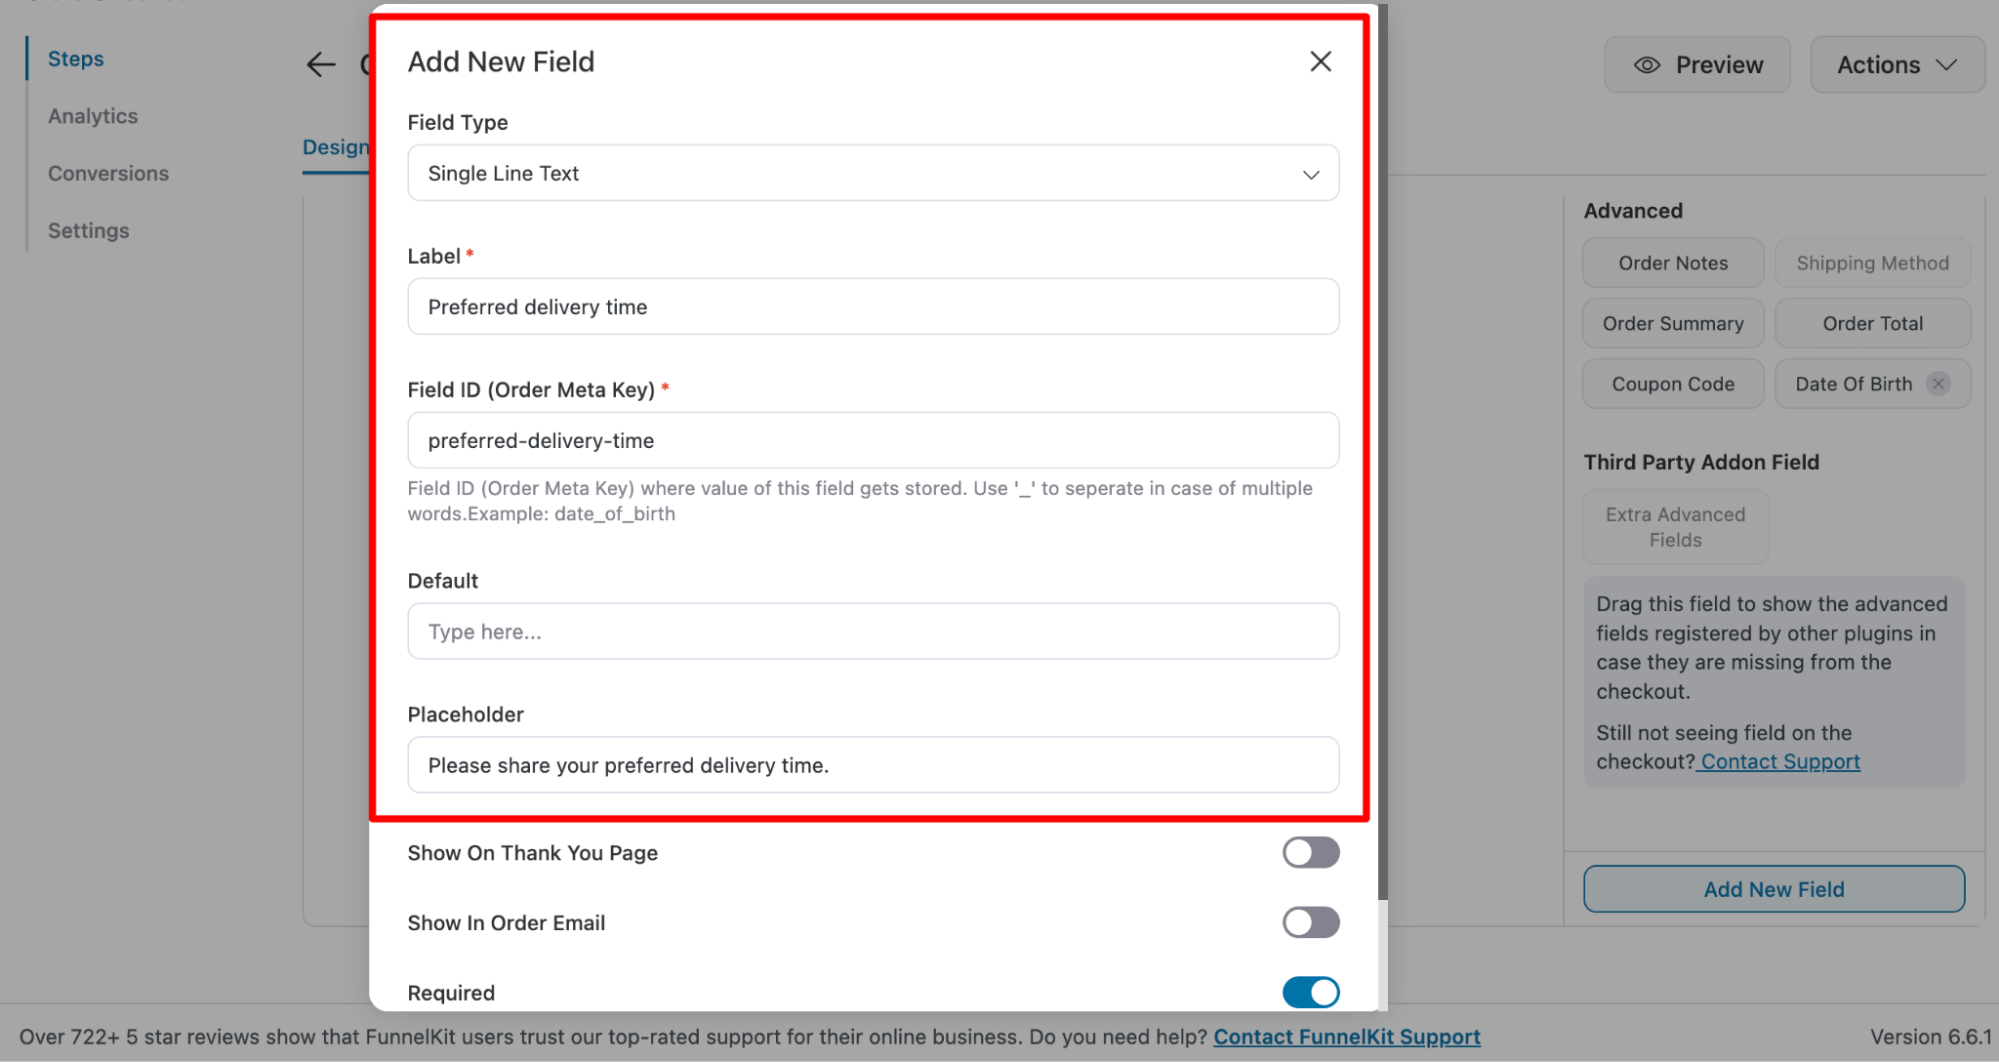
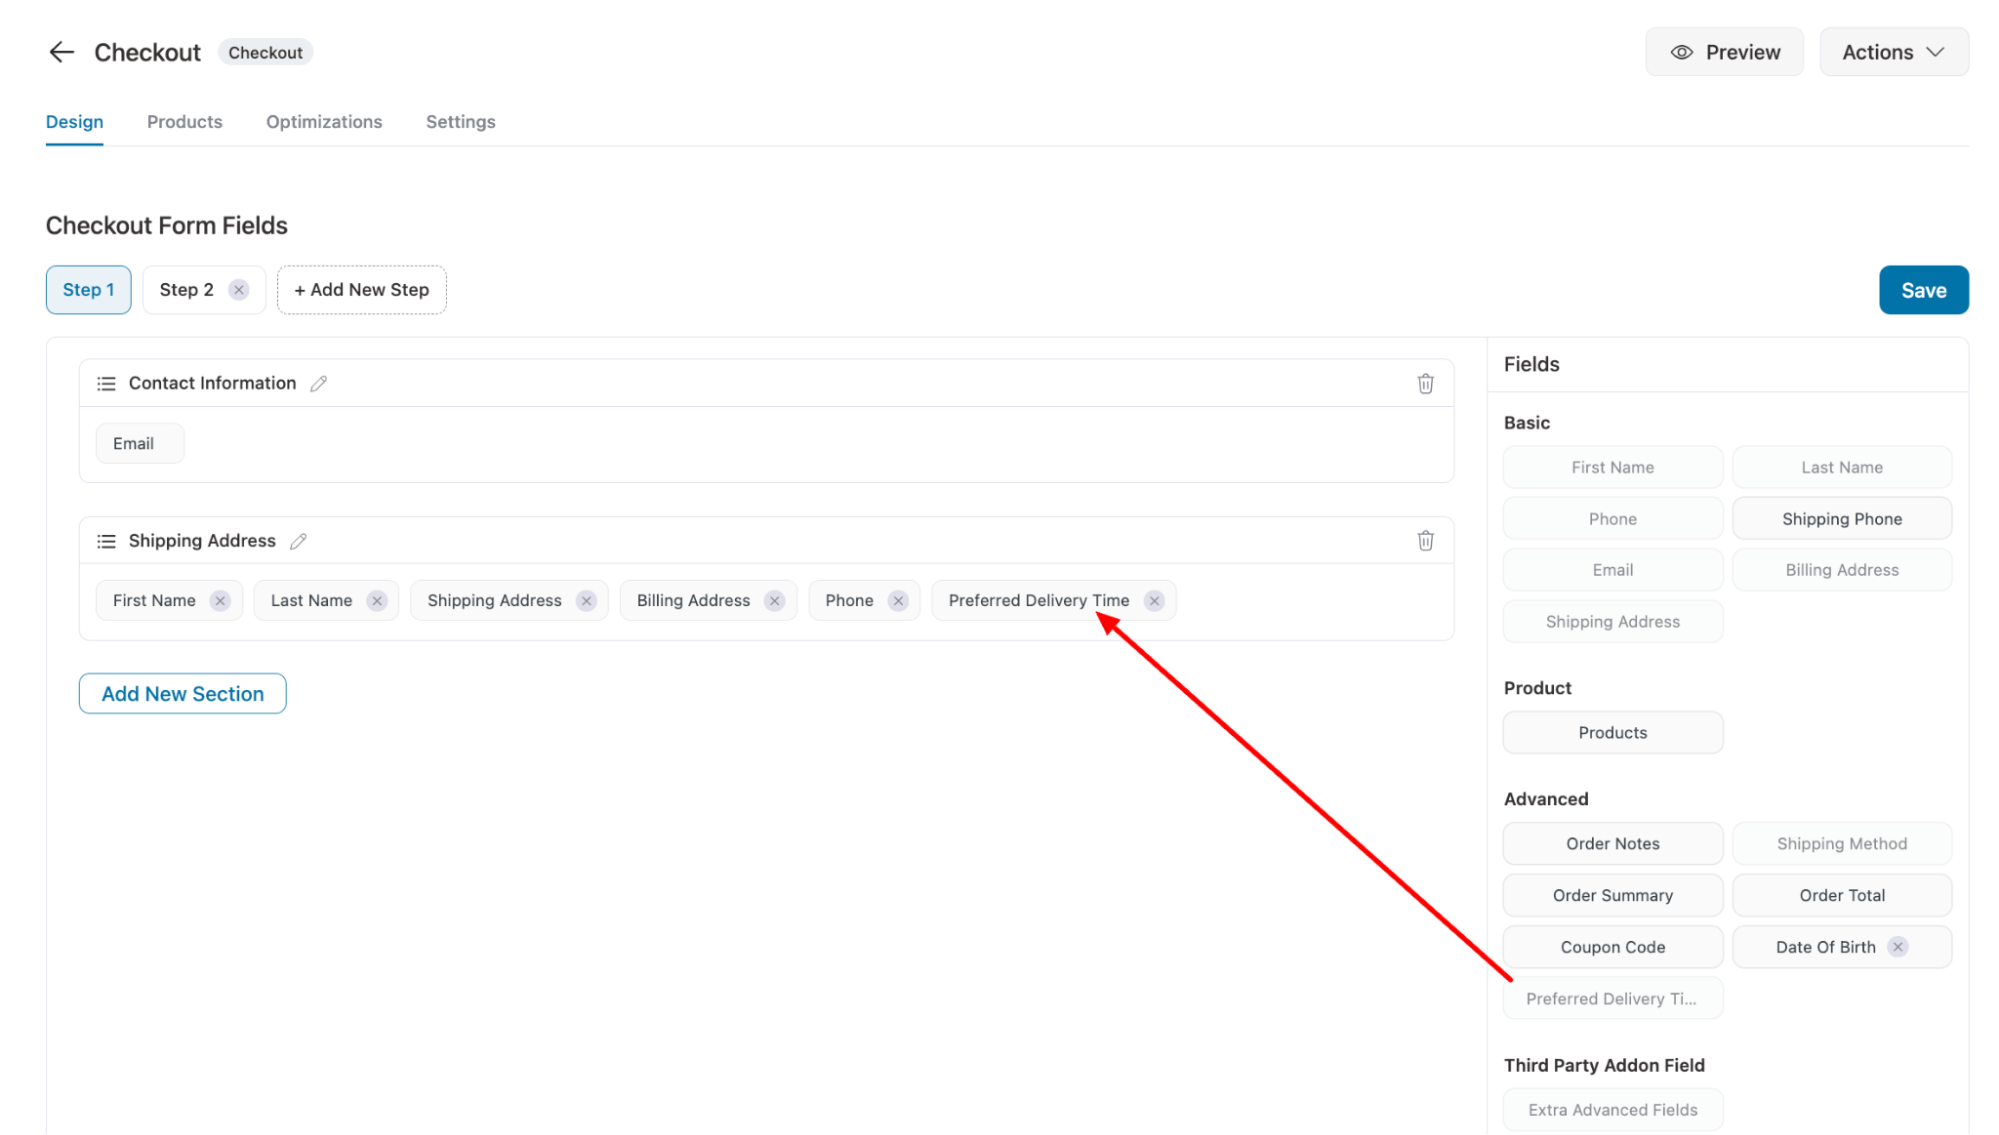
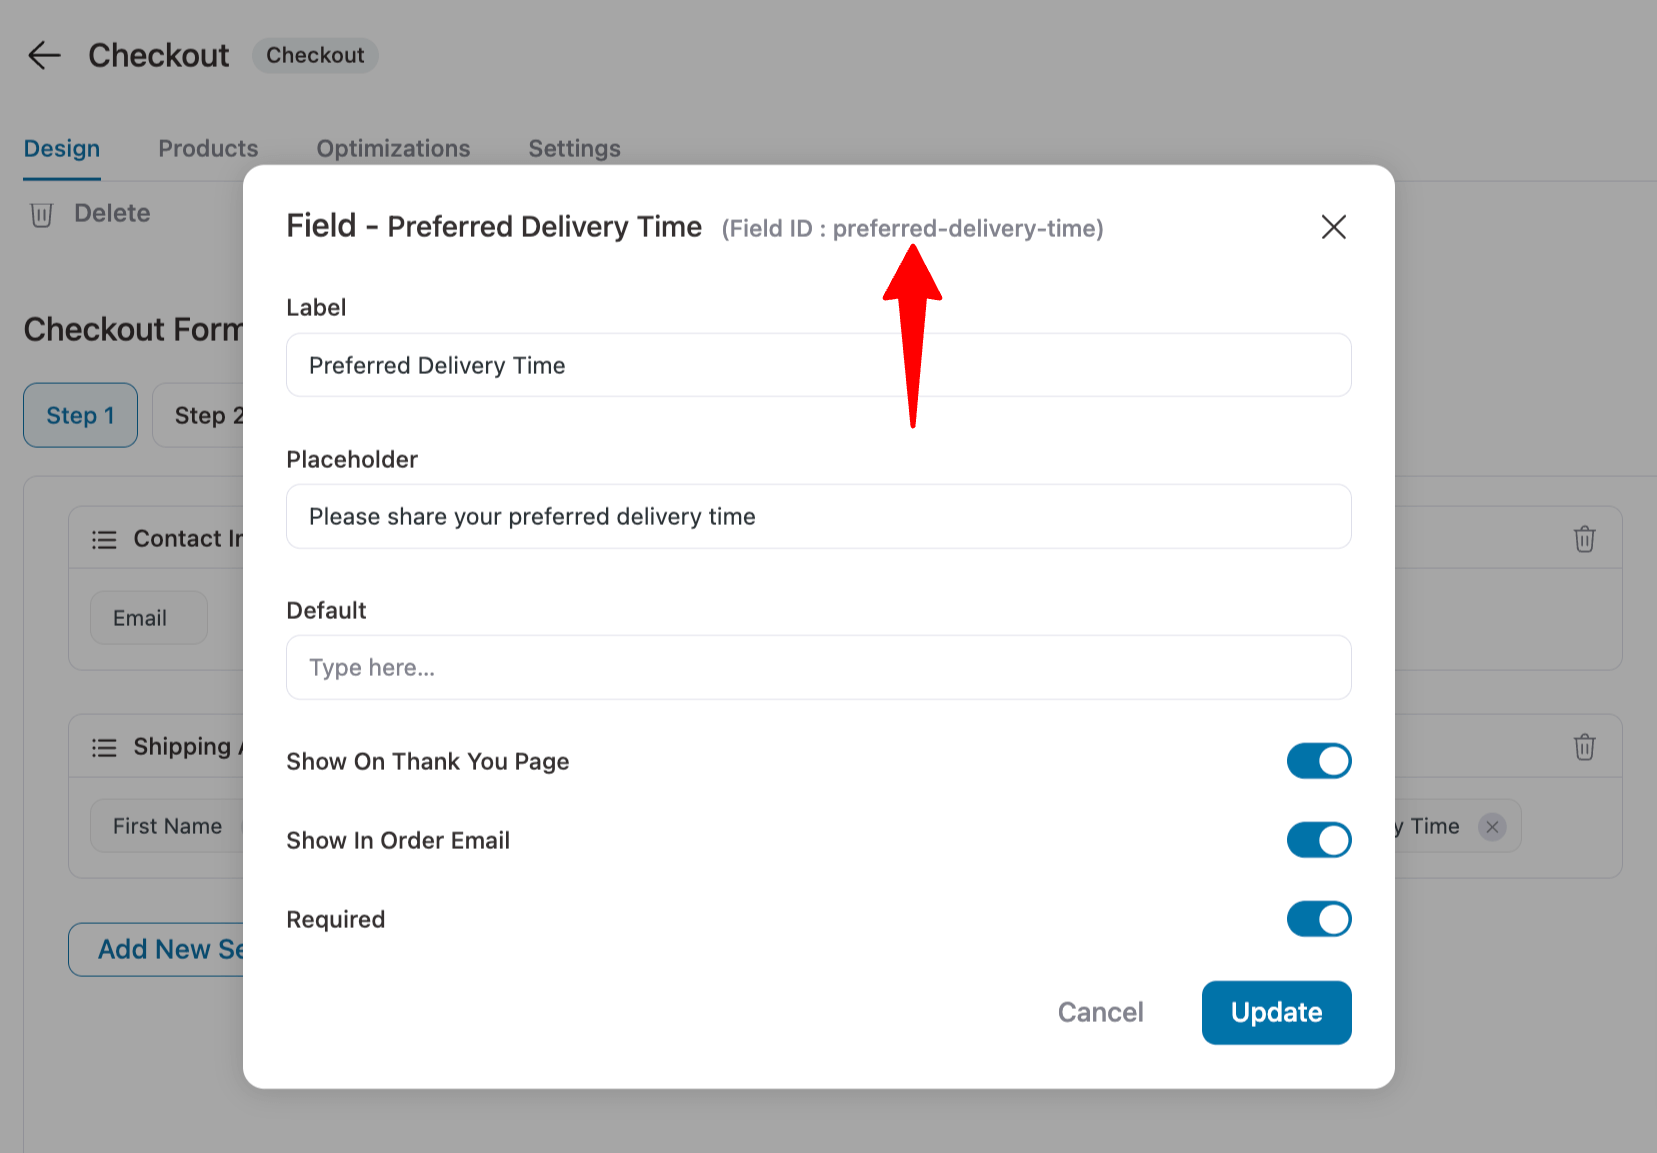
Here, for example, we will add a field to collect the preferred delivery time from the customer.
For this, provide the following information:
- Field Type: Choose the input type. Here, we are going with one-line text.
- Label: Provide a label for the custom field.
- Field ID (Order Meta Key): Enter a field ID to store the value. You can use '_' to separate in case of multiple words.
- Default: You can add a default value. We are leaving this blank as we want users to provide the value.
- Placeholder: Enter a placeholder to guide the user about what to share.
Step 3: Add a custom field to the WooCommerce email
Now, turn the toggle option for “Show In Order Email” to ensure that the custom field you created to collect additional information will be added to WooCommerce emails.
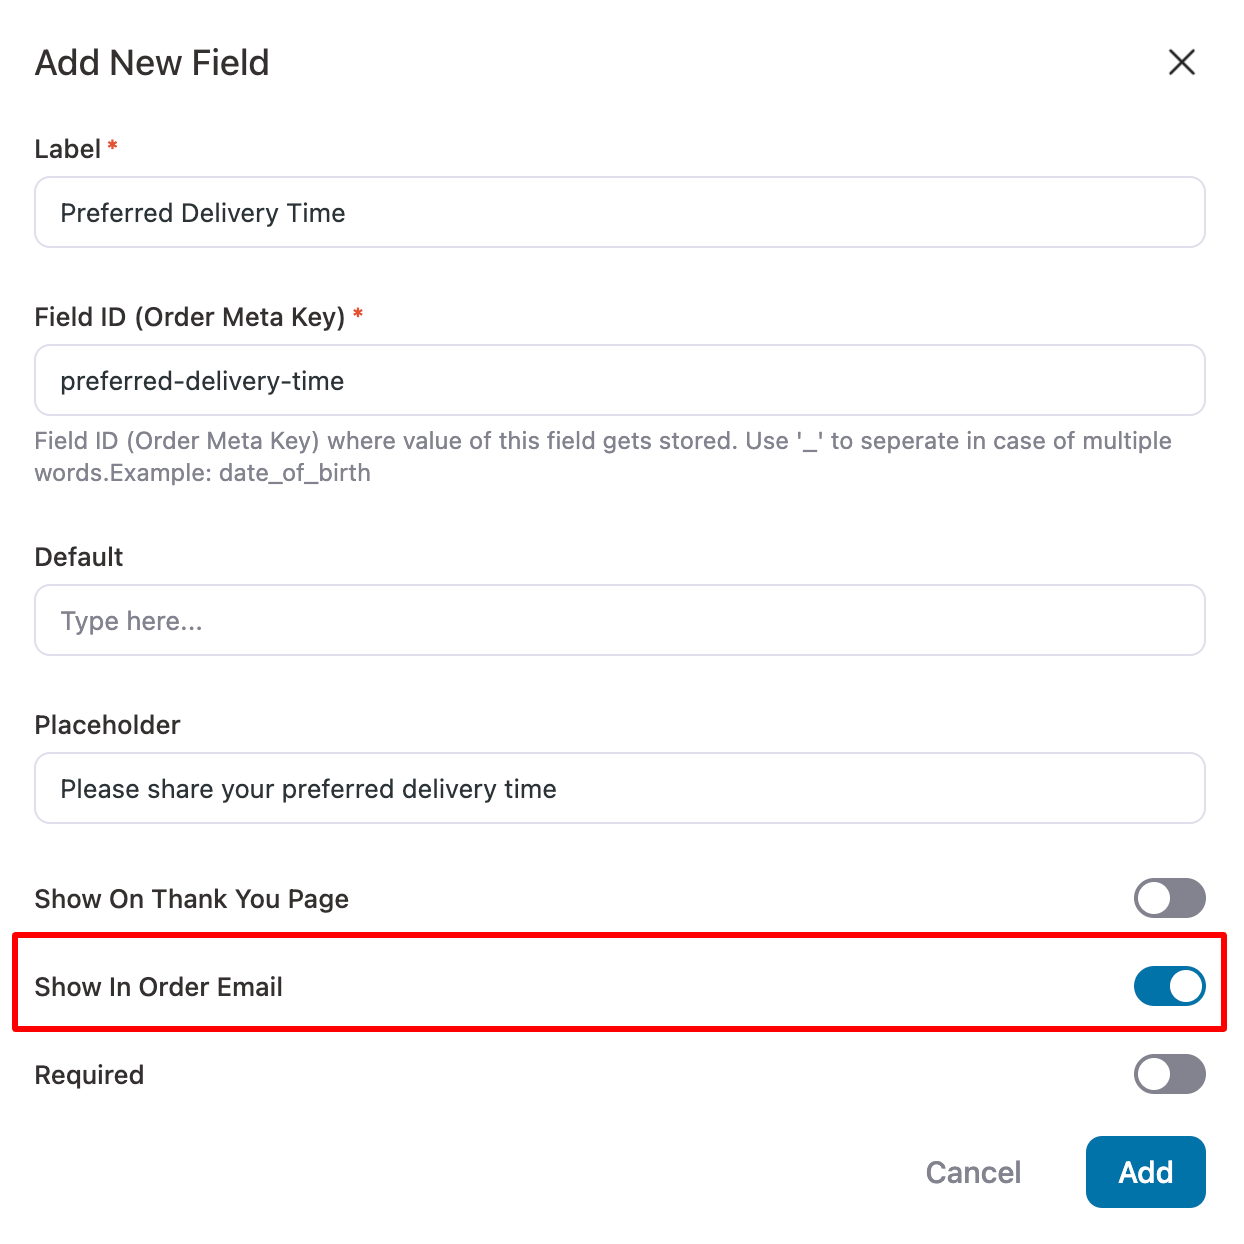
If you want to add it to the thank you page, then turn on the toggle for “Show on Thank you page.” To make it a required field at checkout, turn on the required option.
Make sure to hit “Add”.
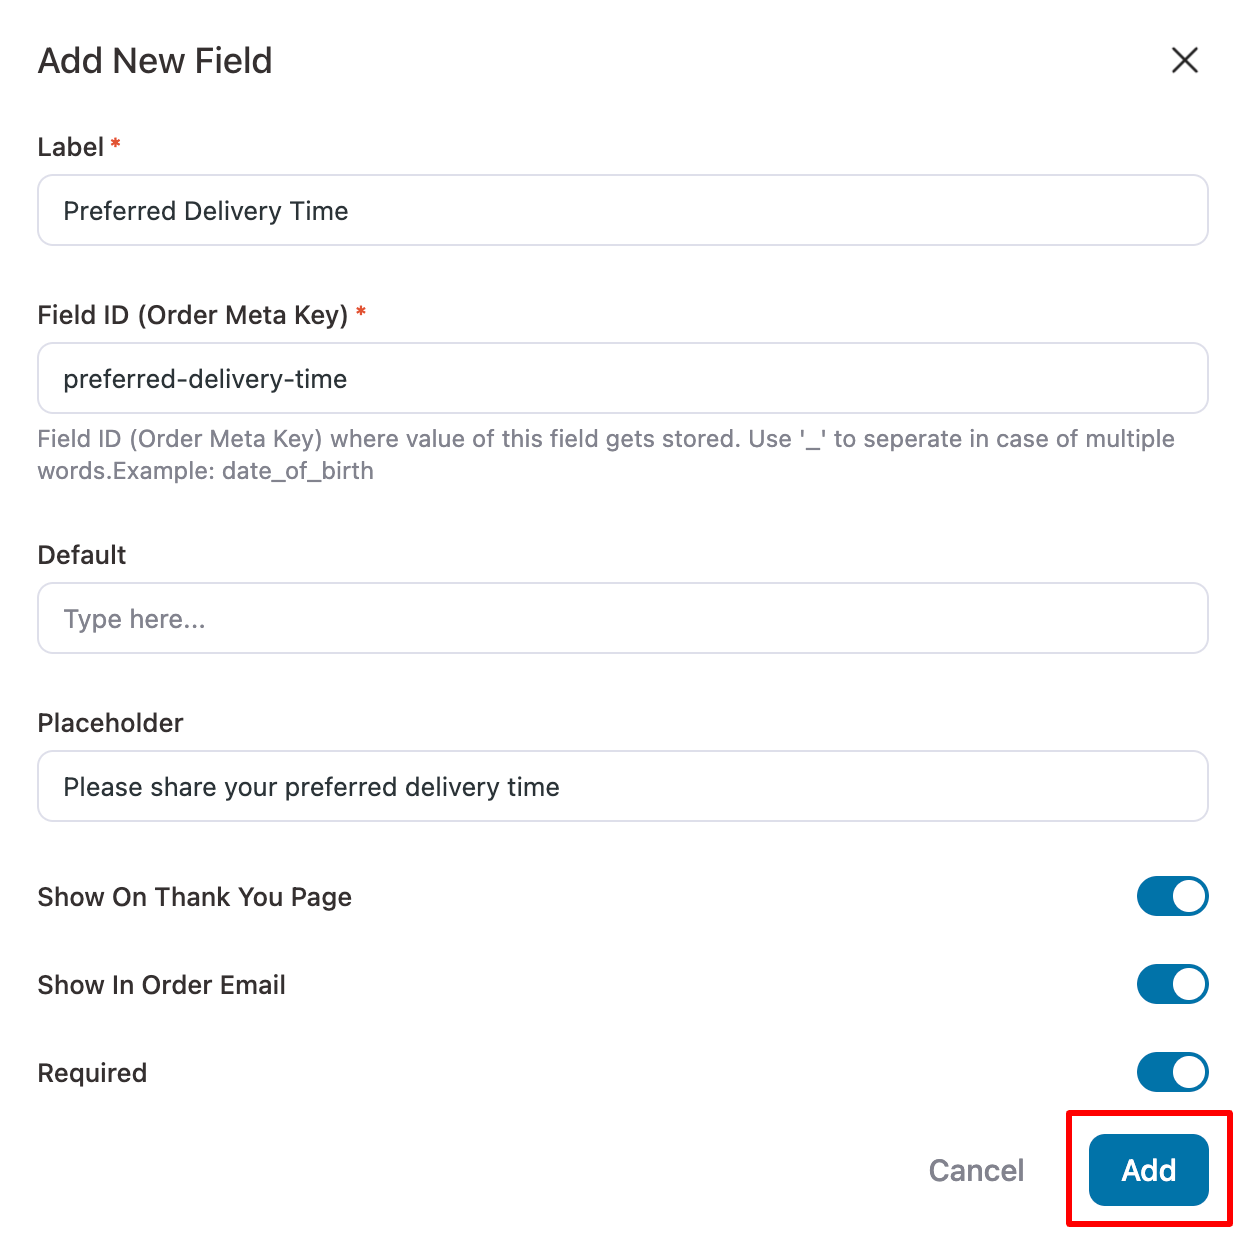
This will add the field to the Advanced section.
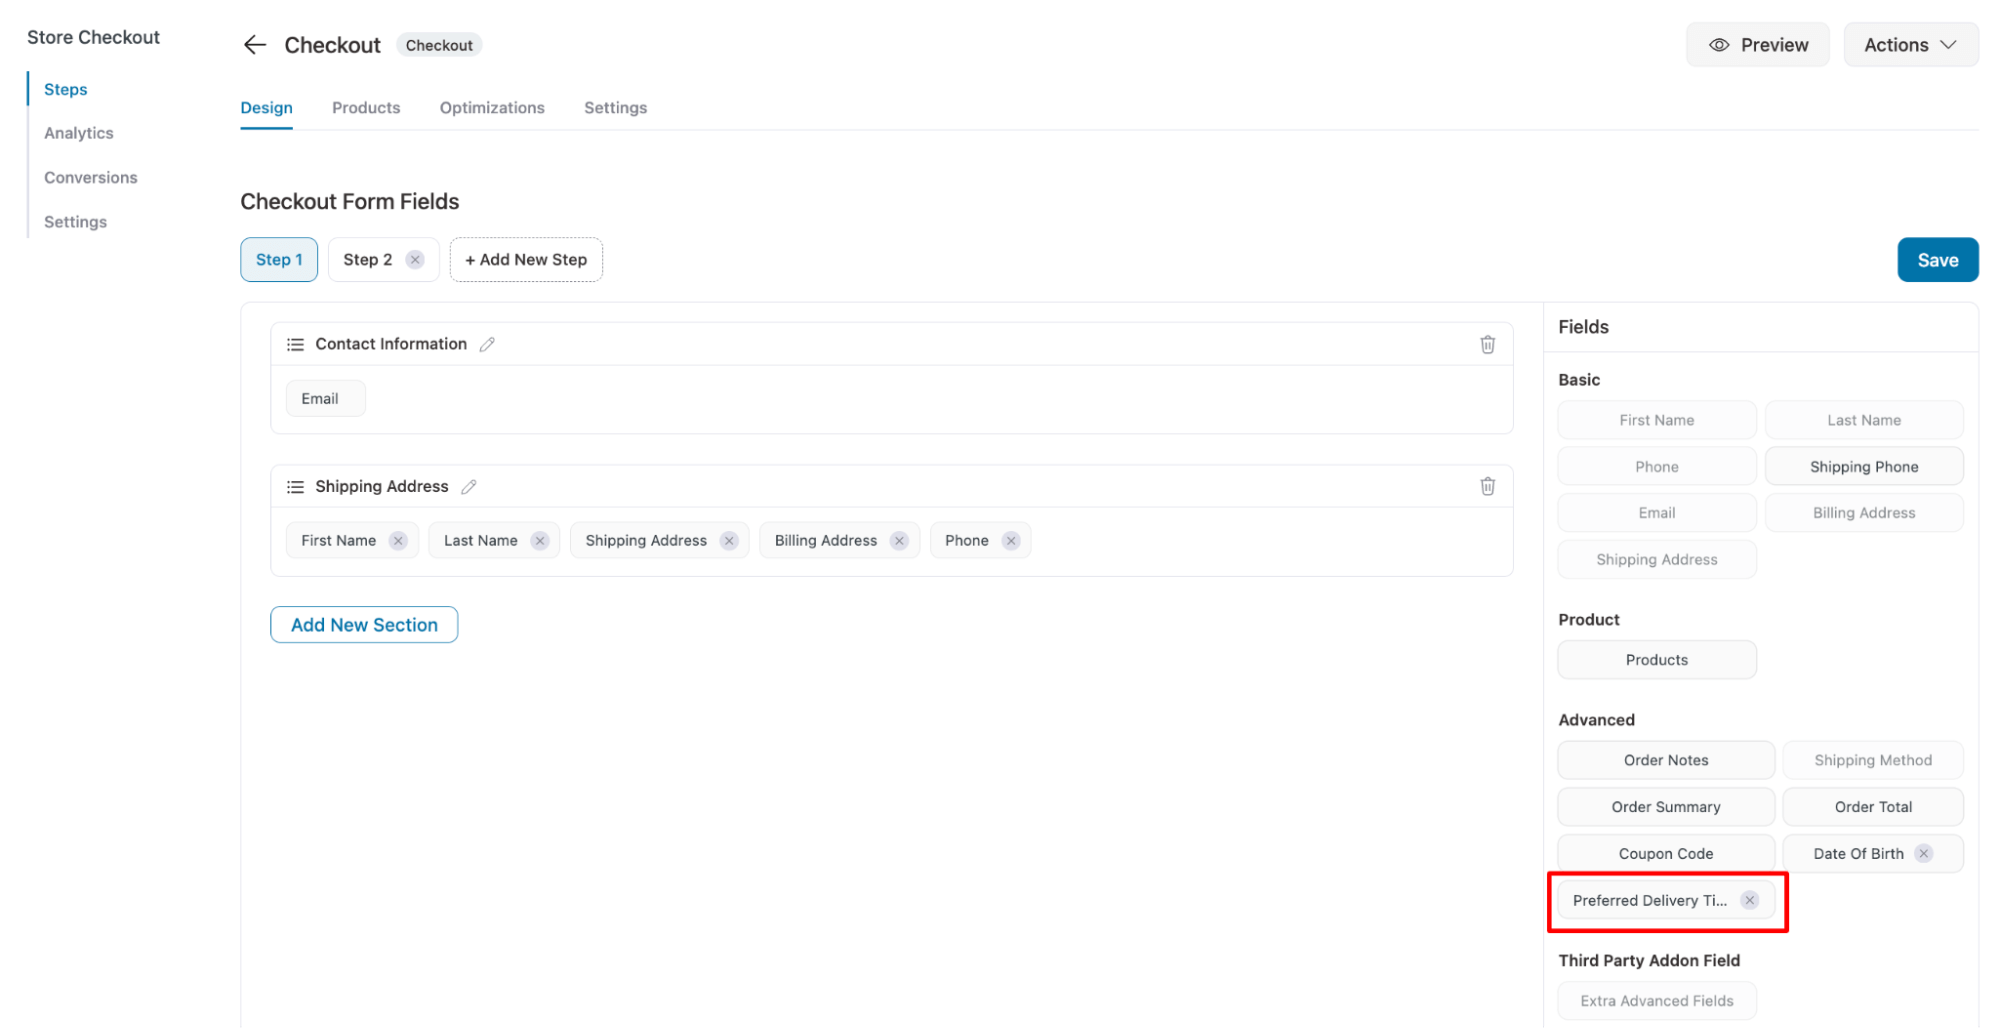
Step 4: Add a custom field to WooCommerce checkout
Now, drag and drop the newly created field to the checkout form.
Make sure to save the changes.
👉 For more details, read our blog on how to add custom fields to checkout.
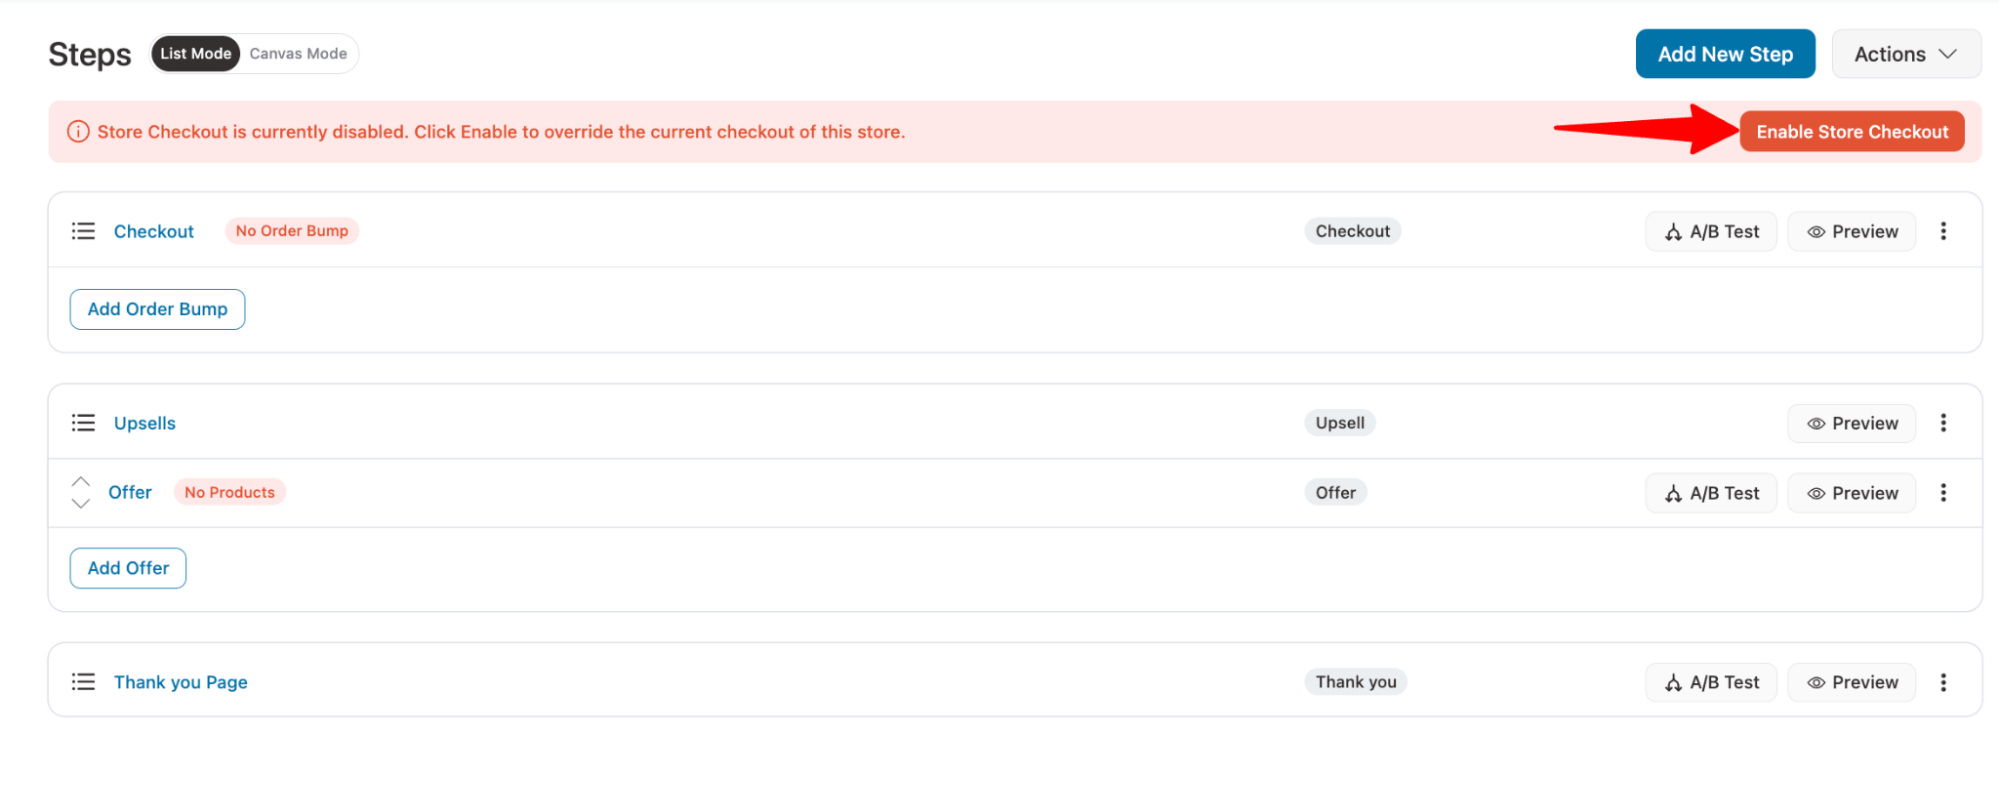
Step 5: Enable store checkout
Finally, you now need to enable store checkout.
Step 6: Place a test order
Now, place a test order and make sure to fill out the custom field.

Now, check the order confirmation email in your inbox and the email should contain the custom field.
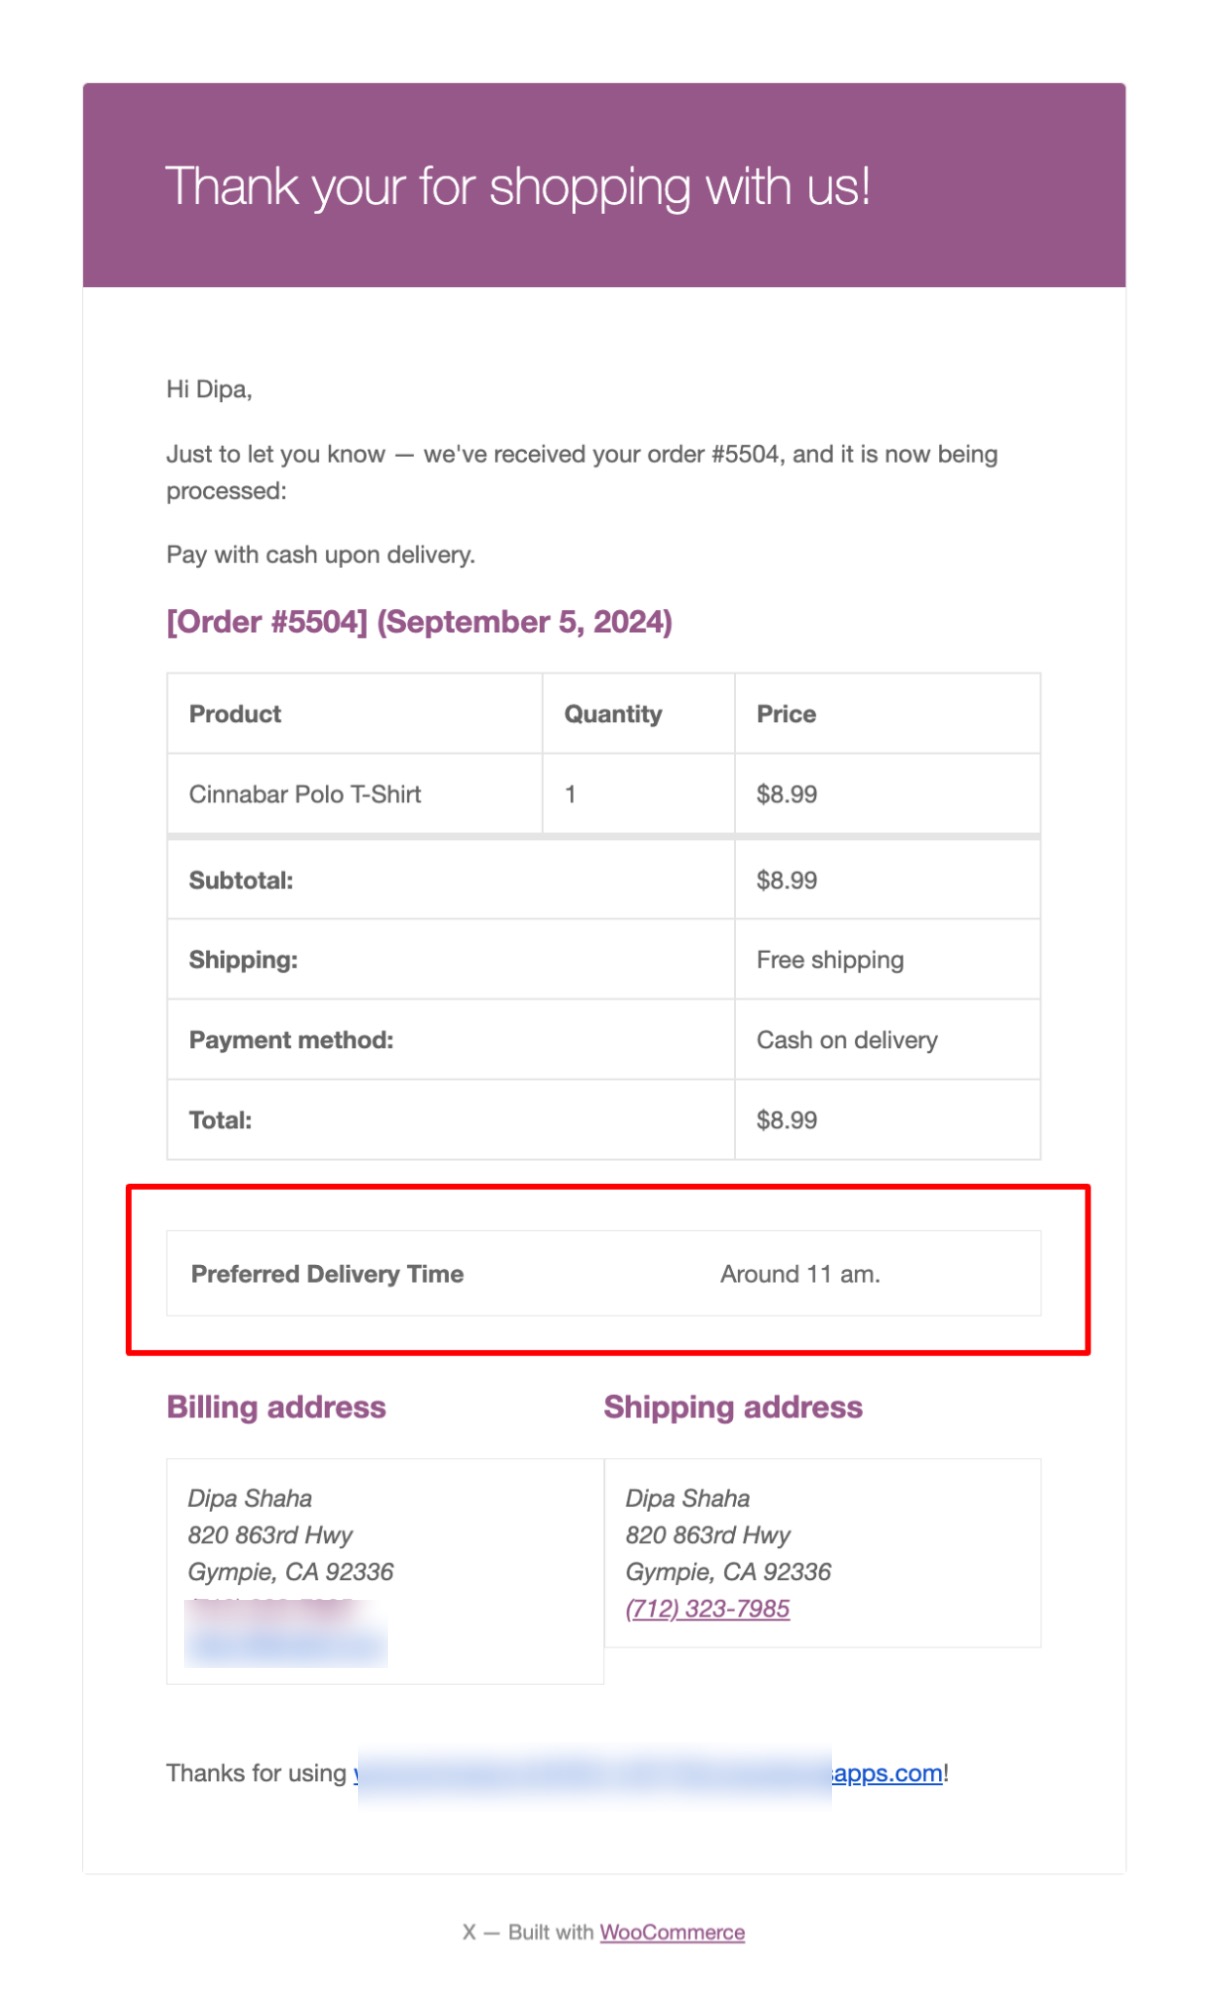
That’s it. This is how you can add custom field formation collected at checkout to your WooCommerce default emails.
However, if you want to add other types of custom fields, like discount codes, shipping policies, social icons, etc., then you need to customize the default emails.
Move to the next section to find out the process.
How to Customize and Add Custom Fields to WooCommerce Email?
To customize the default WooCommerce order emails, we will use FunnelKit Automations.
This powerful marketing automation tool allows you to replace the default WooCommerce emails with fully customizable ones.
You can customize all the default emails, such as order confirmations, order failed emails, shipment emails, and others. In addition to customizations, you can add custom fields to your emails.
🔔 Note: In this guide, we’ll demonstrate how to add a custom field to the WooCommerce order confirmation email. You can follow the same steps for all order emails.
Before moving on to the main process, install and activate FunnelKit Automations.
Now follow these steps:
Step 1: Disable the default WooCommerce email
We will disable the default email and then create automation to send customized emails.
To disable any of the WooCommerce default emails, navigate to the WooCommerce ⇒ Settings ⇒ Emails tab and click on the go to manage option for the email you want to disable.
Then, uncheck the option that says “Enable this email notification.” Here, we are going to disable order confirmation, aka processing order email.
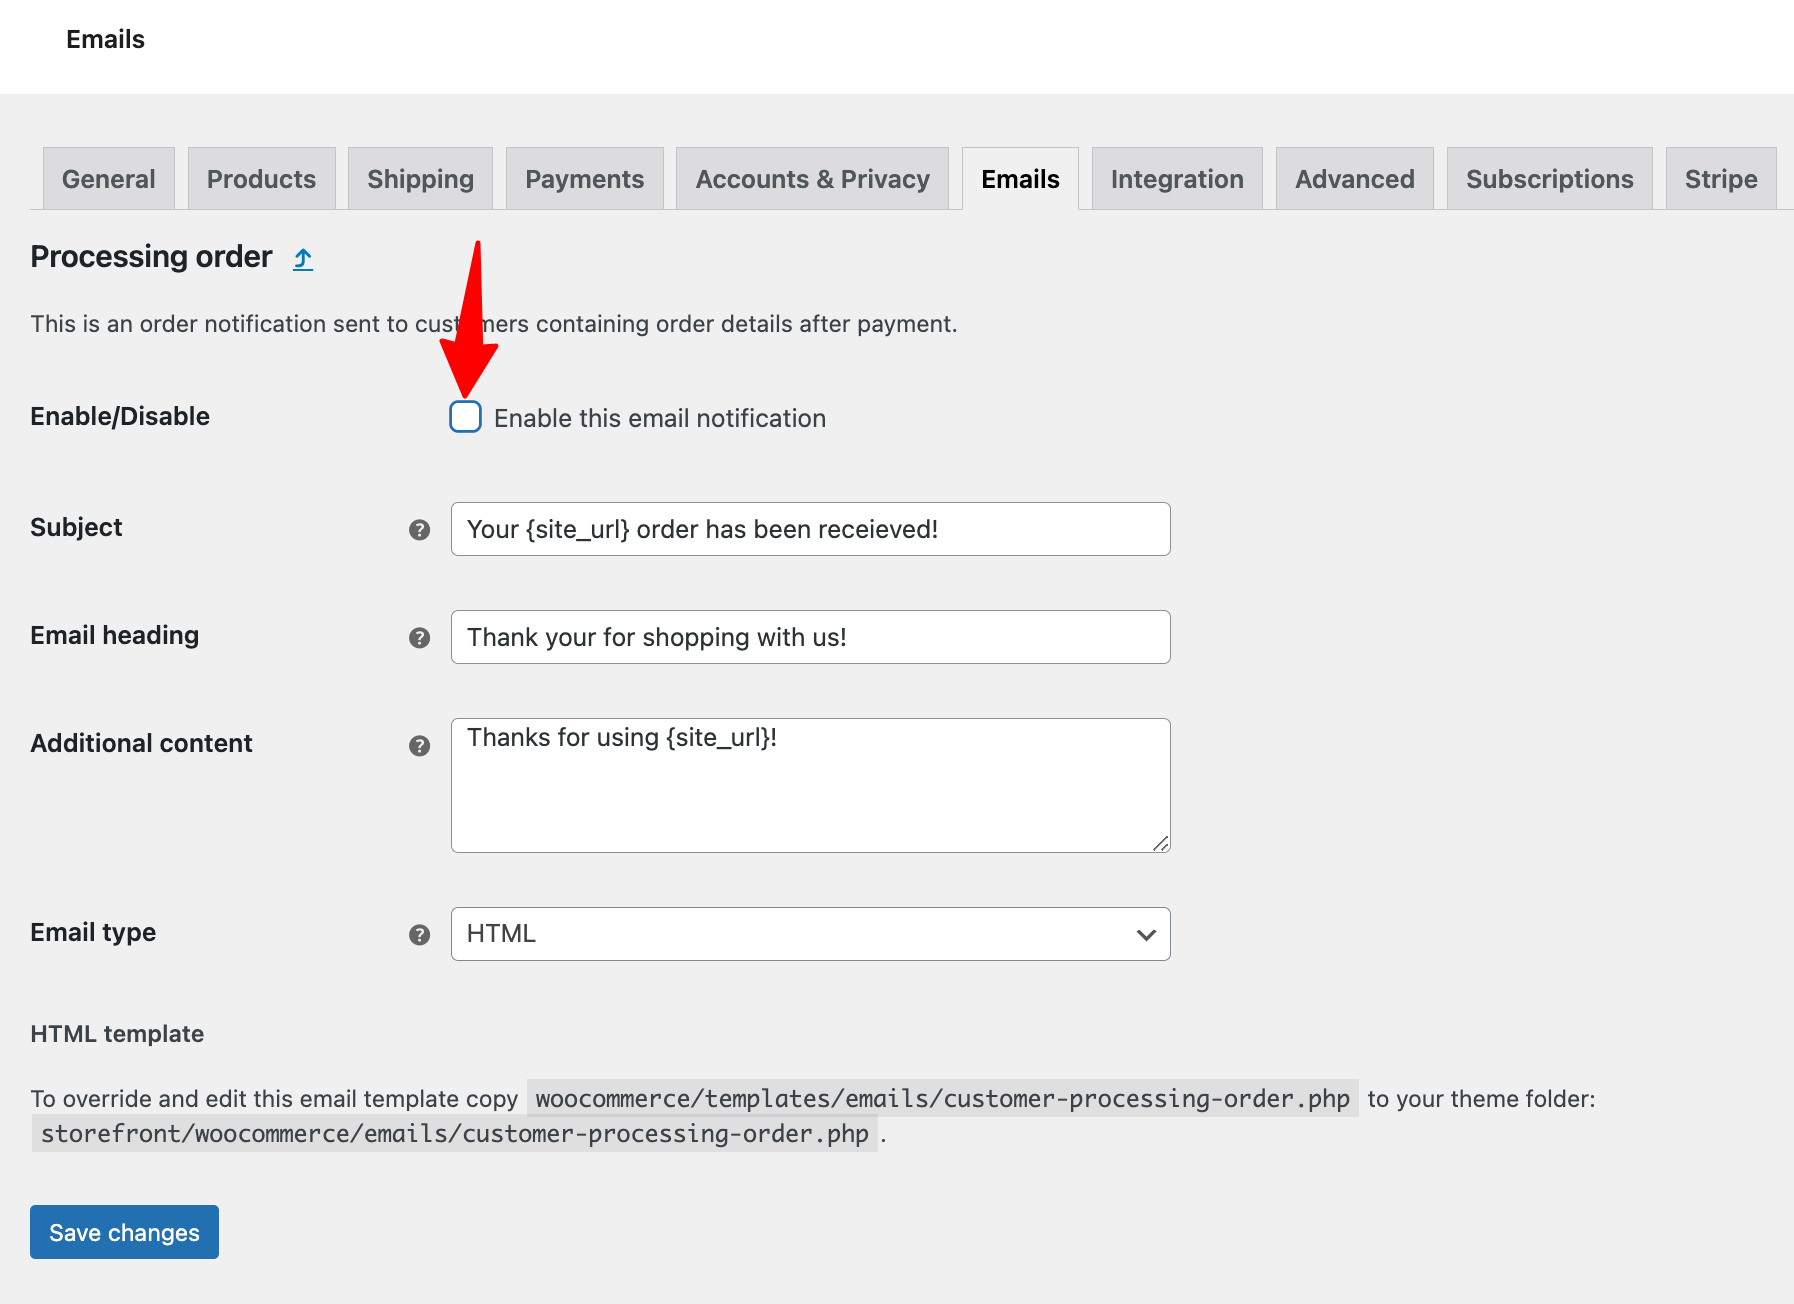
Make sure to hit save changes.
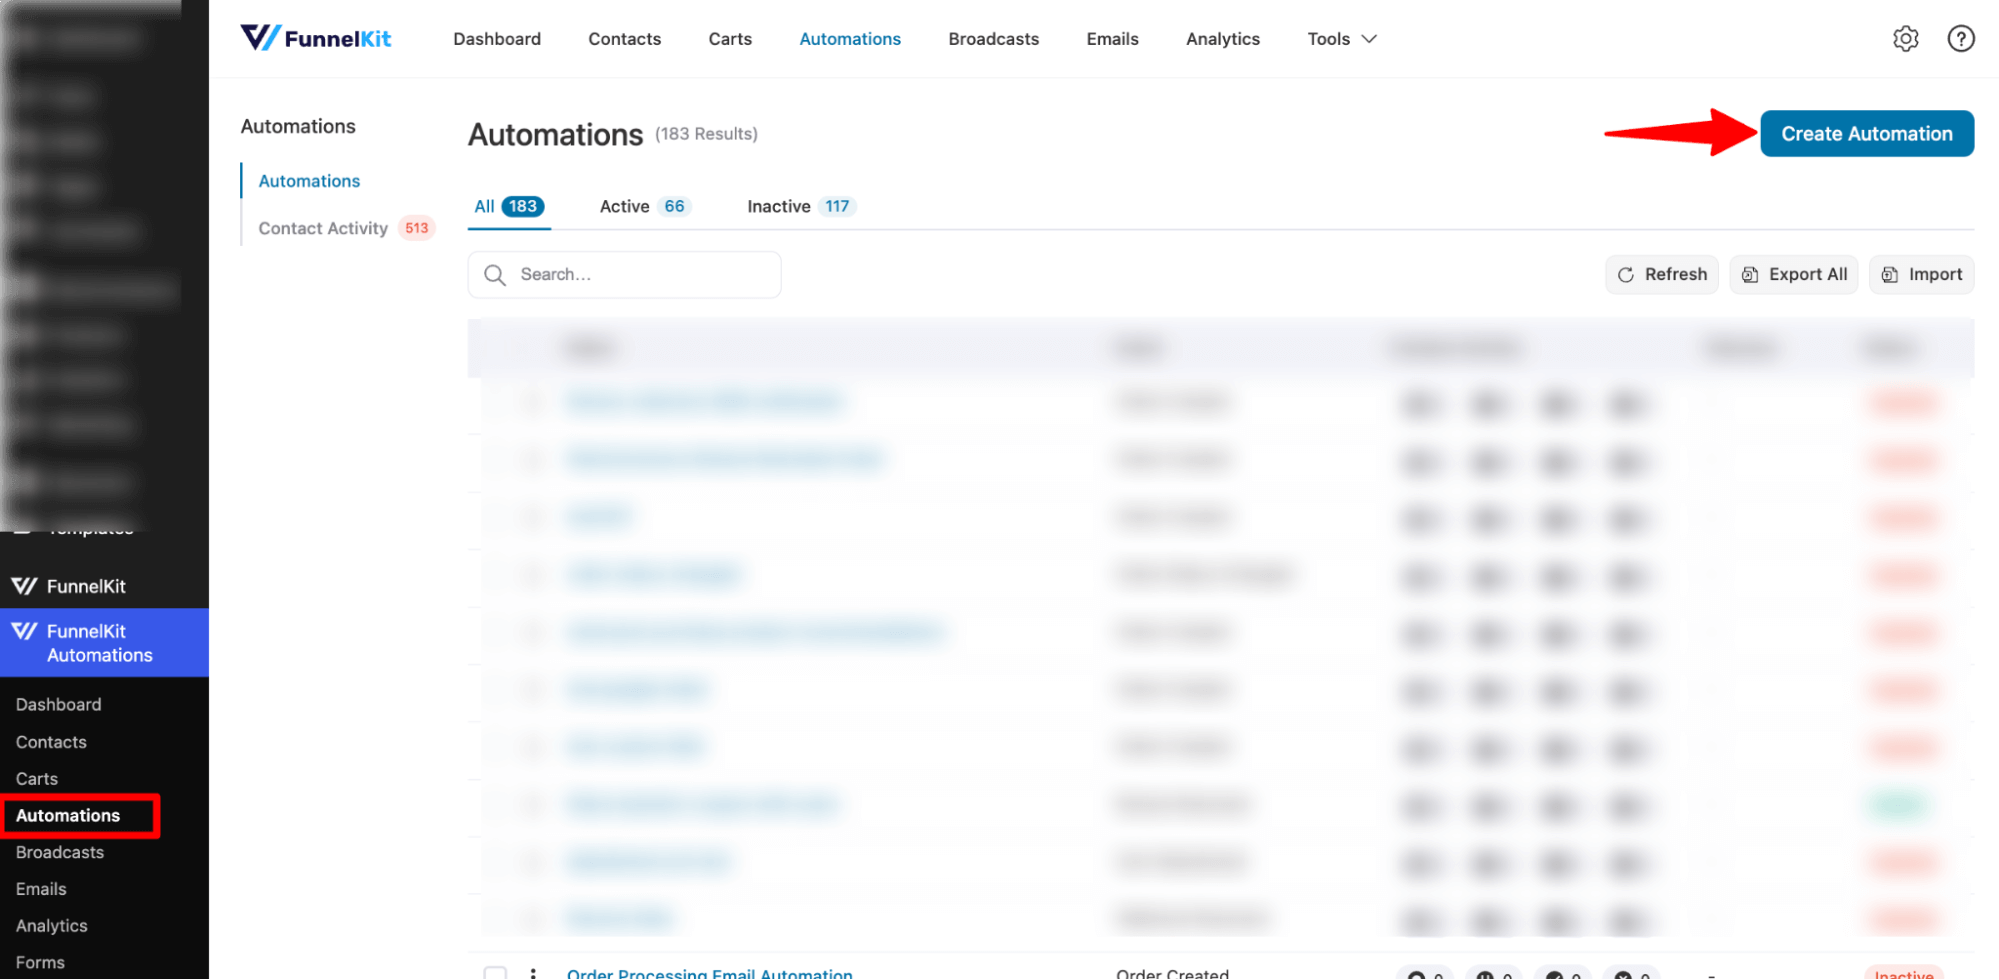
Step 2: Add new automation
For that, navigate to FunnelKit Automations ⇒ Automations and then click on Create Automation.
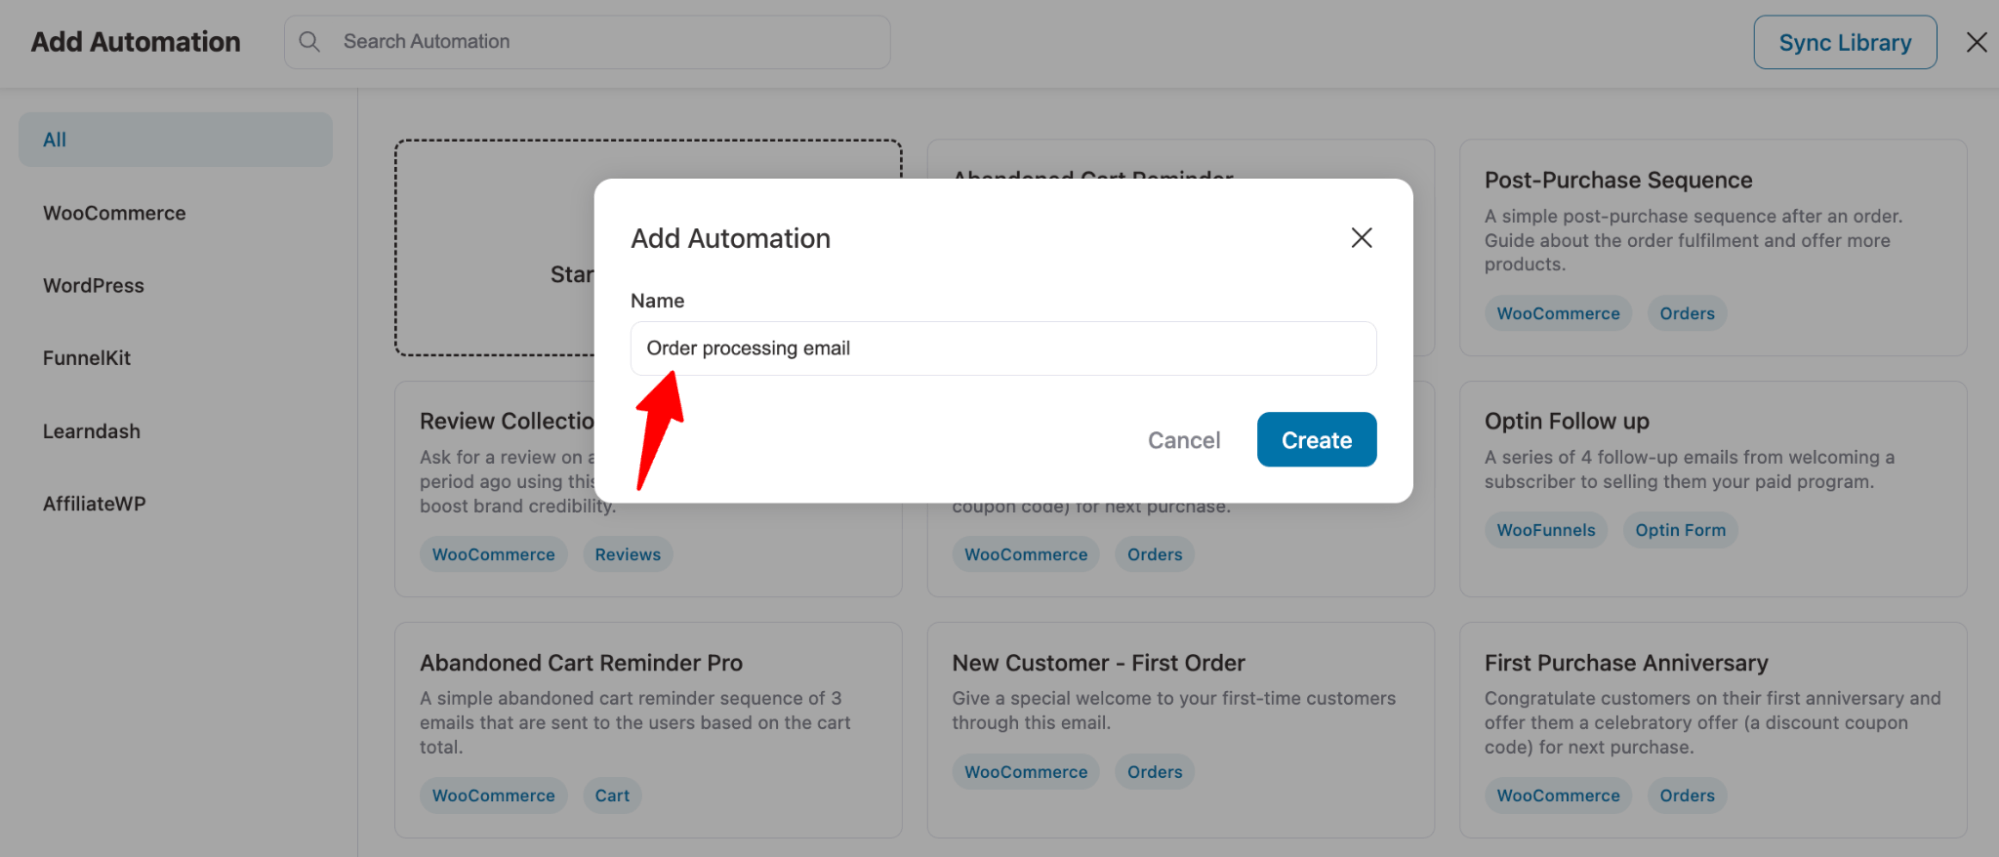
We will create an automation from scratch. For that, hit “Start from scratch”, provide a name, and click Create to complete.
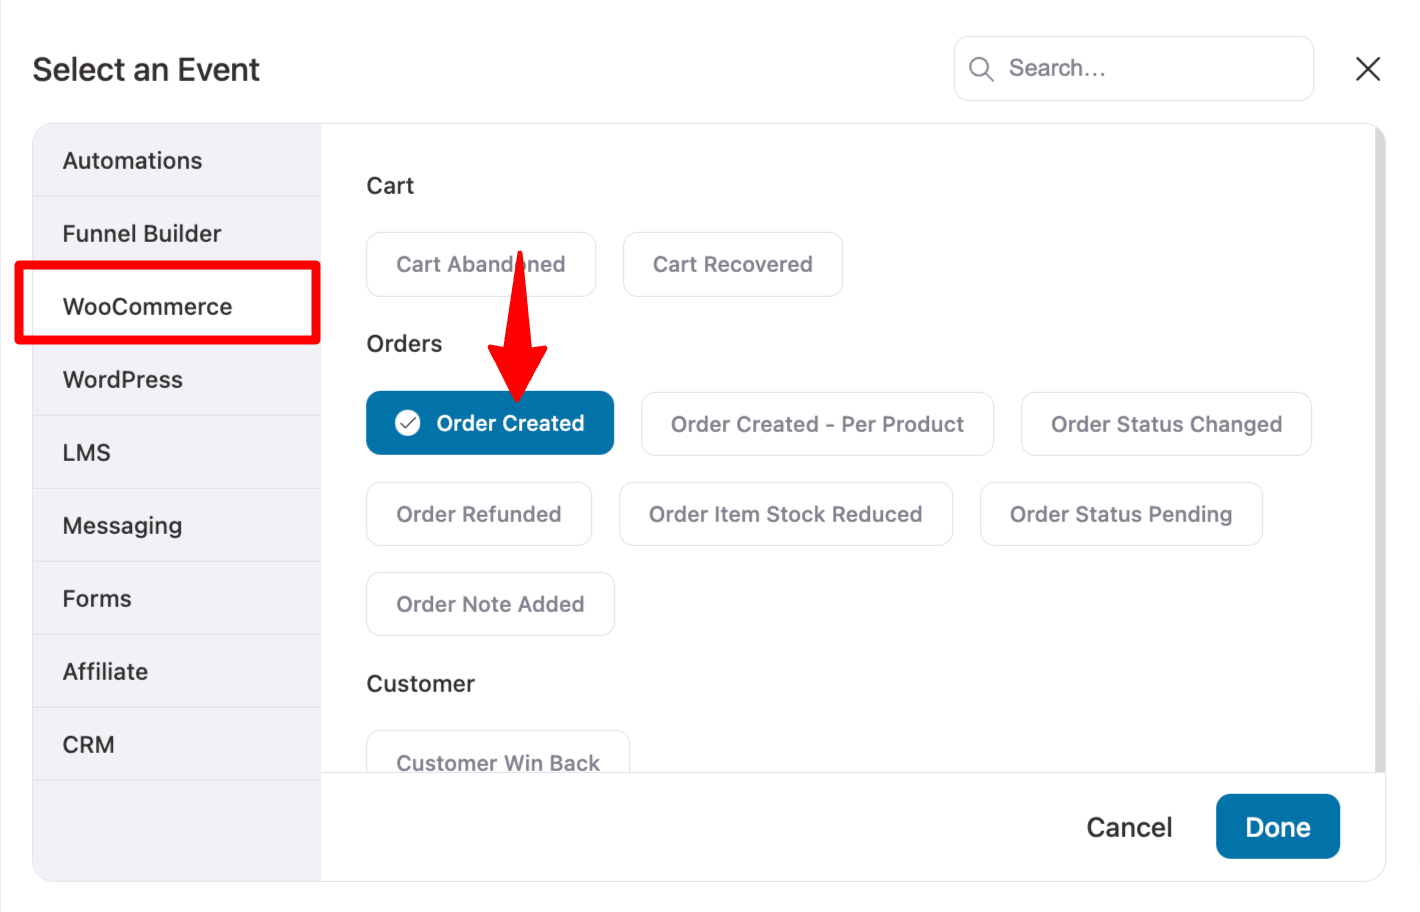
Step 3: Select the order processing event trigger
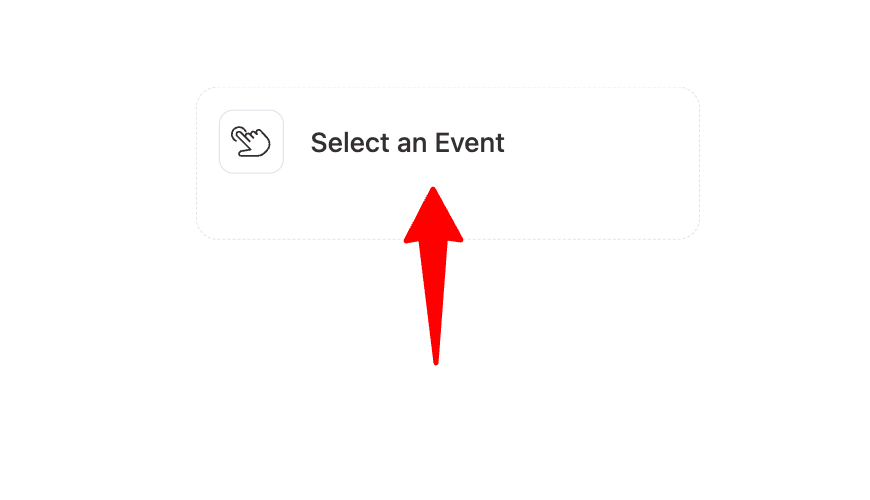
Now, it’s time to choose the automation trigger. Click the “Select an event” option.
Choose the "order created" event and hit done.
Let's configure the following option:
- Order Statuses: Check the order status processing.
- Order Contains: Order processing should be sent for all orders with any products. So choose the option of any product.
- Runs On Contact: Choose the option ‘multiple times.’
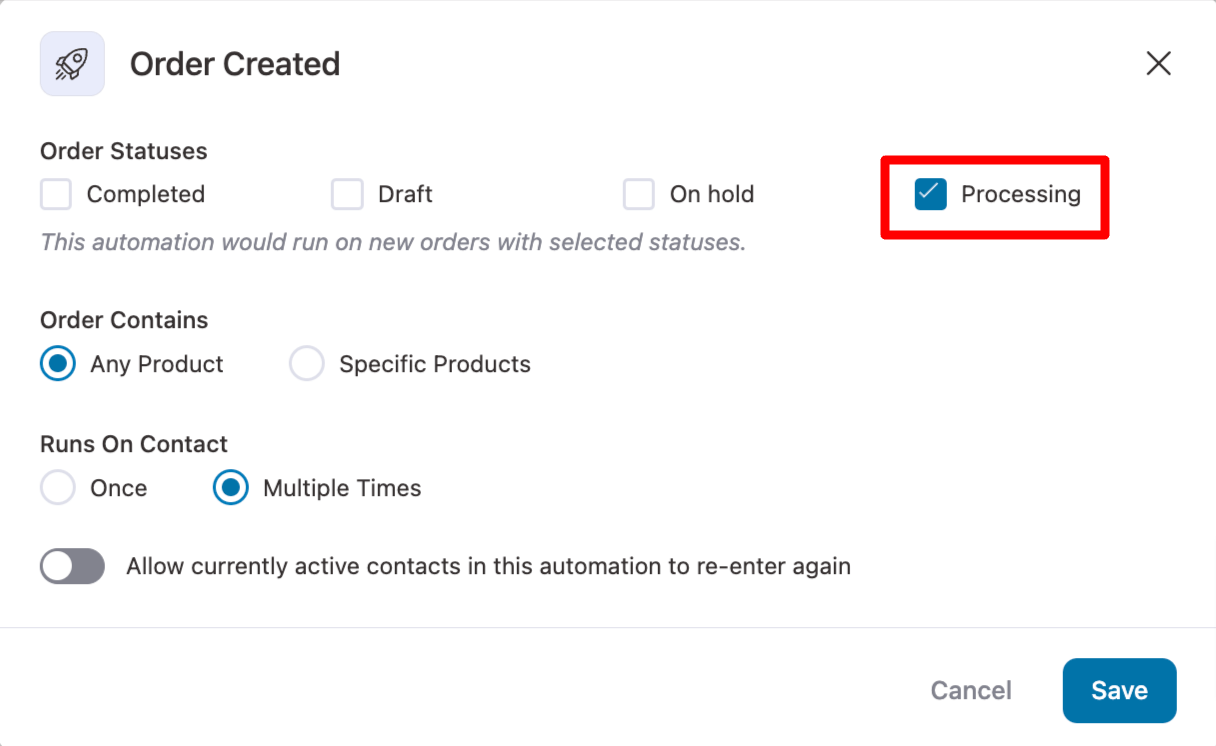
Save changes to set the order processing automation trigger.
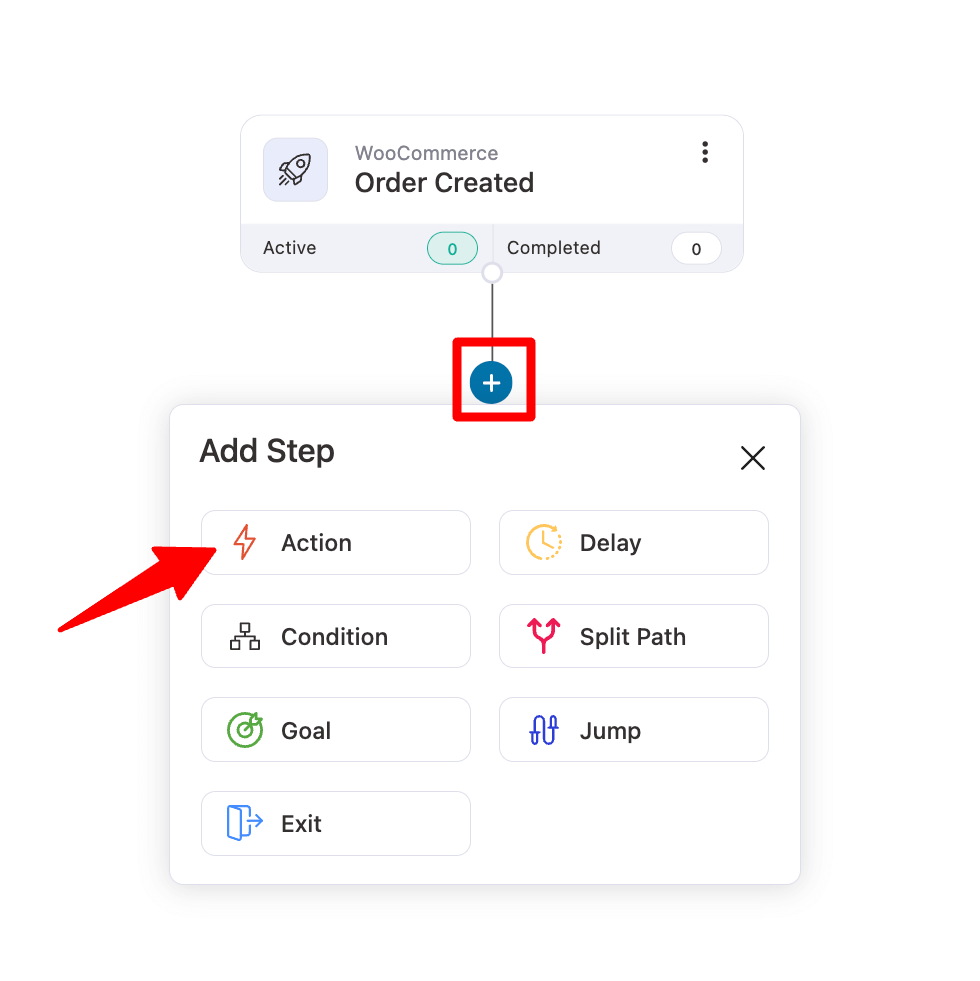
Step 4: Add a send email action
Now, we will add a new action in the automation to send an order-processing email. For this, hit “+”, then choose the option “Action”.
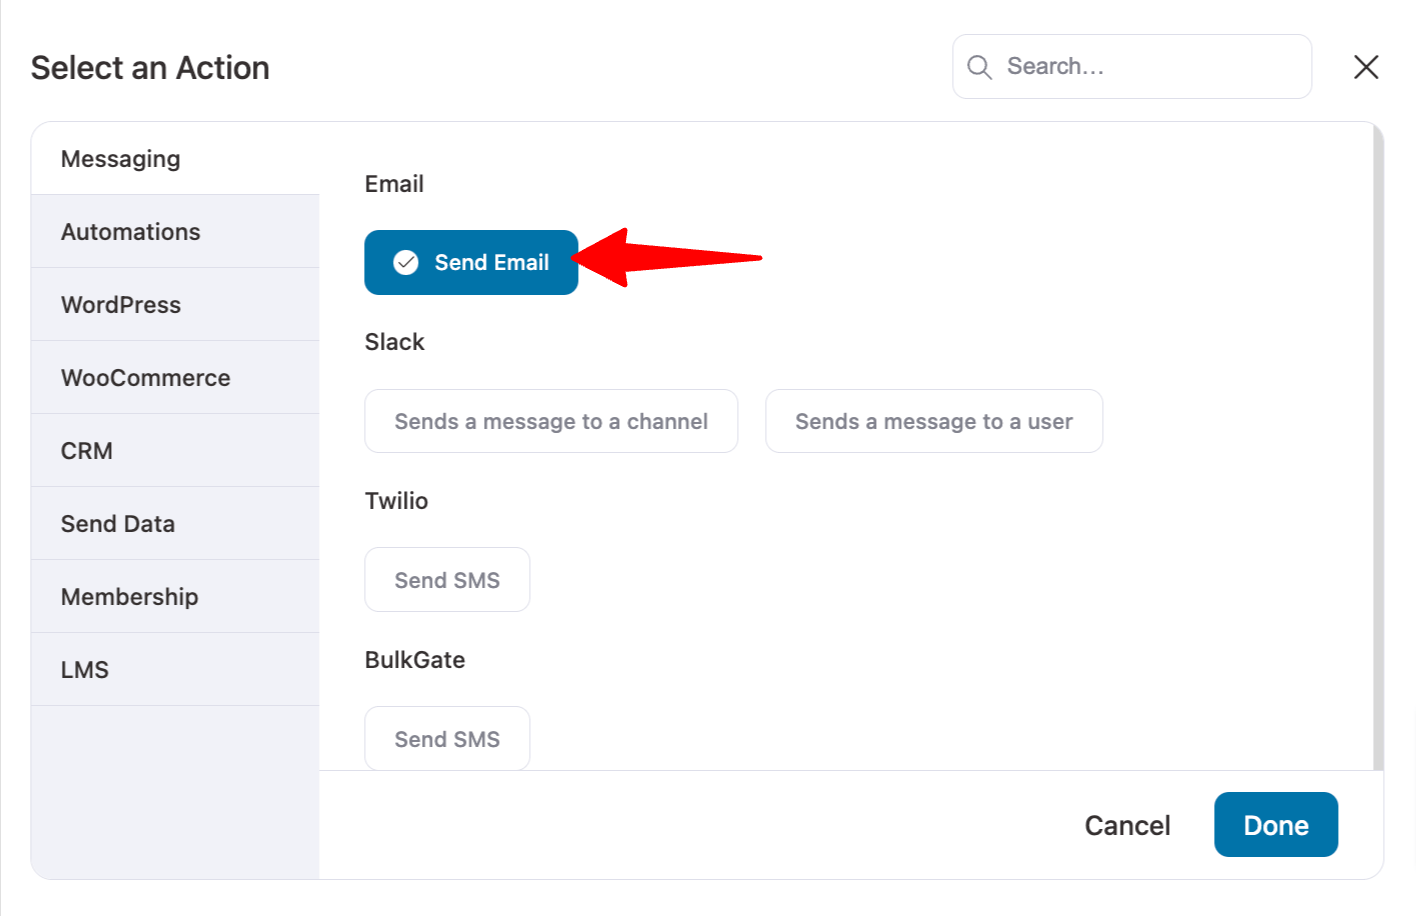
Under messaging, choose the action “Send Email” and hit Done.
Step 5: Customize the email to add custom fields
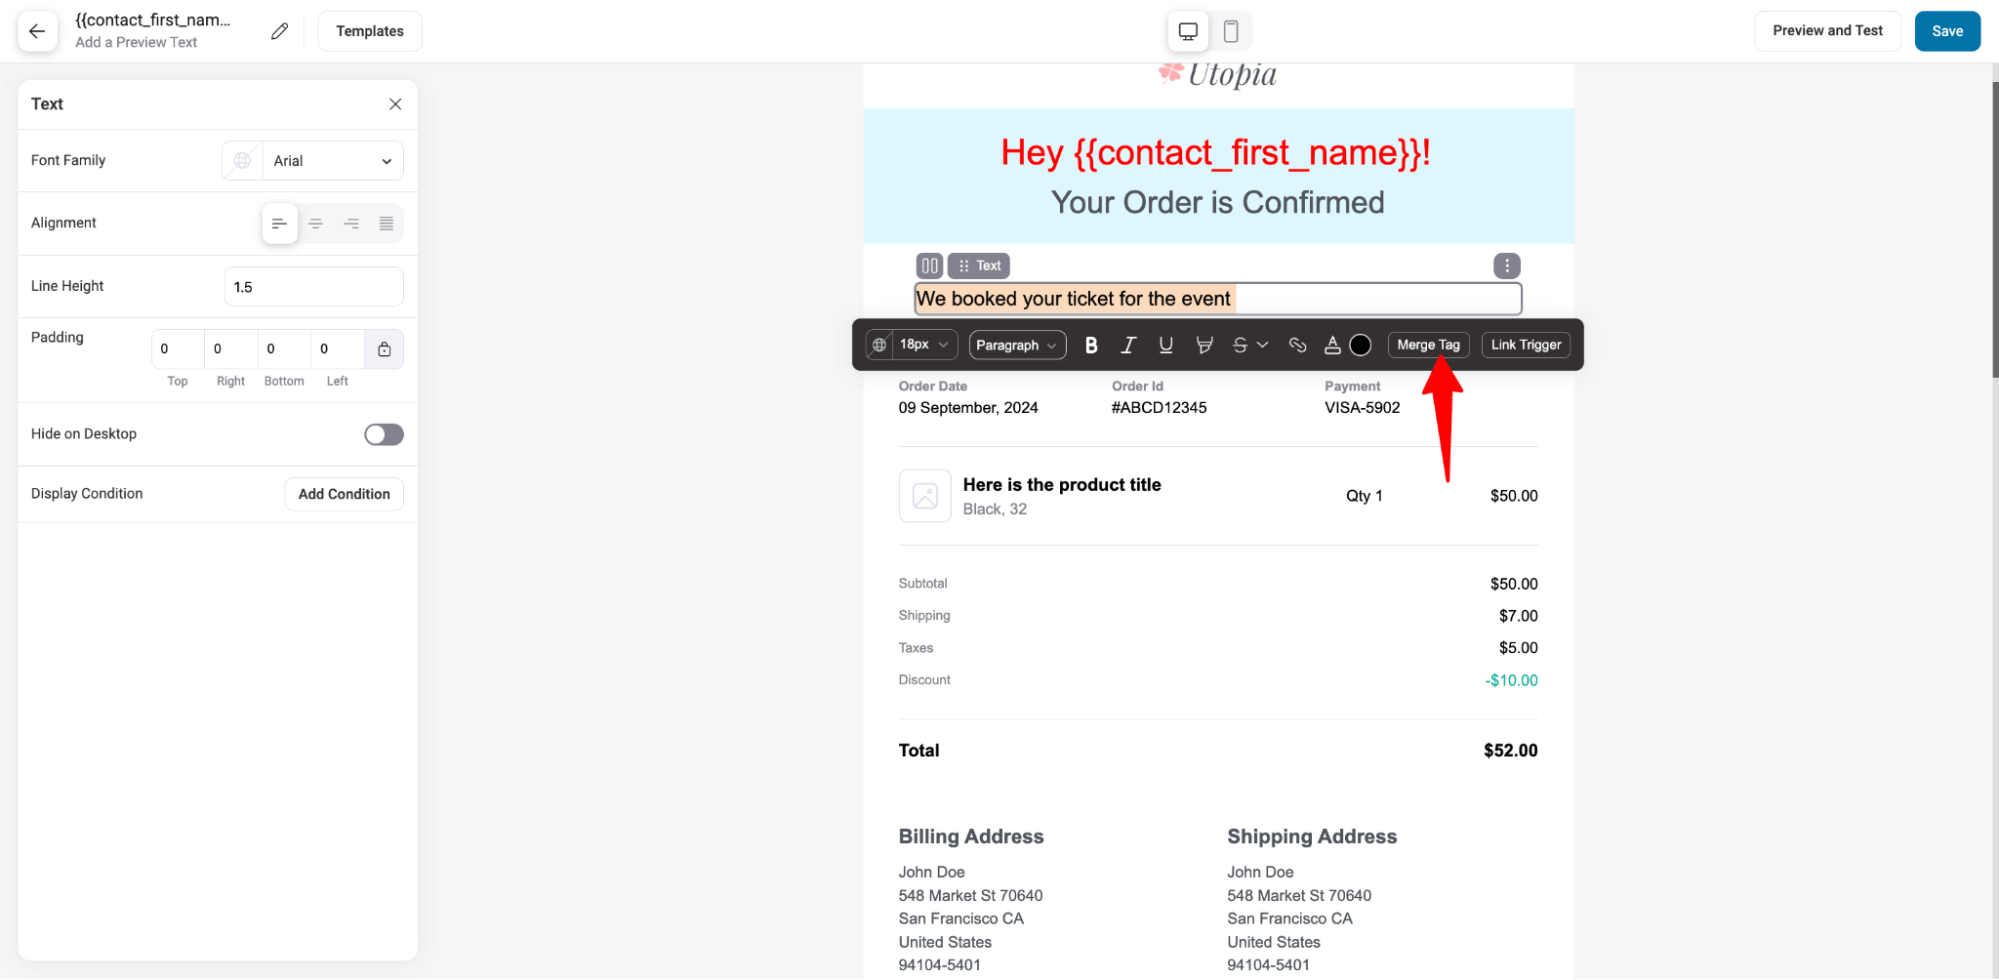
Set the email subject line and preview text.
Feel free to use the merge tag to personalize the messaging. Here we are using a merge tag to dynamically show the customer name and order ID.
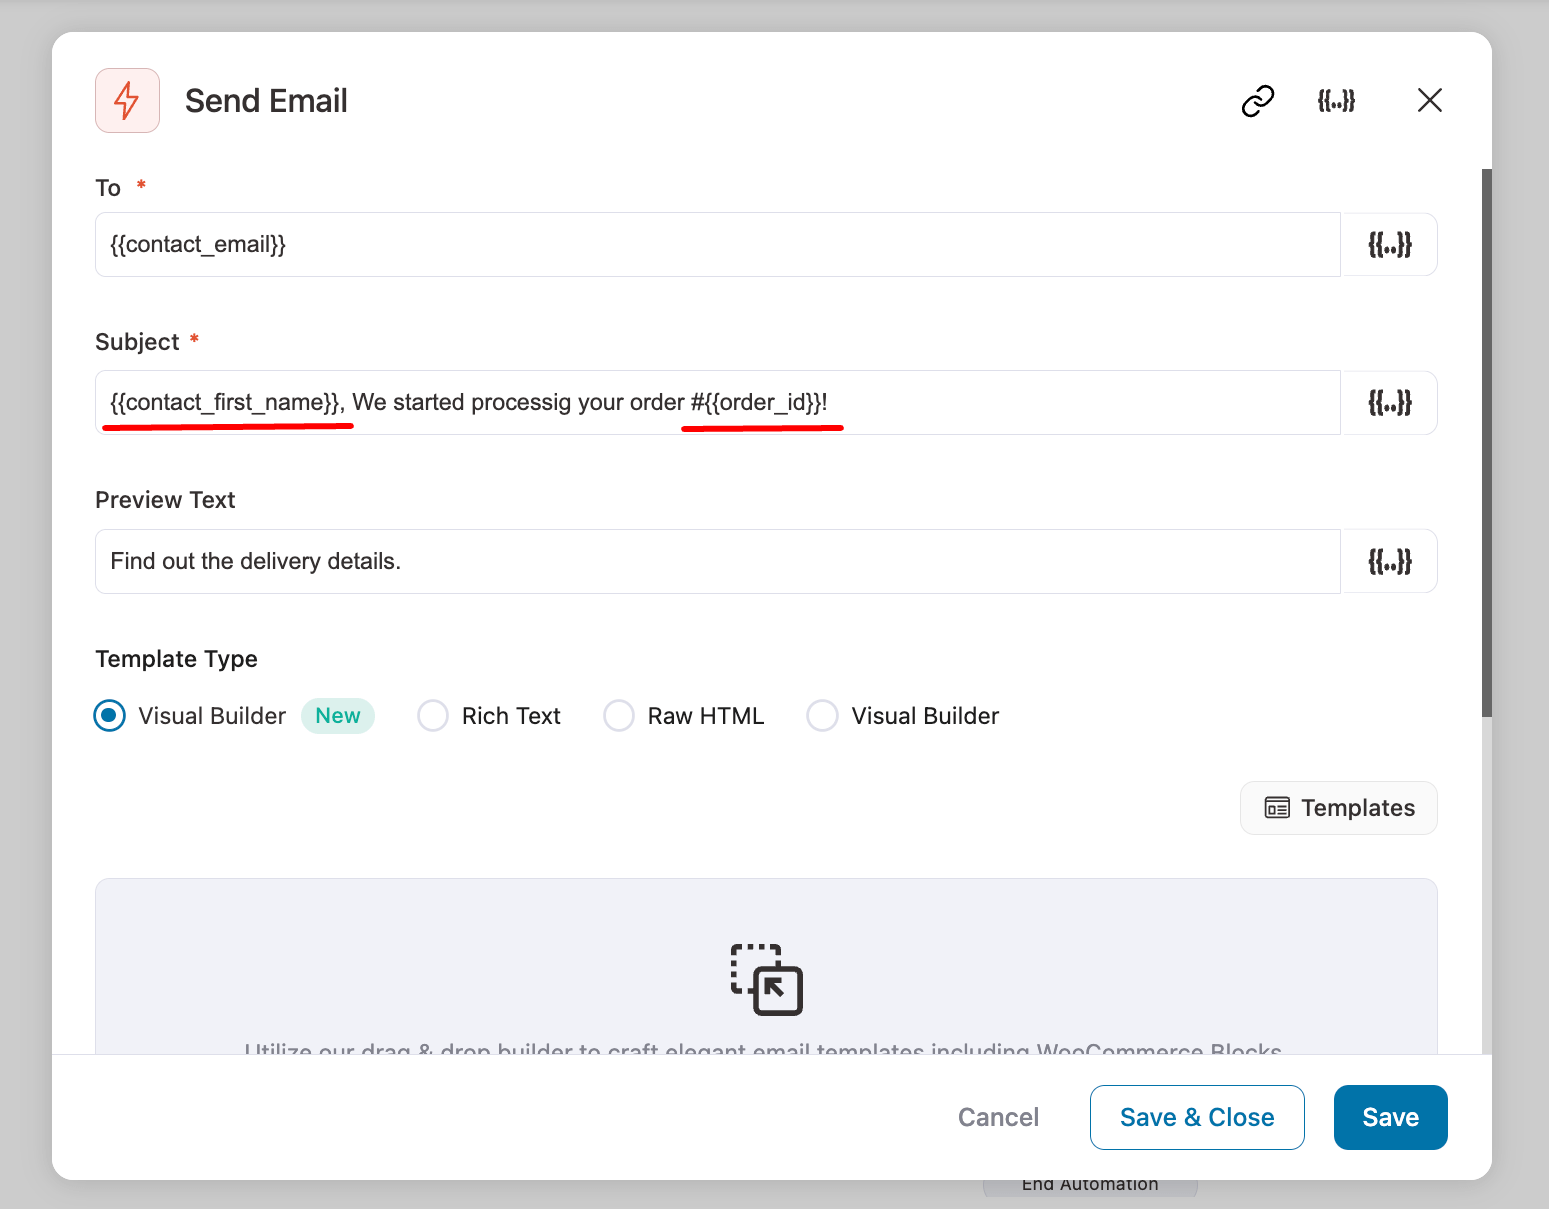
Now, it’s time to customize the email body and add the custom field to the WooCommerce email.
To design and customize the order processing email, we suggest using the Visual Builder (New). This advanced drag-and-drop email builder offers many prebuilt email templates.
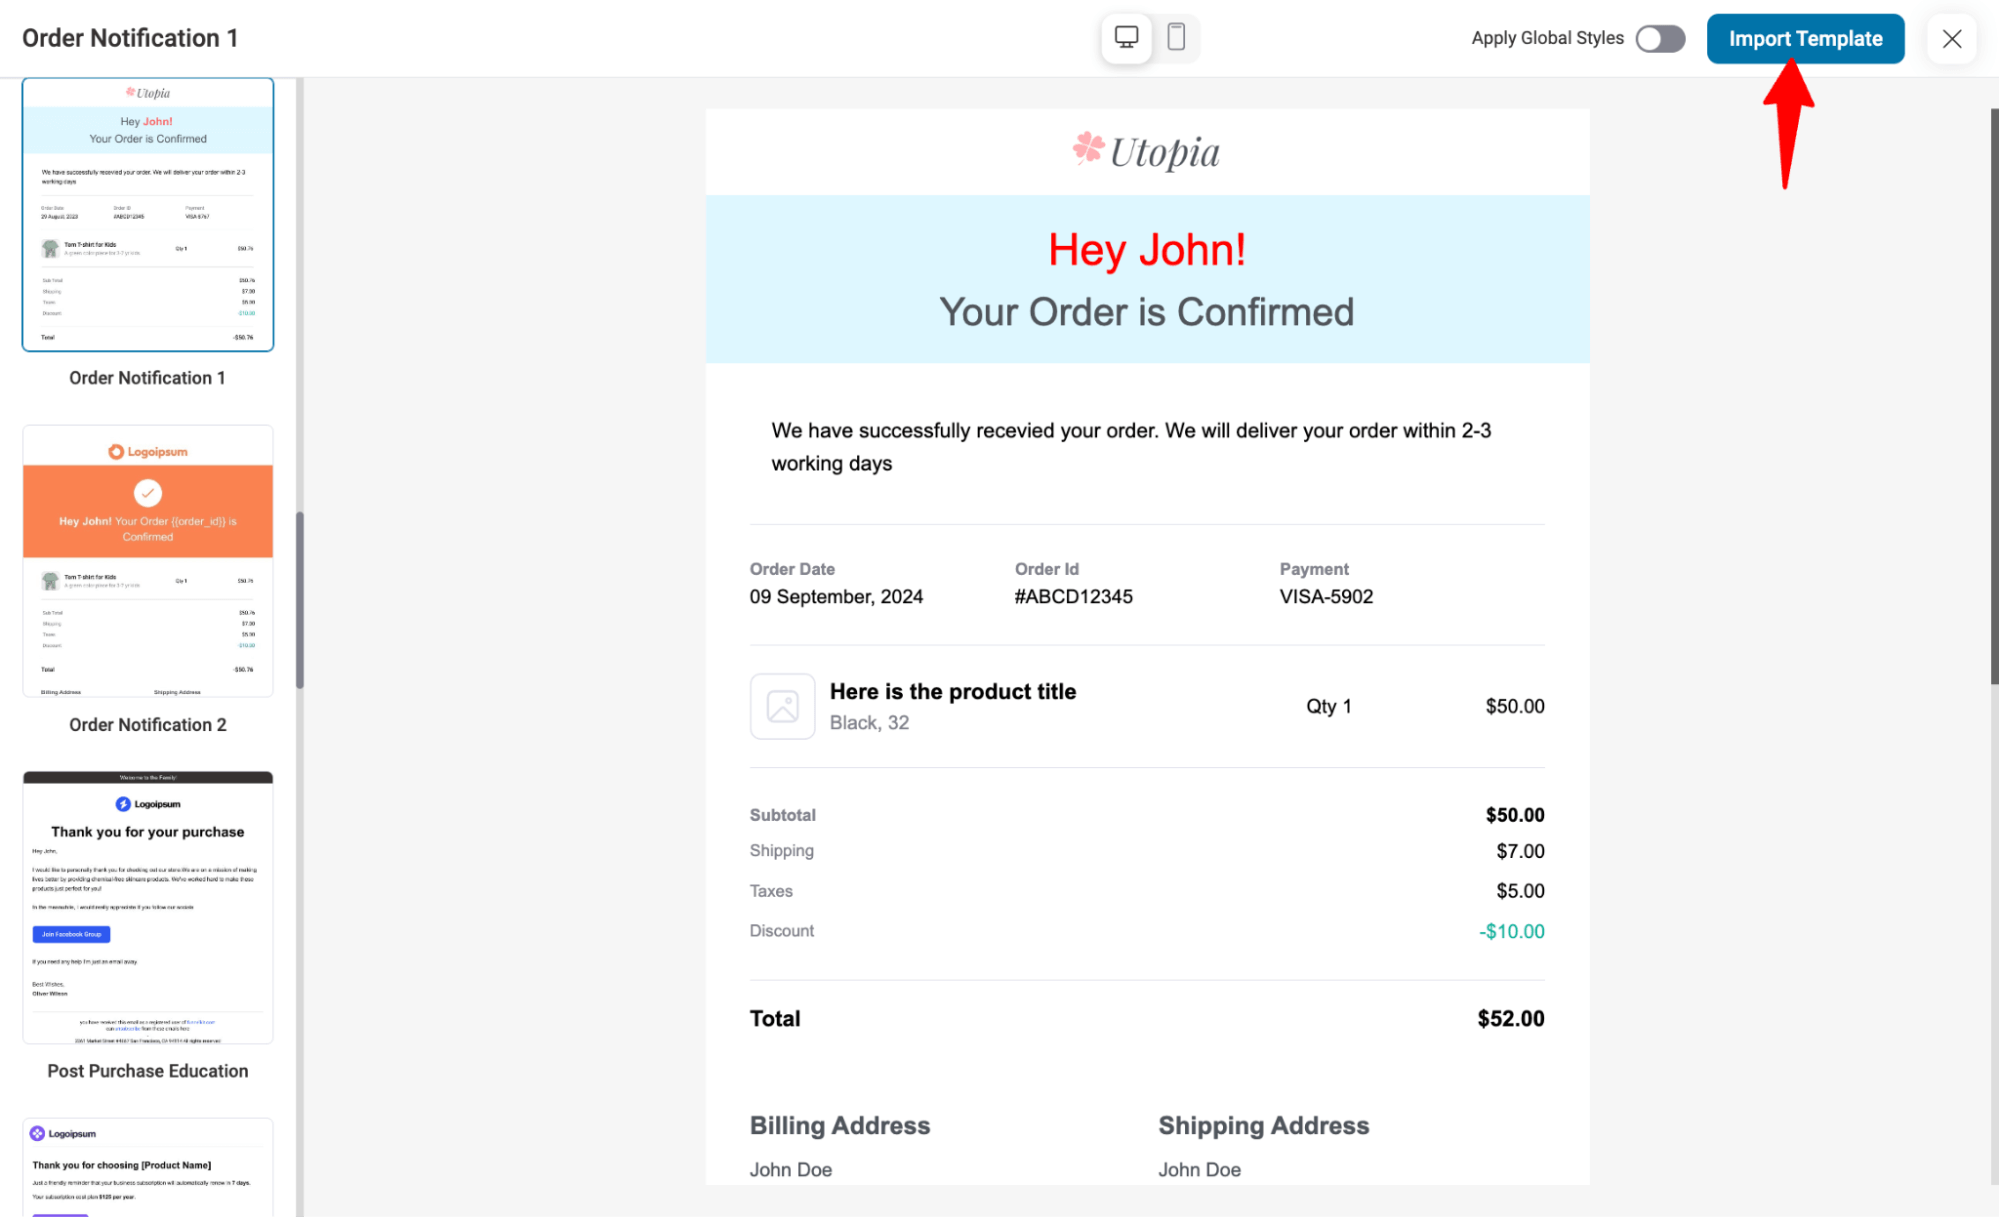
To use this, make sure to choose Visual Builder (New) and hit “Edit”. Then, you will find a lot of pre-built templates. We will use the template “Order Notification 1”.
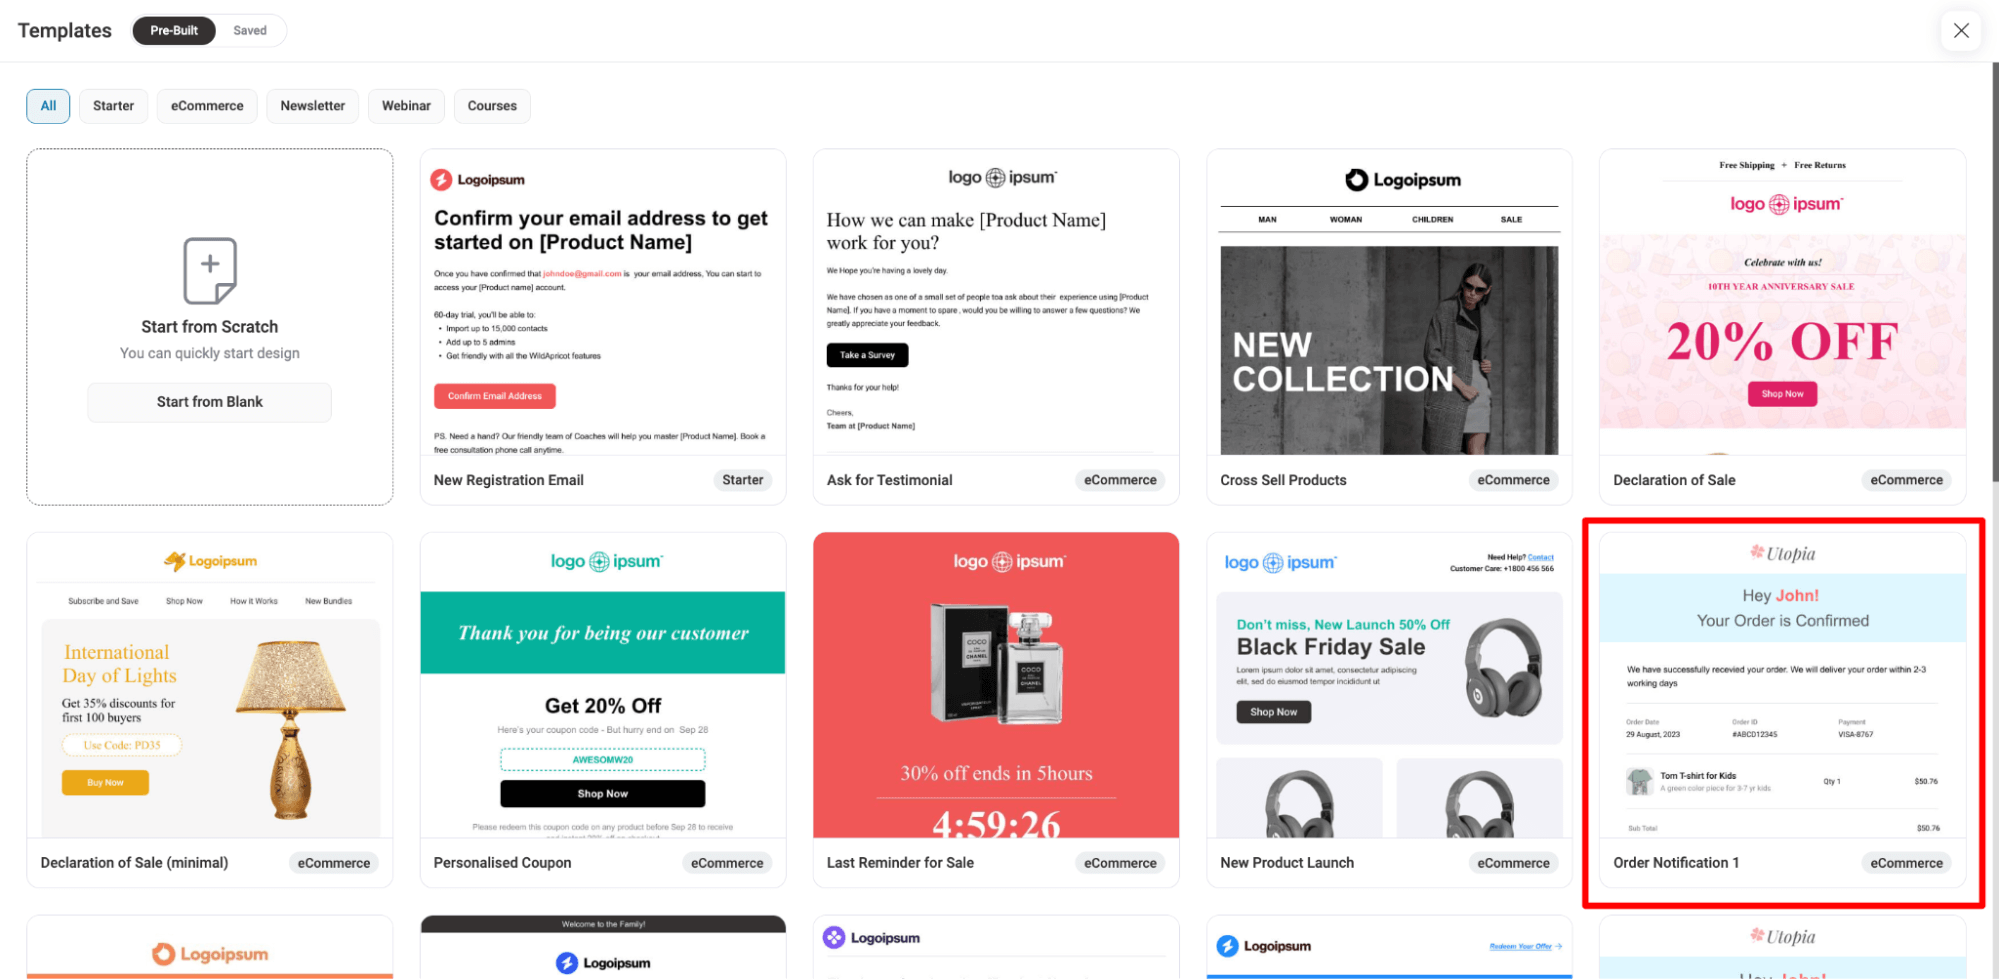
To import, hover on the template, hit Preview, and then click on “Import Template.”
Now it’s time to customize the emails, like changing the logo, text, etc. As per the custom fields, here is how you can do it:
Custom field collected at checkout
You can follow the process we showed above to collect custom data at checkout. However, to add the information in the email, you need to use order data merge tag.
For this first copy, the field ID of the custom field.
Now, come to the email customization options and go to the merge tag.
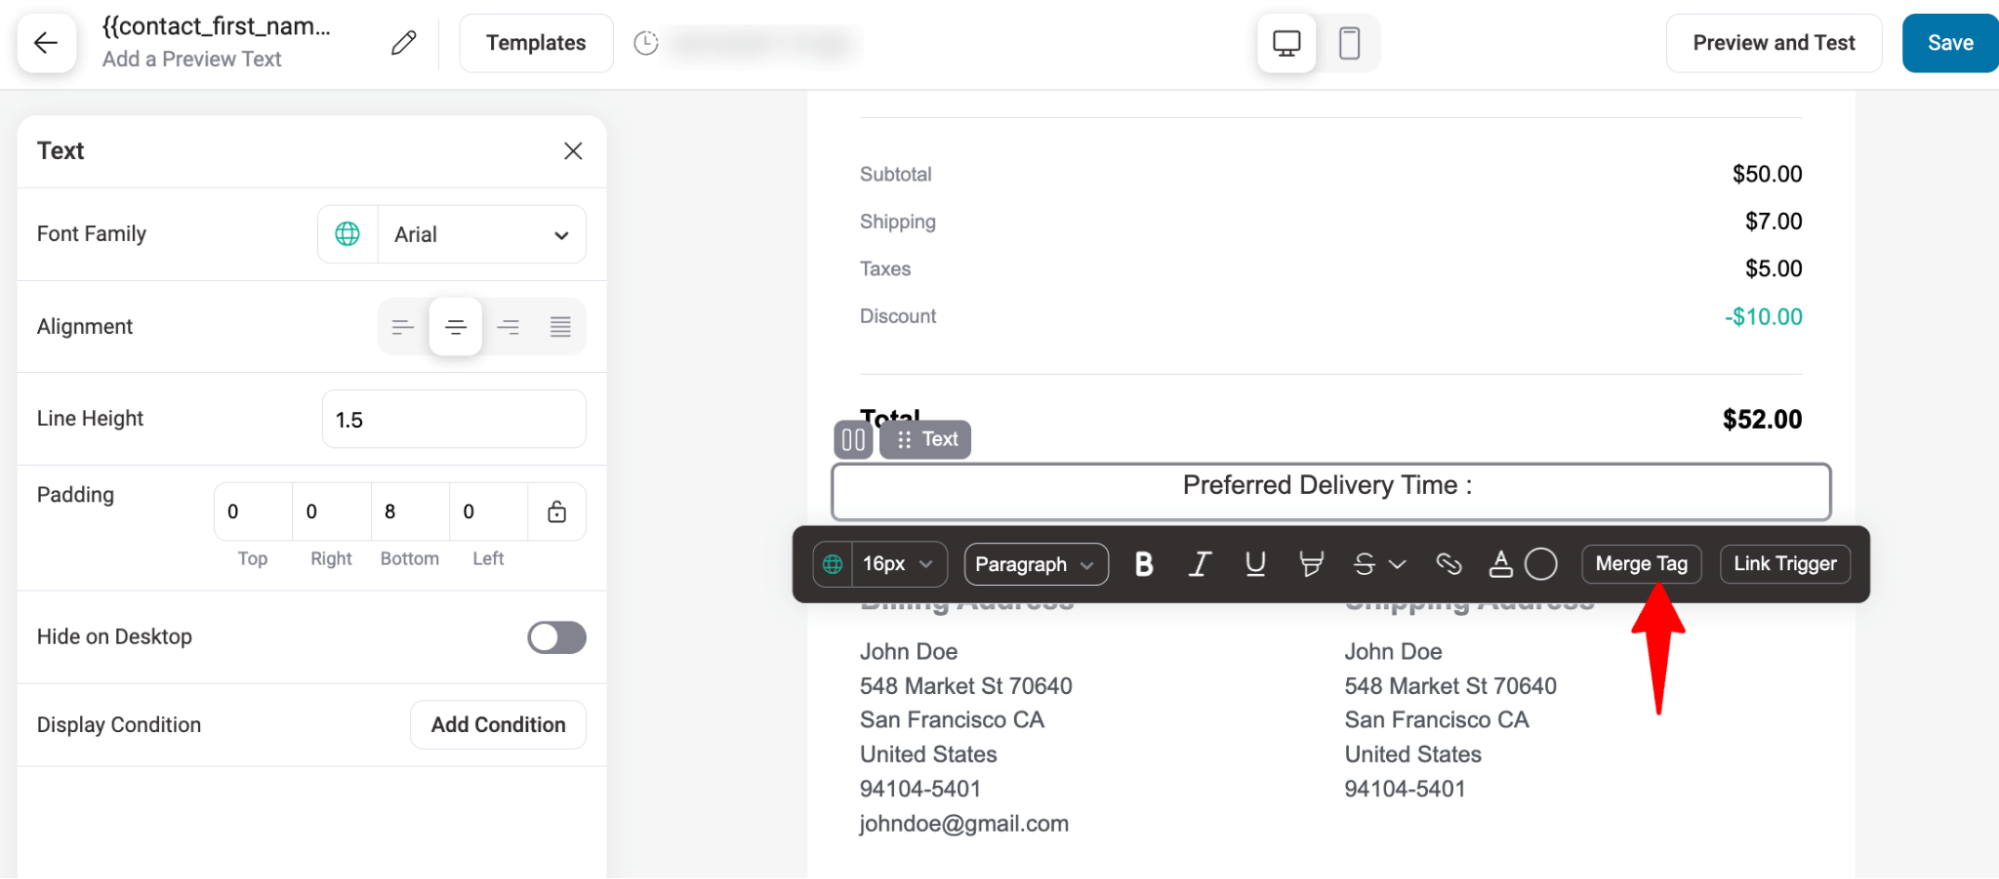
Here, search for the Order Data merge tag and hit the settings icon.
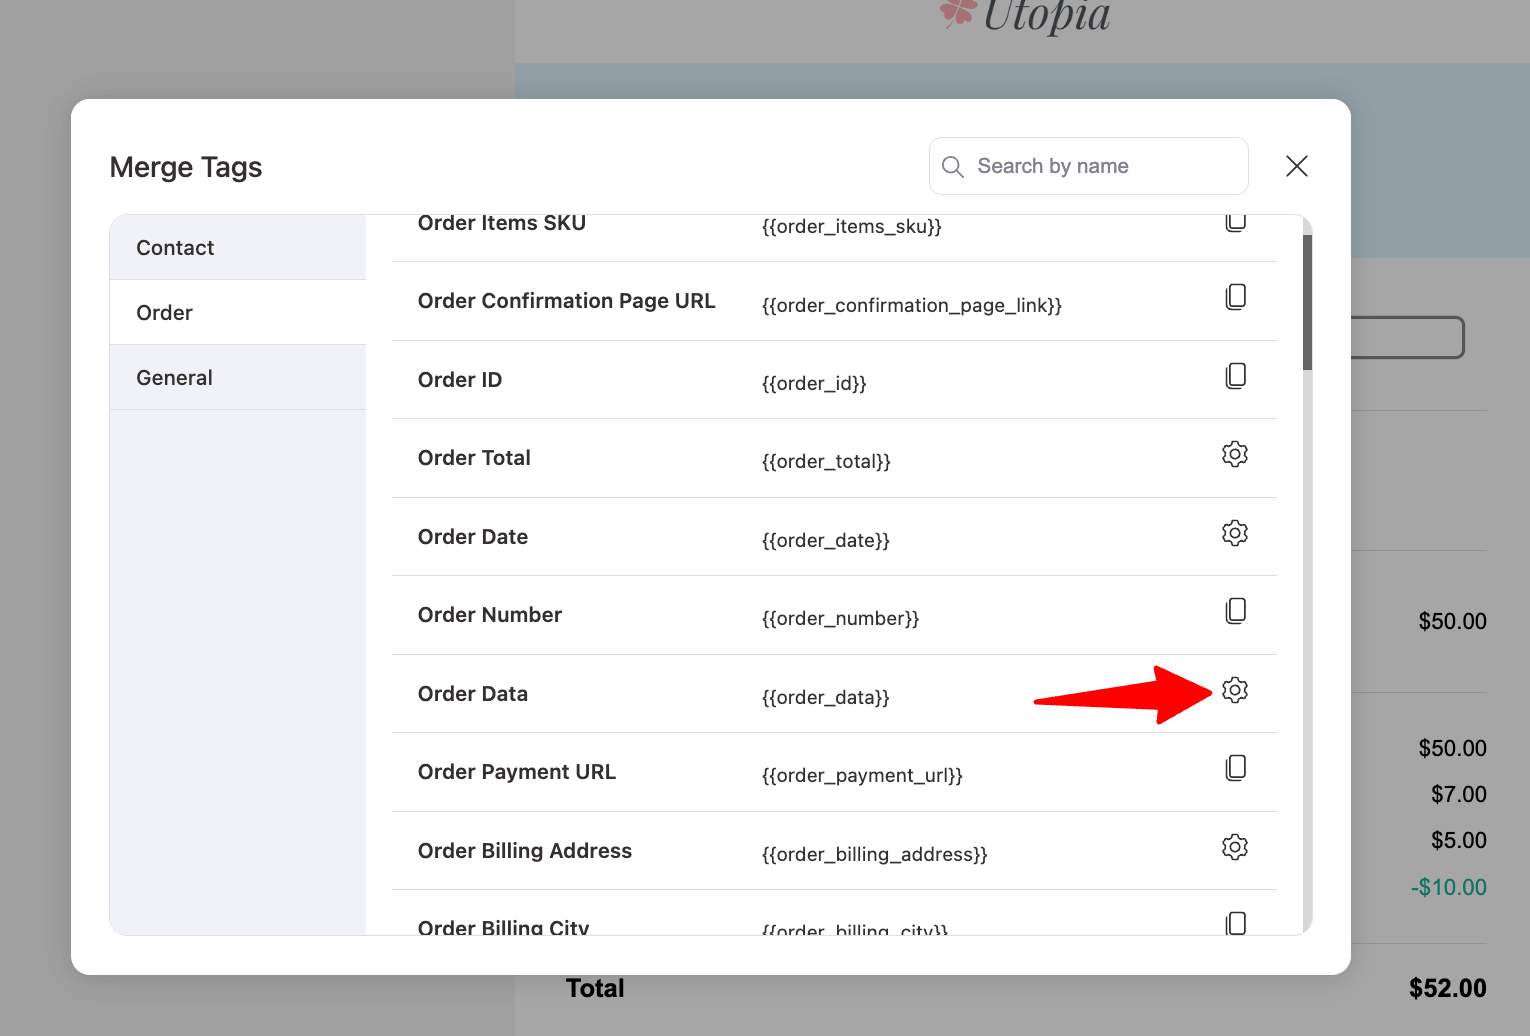
Here, paste the copied Field ID in the Meta Key field, choose the Meta Field Type, and hit “Copy” to copy the value.
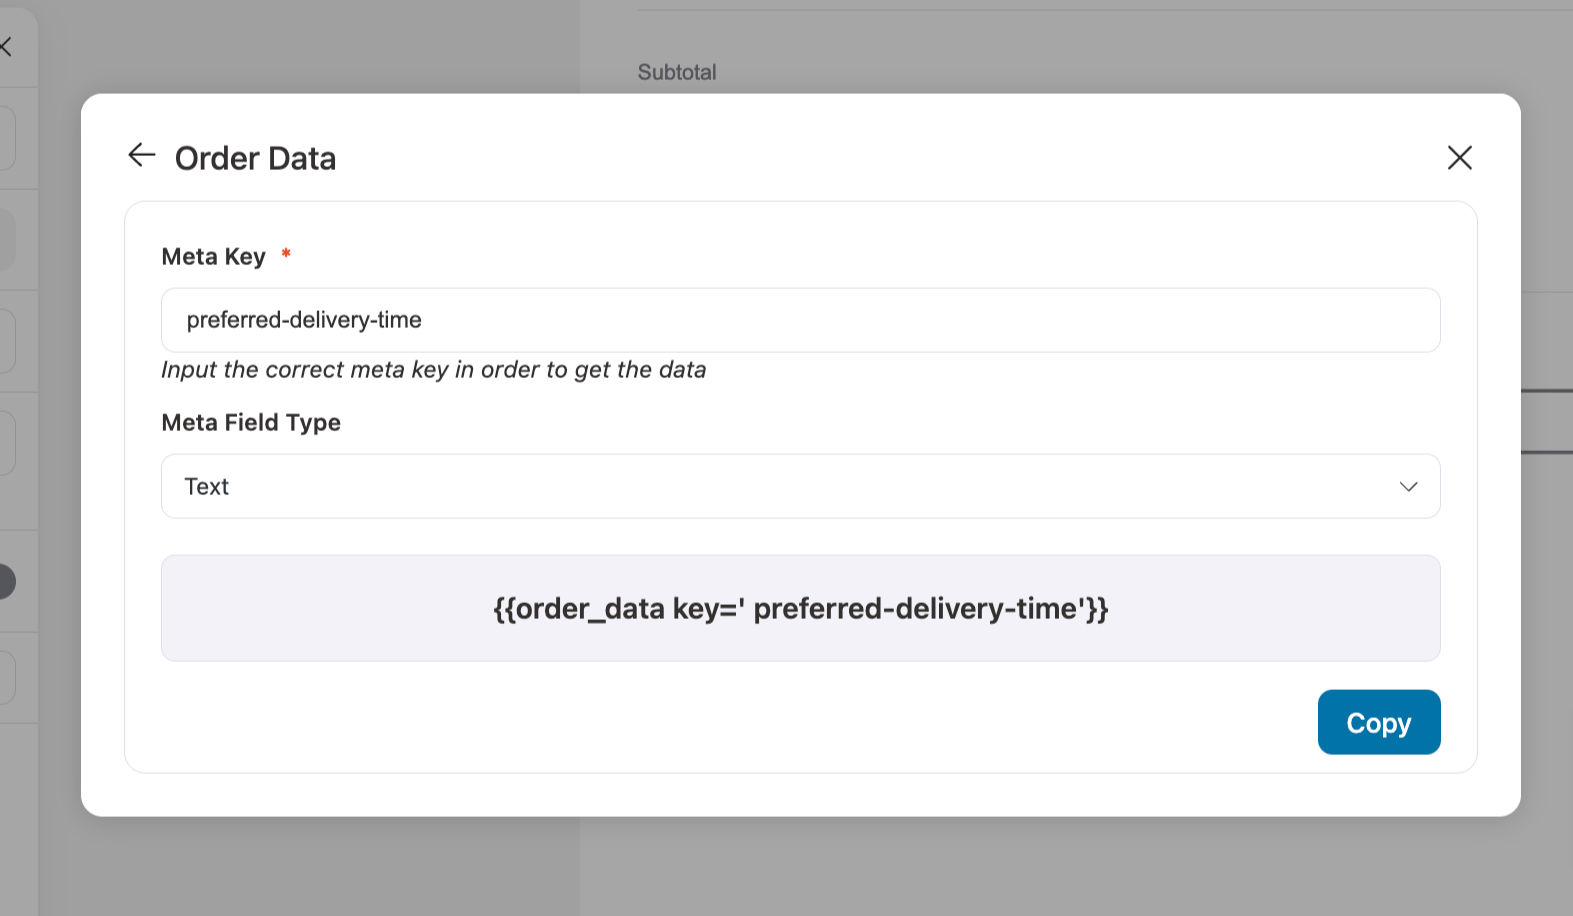
Now, paste the value in your email body.
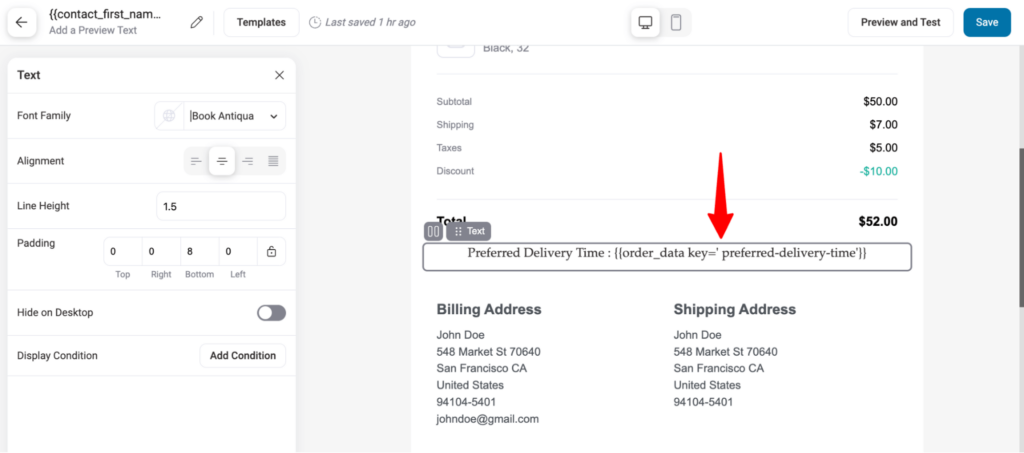
This will add the custom data to your WooCommerce email.
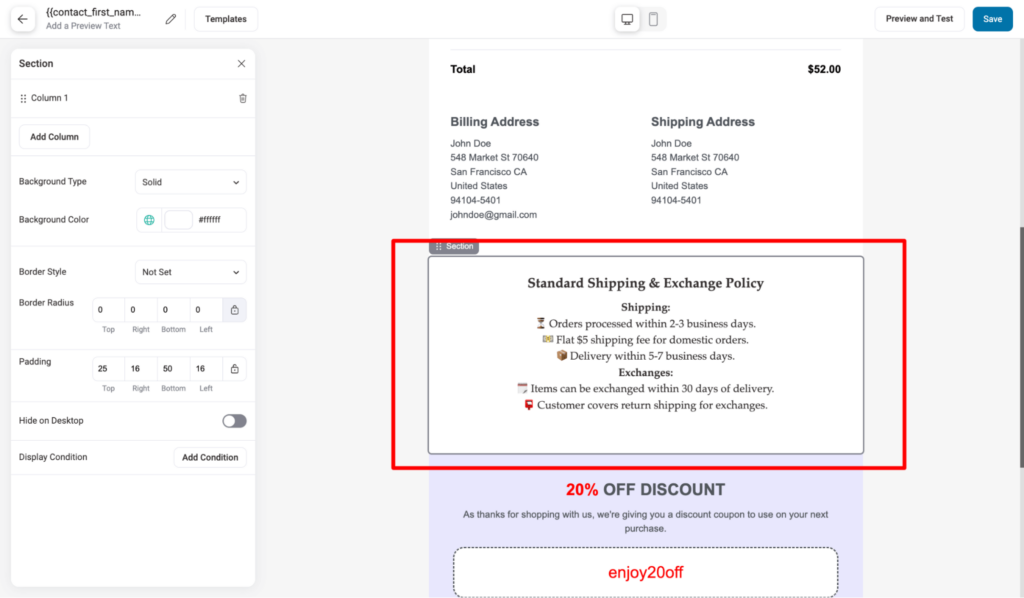
Shipping and exchange policy
To add the shipping and exchange policy. Simply drag and drop a text block and add the content.
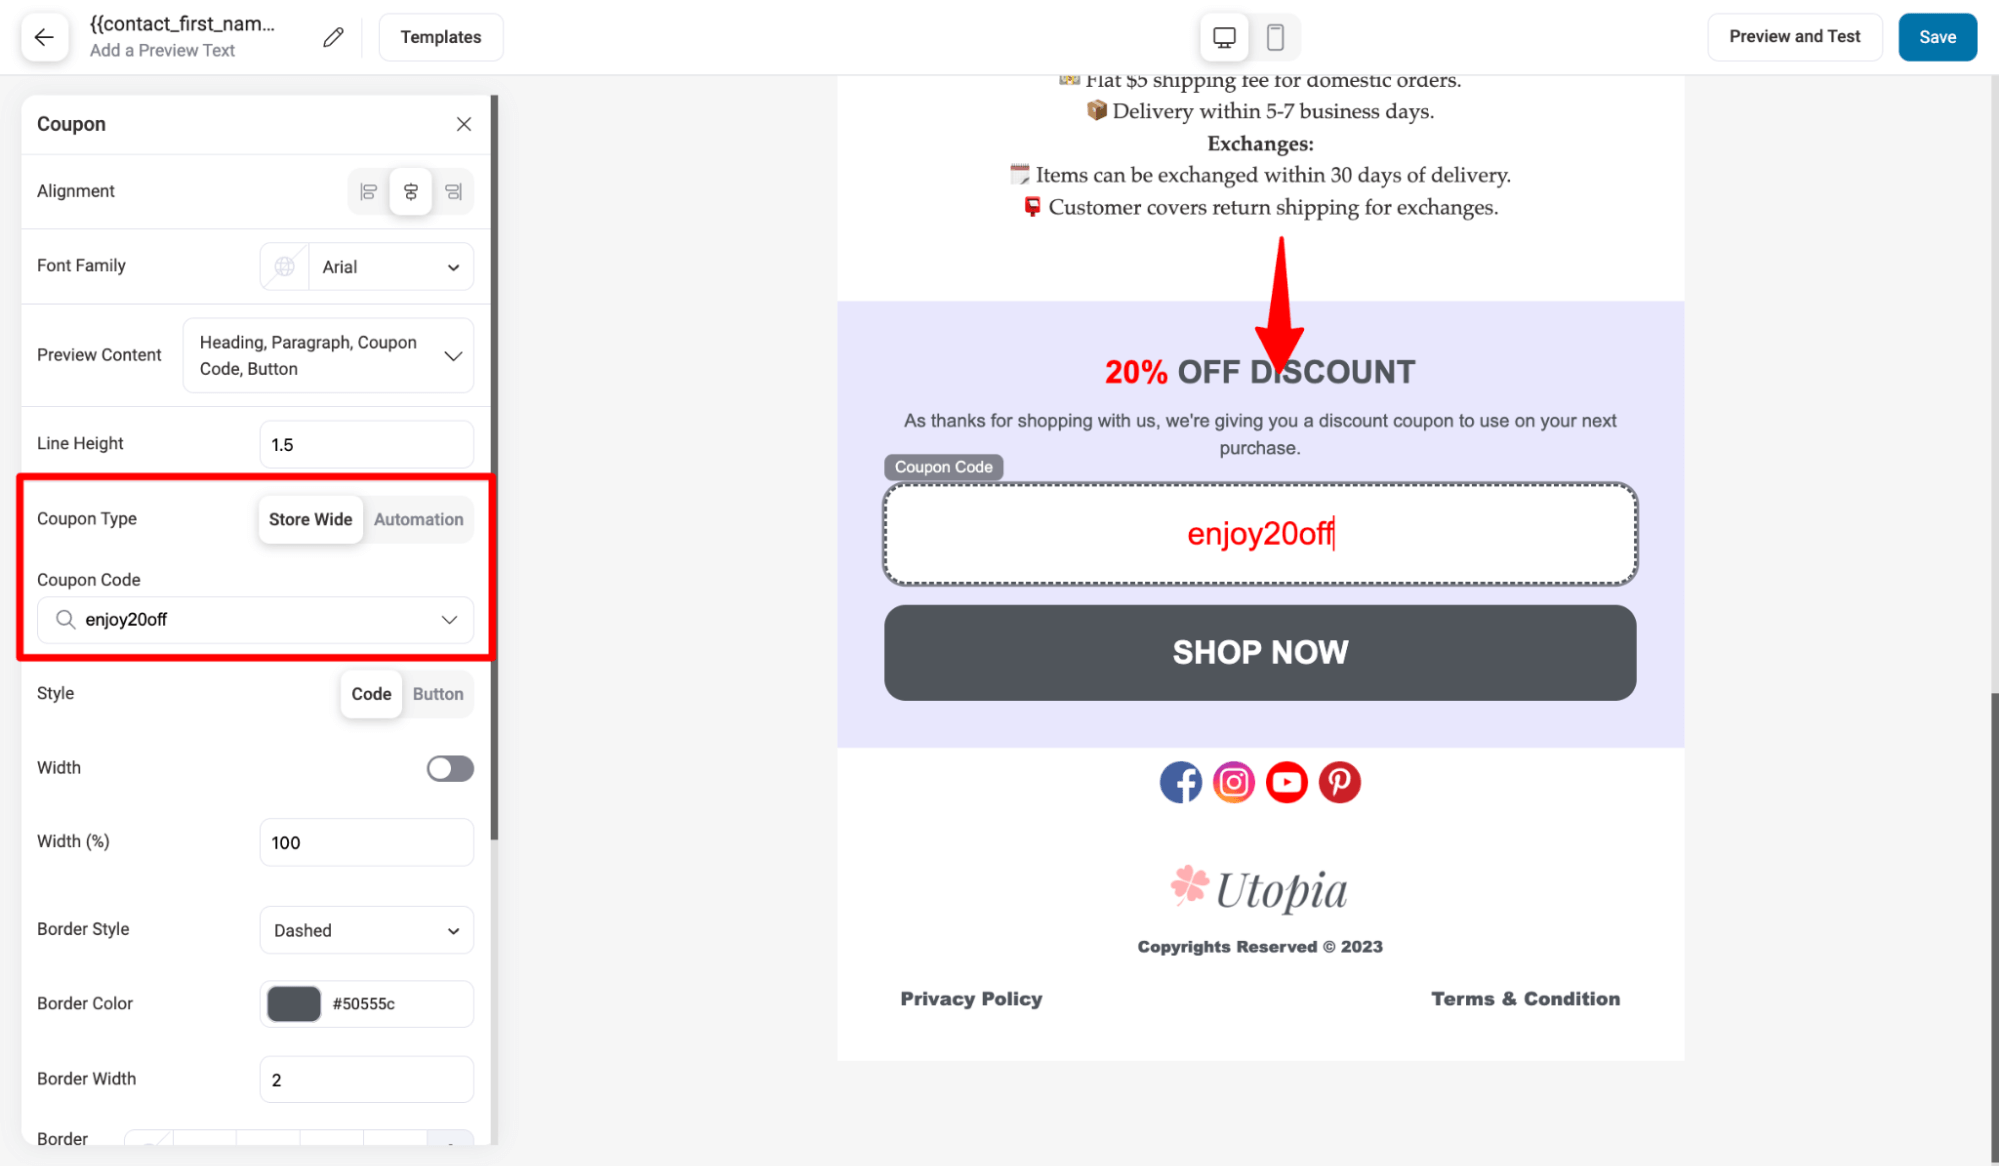
Discount coupon
The template we imported already has a discount block section. You can either add an existing store discount coupon or a dynamic coupon to it.
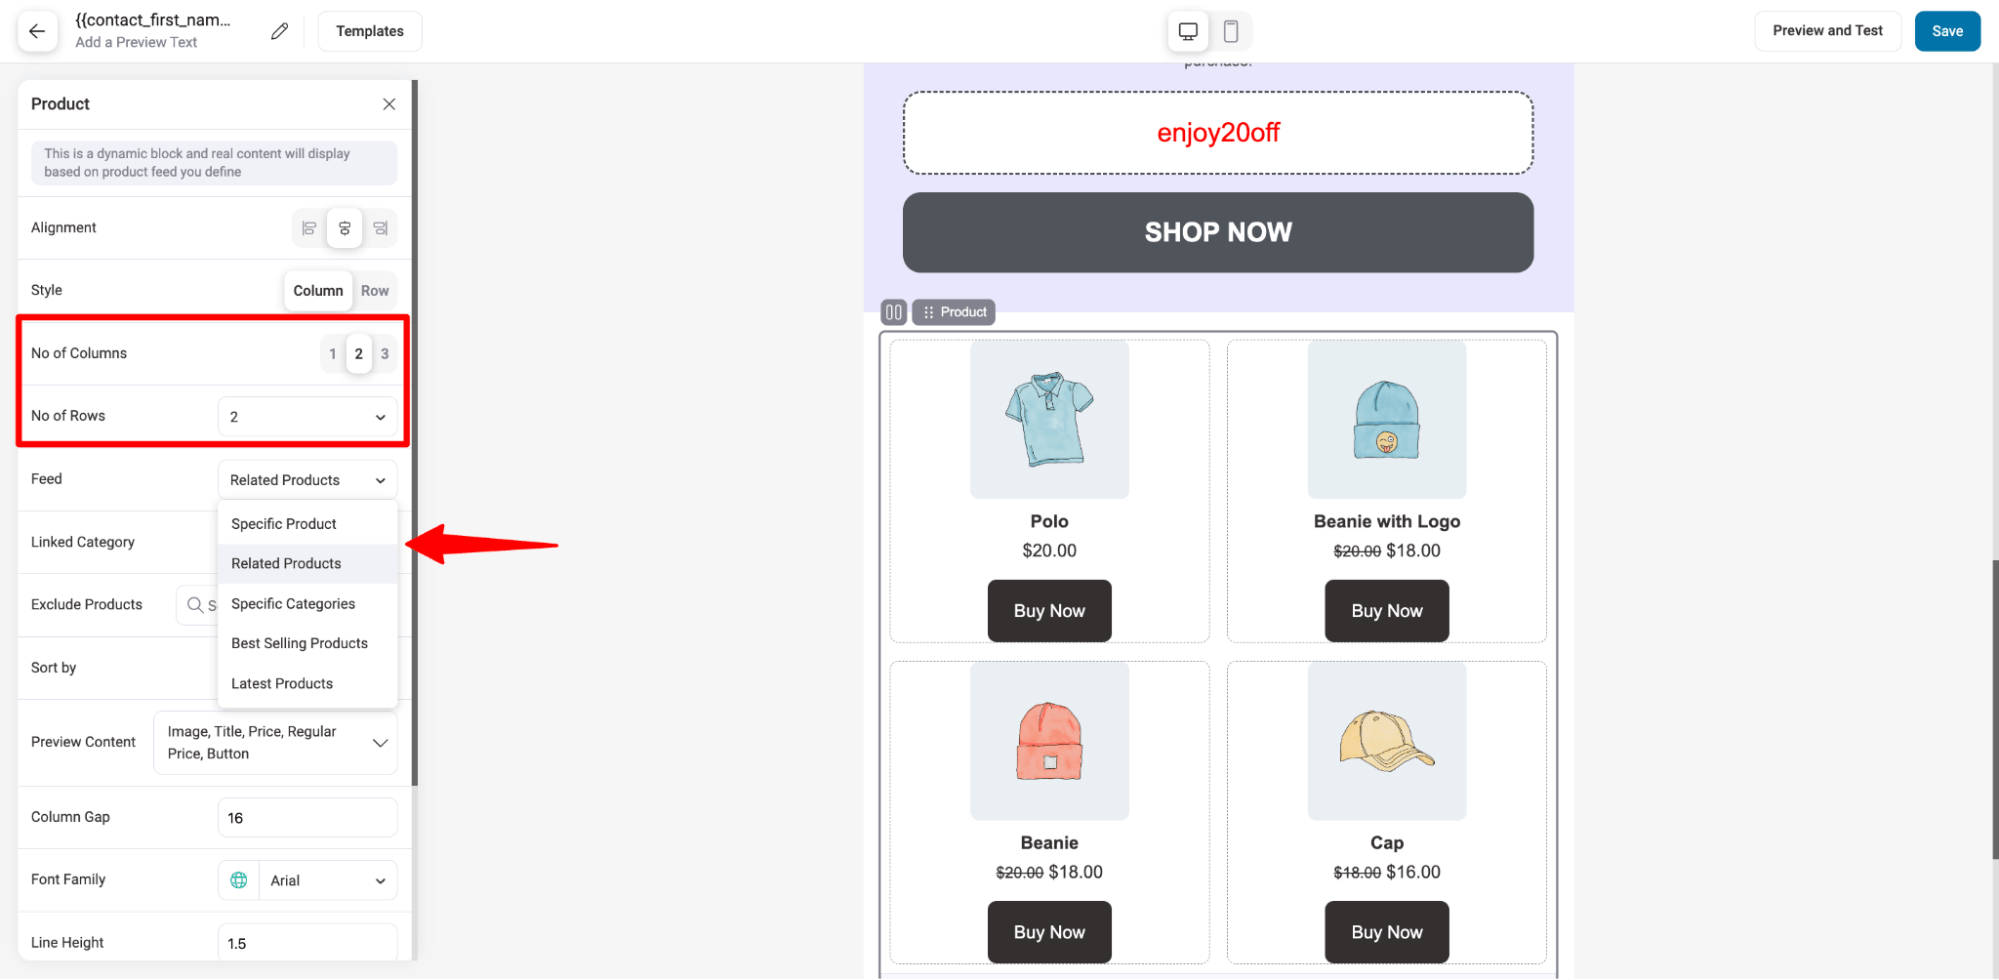
Product recommendations
Drag and drop the Product block to add product recommendations. You can use different feed types like related products, best-selling products, latest products, specific products, etc., to recommend products.
You can also choose the number of products you want to show as a recommendation using row and column numbers.
Social icons
To add a social icons, drag and drop the Social block. After adding on the left side, you can customize the position, icons, style, size, gap, etc.
To add the relevant link, hover over the icon and then click on the 🔗 option to add the social links.
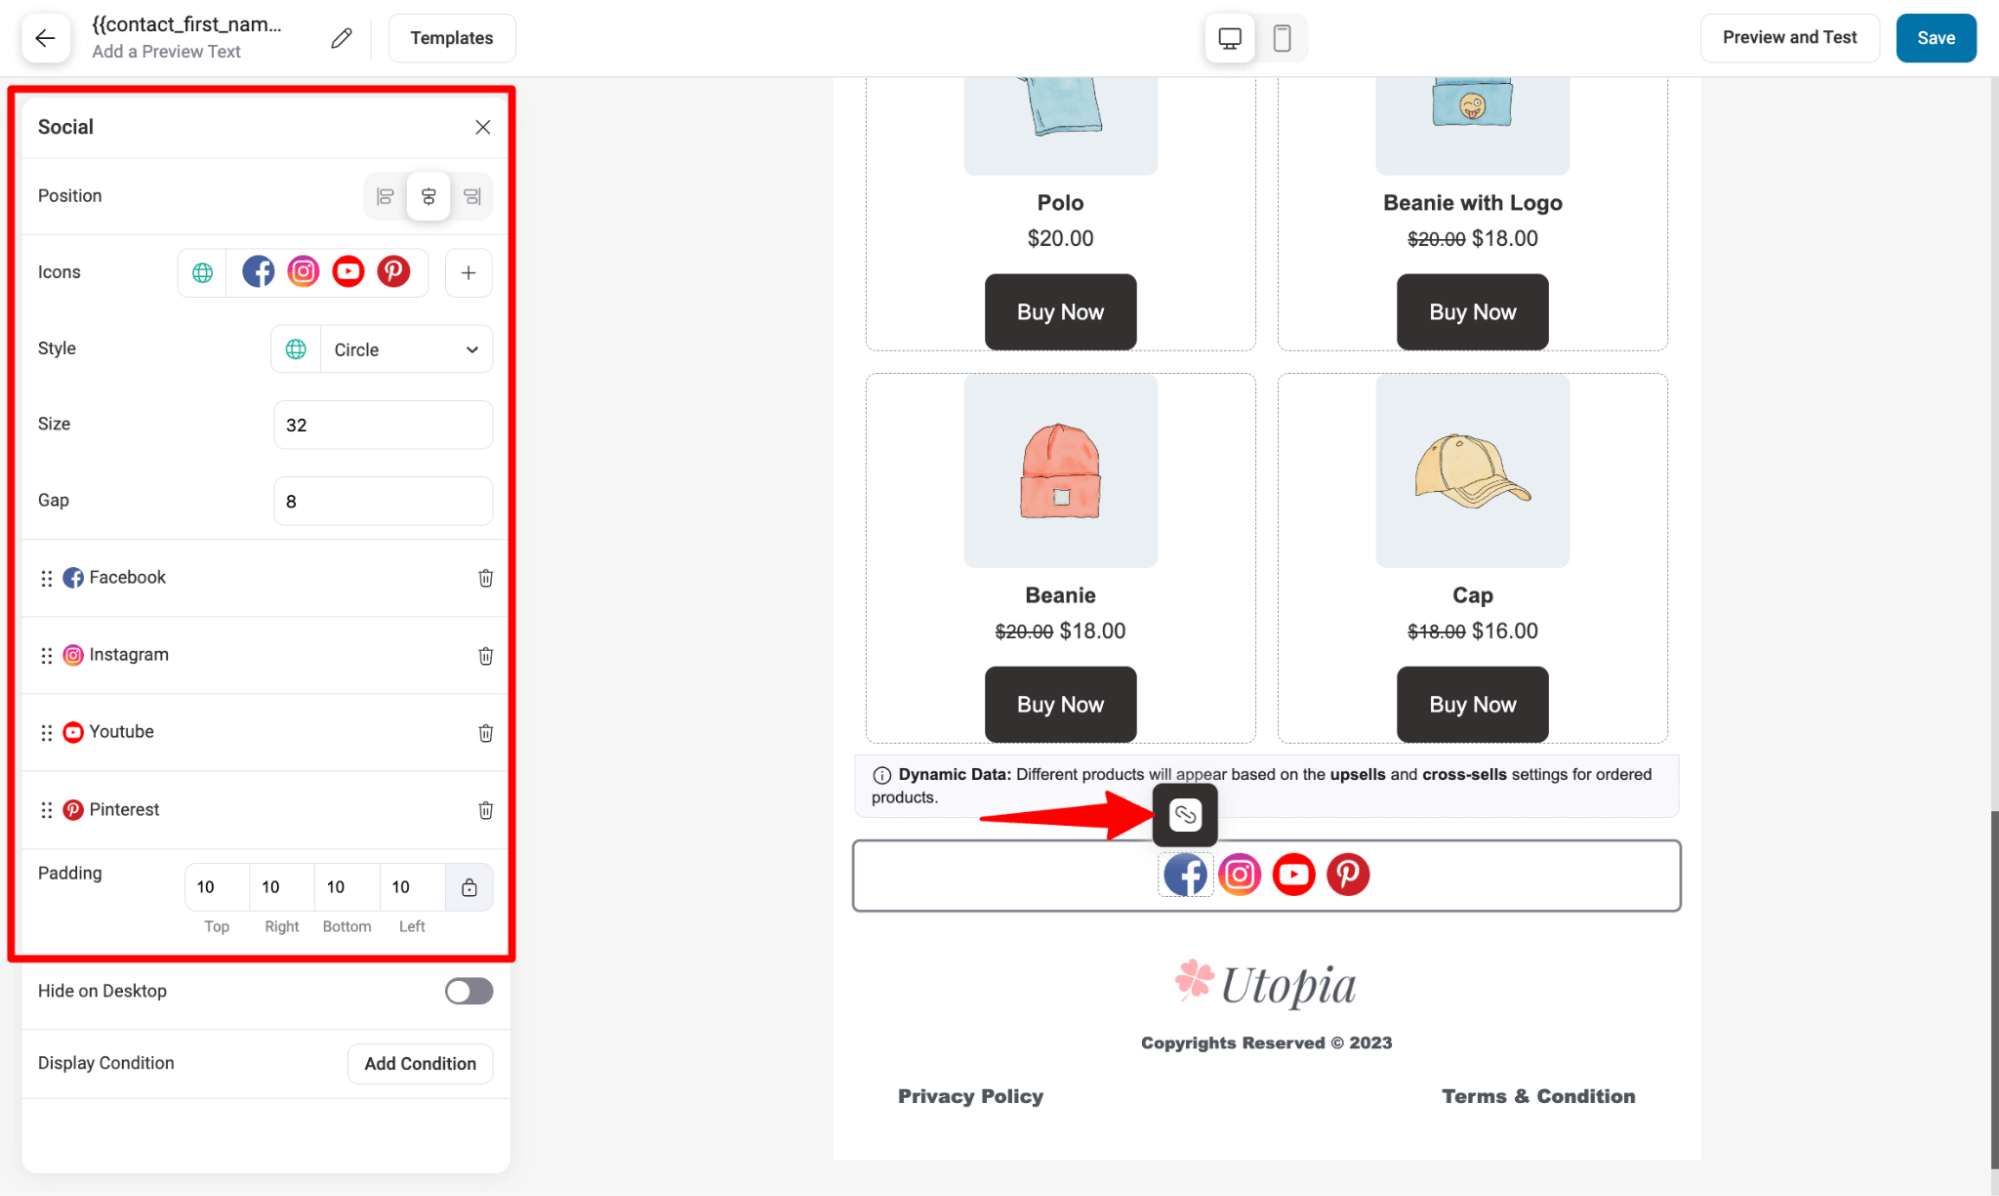
Repeat the same process to add links to all the social icons.
🔔 Similarly, you can also add order notes and shipment tracking information.
After completing the customization, make sure to save the template.
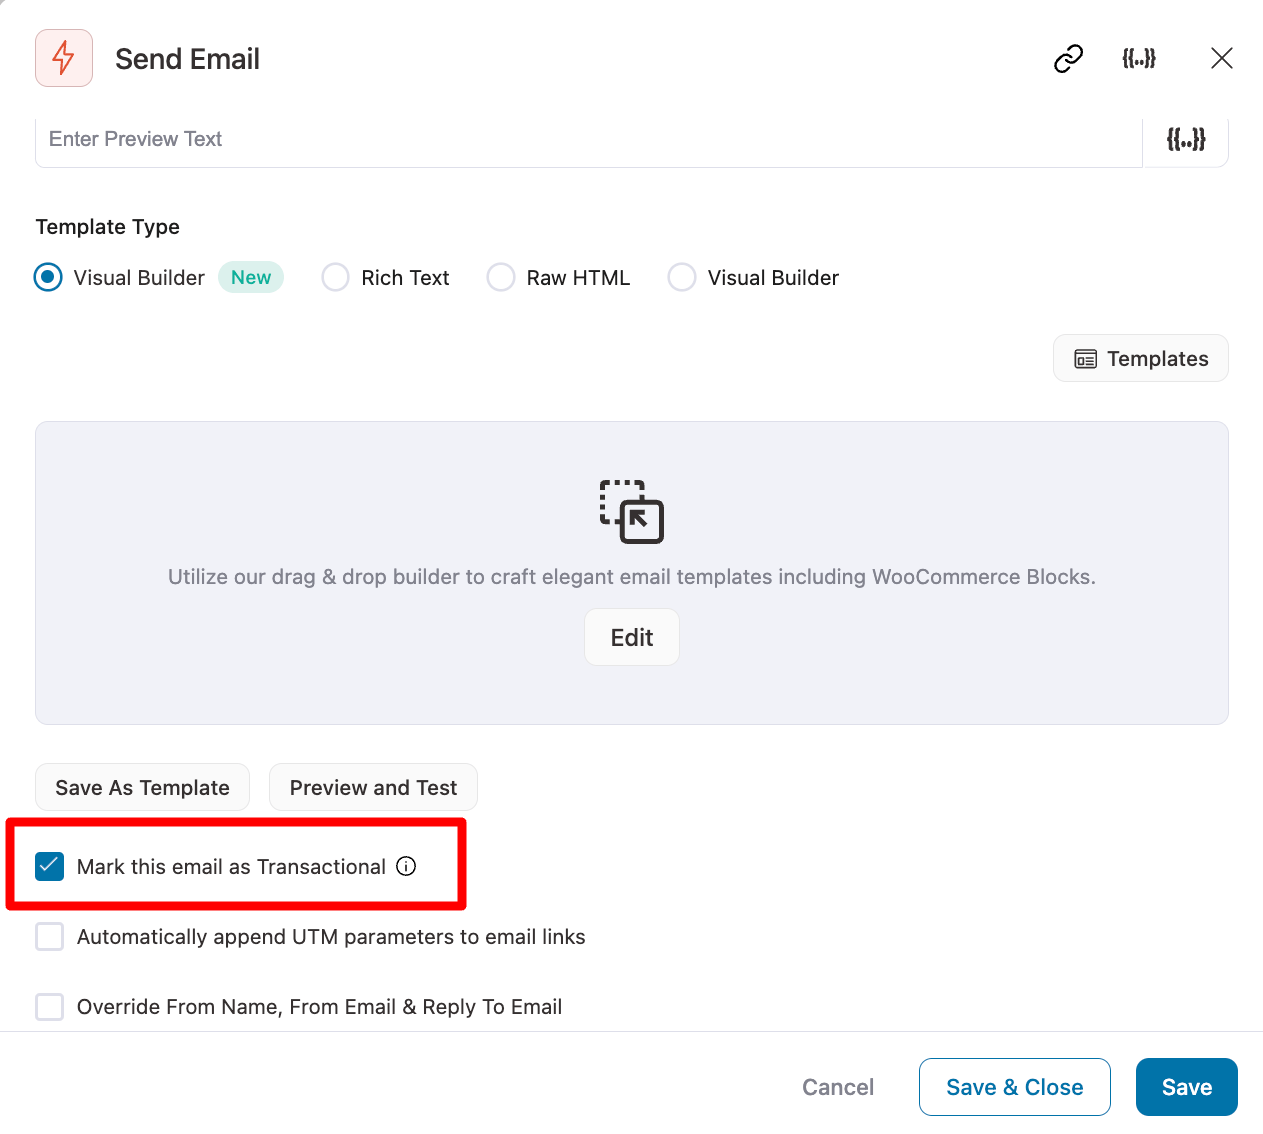
Since the order-processing email is transactional, make sure to mark them as Transactional before saving.
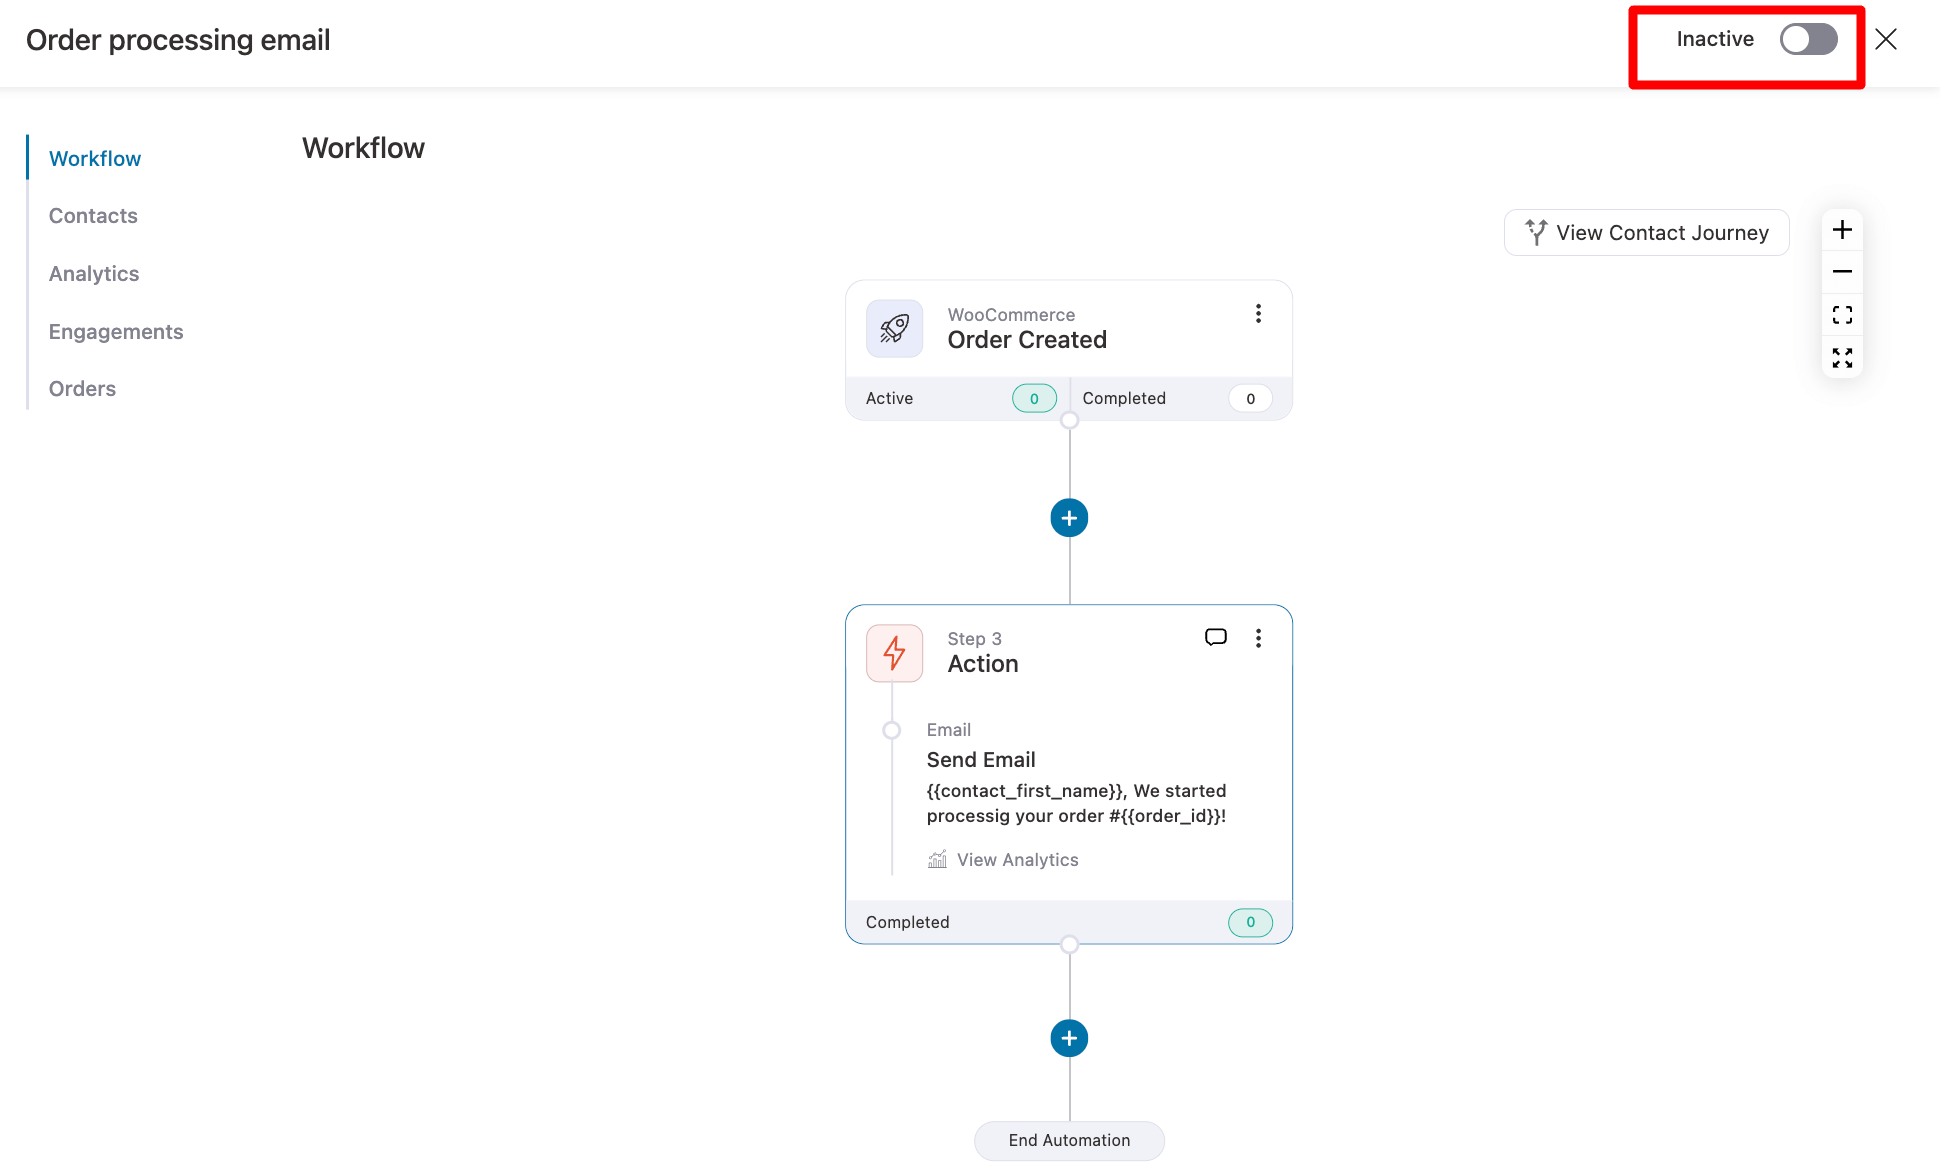
Step 6: Activate the automation
Now activate the automation by turning on the toggle option on the top right side.
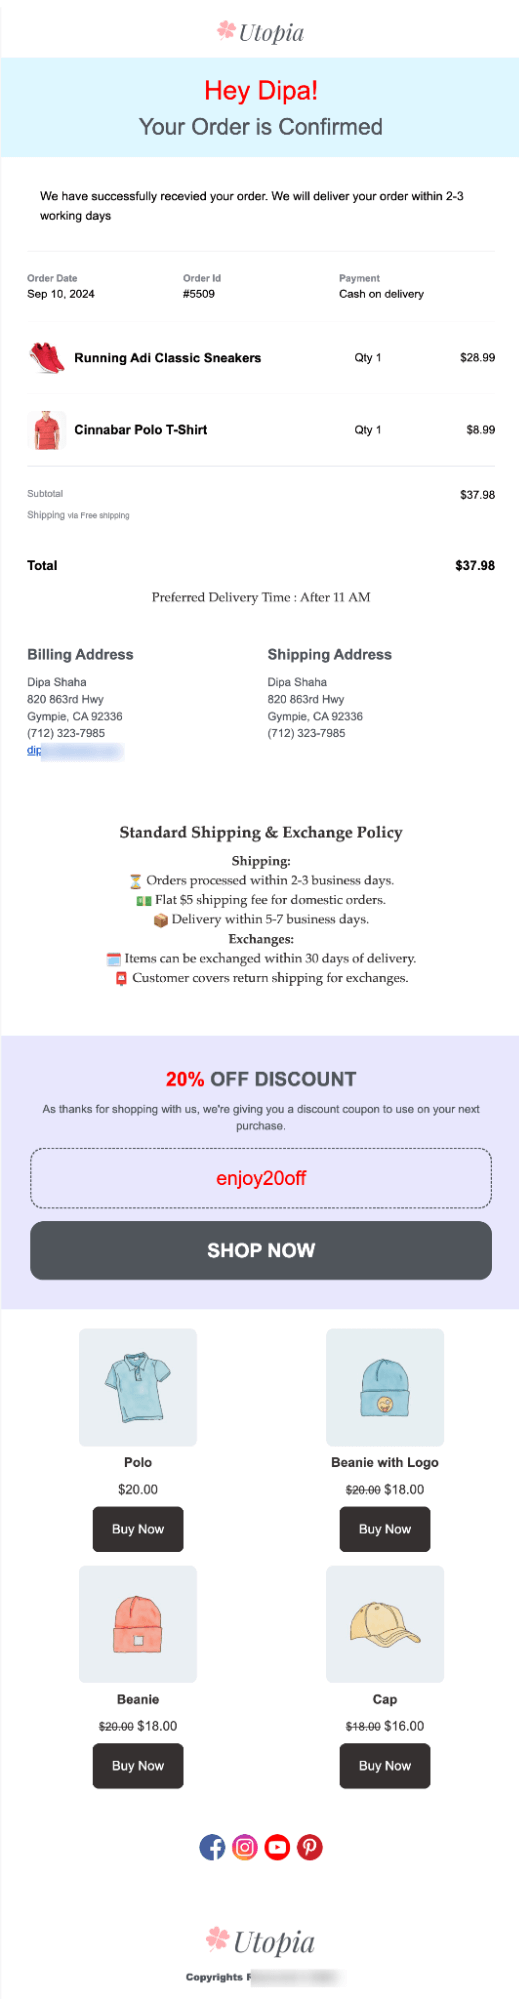
Here is an email we received from the test order:
How to Add Third Party Custom Field Data to WooCommerce Email?
If you use third-party plugins with WooCommerce, those plugins can push important metadata inside their order.
Often, this data is relevant to your customers, making it essential to include in WooCommerce emails.
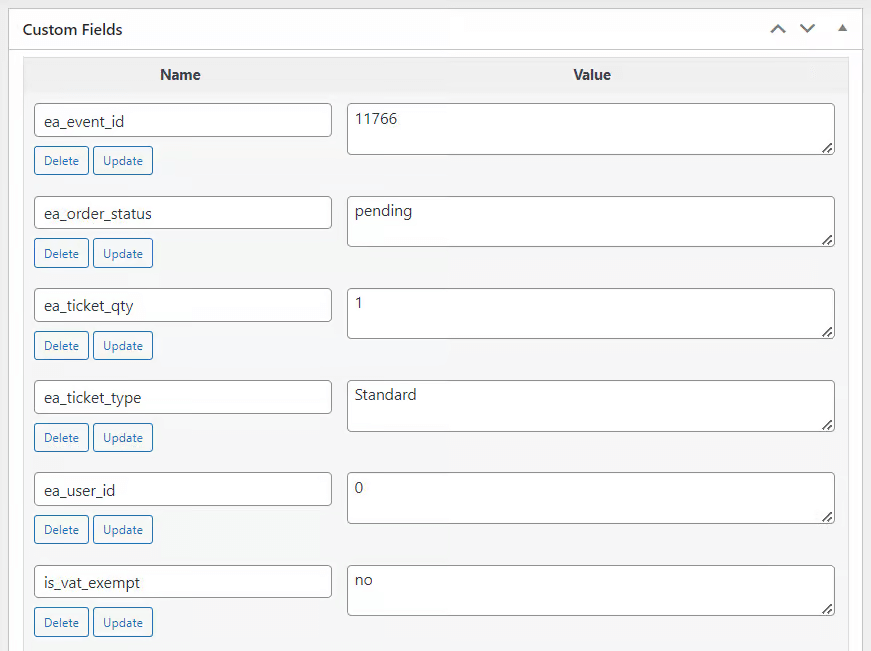
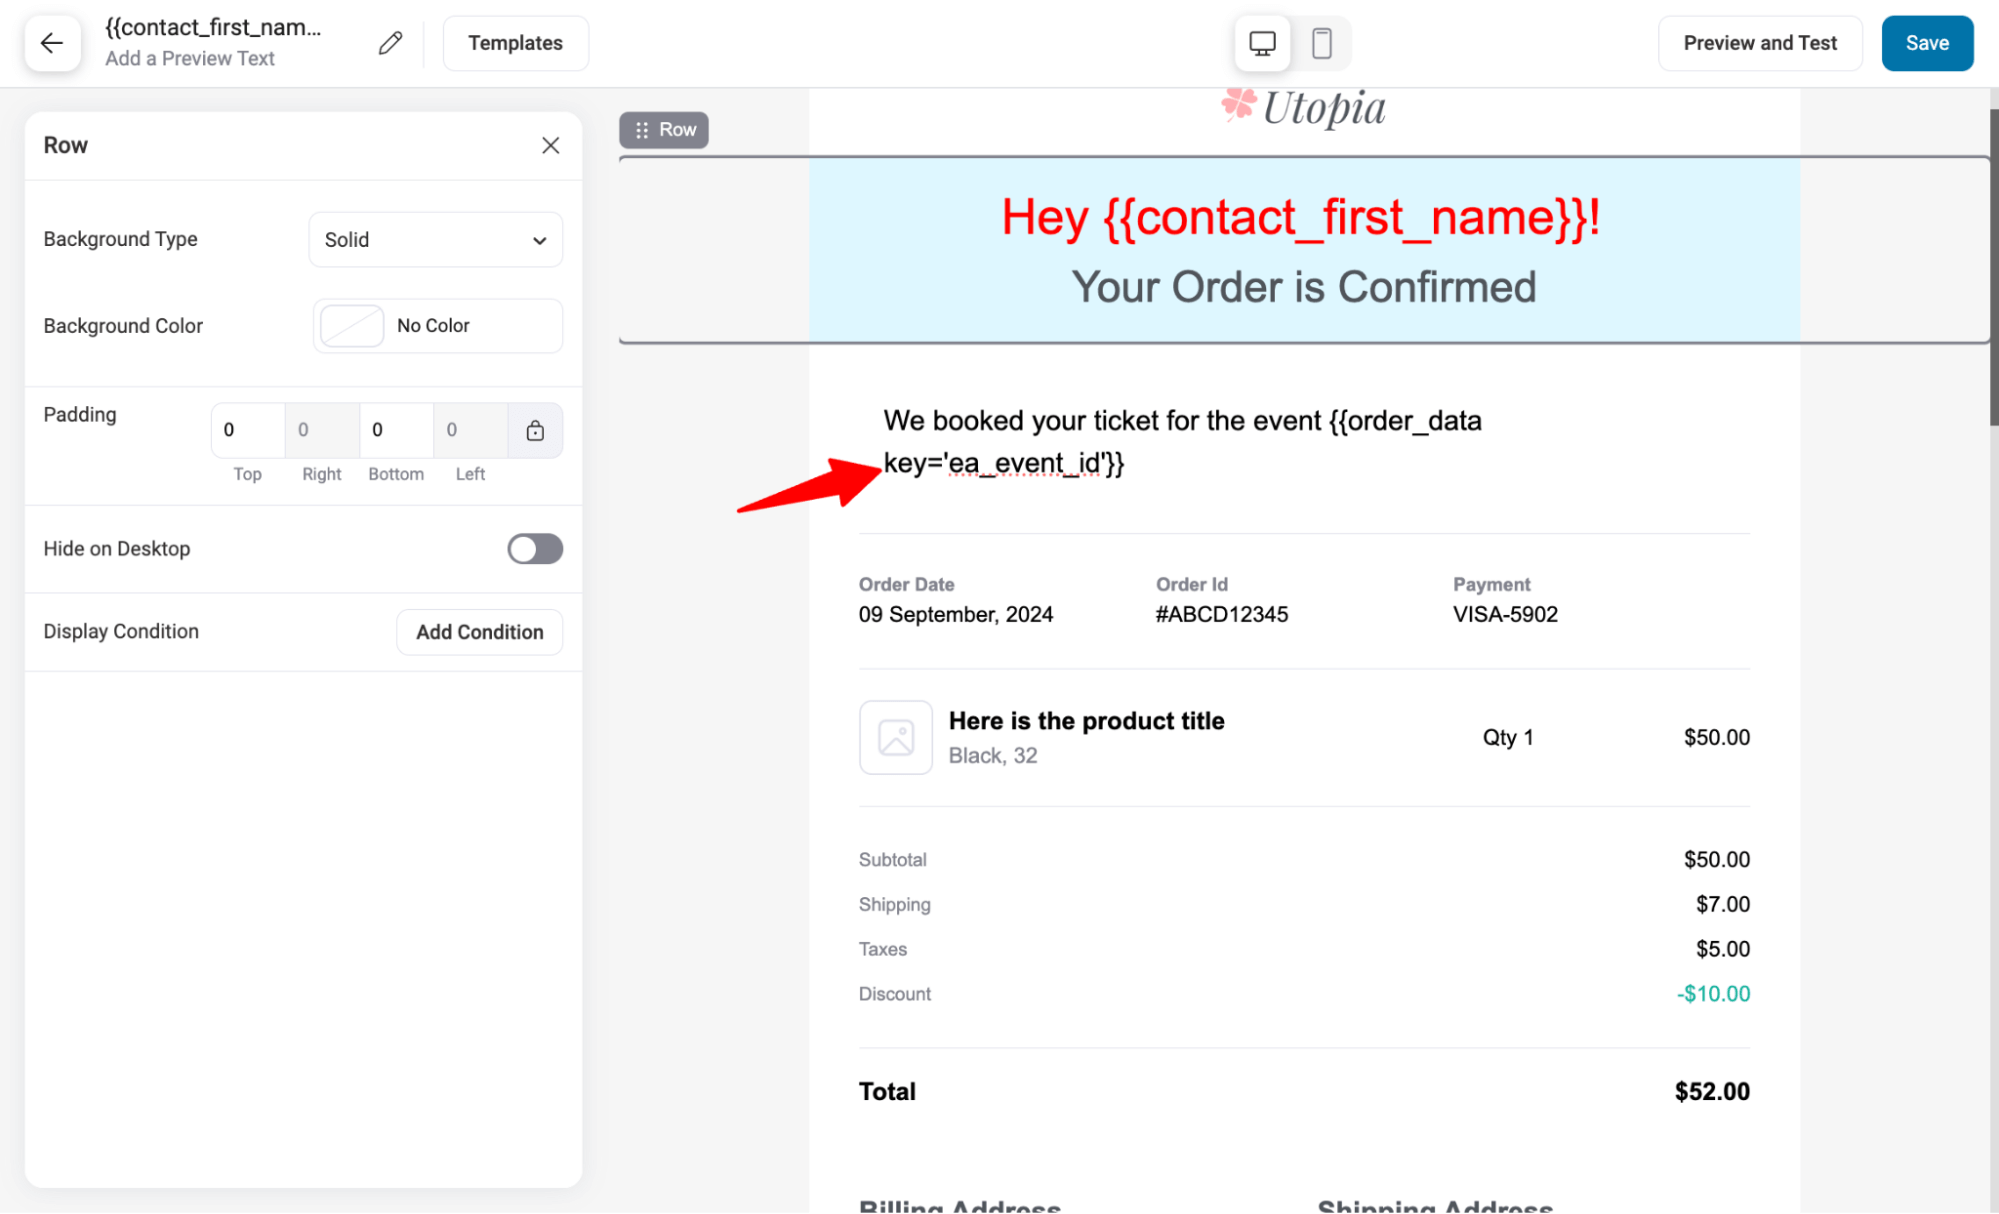
Suppose you're hosting an online event or workshop through your WooCommerce store using an event management plugin.
You'll come across various custom fields for the event, such as event ID, event order status, ticket quantity, ticket type, and more.
Including these custom fields in your WooCommerce emails ensures your customers receive all necessary details.
You can include such third-party metadata using merge tags. For that click on the Merge tag.
Then, from the merge tag list, Go to the settings for order data.
Then, select the metadata. For example, the meta name of the Event ID is ‘ea_event_id’. Once you select copy this merge tag.
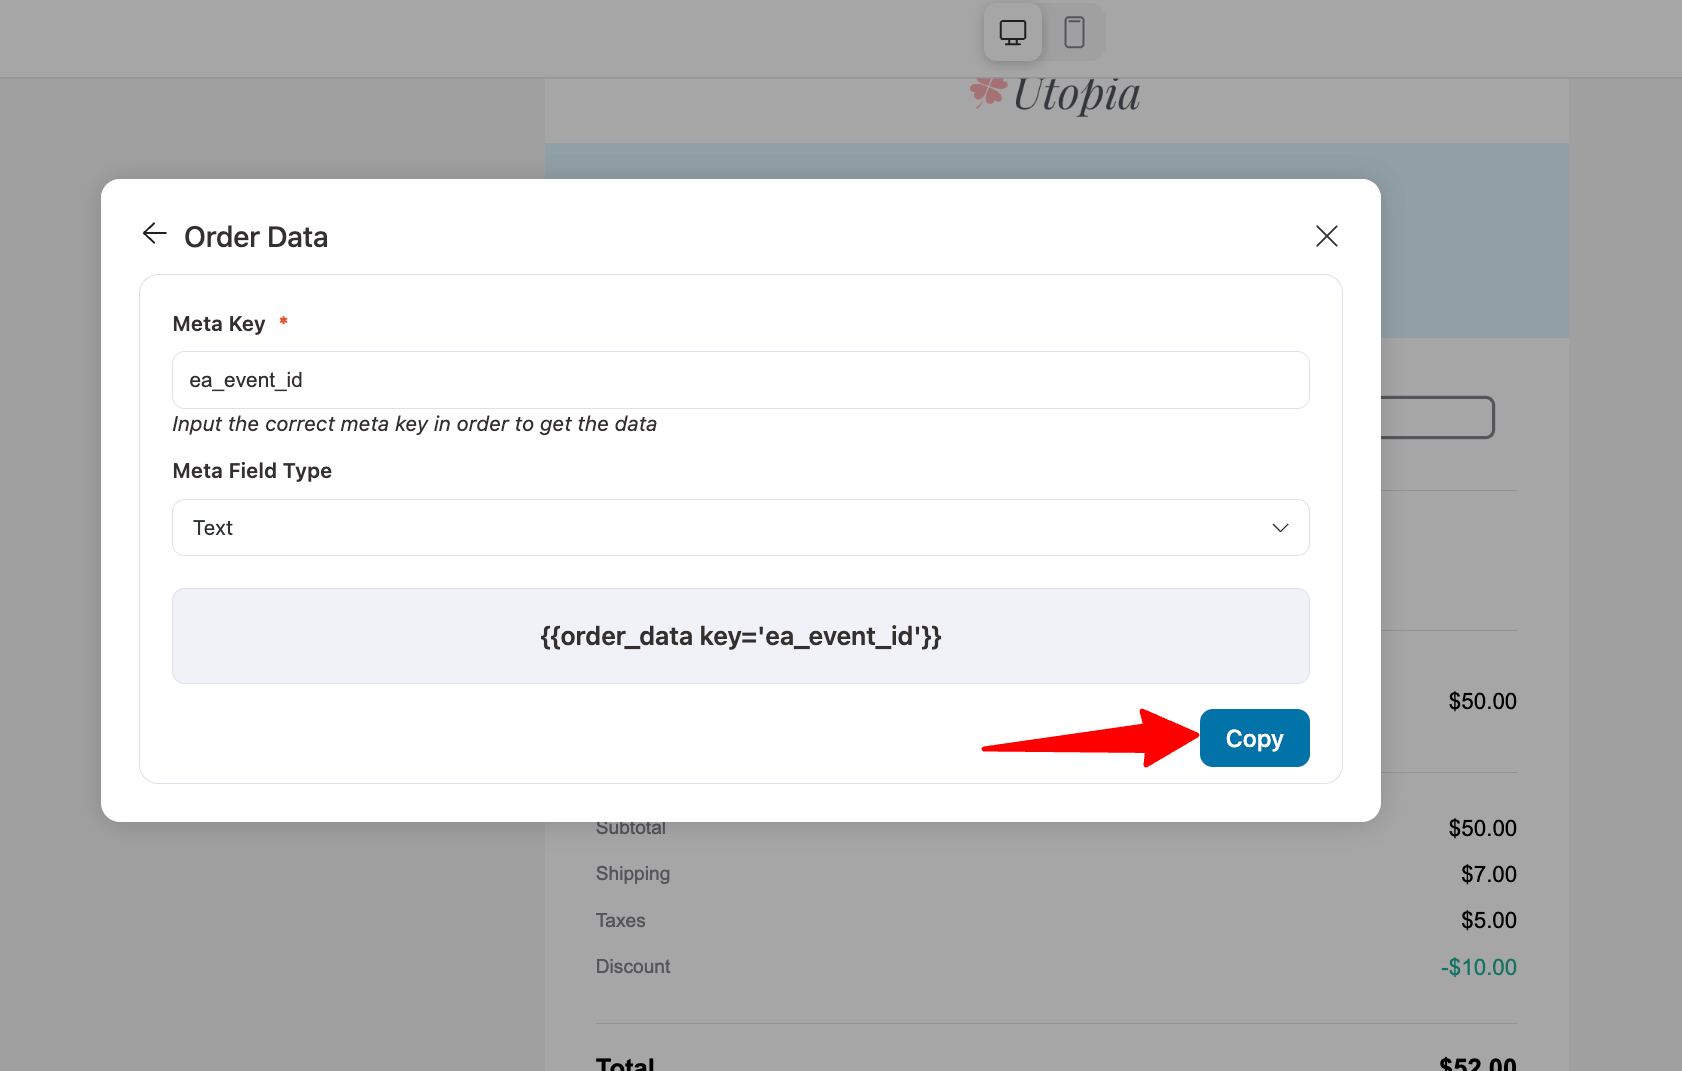
Now, you paste it into your email to add third-party metadata.
That’s it. You can follow this process to add any third-party custom data to add to your WooCommerce emails.
👉 Must Read: 6 Types of WooCommerce Follow-Up Emails
Add Custom Fields to WooCommerce Emails for Effective Communication!
Custom fields in WooCommerce provide crucial data about customer orders. To ensure clear and effective communication with your customers, it’s essential to include all important details.
Whether it's adding custom instructions, integrating third-party metadata, or sharing your exchange policy, custom fields play a vital role.
They can even boost your social media following with icons or close a sale with a discount coupon.
With FunnelKit Automations, adding custom data to your emails is incredibly easy. Plus, you get access to an amazing email builder to create stunning, personalized emails.
So, get FunnelKit Automations today and start adding custom fields to WooCommerce emails for more effective communication!
The post How to Add a Custom Field to WooCommerce Email? appeared first on FunnelKit.