Have you ever hesitated to enter your credit card details on a website that just didn’t feel right? You’re not alone.
In fact, studies show that 19% of online shoppers abandon their carts because they don’t trust the site with their payment information. Even if your WooCommerce store is 100% secure, people won’t stick around if they don’t feel safe.
That’s where trust badges come in.
These aren’t just icons; they’re visual proof that your store is safe, legitimate, and worthy of their hard-earned money.
In this post, we’ll show you exactly how to add trust badges to your WooCommerce checkout page the smart way.
This way, you can earn trust, increase sales, and build a brand that customers feel safe buying from.
What are Trust Badges and Why are They Important?
Trust badges are small, visual icons or symbols displayed on key pages of your website, such as product pages, the cart page, the website footer, and especially the checkout pages, to reassure customers that your store is safe, reliable, and credible.
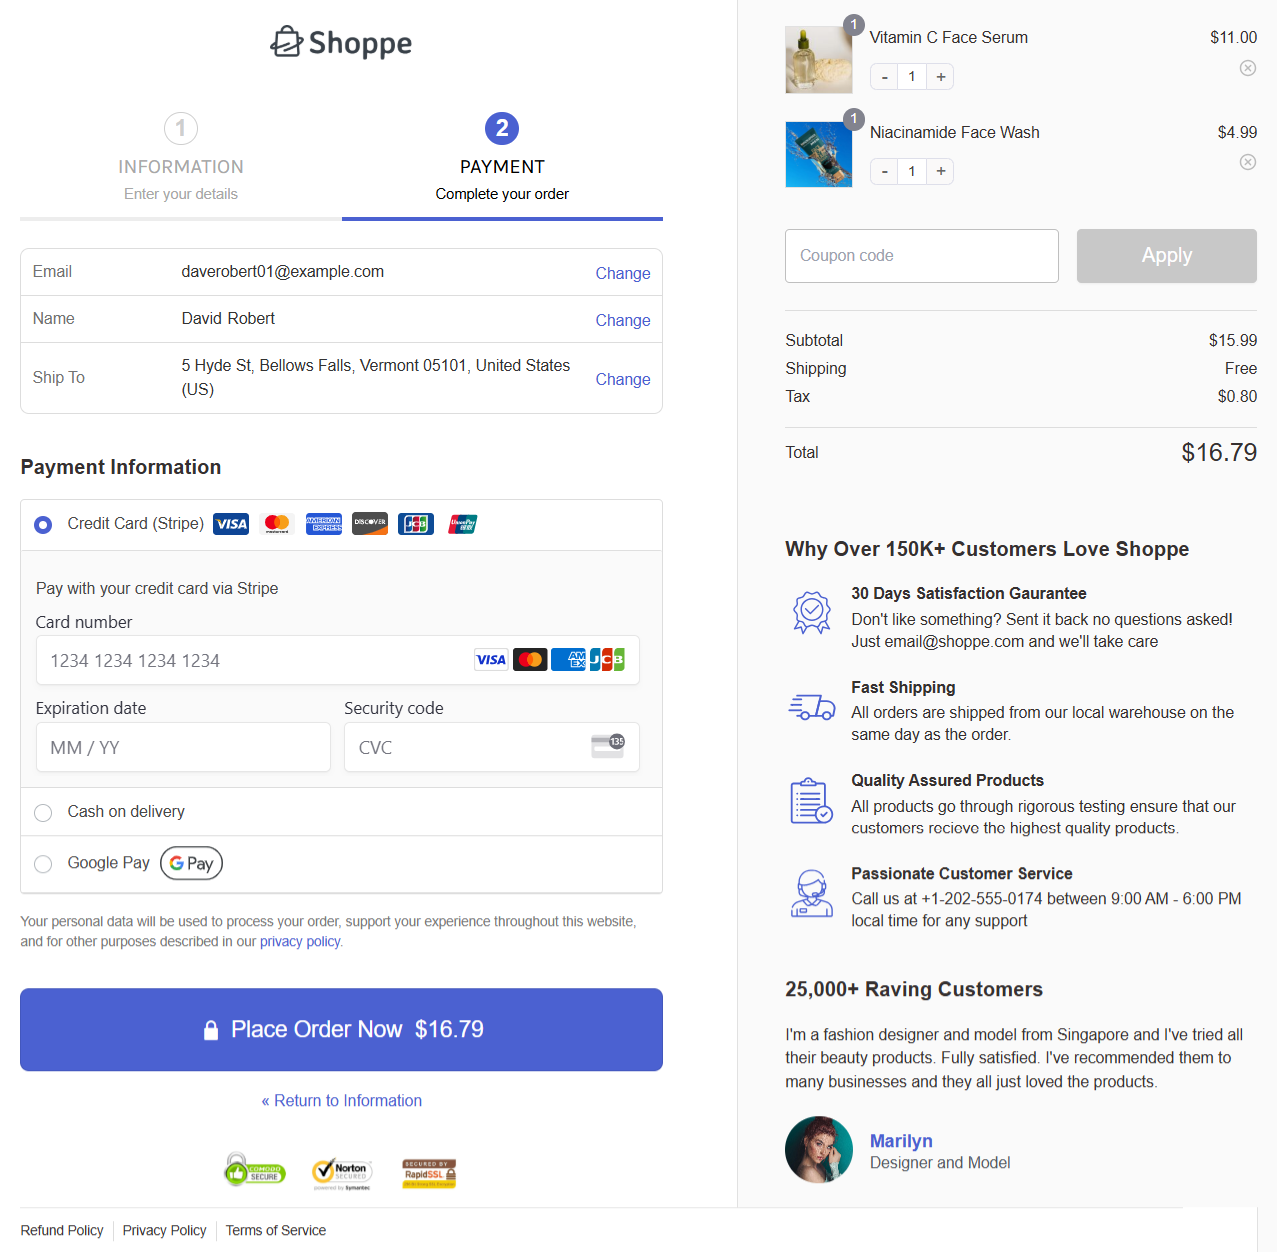
For example, take a look at this checkout page:
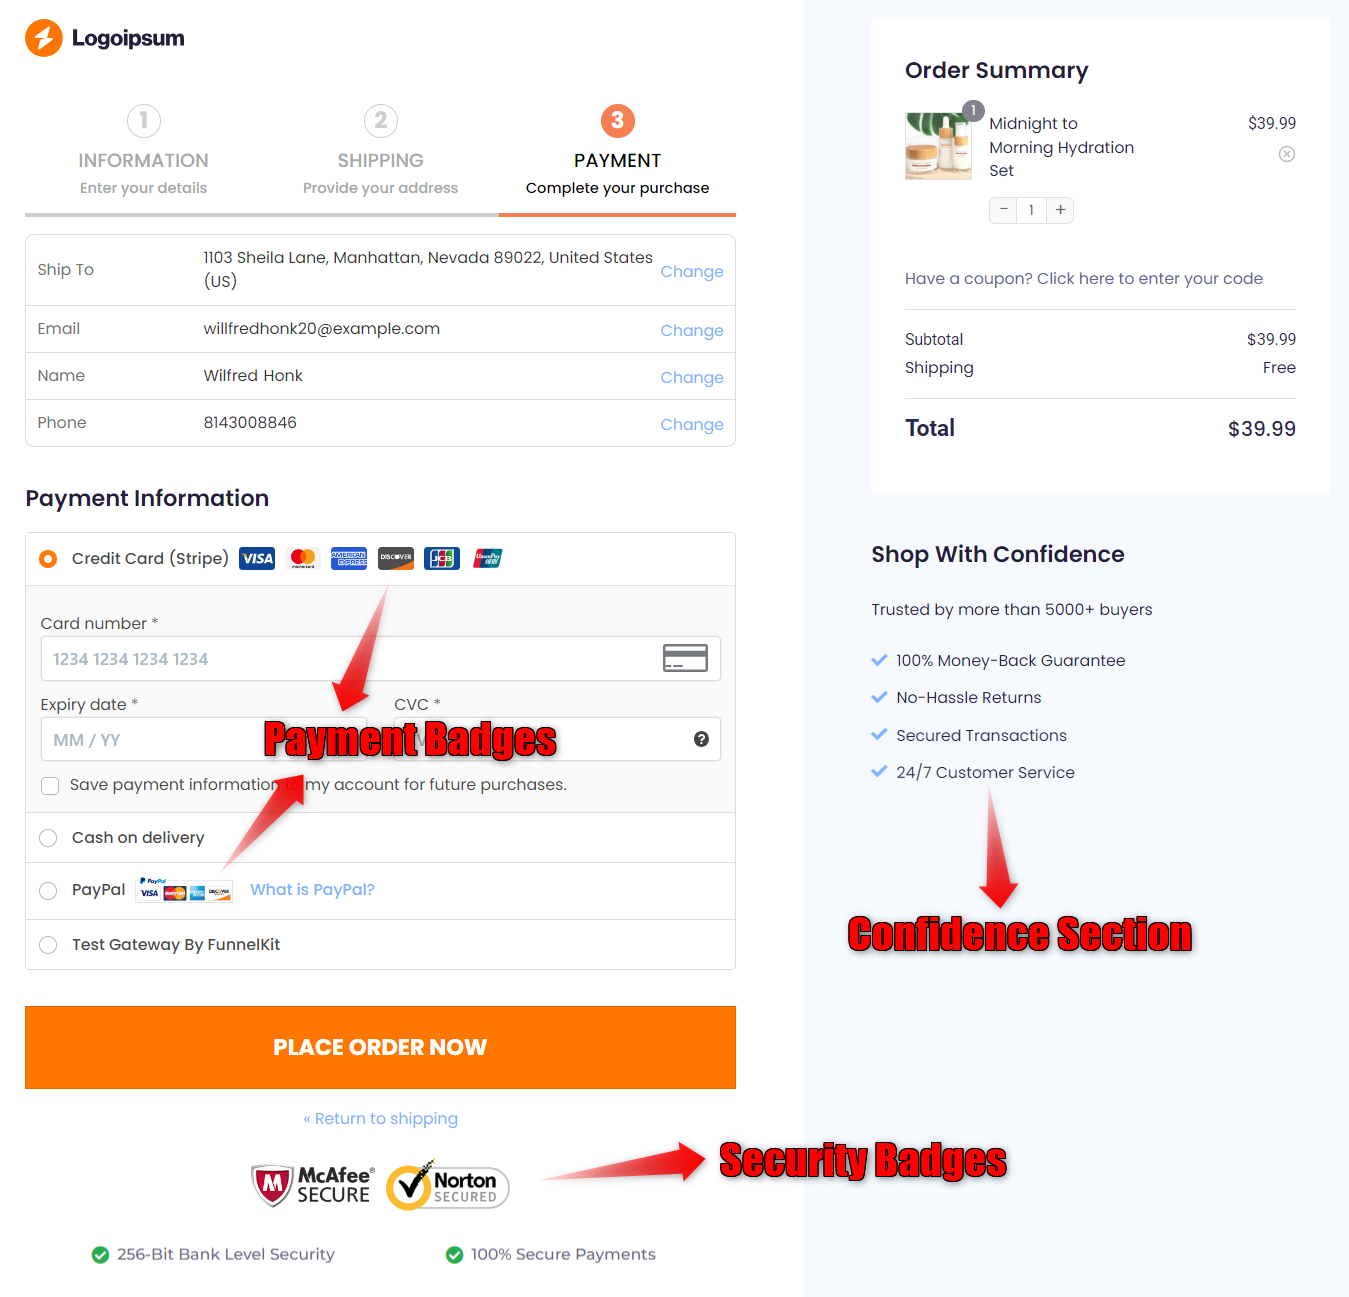
This checkout page features security seals from McAfee and Norton, as well as payment badges. Plus, the confidence section on the right has a money-back guarantee, easy returns, customer service, and other prominent trust seals.
These symbols serve as subtle yet powerful signals that help customers feel secure when making a purchase from your WooCommerce store.
Why Add Trust Badges to WooCommerce Checkout Page?
Many users have asked us, “Do trust badges really work?”. A study by Baymard Institute easily answers this question.
Adding a trust badge to your website or crucial pages significantly improves the conversion rate by as much as 42%. It works seamlessly on your online store, whether you’re selling physical products, digital items, or anything.
Let’s look at a few reasons why trust signals are essential for your checkout:
- Reduce purchase anxiety: Secured trust badges ease shoppers’ concerns about their payments and order returns (if they don’t like the product) and help them feel comfortable completing their purchase.
- Reinforce security and data protection: Displaying SSL badges and trusted antivirus logos demonstrates that the connection is encrypted and that personal and credit card information is secure.
- Show familiar payment options: Displaying recognizable payment provider logos, such as Visa, Mastercard, PayPal, and Apple Pay, assures customers that you accept their preferred method and are backed by legitimate payment processors.
- Highlight risk-free purchase policies: Trust badges like “30-Day Moneyback Guarantee”, “Hassle-Free Returns”, “Satisfaction Guaranteed”, etc., serve as the final nudge if a shopper is on the fence about their purchase.
- Feature social proof and credibility: While most social proof is typically displayed on product pages, showing quick badges like “Trusted by 50,000+ customers” or “Rated 4.9/5” and quoting real customer reviews at checkout reminds buyers that many others trust your brand, allowing them to make informed purchasing decisions.
Types of Trust Badges You Can Add to the WooCommerce Checkout Page
Here’s a breakdown of the most common and effective trust badges you can use on your checkout page:
1. Security badges
Shoppers hesitate to enter their personal or payment details if there is no visible sign of security. That’s where security badges come into play.
Security badges include ‘SSL Secure’, ‘McAfee Secure’, ‘Norton Secured’, ‘100% Secure Checkout’, ‘End-to-End Encryption’, etc.

Security badges instantly signal that your checkout page or store is encrypted and safe. They reassure shoppers that:
- Their personal details and credit card information are protected
- Your site is regularly scanned for potential threats
How to get the Norton or McAfee certificates?
To obtain a secure Norton seal, you must purchase a Symantec (now DigiCert) SSL certificate and install it on your website. For the McAfee badge (now TrustedSite Certified), you need to obtain your certificate from there.
When people feel safe, they’re more likely to buy from your store.
2. Payment badges
Shoppers may question whether your store supports their preferred payment method. Furthermore, if they don’t see a recognizable payment option, they might suspect your WooCommerce store isn’t legitimate.
In this case, displaying trusted payment provider logos shows that:
- Your store supports popular and reliable gateways
- These payments are backed by global financial platforms
For example, payment badges like Visa, Mastercard, American Express, PayPal, Apple Pay, Google Pay, etc.
To accept payments for orders, your store must have a payment gateway plugin enabled. You can display payment method badges on the checkout page to build trust and reassure customers.
Familiar payment logos create a sense of legitimacy, boosting trust in your brand.
3. Money-back guarantee badges
What if the product doesn’t work as expected? Or what if the customer changes their mind? Without a visible refund policy, many customers hesitate and abandon their carts.
In this scenario, guarantee badges remove that risk. They communicate that:
- Your business stands behind your product
- Reassures customers that their money is protected
- Customers can request a refund if they are unsatisfied with the product
For example, ‘14-Day Money-Back Guarantee’, ‘Risk-Free Purchase’, etc.
These badges are powerful for converting fence-sitters and increasing confidence in your products and offers.
4. Free shipping badges
Surprise shipping fees or additional costs at checkout are the top reason for cart abandonment.
Free shipping badges eliminate unpleasant surprises and add value to shoppers’ minds. Even if you offer conditional free shipping above a specific order value, a badge still sets the right expectation upfront.
For example, ‘Free Shipping on All Orders’, ‘Free Shipping over $50’, and more.
If your store offers free shipping over a certain cart amount, you can insert them on your checkout page. You can get these shipping badges for free on Canva, Freepik, Adobe Stock, etc.
5. Third-Party Certification Badges
Your website looks good, but how do customers know you’re worth their money? Many shoppers want to see external validation from others before they trust an unfamiliar brand.
This is where third-party certification badges act as key authority signals. They show that:
- You’ve passed independent checks
- Other popular brands rate your business positively
- You’re not just claiming, but you’ve earned the trust
For example, ‘Better Business Bureau (BBB) Accredited Business’, ‘TrustedSite Verified’, ‘Google Certified’, and more.
These badges are especially valuable for new WooCommerce stores that are still building their reputation.
6. Customer reviews
About 92% of shoppers read customer reviews and testimonials before purchasing anything online.
No social proof means shoppers may think, ‘If anyone has bought this product?’ or ‘Is it as good as the store claims?’, which often leads to hesitation and abandoned carts.
Customer review badges serve as social proof, a powerful psychological trigger influencing buyer behavior. These badges instantly communicate:
- Your business is reliable and trustworthy
- Others have purchased and liked your product
Customer reviews and badges include a real testimonial from customers on the checkout page, ‘Rated 4.9/5 by 13,000+ Customers’, ‘Over 8,300 Verified 5-Star Reviews’, and more.
The customer review trust badges can dramatically boost trust and encourage conversions in your online store.
7. Satisfaction guarantee
Online shoppers worry about wasting money, especially when trying a new brand. They always ask, ‘What if I hate it?’, ‘What if it doesn’t work for me?’, etc. This fear leads to hesitation in making a purchase or abandoning it altogether.
Satisfaction guarantee badges reduce buyer anxiety by reassuring them that you prioritize their happiness. These badges help by:
- Showing confidence in your product or service
- Offering peace of mind after the purchase
- Encouraging the shopper to try without pressure
For example, ‘100% Satisfaction Guaranteed’, ‘Try It Risk-Free’, etc.
They work great in tandem with money-back guarantee badges, especially for high-ticket items, digital products, or courses.
How to Add Trust Badges to WooCommerce Checkout Page? (Easiest and Most-Effective Method)
Use a checkout customizer plugin if you want a no-code solution to add trust badges to the WooCommerce checkout.
FunnelKit Funnel Builder is an all-in-one solution that features professionally designed checkout templates with pre-installed trust badges, enabling you to create a highly optimized checkout experience with ease.
You can transform your default checkout with a custom one, utilizing all high-converting elements and trust badges.
Get a copy of the FunnelKit Funnel Builder below.
Install and activate the FunnelKit Funnel Builder plugin on your WordPress website.
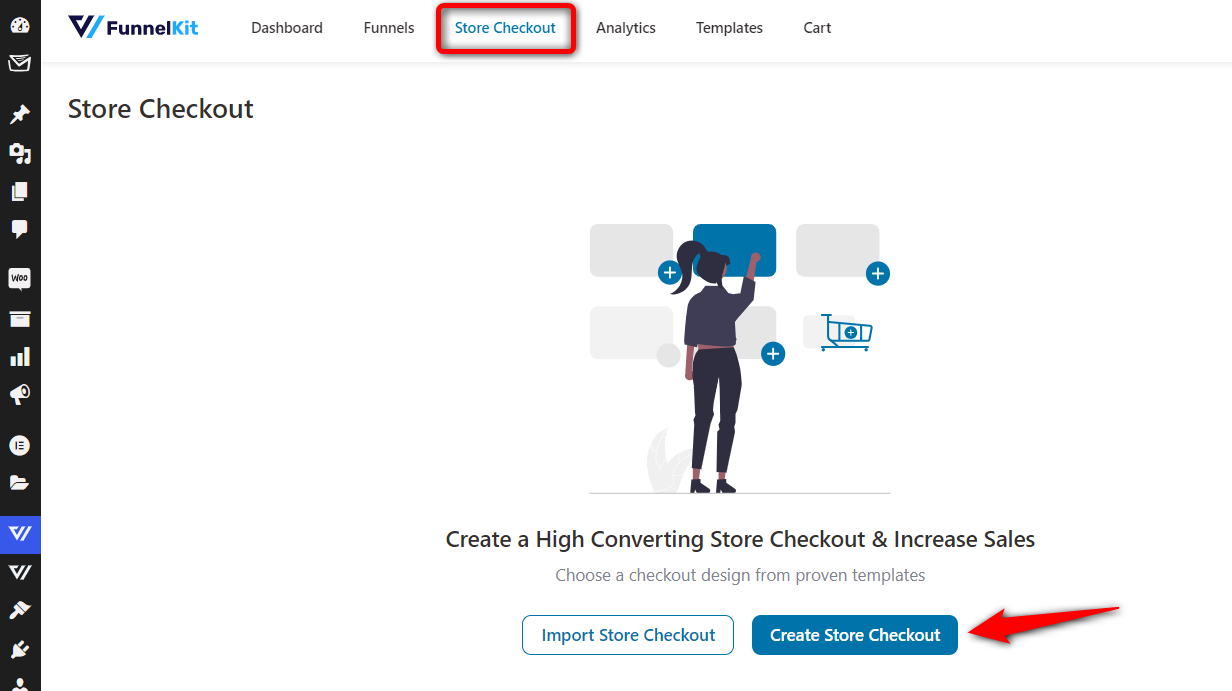
Step 1: Create a store checkout
Navigate to FunnelKit ⇨ Store Checkout and click on the ‘Create Store Checkout’ button.
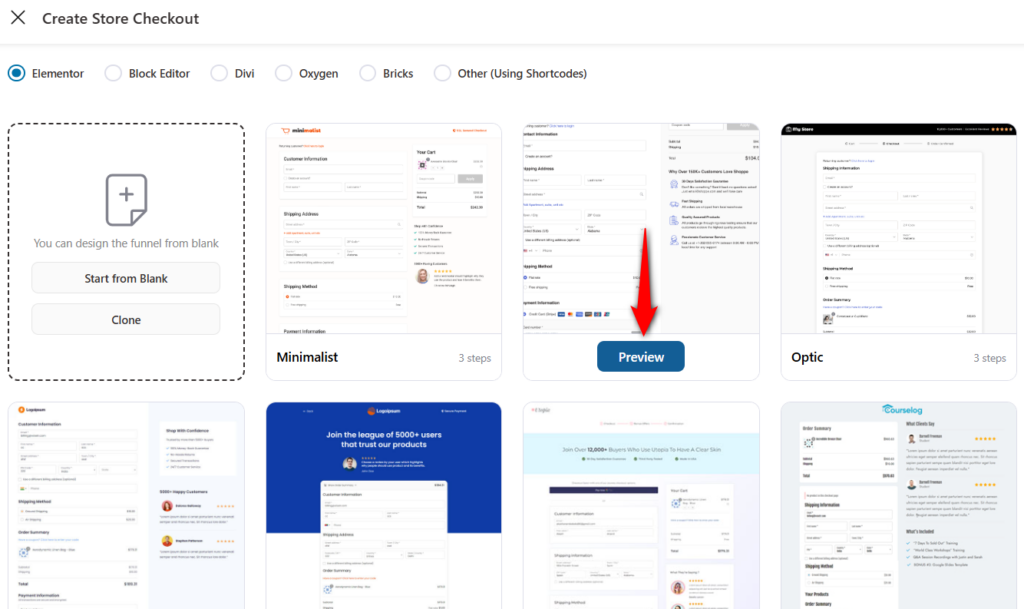
You’ll get directed to the FunnelKit checkout templates page. These are pre-designed templates that come optimized for all devices.
Choose your page builder, then hover over the store checkout template you like and hit ‘Preview’.
Next, select the number of steps you want on your checkout page and hit the ‘Import This Funnel’ button.
Enter the name of your store checkout.
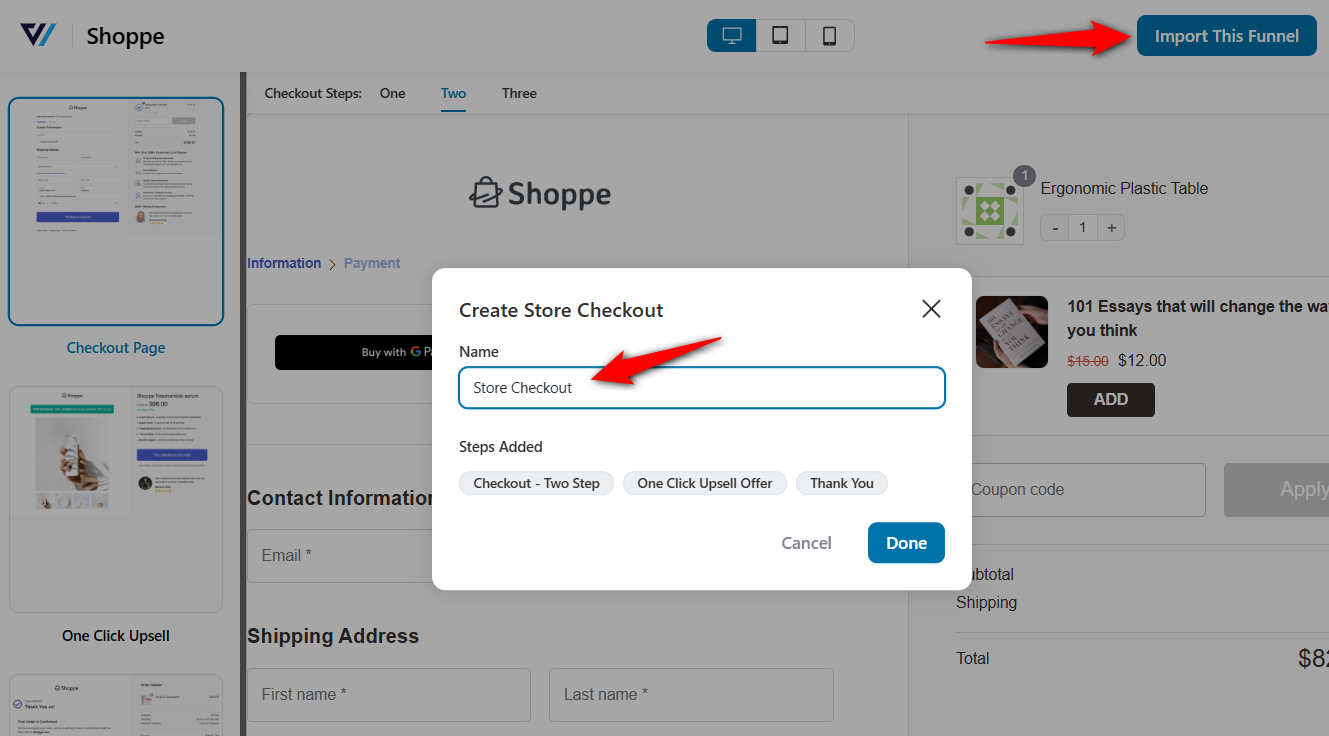
Clicking on ‘Done’ will import the store checkout funnel.
Step 2: Customize your checkout page in WooCommerce
Click on the checkout page step in your funnel.
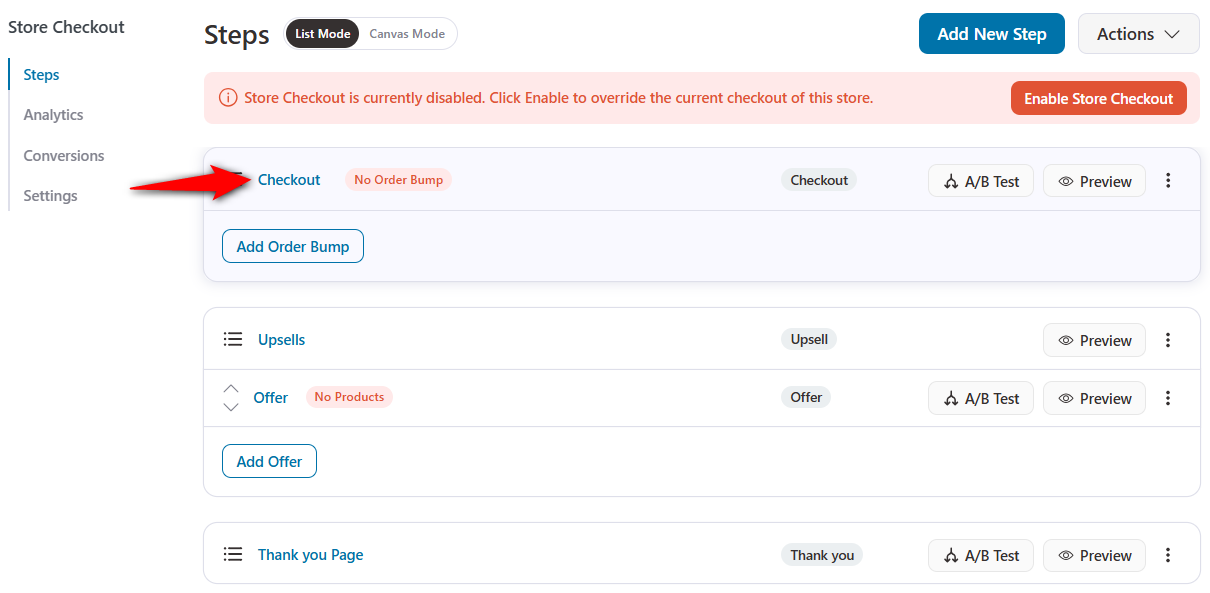
On the Design tab, click on the ‘Edit Elementor Template’ button to start customizing your checkout page. Here, we'll be adding the WooCommerce trust badges.
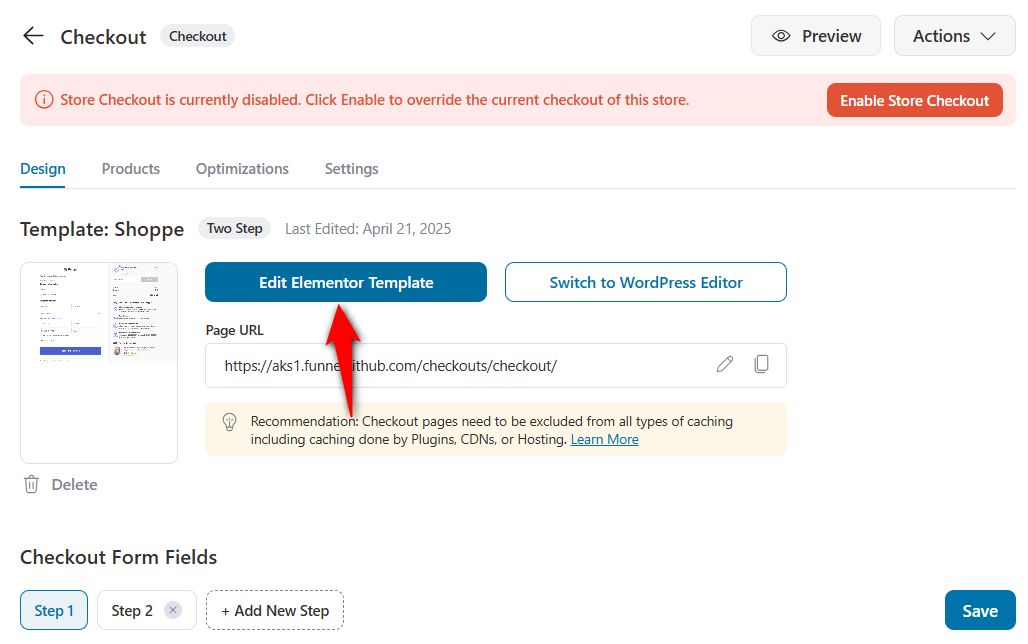
As you can see, the page has loaded in Elementor (because we had chosen Elementor as our preferred page builder).
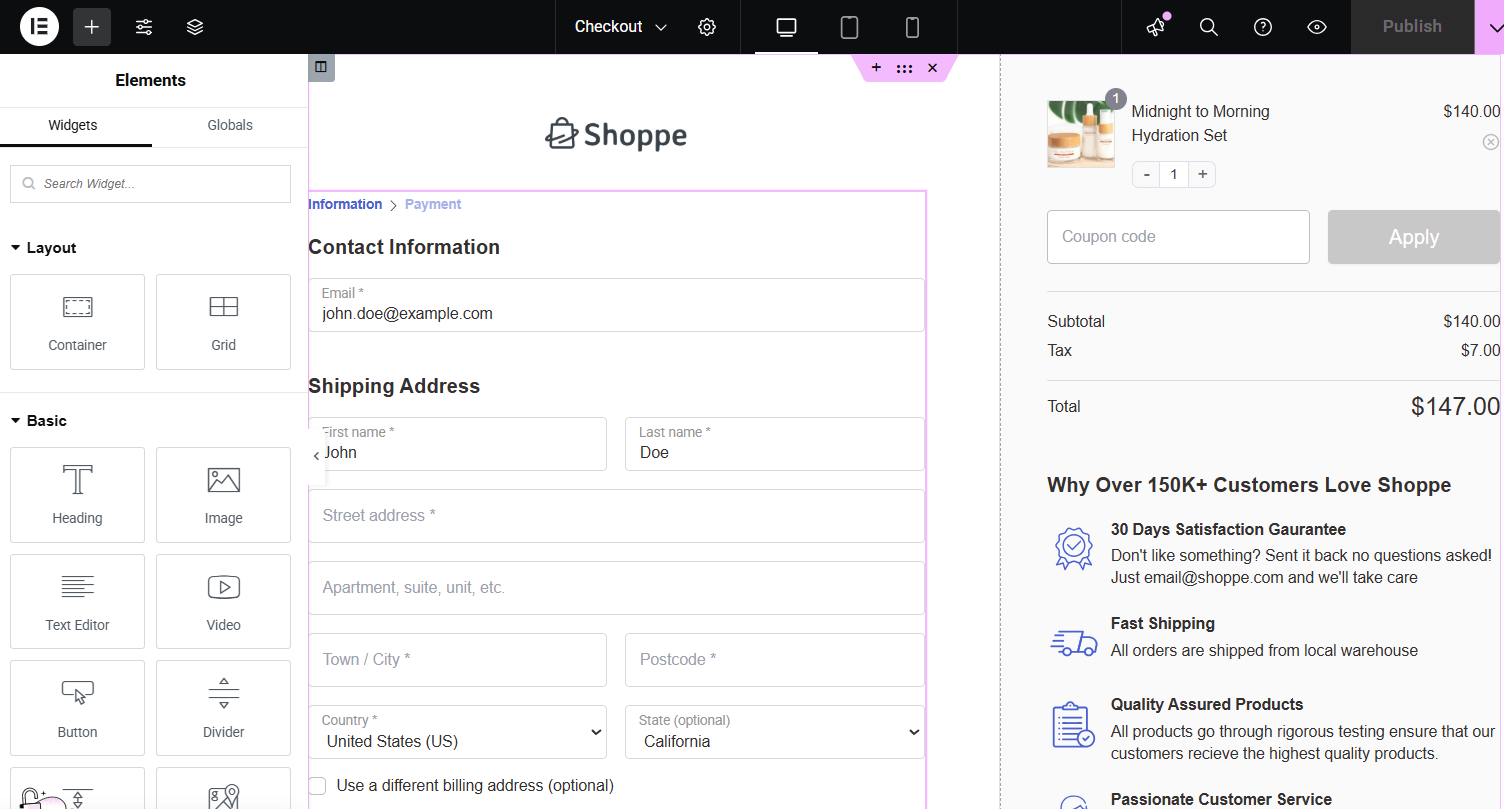
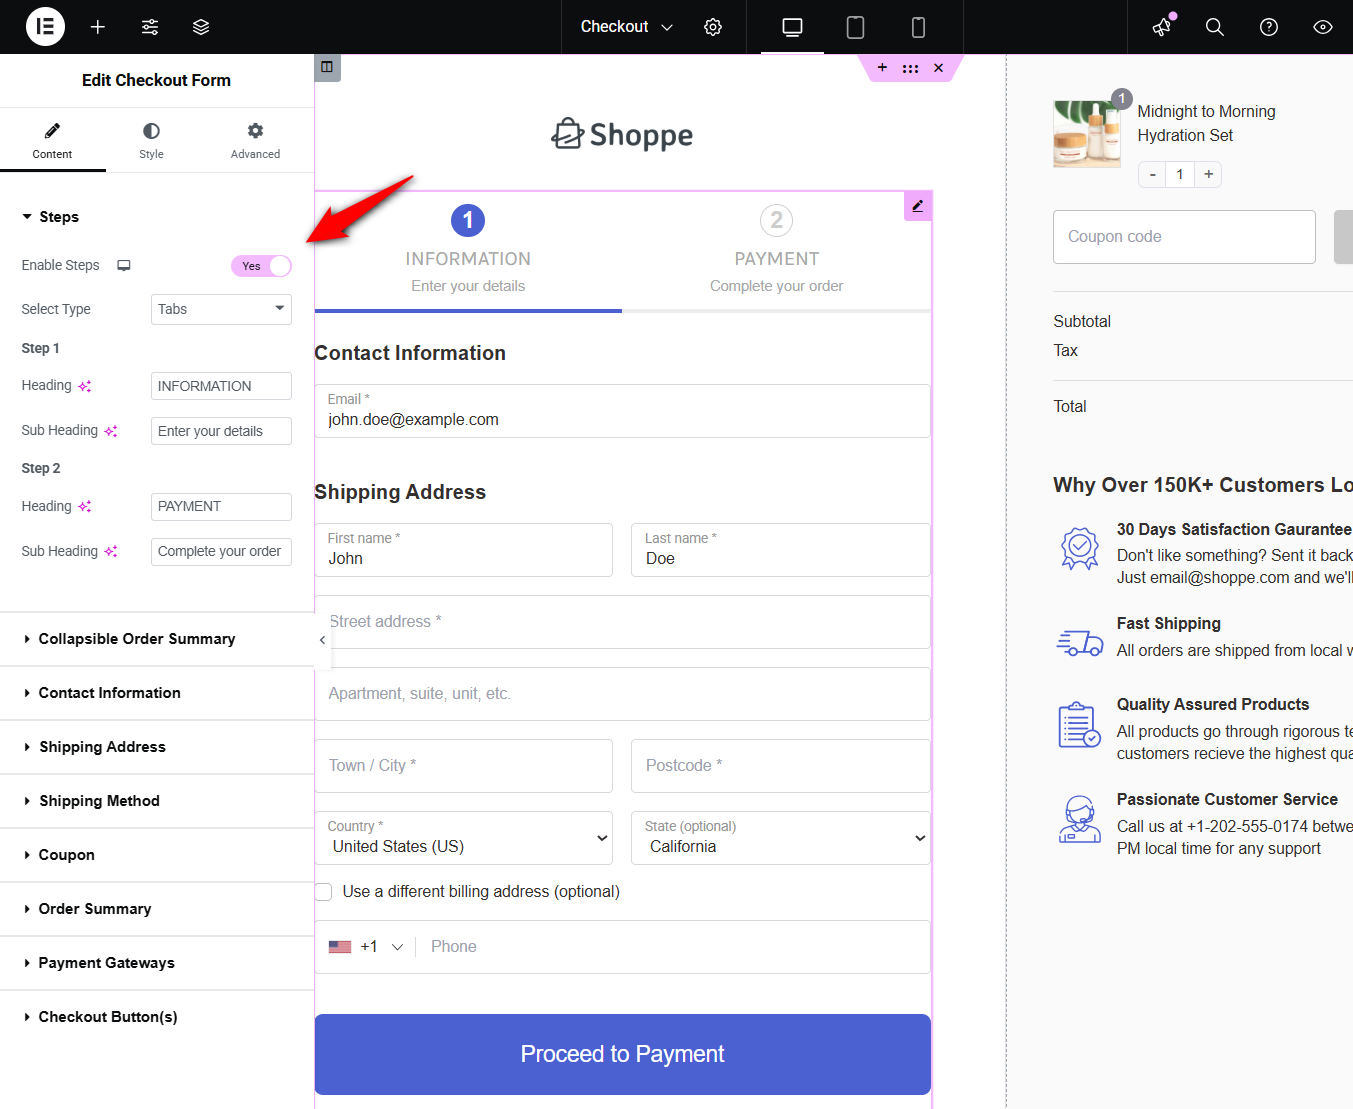
Modify your checkout page with steps, adjust the field widths, update your business logo, customize the mini cart section, and more.
Next, let’s add the trust badges.
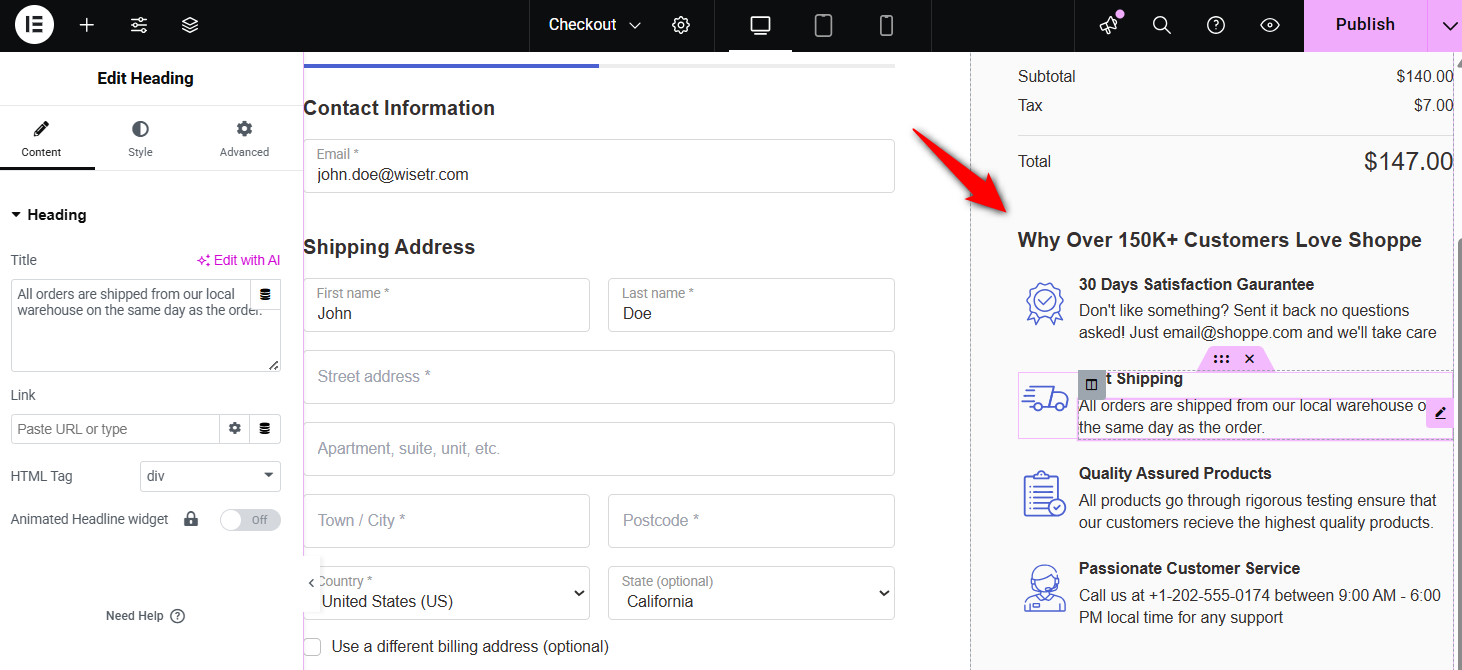
Step 3: Add trust badges to the WooCommerce checkout page
As you can see, the page already has confidence page elements:
- 30-day satisfaction guarantee
- Fast shipping
- Quality assured products
- Passionate customer service
Feel free to modify them as you see fit.
Let’s add some security badges and a genuine customer review.
To add a badge, add an image below the checkout button:
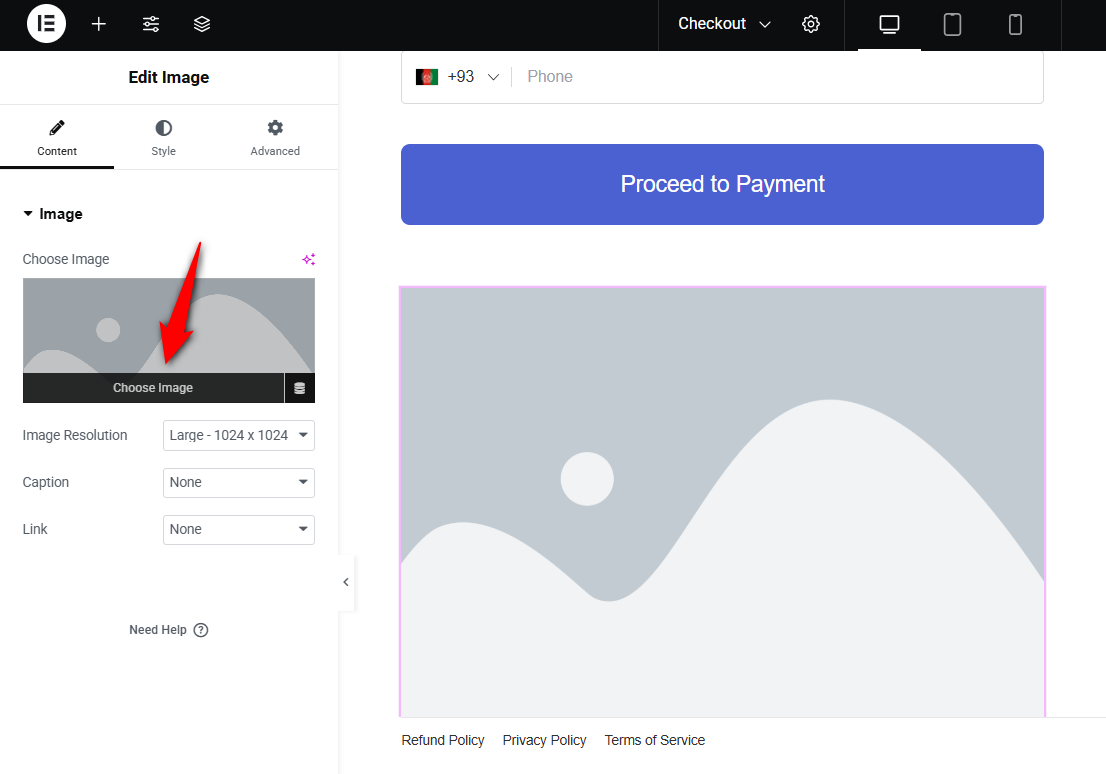
Insert the security badge you want to have here.
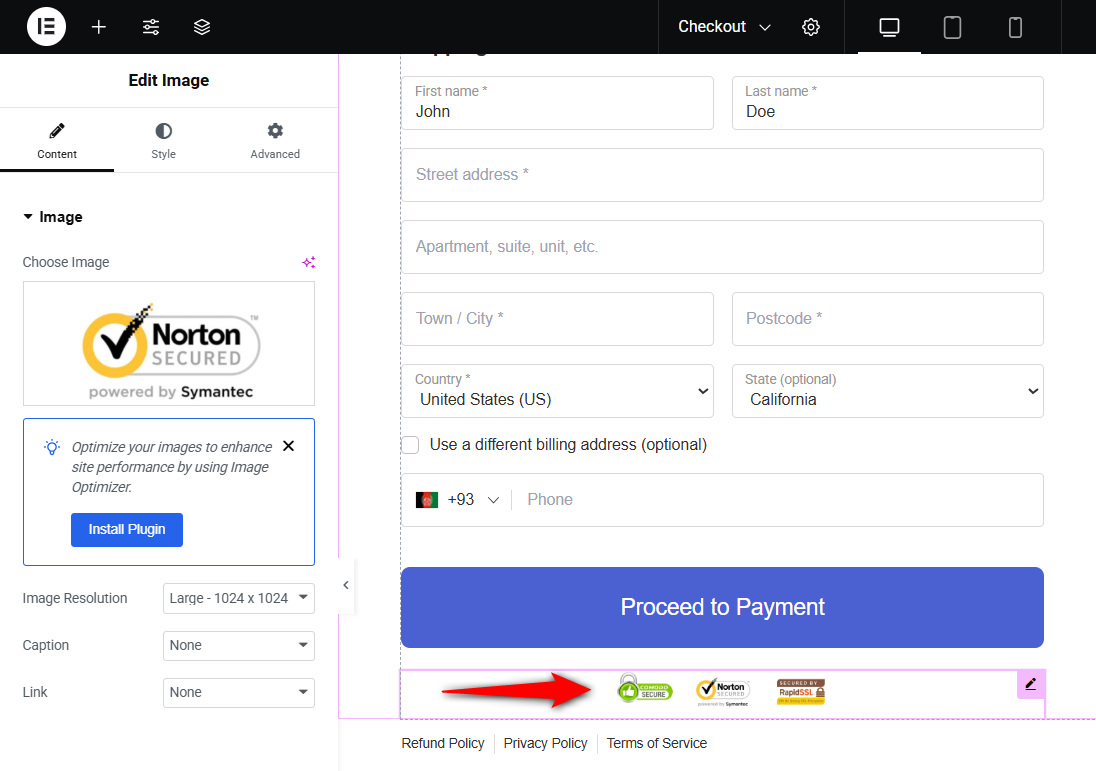
Nicely done! You’ve successfully added the security badge to the checkout page.
Next, let’s add a customer testimonial section below the confidence section on the right side.
Here, we’ve inserted the heading section to begin our customer testimonial section:
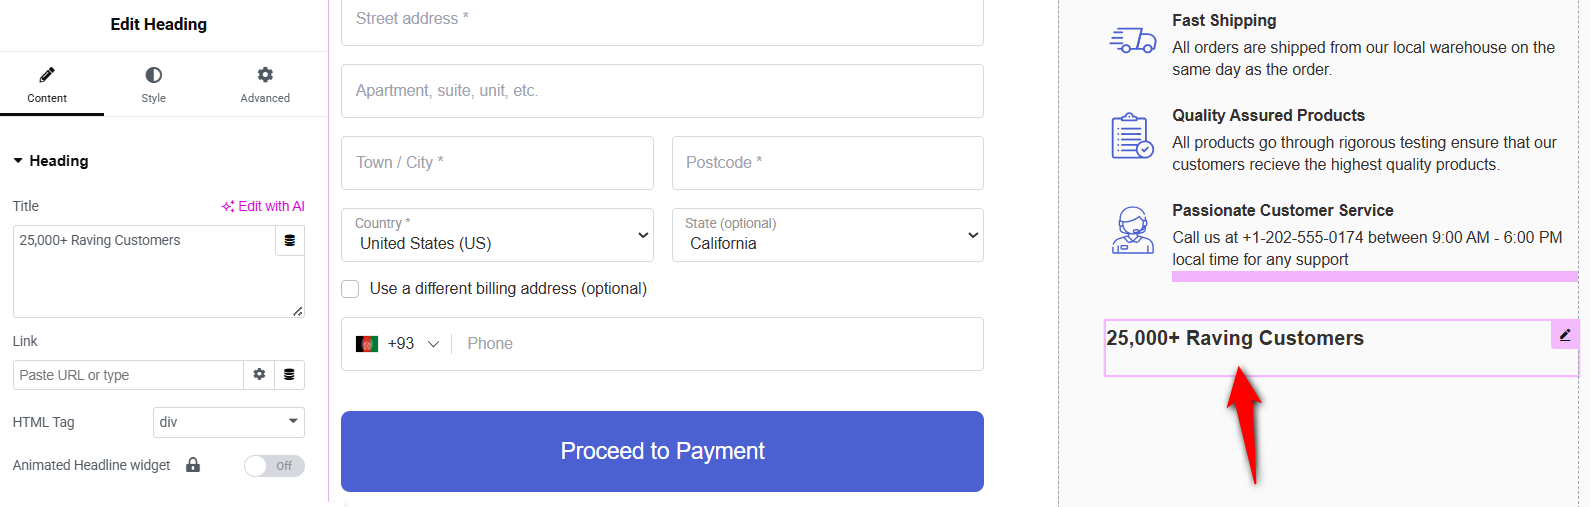
Add the testimonial widget below the heading and customize it as you like.
Here, we’ve edited the testimonial content, image file, resolution, name, title, link, image position, text alignment, and other details.
Hit ‘Publish’ when done. This is how you can add trust badges to the WooCommerce checkout page.
Step 4: Activate the store checkout
Go back to your store checkout funnel and hit the ‘Enable Store Checkout’ button.
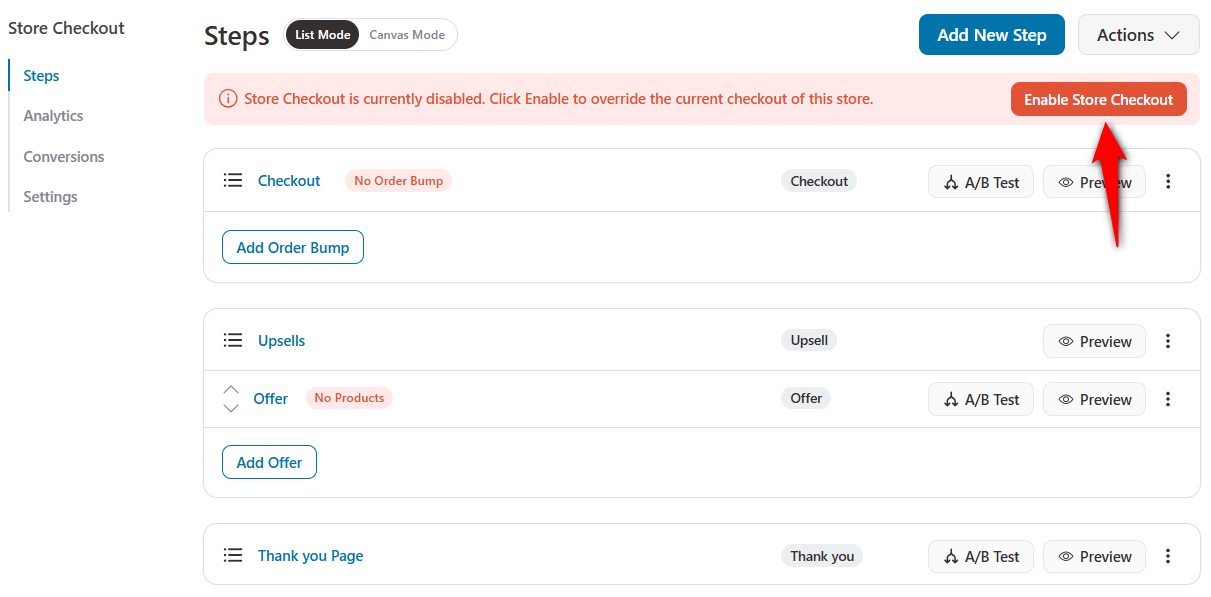
When a shopper adds an item to the cart and heads to the checkout page, they’ll see the trust badges there:
As you can see, the security badges, confidence, and customer testimonials are prominently displayed on the checkout page, making your store appear secure and authentic.
BONUS: 5 Proven Tips to Use Trust Badges on Your WooCommerce Checkout Page to Effectively Boost Conversions
Here are five proven tips to maximize the effectiveness of trust badges on your WooCommerce checkout page.
1. Place the trust badges in high-action areas
The best position for trust badges on the checkout page is right below the “Place Order” button, where shoppers experience last-minute hesitation.
We also recommend adding badges to your website footer.
If you’re using a custom checkout page using FunnelKit Funnel Builder, you can add different badges below the mini cart section, too.
2. Use recognizable, high-authority badges
Stick to well-known badges such as security badges (Norton Secured, McAfee Secure, etc.).
You can use satisfaction badges and customer testimonials to build shoppers’ trust in your brand.
However, avoid overloading your checkout page with too many or low-quality badges.
3. Optimize for mobile view
With over 60% of mobile traffic directed to e-commerce sites, ensure your trust badges are well-sized and clearly visible on smaller screens.
Use FunnelKit Funnel Builder and your favorite page builder to adjust placement for mobile devices.
4. A/B test the badge placements
However, we recommend that you A/B test your placements to determine which badge position converts best for you.
Performing A/B tests is quick and easy with FunnelKit Funnel Builder, allowing you to test badge placement, design, messaging, and more to track their effectiveness in your WooCommerce store.
5. Optimize page speed
Many users ask whether adding external images, such as badges, can impact page load times.
To solve this, you can use optimized images. We’ve noticed SVGs are more lightweight and scalable than PNG or other image type. If necessary, implement lazy loading for multiple badges in your WooCommerce store.
If you're a developer with coding skills, you can even add custom code for trust badges too.
Ready to Instill Confidence in Your Buyers with Trust Badges?
Adding trust badges to your WooCommerce checkout page is all about creating a sense of security, trust, and reliability as customers are about to make a purchase.
With FunnelKit Funnel Builder, placing these trust signals exactly where they matter is a breeze.
Whether it’s below the place order button or near your payment icons, it’s just a matter of drag and drop. Plus, for a mobile-optimized experience, you can make changes to the mobile view only.
So don’t let hesitation cost you sales; instead, set up your trust badges, build credibility, and guide your shoppers confidently through the finish line.
Are you ready to boost trust and drive more conversions?
Then, transform your checkout experience with FunnelKit Funnel Builder and give your customers the peace of mind they need to complete their purchase!
The post How to Add Trust Badges to WooCommerce Checkout Page appeared first on FunnelKit.